

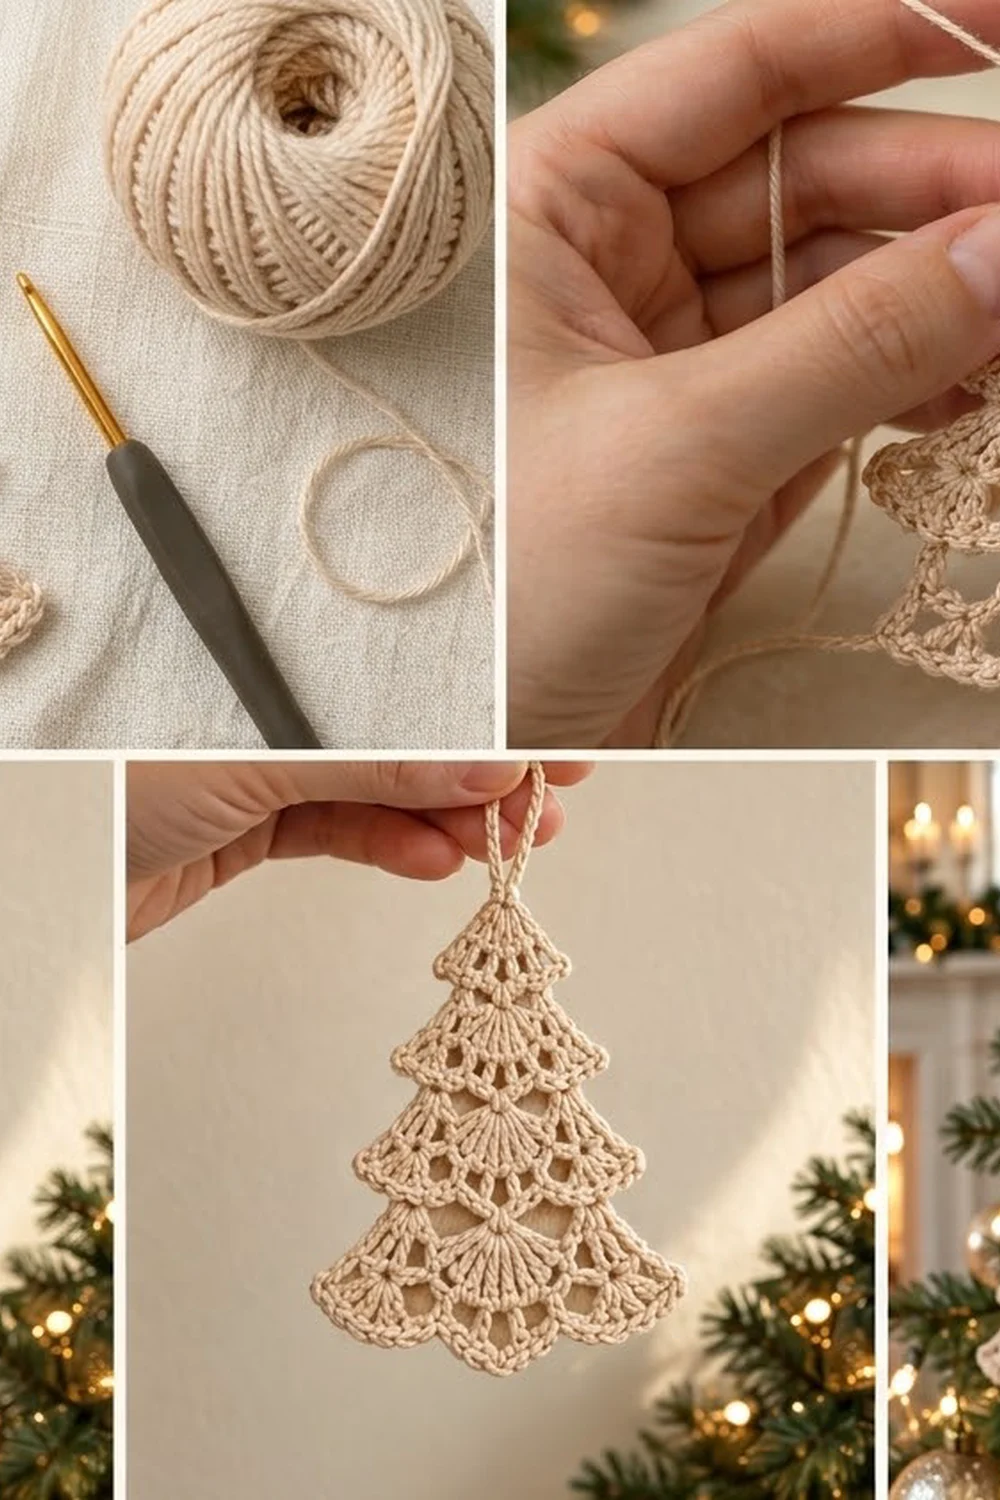
The Frosted Lace Christmas Tree is a small, flat lace ornament in four tiers. Each tier widens toward the bottom and ends in a soft scalloped edge. The bottom tier gets an extra row of open chain loops so the hem looks light and lacy. A sturdy loop at the top lets it hang straight on a branch, a gift tag, or a window hook.
The sample uses one cream cotton thread, which looks like vintage doily lace or frosted glass. Ivory, white, or soft gold suit it just as well. Because it is worked in mercerized cotton and lightly starched, it holds a crisp shape and does not curl.
This pattern uses US crochet terms. The finished ornament measures 4 in (10.2 cm) wide by 5 in (12.7 cm) tall, plus a 1.25 in (3.2 cm) hanging loop.
You work the tree in one piece from the top down, in turned rows. A small chain ring makes the treetop. Each tier then follows the same four-row sequence: a mesh base row, a fan row with a 9-dc central fan, a post row, and a scallop row. The edging goes along the bottom tier, and the hanging loop is added last.
Finished Size and Construction
- Finished size: 4 in (10.2 cm) wide × 5 in (12.7 cm) tall, plus a 1.25 in (3.2 cm) loop
- Skill level: Intermediate (lace work in fine thread, simple repeats)
- Terminology: US crochet terms
- Yarn weight: Size 3 crochet thread (Lace / 0)
- Hook: 2.25 mm (US B-1)
- Number of pieces: 1
- Layout: One tree with 4 stacked tiers, worked top-down in rows
- Piece size before edging: 3.75 in (9.5 cm) wide × 4.75 in (12.1 cm) tall
- Edging depth: 0.25 in (0.6 cm) along the bottom edge
Materials
Thread: Use mercerized cotton crochet thread in size 3. It has clear stitch definition and takes starch well. Avoid acrylic, because it will not hold a blocked shape.
- Cream/ecru: about 6 g / 17 m for one ornament
The quantity includes a margin of about 20% for your gauge swatch and weaving in ends. A single 50 g ball makes about eight ornaments.
Tools:
– 2.25 mm (US B-1) crochet hook
– Tapestry needle
– Scissors
– Rust-proof pins
– Foam blocking board or folded towel
– Fabric stiffener or spray starch
– Paper template (instructions in Final Blocking)
Abbreviations (US Terms)
- ch – chain
- sl st – slip stitch
- sc – single crochet
- dc – double crochet
- sk – skip
- sp(s) – space(s)
- st(s) – stitch(es)
- RS / WS – right side / wrong side
- [ ] – repeat the instructions inside the brackets as many times as stated
Special stitch:
– Shell: 5 dc in the same stitch.
Counting notes:
– A ch-3 at the start of a row counts as 1 dc.
– A ch-4 at the start of a row counts as 1 dc + ch 1.
– A ch-5 at the start of a row counts as 1 dc + ch 2.
– In post rows, each dc and each ch-1 counts as 1 stitch.
Gauge and Checkpoints
Gauge: In a post row (dc, ch 1 pattern), 10 sts = 1 in (2.5 cm). One full tier of 4 rows = 1.25 in (3.2 cm) tall.
The ornament is small, so Tier 1 works as your gauge swatch. Make it first and measure it before you go on.
Checkpoints (unblocked, lightly flattened):
– After Row 2: 13 sts = 1.3 in (3.3 cm) wide.
– After Row 3 (Tier 1 done): 1.5 in (3.8 cm) wide, 1 in (2.5 cm) tall including the ring.
– After Row 6: 21 sts = 2.1 in (5.3 cm) wide.
– After Row 7 (Tier 2 done): 2.25 in (5.7 cm) wide, 2.25 in (5.7 cm) total height.
– After Row 10: 29 sts = 2.9 in (7.4 cm) wide.
– After Row 11 (Tier 3 done): 3 in (7.6 cm) wide, 3.5 in (8.9 cm) total height.
– After Row 14: 37 sts = 3.7 in (9.4 cm) wide.
– After Row 15 (Tier 4 done): 3.75 in (9.5 cm) wide, 4.75 in (12.1 cm) total height.
If your tree is too big: go down to a 2.0 mm hook, or tighten your chain spaces. Loose chains are the most common cause of oversizing.
If your tree is too small: go up to a 2.5 mm hook. Also check that you are pulling each dc up to full height.
A difference of up to 0.125 in (0.3 cm) can be fixed when blocking. If you are off by more, change the hook.
Treetop and Tier 1
Ring: Ch 4, sl st in the first ch to form a ring.
Row 1 (RS): Ch 3 (counts as dc), 6 dc in ring. Turn. (7 dc)
This makes a half-circle fan. Leave the top half of the ring empty, because the hanging loop goes there later.
Row 2: Ch 4 (counts as dc + ch 1), dc in next dc, [ch 1, dc in next dc] 4 times, ch 1, dc in top of turning ch. Turn. (7 dc, 6 ch-1 sps = 13 sts)
Row 3 (scallop row): Ch 1, sc in first dc, [sk ch-1 sp, shell in next dc, sk ch-1 sp, sc in next dc] 3 times. The last sc goes in the 3rd ch of the turning ch. Turn. (3 shells: 15 dc + 4 sc = 19 sts)
Row 3 uses all 7 dc from Row 2. The 4 sc land on dc 1, 3, 5, and 7, and the 3 shells land on dc 2, 4, and 6. Tier 1 is complete.
Tier 2 (Rows 4–7)
Row 4 (base row): Sl st in first sc and in next 3 dc. You are now in the center dc of the first shell. Ch 5 (counts as dc + ch 2), dc in next sc, ch 2, dc in center dc of next shell, ch 2, dc in next sc, ch 2, dc in center dc of last shell. Leave the remaining sts unworked. Turn. (5 dc, 4 ch-2 sps)
The 2 outer dc of each outer shell stay free. They stick out past the new tier and make the tree’s stepped edge.
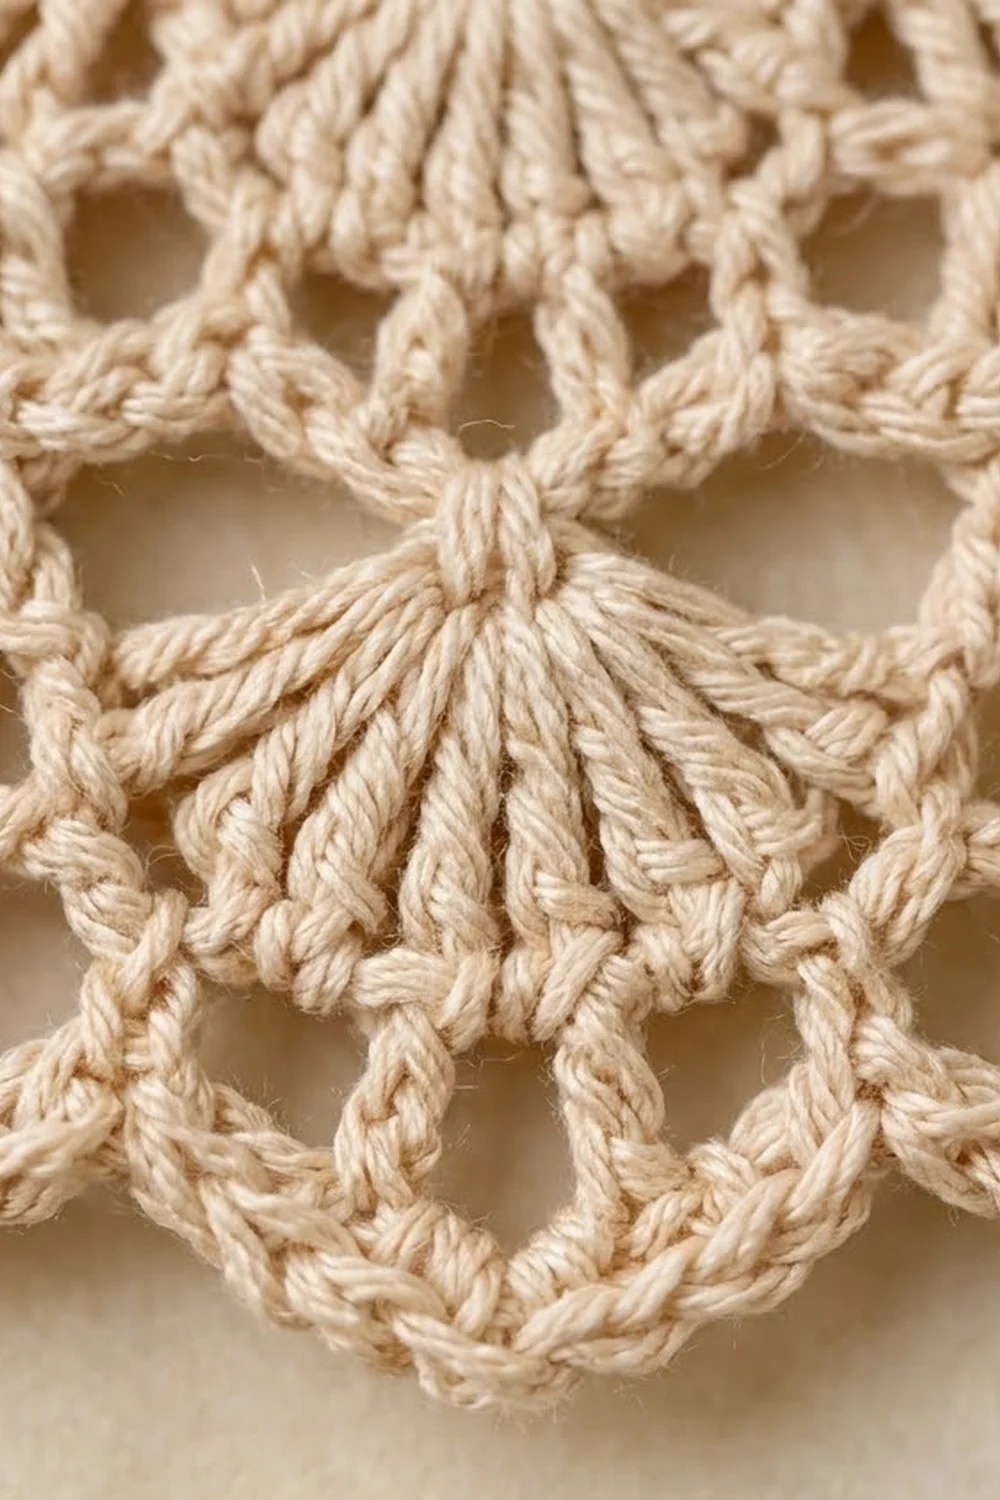
Row 5 (fan row): Ch 3 (counts as dc), dc in same st, 2 dc in next ch-2 sp, sk next dc, 2 dc in next ch-2 sp, 9 dc in center dc, 2 dc in next ch-2 sp, sk next dc, 2 dc in next ch-2 sp, 2 dc in 3rd ch of turning ch. Turn. (Total for this row: 2 + 2 + 2 + 9 + 2 + 2 + 2 = 21 dc)
The 9 dc worked into the center post make the central fan.
Row 6 (post row): Ch 4 (counts as dc + ch 1), sk next dc, dc in next dc, [ch 1, sk next dc, dc in next dc] across. The last dc goes in the top of the turning ch. Turn. (11 dc, 10 ch-1 sps = 21 sts)
Row 7 (scallop row): Ch 1, sc in first dc, [sk ch-1 sp, shell in next dc, sk ch-1 sp, sc in next dc] 5 times. Turn. (5 shells: 25 dc + 6 sc = 31 sts)
Tier 3 (Rows 8–11)
Row 8 (base row): Sl st in first sc and in next 3 dc. Ch 5 (counts as dc + ch 2), [dc in next sc, ch 2, dc in center dc of next shell, ch 2] 3 times, dc in next sc, ch 2, dc in center dc of last shell. Turn. (9 dc, 8 ch-2 sps)
Row 9 (fan row): Ch 3, dc in same st, [2 dc in next ch-2 sp, sk next dc] 3 times, 2 dc in next ch-2 sp, 9 dc in center dc, 2 dc in next ch-2 sp, [sk next dc, 2 dc in next ch-2 sp] 3 times, 2 dc in 3rd ch of turning ch. Turn. (Total for this row: 2 + 8 + 9 + 8 + 2 = 29 dc)
Row 10 (post row): Work as Row 6. (15 dc, 14 ch-1 sps = 29 sts)
Row 11 (scallop row): Ch 1, sc in first dc, [sk ch-1 sp, shell in next dc, sk ch-1 sp, sc in next dc] 7 times. Turn. (7 shells: 35 dc + 8 sc = 43 sts)
Tier 4 (Rows 12–15)
Row 12 (base row): Sl st in first sc and in next 3 dc. Ch 5, [dc in next sc, ch 2, dc in center dc of next shell, ch 2] 5 times, dc in next sc, ch 2, dc in center dc of last shell. Turn. (13 dc, 12 ch-2 sps)
Row 13 (fan row): Ch 3, dc in same st, [2 dc in next ch-2 sp, sk next dc] 5 times, 2 dc in next ch-2 sp, 9 dc in center dc, 2 dc in next ch-2 sp, [sk next dc, 2 dc in next ch-2 sp] 5 times, 2 dc in 3rd ch of turning ch. Turn. (Total for this row: 2 + 12 + 9 + 12 + 2 = 37 dc)
Row 14 (post row): Work as Row 6. (19 dc, 18 ch-1 sps = 37 sts)
Row 15 (scallop row): Ch 1, sc in first dc, [sk ch-1 sp, shell in next dc, sk ch-1 sp, sc in next dc] 9 times. Turn. (9 shells: 45 dc + 10 sc = 55 sts)
Why the tiers grow evenly: A base row has (2 × previous shells − 1) posts. The fan row turns those posts into 4 × new shells + 1 dc. The post row turns those dc into 2 × new shells + 1 posts, and each shell plus its sc uses 2 posts. That gives 3, 5, 7, and 9 shells with no fudging.
Border: Bottom Edging
The edging goes only across the bottom of Tier 4. The tier steps and sides stay as worked, so the outline stays crisp.
Border gauge: 3 ch-3 loops per shell. Each shell plus its sc measures about 0.4 in (1 cm) across.
Row 16 (RS): Ch 1, sc in first sc. Then work [ch 3, sk 1st dc of shell, sc in 2nd dc, ch 3, sk center dc, sc in 4th dc, ch 3, sk 5th dc, sc in next sc] 9 times. Fasten off. (28 sc, 27 ch-3 loops)
Bottom edge count: It starts from 55 sts (45 dc + 10 sc). Each of the 9 shells gives 3 loops, so 9 × 3 = 27 loops. You need 28 sc: 1 at the start plus 3 per shell (9 × 3 = 27). No extra stitches are added at the corners, because the first and last sc sit on the Row 15 edge sc.
Why the math works: Each ch-3 loop spans 2 sts of the row below. The chain loops lie loosely and arch outward, so the edging adds about 0.25 in (0.6 cm) of depth without pulling in. The end loops flare out about 0.125 in (0.3 cm) on each side. That brings the width from 3.75 in (9.5 cm) to 4 in (10.2 cm).
Hanging loop: With RS facing, join thread with a sl st in the empty top half of the starting ring. Ch 22, sl st in ring. Work 30 sc over the chain loop, then sl st in ring. Fasten off. The loop hangs 1.25 in (3.2 cm) above the treetop.
Weave in all ends along the wrong side of the dc posts.
Final Blocking
- Make a template. On paper, draw a tree 4 in (10.2 cm) wide at the base and 5 in (12.7 cm) tall. Mark the tier lines at 1 in (2.5 cm), 2.25 in (5.7 cm), and 3.5 in (8.9 cm) from the top. Mark the tier widths at those lines as 1.5 in (3.8 cm), 2.25 in (5.7 cm), and 3 in (7.6 cm).
- Cover the template with plastic wrap and lay it on your blocking board.
- Wet the ornament in cool water. Gently squeeze out the water without wringing.
- Pin the center line first: the treetop and the center of the bottom edging.
- Pin each outer half-shell point at its tier step, working down both sides symmetrically.
- Pin each scallop along the tier edges. Then pin each ch-3 loop of the bottom edging into a rounded arch.
- Open the central fans with a fingertip so they lie flat.
- Apply stiffener with a brush or spray until the piece is damp through.
- Dry completely, at least 12 hours, before unpinning. Pin the hanging loop flat so it dries straight.
Final Quality-Control Checklist
- Four tiers, each with exactly one 9-dc central fan at center.
- Shell counts per tier: 3, 5, 7, 9.
- Outer half-shells stick out at each tier step on both sides.
- Bottom edging has 27 ch-3 loops.
- Finished size is 4 in (10.2 cm) × 5 in (12.7 cm), give or take 0.125 in (0.3 cm).
- The tree is symmetrical left to right when folded on the center line.
- The hanging loop is centered, firm, and 1.25 in (3.2 cm) long.
- All ends are woven in invisibly, and no starch residue shows in the holes.
Troubleshooting
The central fan is off-center: Count the posts in the base row. Tier 2 needs 5 posts, Tier 3 needs 9, and Tier 4 needs 13. The 9-dc fan always goes in the middle post.
Wrong number of posts in a post row: Recount the fan row. It must be 21, 29, or 37 dc. The usual mistake is working into a post that should be skipped.
Tier edges ruffle: Your shells are too loose. Go down a hook size for the scallop rows only.
The tree cups or curls: The chain spaces are too tight. Make each ch-2 a little looser in the base rows.
Tier steps don’t stick out: Make sure you start each base row with sl sts into the center dc of the first shell, and stop at the center of the last shell.
Loop twists: Work the sc evenly over the chain and pin it flat while it dries.
Care
Spot clean only, or hand wash in cool water with mild soap. Re-block and re-starch afterward. Store flat between tissue paper so the scallops don’t crush.
Final Notes
The measurement chain is simple. Tier 1 is 1.5 in (3.8 cm) wide and is your gauge check. Each tier adds 2 shells and about 0.75 in (1.9 cm) of width, along with 1.25 in (3.2 cm) of height. That takes you to 3.75 in (9.5 cm) × 4.75 in (12.1 cm) before edging. The 27-loop edging brings the tree to 4 in (10.2 cm) × 5 in (12.7 cm), and the loop adds 1.25 in (3.2 cm), for an overall hanging length of 6.25 in (15.9 cm).
If your counts match at each post row (13, 21, 29, 37 sts), the shape will come out right every time. Make one, check it against the template, and then make a set for the tree or tuck one into a holiday card.
Happy crocheting!