

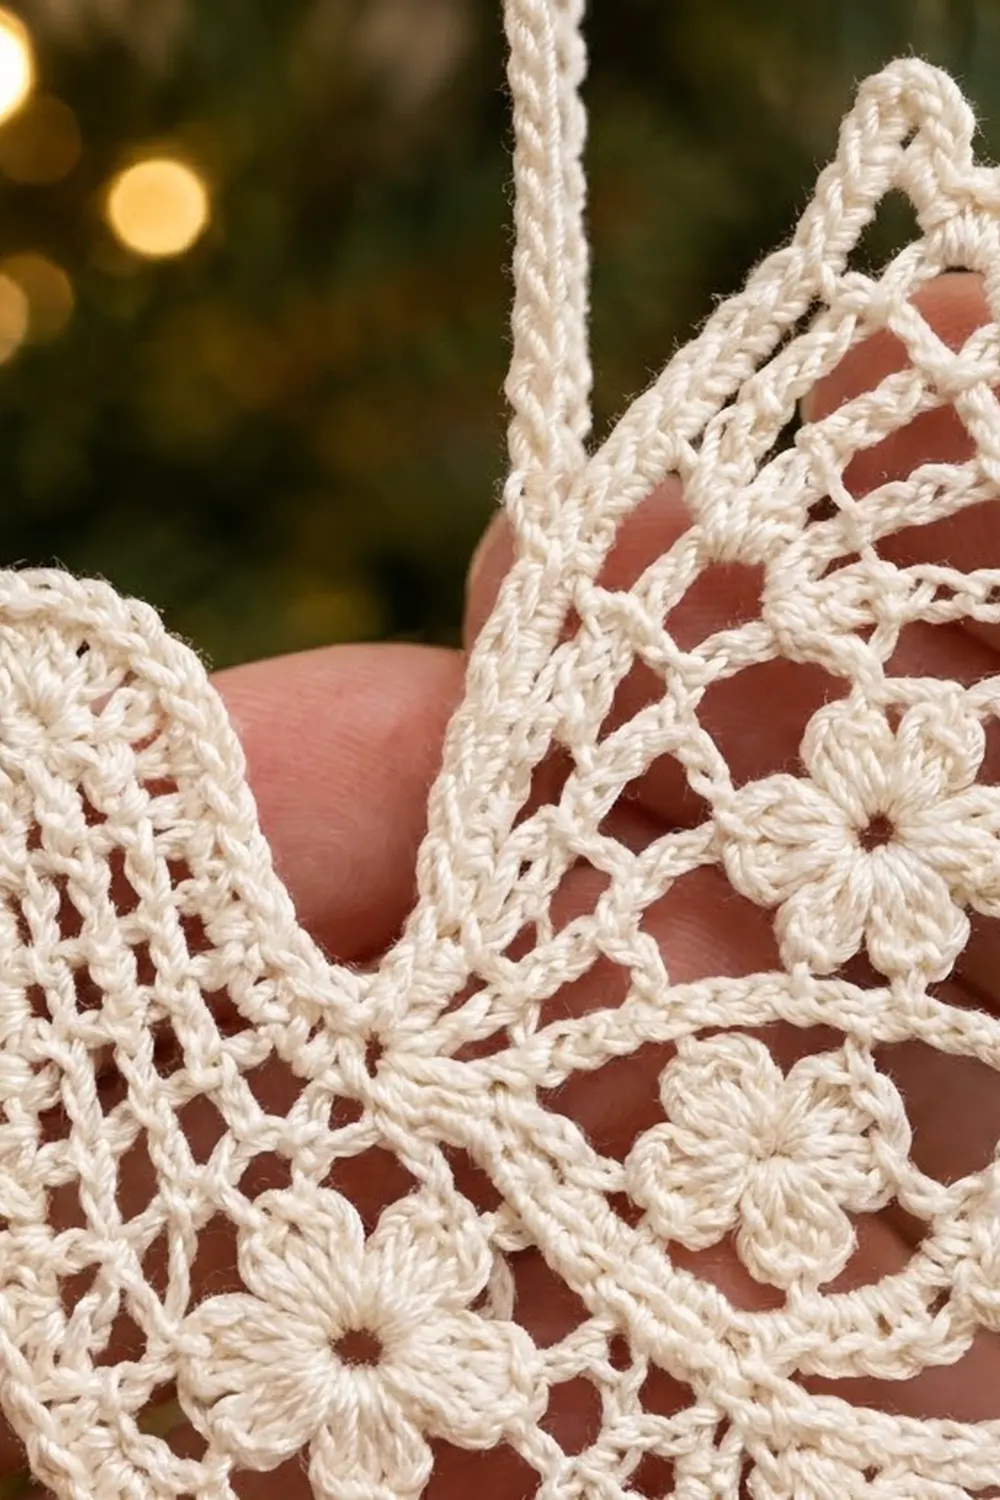
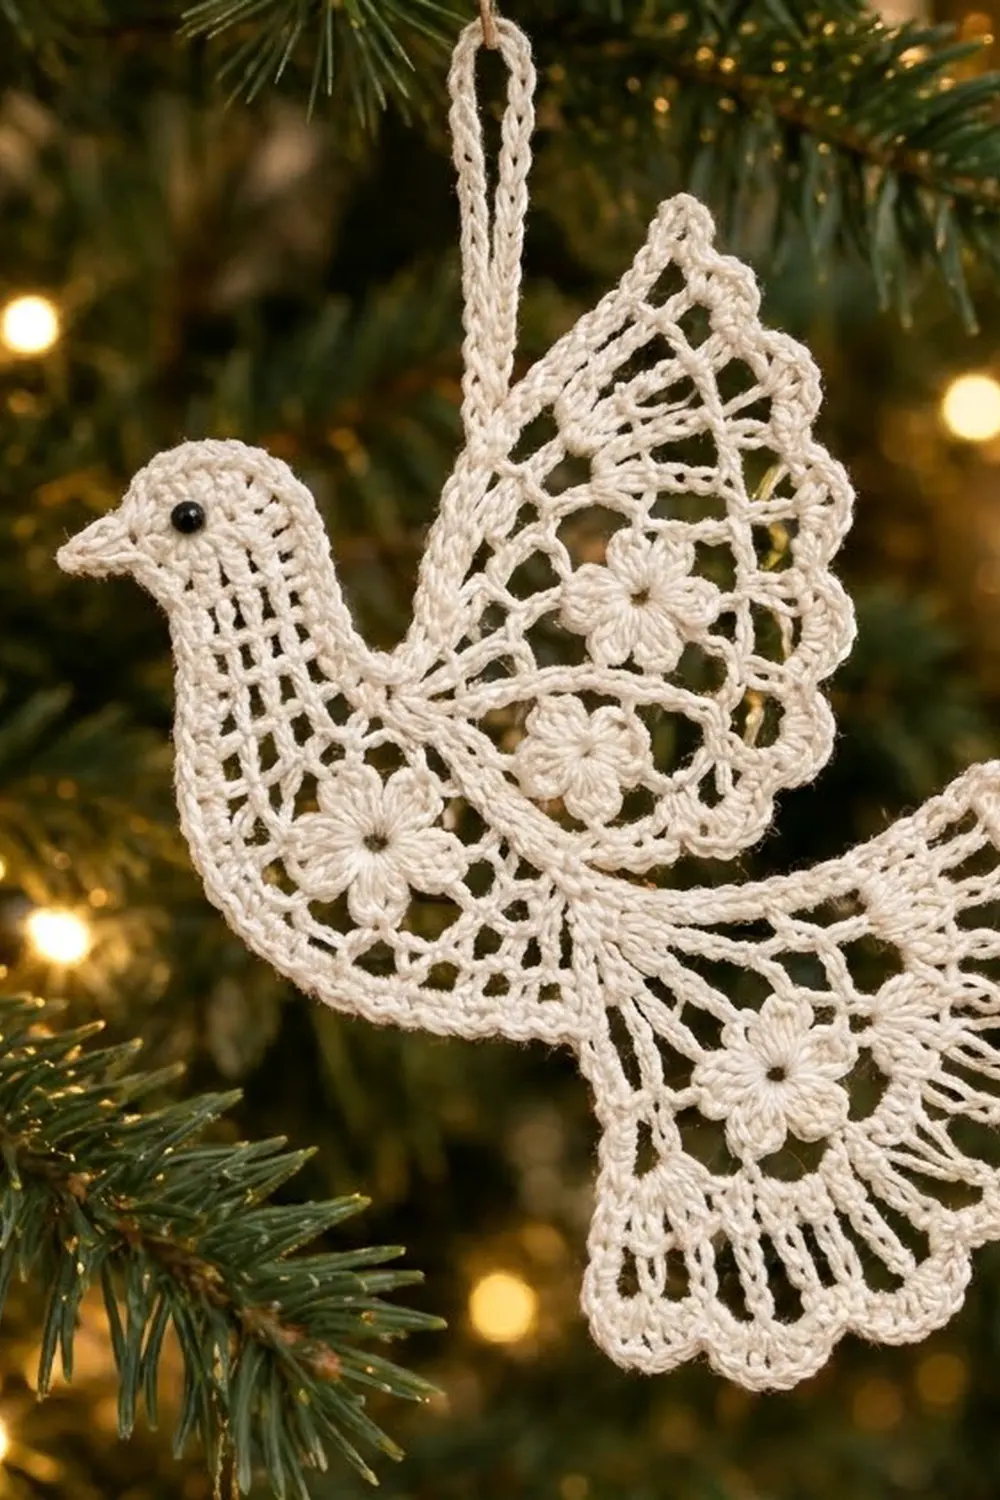
The Noel Lace Dove is a delicate thread ornament in soft ivory. It shows a dove in flight facing left. The wing rises in a fan, the tail fans down behind the body, and both end in rounded scallops. Four small five-petal flowers sit on the lace, and a tiny black eye finishes the face.
You make it in one color of size 10 cotton thread. The eye is a black bead or a few stitches of black floss. The look is classic heirloom lace: open ladder ribs, crisp outlines and rounded scallops that catch the tree lights.
This pattern uses US crochet terms. The finished ornament measures about 4.5 in (11.4 cm) wide x 4 in (10.2 cm) tall, not counting the hanging loop. The loop adds 1.5 in (3.8 cm).
Construction is simple. You work the body in three rounds around a foundation chain. Then you work the wing and the tail in short rows directly off the body’s edge, so nothing is sewn together. One outline round ties all the edges together and makes the hanging loop. Last, you sew on four tiny flowers, add the eye and block the ornament.
Finished Size and Construction
- Finished size: 4.5 in (11.4 cm) wide x 4 in (10.2 cm) tall, plus a 1.5 in (3.8 cm) loop
- Skill level: Intermediate
- Terminology: US crochet terms
- Yarn weight: Size 10 crochet thread (Lace, weight 0)
- Hook: 1.5 mm (US steel 8)
- Number of pieces: 1 ornament, plus 4 tiny flower appliqués sewn on
- Layout: A single dove with the head to the left, the wing up and the tail down and back
- Body size: 3.5 in (8.9 cm) long x 1.25 in (3.2 cm) tall
- Size before border: 4.3 in (10.9 cm) wide x 3.8 in (9.7 cm) tall
- Border depth: About 0.1 in (0.3 cm) on every edge
Materials
Choose a mercerized cotton thread in size 10. Mercerized thread gives crisp stitch definition and takes starch well. Avoid fuzzy or very soft threads, because the scallops will not hold their shape.
- Ivory size 10 cotton thread: 6 g, about 30 m (33 yd)
- Black: one 3 mm black bead, or less than 1 g (about 0.5 m / 0.5 yd) of black embroidery floss
Tools:
- 1.5 mm (US steel 8) crochet hook
- Fine tapestry needle or beading needle
- Sewing needle and ivory sewing thread (optional, for the flowers)
- Locking stitch markers (3)
- Scissors and a ruler
- Fabric stiffener or spray starch
- Foam blocking board and rust-proof pins
The quantities include about 25 percent extra for your test flower and for weaving in ends.
Abbreviations (US Terms)
- ch: chain
- sl st: slip stitch
- sc: single crochet
- hdc: half double crochet
- dc: double crochet
- tr: treble crochet
- sp: space
- st(s): stitch(es)
- tch: turning chain
- rnd: round
Special stitch: 2-dc cluster (2-dc cl). Yarn over, insert the hook in the stitch, pull up a loop, yarn over and pull through 2 loops. Repeat once more in the same stitch. Yarn over and pull through all 3 loops on the hook.
Gauge and Checkpoints
Gauge: 10 sc = 1 in (2.5 cm) with size 10 thread and a 1.5 mm hook.
Make one flower first as your test piece. It should measure 0.6 in (1.5 cm) across. Then check these measurements as you go:
- Body after Rnd 1: 2.75 in (7.0 cm) long x 0.6 in (1.5 cm) tall
- Body after Rnd 2: 3.25 in (8.3 cm) long x 1 in (2.5 cm) tall
- Body after Rnd 3: 3.5 in (8.9 cm) long x 1.25 in (3.2 cm) tall
- Wing base (Row 1): 1.1 in (2.8 cm) wide
- Tail base (Row 1): 0.9 in (2.3 cm) wide
- Wing and tail depth after Row 5: about 1.5 in (3.8 cm) each after blocking, a little less before
If the body is more than 0.25 in (0.6 cm) too long after Rnd 1, switch to a 1.25 mm hook. If it is more than 0.25 in (0.6 cm) too short, switch to a 1.75 mm hook. Small differences are fine because blocking evens them out.
Body
Ch 22.
Rnd 1: Work 3 sc in 2nd ch from hook (head tip), sc in next 4 ch, hdc in next 6 ch, dc in next 9 ch, 7 dc in last ch (tail end). Rotate and work along the opposite side of the foundation chain: dc in next 9 ch, hdc in next 6 ch, sc in next 4 ch. Do not work into the first ch again. Sl st to first sc. (48 sts: 3 + 4 + 6 + 9 + 7 + 9 + 6 + 4)
With the head on the right, the first side you worked becomes the dove’s back.
Rnd 2: Ch 1, sc in first st, 3 sc in next st (center of head tip), sc in next 5 sts. That gives 9 sc on the head. Ch 1, skip next st, dc in next st 18 times, ch 1, skip next st, sc in last 4 sts. Sl st to first sc. (50 sts: 13 sc, 18 dc, 19 ch-1 sps)
The sc section keeps the head solid, and the dc mesh opens up the body. The 7 dc at the tail end make the mesh fan around the curve.
Rnd 3 (trim round): Ch 1, sc in first sc, sc in next sc. In the center sc of the head tip, work (sc, ch 3, sc in 2nd ch from hook, sc in next ch, sc in same sc) to make the beak. Sc in each remaining sc and dc, and work 1 sc in each ch-1 sp around. Sl st to first sc. Fasten off. (50 sts worked 1 per existing st + 1 extra sc at the beak = 51 sc, plus the beak point)
Mark the attachment points. Number the Rnd 3 sc starting from the first sc (#1). Count both sc beside the beak (#3 and #4). Place markers on sc #13 and #23 (the wing edges) and on sc #25 (the start of the tail). The tail runs from #25 to #33. Sc #24 stays free between the wing and the tail.
Wing
You work the wing in rows across 11 sc of the back edge. The tr columns become the radiating ribs, and the chain spaces get longer each row so the wing fans out.
Row 1: Join thread with sl st in sc #13. Ch 1, sc in same st and in next 10 sts, ending in sc #23. Turn. (11 sc)
Row 2: Ch 4 (counts as dc + ch 1), dc in next sc, ch 1, dc in next sc 9 times. Turn. (11 dc, 10 ch-1 sps)
Row 3: Ch 6 (counts as tr + ch 2), tr in next dc, ch 2 9 times, tr in 3rd ch of tch. Turn. (11 tr, 10 ch-2 sps)
Row 4: Ch 7 (counts as tr + ch 3), tr in next tr, ch 3 9 times, tr in 4th ch of tch. Turn. (11 tr, 10 ch-3 sps)
Checkpoint: the top edge of the wing should now spread to about 3 in (7.6 cm).
Row 5 (scallops): Ch 1, sc in first tr, ch 2, 7 dc in next tr, ch 2, sc in next tr 5 times, working the last sc in 4th ch of tch. Fasten off. (5 shells: 6 sc, 35 dc, 10 ch-2 sps)
Each repeat uses 2 tr, so 1 + (5 x 2) = 11 tr. The ch-2 bridges let each shell arch outward into a rounded scallop.
Tail
The tail uses the same rows over 9 sts.
Row 1: Join thread with sl st in sc #25. Ch 1, sc in same st and in next 8 sts, ending in sc #33. Turn. (9 sc)
Row 2: Ch 4 (counts as dc + ch 1), dc in next sc, ch 1, dc in next sc 7 times. Turn. (9 dc, 8 ch-1 sps)
Row 3: Ch 6 (counts as tr + ch 2), tr in next dc, ch 2 7 times, tr in 3rd ch of tch. Turn. (9 tr, 8 ch-2 sps)
Row 4: Ch 7 (counts as tr + ch 3), tr in next tr, ch 3 7 times, tr in 4th ch of tch. Turn. (9 tr, 8 ch-3 sps)
Checkpoint: the top edge of the tail should measure about 2.4 in (6.1 cm).
Row 5 (scallops): Ch 1, sc in first tr, ch 2, 7 dc in next tr, ch 2, sc in next tr 4 times, working the last sc in 4th ch of tch. Fasten off. (4 shells: 5 sc, 28 dc, 8 ch-2 sps)
Check: 1 + (4 x 2) = 9 tr.
Flowers (Make 4)
Rnd 1: Ch 4, sl st to first ch to form a ring. Ch 1, 10 sc in ring. Sl st to first sc. (10 sc)
Rnd 2: Ch 2, 2-dc cl in next sc, ch 2, sl st in next sc 5 times. Fasten off, leaving a 6 in (15.2 cm) tail. (5 petals)
Each petal uses 2 sc, so 5 x 2 = 10 sc. The ring leaves a small open center.
Border
The border is one outline round. It firms up the wing and tail edges, makes the hanging loop and runs a neat slip-stitch line around the body.
Border gauge: Along the row ends, work 1 sc per sc row, 2 sc per dc row and 3 sc per tr row. This matches the height of each row, so the side edges lie flat.
Border Rnd: Hold the dove with the head on the right and join with sl st in sc #1 of body Rnd 3. Work in this order:
- Head and back (#1 to #12): Sl st in each sc, leaving the beak unworked. (12 sl st)
- Wing, first side: Work 1 sc in the Row 1 end, 2 in the Row 2 end, 3 in the Row 3 end and 3 in the Row 4 end, then sc in the first sc of Row 5. (10 sc)
- Wing scallops: For each shell, sc in ch-2 sp, sc in each of 7 dc, sc in next ch-2 sp (9 sc). Sl st in each sc between shells. On the 3rd shell, after the 4th sc: ch 30, sl st in that same sc, work 36 sc over the ch-30 loop, sl st in the same sc again, then finish the shell. (5 shells x 9 = 45 sc, plus 4 sl st)
- Wing, second side: Sc in the last sc of Row 5, then work 3, 3, 2 and 1 sc down the row ends. (10 sc)
- Gap: Sl st in sc #24. (1 sl st)
- Tail, first side: Work 1, 2, 3 and 3 sc up the row ends, then sc in the first sc of Row 5. (10 sc)
- Tail scallops: Work each shell the same way as on the wing, with sl st in each of the 3 sc between shells. (4 shells x 9 = 36 sc, plus 3 sl st)
- Tail, second side: Sc in the last sc of Row 5, then work 3, 3, 2 and 1 sc down the row ends. (10 sc)
- Belly and throat (#34 to #51): Sl st in each sc. (18 sl st)
Sl st to first sl st. Fasten off.
Border totals: Wing 10 + 45 + 4 + 10 = 69 sts. Tail 10 + 36 + 3 + 10 = 59 sts. Body 12 + 1 + 18 = 31 sl st. The round has 159 sts in total (121 sc and 38 sl st), plus the loop (ch 30 and 36 sc).
Why the math works: The body edge has 51 sc. The wing uses 11 and the tail uses 9, which leaves 51 − 11 − 9 = 31 free sc. The border places exactly 1 sl st in each of them. Each side edge gets 9 sc for its four rows (1 + 2 + 3 + 3), plus 1 sc in the end sc of Row 5. The 36 sc on the loop make a firm, corded hanger that does not twist.
Eye: Sew on the bead, or work 2 small satin stitches in black floss. Place it on the head 3 sts behind the beak, between Rnd 1 and Rnd 2.
Flowers: Sew one flower on the body mesh, centered between the head and the tail. Sew two on the wing: one over Rows 3–4 near the top and one over Rows 2–3 near the body. Sew one on the tail over Rows 3–4. Stitch through each petal tip and around the center so each flower lies flat over the open spaces.
Final Blocking
- Weave in all ends along stitch columns, not across open spaces.
- Soak the ornament in fabric stiffener, or dampen it and spray it with starch.
- Gently squeeze out the excess. Do not wring.
- Lay it on the board with the head to the left. Either face can be the front.
- Pin the body to 3.5 in (8.9 cm) long.
- Pin each tr rib of the wing straight so they fan outward, and pin the tip of each scallop. Repeat for the tail.
- Check the overall size: 4.5 in (11.4 cm) wide x 4 in (10.2 cm) tall.
- Pin the hanging loop straight up so it measures 1.5 in (3.8 cm).
- Let it dry completely, for at least 12 hours, before you remove the pins.
Final Quality-Control Checklist
- Body Rnd 3 has 51 sc plus the beak.
- The wing has 11 ribs and 5 even scallops. The tail has 9 ribs and 4 scallops.
- Sc #24 forms a small, neat gap between the wing and the tail.
- The side edges lie flat, with no ruffling or cupping.
- The loop is firmly covered and centered on the 3rd wing scallop.
- All four flowers lie flat, with their petals sewn down.
- The eye sits on the head and is clearly visible.
- The finished size is 4.5 in (11.4 cm) x 4 in (10.2 cm).
Troubleshooting
- Body curls into a cup: Rnd 2 is too tight. Work the ch-1 spaces more loosely or go up a hook size.
- Body ruffles at the tail: The 7-dc fan is too loose. Work the tail-end dc of Rnd 1 a little tighter.
- Wing cups instead of fanning out: The chain spaces are too short. Make each chain as tall as the tr next to it.
- Scallops flare and wave: The dc shells are loose. Work them tighter, or pin the scallops more firmly when blocking.
- Side edges pull in: Add 1 extra sc on each tr row end, the same on both sides.
- Loop twists: Work all 36 sc in the same direction and starch the loop straight.
Care
Hand wash in cool water with mild soap, then block and starch the ornament again. Store it flat or hanging, away from damp.
Final Notes
The measurements are easy to check at each stage. One flower at 0.6 in (1.5 cm) confirms your gauge. The body grows from 2.75 in (7.0 cm) to 3.5 in (8.9 cm) long over three rounds. The wing and tail each add about 1.5 in (3.8 cm), on 11 and 9 base stitches. The border brings the finished ornament to 4.5 in (11.4 cm) x 4 in (10.2 cm). Make one, hang it, and you may want a whole flock for the tree.
Happy crocheting!