

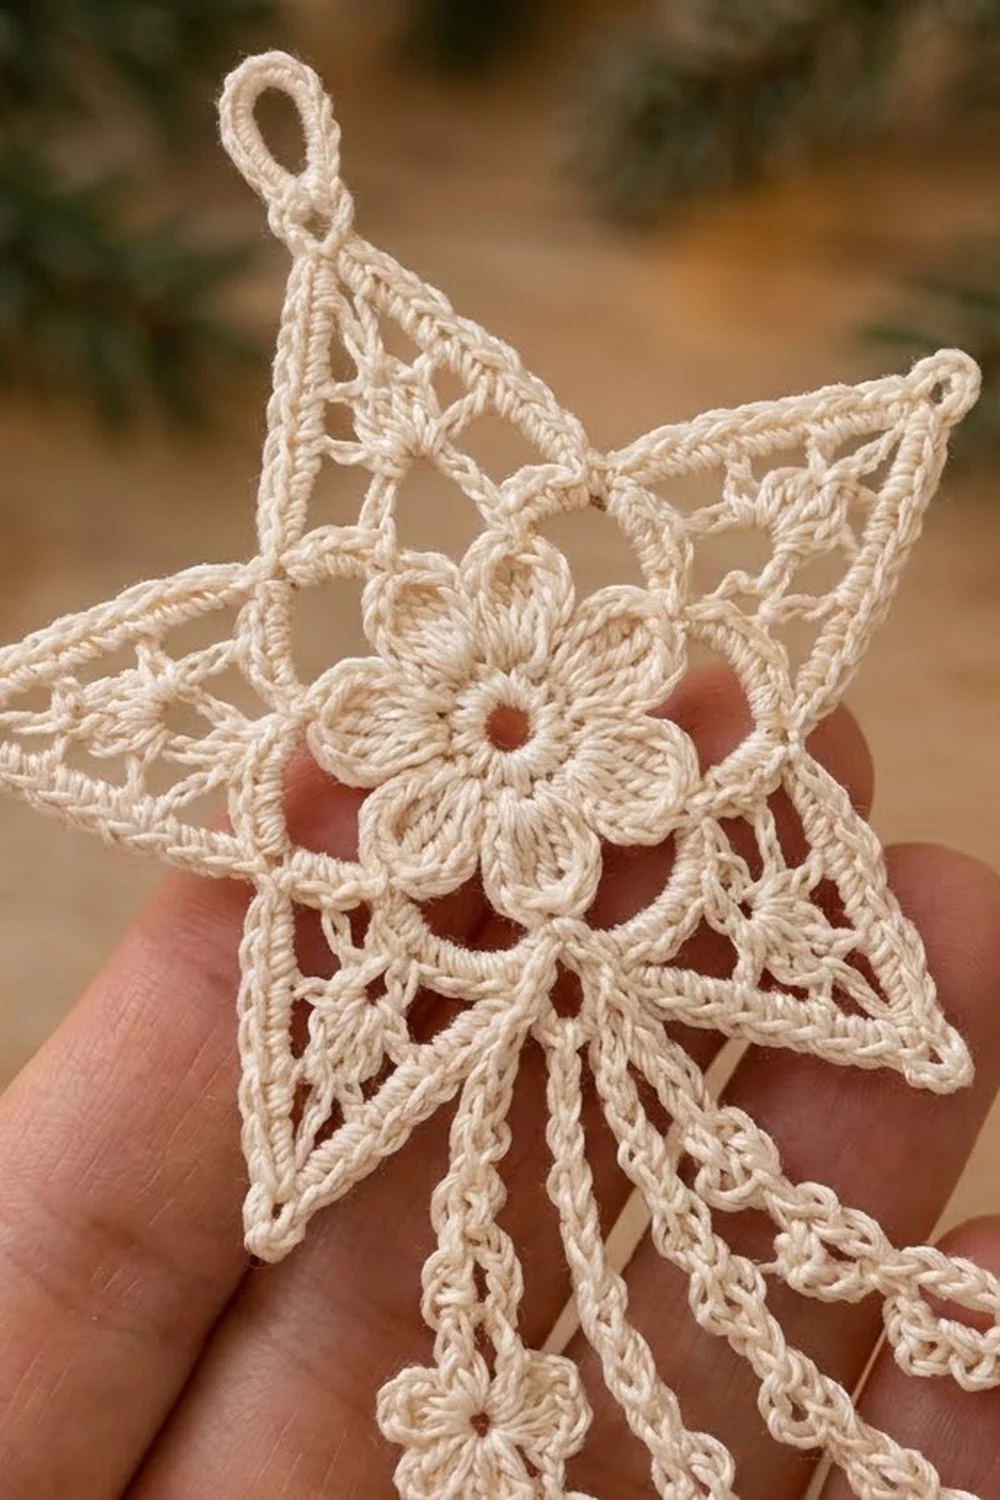
This delicate shooting-star ornament is made in fine cream cotton thread. A five-point lace star sits at the top, with a small six-petal flower inside a round frame at its center. A cluster of lacy tails hangs from the bottom of the star and curves to one side, each one dotted with tiny flowers and little fan shells.
The look is soft, vintage and quietly festive. It’s worked in one color, so the stitch texture does all the work: open filet mesh in the star points, a crisp double outline around the edge, and corded tails that hold a gentle curve after stiffening.
This pattern uses US crochet terms. The finished star measures about 3.5 in (8.9 cm) across its widest two points. The whole ornament, from the top of the hanging loop to the lowest tail tip, is about 9 in (22.9 cm) long.
Construction is continuous. You start with the center flower, add the round frame, then build each star point in short rows straight off the frame. A two-round outline border finishes the star. After that you add the hanging loop and four chain tails, then stiffen and block the piece.
Finished Size and Construction
- Finished size: star 3.5 in (8.9 cm) point to point; total length about 9 in (22.9 cm)
- Skill level: Intermediate (fine thread, short rows, working along a chain)
- Terminology: US crochet terms
- Yarn weight: size 10 crochet cotton thread (lace weight)
- Hook: 1.5 mm (US steel 8)
- Number of pieces: 1, worked in one piece with no sewing
- Layout: one star, with a hanging loop at the top point and four tails hanging from the bottom valley
- Piece size: center flower 1 in (2.5 cm); framed center 1.5 in (3.8 cm); each point about 0.9 in (2.3 cm) long
- Size before border: 3.25 in (8.3 cm) point to point
- Border depth: 2 rounds, about 0.125 in (0.3 cm) per edge, adding 0.25 in (0.6 cm) to the overall width
Materials
Use a mercerized size 10 cotton thread. It shows the stitches clearly and takes stiffener well. Cream, ivory or natural white matches the photo, but white or metallic gold thread works too.
- Cream size 10 cotton thread: 10 g, about 56 m (61 yd)
- 1.5 mm (US steel 8) steel crochet hook
- Fine tapestry needle
- Scissors
- Fabric stiffener, or a mix of 1 part white glue to 1 part water
- Foam blocking board, plastic wrap and rustproof pins
- Small ruler
The quantity above includes a margin. One ornament uses about 7–8 g, so a 50 g ball will make five or six.
Abbreviations (US Terms)
- ch: chain
- sl st: slip stitch
- sc: single crochet
- hdc: half double crochet
- dc: double crochet
- sk: skip
- sp: space
- st(s): stitch(es)
- rnd: round
- MF: mini flower (see below)
- F: fan (see below)
Special stitches
- Mini flower (MF): Ch 5, sl st in the 5th ch from hook to form a ring. [Ch 3, dc in ring, ch 3, sl st in ring] 5 times. This gives 5 petals and leaves you back at the base of the ring.
- Fan (F): Ch 5, sl st in the 5th ch from hook to form a ring. Ch 3 (counts as dc), 8 dc in ring, sl st in base of ring. This gives a half-circle shell of 9 dc.
Gauge and Checkpoints
Gauge isn’t critical for an ornament, but it controls the final size and how lacy the star looks. Work the center (Rnds 1–6) first and measure it before you go on.
- Chain gauge: 9 ch = 1 in (2.5 cm), unstretched
- After Rnd 3 (flower): 1 in (2.5 cm) across
- After Rnd 5 (frame): 1.25 in (3.2 cm) across
- After Rnd 6: 1.5 in (3.8 cm) across, lying flat
- After the points: 3.25 in (8.3 cm) point to point
- After the border: 3.5 in (8.9 cm) point to point
If your center comes out more than 0.125 in (0.3 cm) too big, change to a 1.25 mm hook. If it’s too small or Rnd 6 cups, change to a 1.75 mm hook. If Rnd 6 ripples, your Rnd 5 is usually too tight. Loosen your tension a little, but keep the same stitch counts.
Pattern
Center Flower
Rnd 1: Make a magic ring. Ch 1, 12 sc in ring, sl st to first sc. Pull the ring closed. (12 sc)
Rnd 2: Ch 1, sc in same st, ch 3, sk 1, [sc in next st, ch 3, sk 1] 5 times, sl st to first sc. (6 sc, 6 ch-3 sps)
Rnd 3 (petals): Sl st into first ch-3 sp. Work (sc, hdc, 3 dc, hdc, sc) in each ch-3 sp around, sl st to first sc. (6 petals, 42 sts)
Checkpoint: the flower measures 1 in (2.5 cm) across.
Round Frame
Rnd 4: Working behind the petals, ch 1, sc around the post of the first Rnd 2 sc. [Ch 5, sc around the post of the next Rnd 2 sc] 5 times, ch 5, sl st to first sc. (6 ch-5 loops)
These loops sit behind the petals, so the flower stays raised at the front.
Rnd 5: Sl st into first ch-5 loop. Ch 1, work 5 sc in each ch-5 loop around, sl st to first sc. (30 sc)
This is the smooth round frame around the flower. Checkpoint: 1.25 in (3.2 cm) across.
Rnd 6 (conversion): Ch 1, [sc in next 2 sts, 2 sc in next st] 10 times, sl st to first sc. (30 + 10 = 40 sc)
Checkpoint: 1.5 in (3.8 cm) across, lying flat. The 40 sts split into 5 groups of 8, one group for each point. Number the sts in each group 1 to 8. The sl st join sits in st 1 of Point 1.
Star Points
Each point is worked in short rows over its own 8 sts. Don’t fasten off between points.
Row 1: Ch 4 (counts as dc in st 1 + ch 1), sk st 2, dc in st 3, ch 1, sk st 4, dc in st 5, ch 1, sk st 6, dc in st 7. (4 dc, 3 ch-1 sps)
Row 2: Turn. Sl st in first ch-1 sp, ch 4 (counts as dc + ch 1), dc in next ch-1 sp, ch 1, dc in last ch-1 sp. (3 dc, 2 ch-1 sps)
Row 3 (tip): Turn. Sl st in first ch-1 sp, ch 2, dc in next ch-1 sp. The ch-2 and the dc lean together to form one peak. Ch 5, sl st in top of the dc you just made. (1 peak, 1 ch-5 tip loop)
Descend: Work sl sts down the edge where you finished: 2 sl sts along the end of Row 2, then 2 sl sts along the end of Row 1. Sl st in st 8 of the ring. This st 8 is the valley between two points.
Sl st in st 1 of the next group. Repeat Rows 1–3 and the descent 4 more times, for 5 points in all. The last descent ends with a sl st in st 8 of Point 5. Don’t fasten off.
Each point is a mesh triangle about 0.9 in (2.3 cm) from the frame to the tip, with open lattice lines running to the peak. Checkpoint: 3.25 in (8.3 cm) point to point.
Border
Border gauge: 2 sc along each dc row-end, so 6 sc along each 3-row edge. The two border rounds add about 0.125 in (0.3 cm) to every edge.
One unit is a point plus the valley before it: 1 valley sc, 6 sc up one edge, the tip, and 6 sc down the other edge.
Border Rnd 1: Ch 1, sc in the same st 8 (the valley sc). Work 6 sc evenly up the edge of the next point (2 sc per row-end). Work (2 sc, ch 3, 2 sc) in the ch-5 tip loop. Work 6 sc evenly down the other edge. Sc in the next valley st 8. Repeat from * to * around. On the last repeat, leave out the final valley sc and sl st to the first sc instead.
- Per unit: 1 + 6 + 2 + 2 + 6 = 17 sc, plus 1 ch-3 tip sp
- Total: 5 × 17 = 85 sc and 5 ch-3 sps
Border Rnd 2: Ch 1, sc in each sc around, working (sc, ch 4, sc) in each ch-3 tip sp. Sl st to first sc. Fasten off.
- Per unit: 17 sc worked 1 per st + 2 extra sc at the tip = 19 sc, plus 1 ch-4 tip loop
- Total: 85 + 10 = 95 sc and 5 ch-4 loops
Why the math works: Every point has the same 3 rows on each side, so every edge takes exactly 6 sc. The extra stitches at each tip (4 sc in Rnd 1 and 2 more in Rnd 2) let the outline turn the sharp corner without pulling. The valley stays at 1 sc, which keeps the inner corners deep and crisp. Because all five units match, the star stays symmetrical. Checkpoint: 3.5 in (8.9 cm) point to point.
Hanging Loop
Choose any point as the top and call it Point 1. Join the thread with a sl st in the ch-4 tip loop of Point 1. Ch 25, then sl st in the same tip loop. Work 32 sc over the ch-25 loop, sl st in the tip loop and fasten off. The loop stands about 1.25 in (3.2 cm) above the star.
Tails
The tails hang from the valley opposite the top point. With Point 1 at the top, this is the valley sc between Points 3 and 4. Call it V.
For each tail, you chain down, make a motif at the end, then work sc back up along the chain, adding more motifs as you go. The sc pass turns the chain into a firm cord.
Tail 3 (short inner tail): Join the thread with a sl st in the sc just before V. Ch 28, work MF. Working back along the chain: sc in next 8 ch, work F, sc in next 20 ch. Sl st in the same sc where you joined. (8 + 20 = 28 sc, 2 motifs) About 3 in (7.6 cm) long.
Tail 1 (longest): Sl st in V. Ch 40, work MF. Working back: sc in next 6 ch, work F, sc in next 10 ch, work MF, sc in next 10 ch, work F, sc in next 14 ch. Sl st in V. (6 + 10 + 10 + 14 = 40 sc, 4 motifs) About 4.5 in (11.4 cm) long.
Tail 2: Ch 34, work F. Working back: sc in next 8 ch, work MF, sc in next 12 ch, work F, sc in next 14 ch. Sl st in V. (8 + 12 + 14 = 34 sc, 3 motifs) About 3.75 in (9.5 cm) long.
Tail 4 (shortest): Sl st in the sc just after V. Ch 22, work F. Working back: sc in next 10 ch, work MF, sc in next 12 ch. Sl st in the same sc and fasten off. (10 + 12 = 22 sc, 2 motifs) About 2.5 in (6.4 cm) long.
Make every motif on the side of the cord that faces you. That keeps the weight on one side and helps the tails curve the same way during blocking, like the trail behind a falling star.
Final Blocking
- Weave in all ends along the back of the frame or inside the sc cords, then trim them close.
- Soak the ornament in stiffener until it’s fully wet through.
- Press it gently in a towel without wringing. The mesh holes should be clear, with no stiffener left in them.
- Cover the board with plastic wrap. Lay the star face up and pin the center flat.
- Pin each ch-4 tip loop outward until the star measures 3.5 in (8.9 cm) point to point, with the five points evenly spaced.
- Pin each valley sc inward so the points are sharp.
- Arrange the tails in a gentle curve to one side, with the longest tail on the outside. Pin the petals and fans open.
- Clear any filled mesh holes with a pin.
- Let the ornament dry completely (12–24 hours), then unpin.
Final Quality-Control Checklist
- Rnd 6 has 40 sc and lies flat
- Six petals sit raised in front of the round frame
- All 5 points have 3 rows and an open mesh triangle
- Border Rnd 1 has 85 sc
- Border Rnd 2 has 95 sc and 5 ch-4 tips
- The star measures 3.5 in (8.9 cm) point to point
- The hanging loop is centered on the top tip
- There are 4 tails, with 40, 34, 28 and 22 sc
- The total length is about 9 in (22.9 cm)
- All ends are secure and hidden
Troubleshooting
- Rnd 6 ruffles: Your stitches are too loose, or Rnd 5 is overcrowded. Redo Rnd 6 with a smaller hook.
- Points lean sideways: Check that Row 1 starts in st 1 and ends in st 7, with st 8 left free.
- Tips look blunt: Pull the ch-2 snug in Row 3 and pin the tip loops firmly.
- Border edge waves: You have more than 2 sc per row-end. Recount for exactly 6 sc per edge.
- Tails twist: Keep all motifs on one side and work the sc into the back bump of the chain.
- Tails won’t hold a curve: Use more stiffener and pin a deeper curve.
Care
Store the ornament flat in tissue, away from moisture. If it goes limp, rinse it gently, then stiffen and block it again.

Final Notes
The measurements build in a short chain: a 1 in (2.5 cm) flower, a 1.25 in (3.2 cm) frame and a 1.5 in (3.8 cm) center with 40 sc. The points bring the star to 3.25 in (8.3 cm), and the border finishes it at 3.5 in (8.9 cm). With the loop and four tails added, the ornament is about 9 in (22.9 cm) long. Check each stage as you go, and your star will come out even and graceful.
Happy crocheting!