

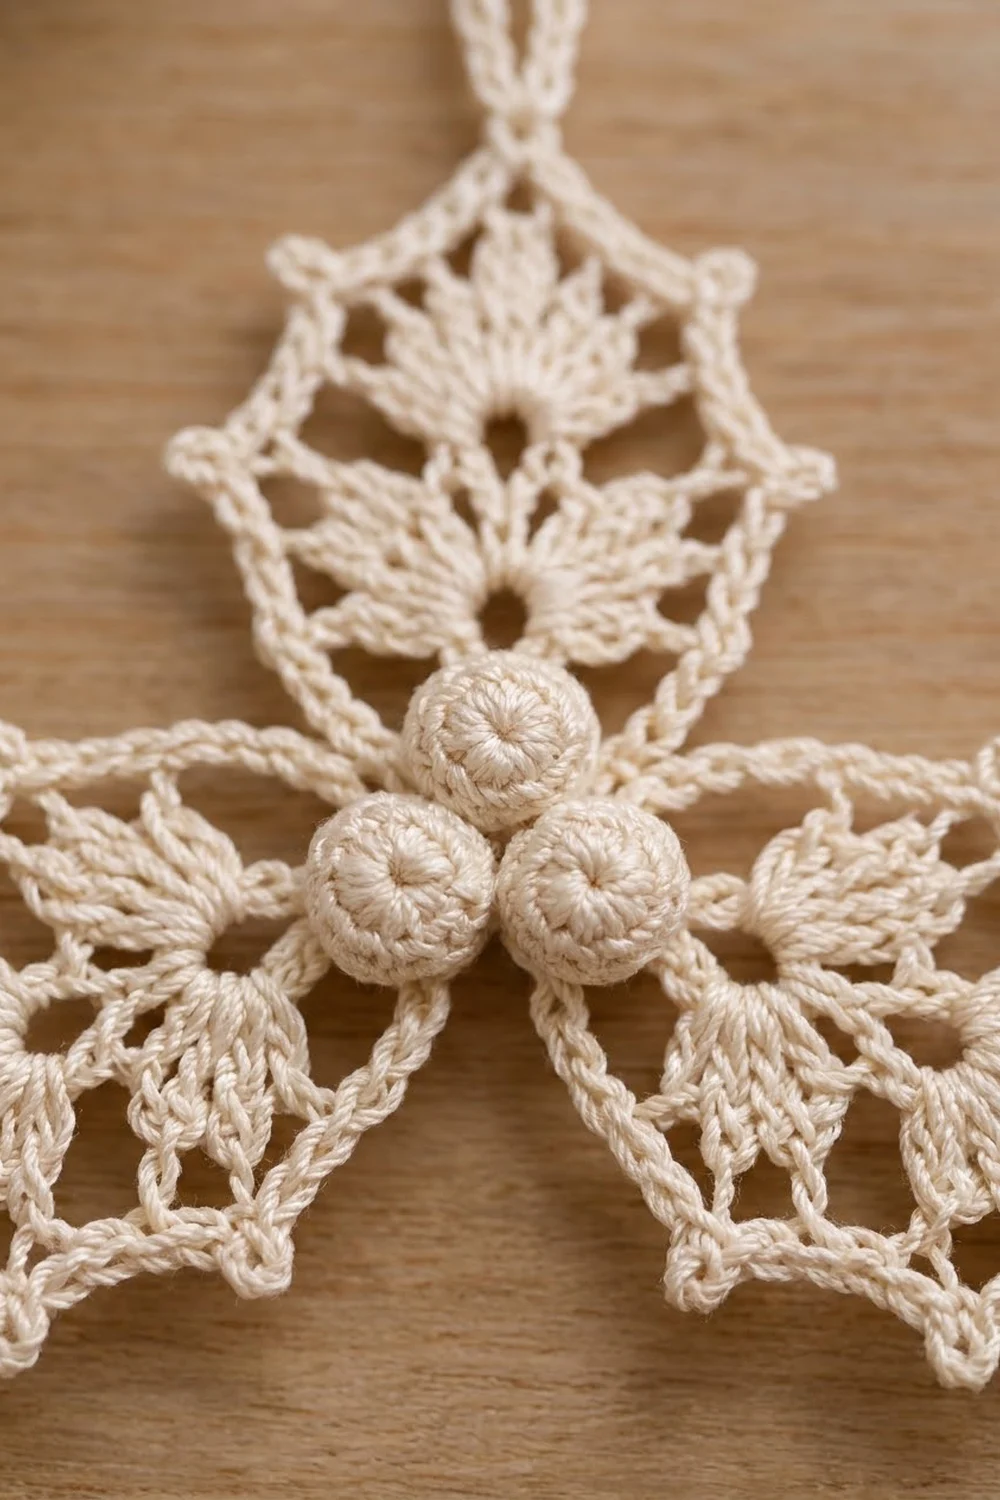
This lacy holly ornament is worked in fine cream cotton thread and looks like a sprig of frosted holly. Three openwork leaves spread from a central cluster of three round, puffy berries, and a sturdy hanging loop sits at the tip of the top leaf.
Everything is worked in one color, ivory or cream, so the texture does the work. Each leaf has a small ring at its base, fans of treble “leaflets” through the middle, and a lacy chain-mesh edge with seven small pointed spikes that give the classic holly outline.
The pattern uses US crochet terms. The finished ornament measures about 4 in (10.2 cm) wide and 3.75 in (9.5 cm) tall, plus a 1.25 in (3.2 cm) hanging loop, for a total height of 5 in (12.7 cm).
Construction is simple and modular. You crochet three fan-shaped leaves in rows and three small stuffed berries in the round. Then you sew the leaf bases together, sew the berries over the center, add the holly-point border around each leaf, and finish with the hanging loop.
Finished Size and Construction
- Finished size: 4 in (10.2 cm) wide x 3.75 in (9.5 cm) tall, plus a 1.25 in (3.2 cm) loop
- Skill level: Intermediate (fine thread, small hook)
- Terminology: US crochet terms
- Yarn weight: Size 10 crochet thread (Lace / 0)
- Hook: 1.75 mm steel hook
- Number of pieces: 6 components (3 leaves, 3 berries) assembled into 1 ornament
- Layout: Trefoil, with leaves pointing to 12, 4, and 8 o’clock and berries in a triangle at the center
- Leaf size before border: 1.5 in (3.8 cm) long x 1.5 in (3.8 cm) wide
- Finished leaf size: 1.75 in (4.4 cm) long x 2 in (5.1 cm) wide
- Ornament size before border: 3.5 in (8.9 cm) wide x 3.25 in (8.3 cm) tall
- Border depth: 0.25 in (0.6 cm)
- Berry size: 0.5 in (1.3 cm) diameter
Materials
Use a mercerized cotton thread in size 10. It’s crisp, holds its shape after starching, and shows the lace clearly. Soft or fuzzy threads blur the spikes and fans.
- Cream / Ivory (MC): 6 g, approx. 32 m of size 10 cotton thread
Tools:
- 1.75 mm steel crochet hook
- Fine tapestry needle
- Small amount of fiberfill or cream thread scraps for stuffing the berries
- 2 stitch markers
- Scissors
- Rustproof pins and a foam blocking board
- Fabric stiffener or spray starch
The quantities include a margin of about 20% for gauge swatching and weaving in ends.
Abbreviations (US Terms)
- ch – chain
- sl st – slip stitch
- sc – single crochet
- sc2tog – single crochet 2 together
- hdc – half double crochet (used only in the spike)
- dc – double crochet
- tr – treble crochet
- sk – skip
- sp(s) – space(s)
- st(s) – stitch(es)
- RS – right side
Special stitches
- Shell: (2 dc, ch 2, 2 dc) in the same space.
- Spike: Ch 4, sl st in 2nd ch from hook, sc in next ch, hdc in next ch. This makes a small tapered point that stands out from the edge. Work the next stitch into the next sc of the round.
Gauge and Checkpoints
Make one complete leaf before anything else. Thread gauge varies a lot between crocheters, and one leaf tells you everything you need to know.
Gauge: 10 dc = 1 in (2.5 cm); 4 rows of dc = 1 in (2.5 cm).
Checkpoints for one leaf, measured from the bottom edge of the ring:
- Ring: 0.25 in (0.6 cm) outer diameter
- After Row 2: 0.75 in (1.9 cm) tall
- After Row 3: 1 in (2.5 cm) tall
- After Row 4: 1.5 in (3.8 cm) long x 1.5 in (3.8 cm) wide, lightly pinned
If your leaf is too big, go down to a 1.5 mm hook or tighten your turning chains. If it’s too small, go up to a 2 mm hook. Don’t change the stitch counts, because the border math depends on them.
Leaf (Make 3)
Each leaf is a half-fan worked in rows from a small ring. The ring becomes the opening near the center of the ornament.
Ring: Ch 6, sl st in first ch to form a ring.
Row 1 (RS): Ch 3 (counts as dc), 8 dc in ring. Turn. (9 dc)
The 9 dc fan across about half the ring. You’ll use the bare lower half of the ring for joining later.
Row 2: Ch 3 (counts as dc), dc in same st, [ch 2, sk next dc, 2 dc in next dc] 4 times, working the last 2 dc in the top of the turning ch. Turn. (10 dc in 5 pairs, 4 ch-2 sps)
Row 3: Ch 3 (counts as dc), dc in next dc, [ch 2, shell in next ch-2 sp, ch 2, dc in each of next 2 dc] 4 times. Turn. (26 dc: 10 in pairs + 16 in shells; 12 ch-2 sps: 8 between groups + 4 in shell centers)
Row 4 (leaflet row): Ch 4 (counts as tr), tr in next dc, [ch 3, sk next ch-2 sp and 2 dc of shell, 7 tr in shell’s ch-2 sp, ch 3, sk 2 dc of shell and next ch-2 sp, tr in each of next 2 dc] 4 times. (38 tr: 10 in pairs + 28 in fans; 8 ch-3 sps)
The four 7-tr fans are the feathery leaflets inside the leaf. The 5 tr pairs form the lacy spokes, and the center pair (tr 19 and 20) is the leaf’s spine. Fasten off and weave in the ends.
Berry (Make 3)
Rnd 1: Magic ring, 6 sc in ring. Don’t join. Work in a spiral and mark the first st. (6 sc)
Rnd 2: 2 sc in each st around. (12 sc)
Rnd 3: [Sc in next st, 2 sc in next st] 6 times. (18 sc)
Rnds 4–5: Sc in each st around. (18 sc)
Rnd 6: [Sc in next st, sc2tog] 6 times. (12 sc)
Stuff firmly with fiberfill or thread scraps.
Rnd 7: Sc2tog 6 times. (6 sc)
Fasten off, leaving an 8 in (20.3 cm) tail. Thread the tail through the front loops of the last 6 sts and pull to close, keeping the tail for sewing. Each berry should measure 0.5 in (1.3 cm) across.
Make All Pieces
Everything is one color:
- Cream / Ivory: 3 leaves + 3 berries
Layout (RS facing you):
            [Leaf A]
               |
           (Berry 1)
      (Berry 2) (Berry 3)
         /           \
   [Leaf B]         [Leaf C]
Leaf A points straight up (12 o’clock), Leaf B points down-left (8 o’clock), and Leaf C points down-right (4 o’clock). The three leaves are 120° apart.
Joining
Method: Whipstitch the rings together with a tapestry needle and matching thread.
- Lay the three leaves RS up in the trefoil layout so the bare lower halves of their rings meet in a small triangle at the center.
- Where Ring A touches Ring B, work 3 whipstitches through the ring chains of both leaves. Repeat between Ring B and Ring C, then between Ring C and Ring A, for 9 whipstitches in total.
- Join only the rings. Leave all row ends free, because the border is worked into them.
- Place Berry 1 just below the base of Leaf A, with Berries 2 and 3 side by side below it, covering the joined rings. Sew each berry down with 6 small stitches around its base. Then sew the berries to each other with 2 stitches at each point where they touch.
Tension: Pull each stitch snug but not tight. If the rings pucker, the leaves will tilt forward and won’t lie flat.
Size checkpoint: Before the border, the joined ornament should measure 3.5 in (8.9 cm) wide x 3.25 in (8.3 cm) tall.
Border (Holly Points)
You work the border separately around the free outer edge of each leaf, starting and ending beside the ring.
Border gauge: about 11 sc = 1 in (2.5 cm), worked into row ends and spaces.
Rnd 1 (sc foundation): With RS facing, join thread at the end of Row 1 on the right-hand side of the leaf, next to the ring. Ch 1.
- Side 1 (row ends): 3 sc around the end of Row 1, 3 sc around Row 2, 3 sc around Row 3, and 4 sc around the ch-4 of Row 4. (13 sc)
- Top (Row 4): Sc in each tr and 3 sc in each ch-3 sp. (38 sc in tr + 24 sc in ch-3 sps = 62 sc)
- Side 2 (row ends): 4 sc around the last tr of Row 4, 3 sc around Row 3, 3 sc around Row 2, and 3 sc around Row 1. (13 sc)
Total: 13 + 62 + 13 = 88 sc. Turn.
Rnd 2 (mesh and spikes): Ch 1. Work 8 segments of 11 sc each:
- Segment: Sc in next sc, [ch 2, sk next sc, sc in next sc] 5 times. (Uses 11 sc and makes 6 sc and 5 ch-2 sps)
- After each of Segments 1 through 7, work 1 Spike.
Total: 48 sc, 40 ch-2 sps, and 7 spikes. Fasten off and weave in the ends. Repeat the border on Leaves B and C.
Why the math works: 88 sc divides evenly into 8 segments of 11, so the 7 spikes fall after sc 11, 22, 33, 44, 55, 66, and 77. Each spike mirrors another across the center: 11 and 77, 22 and 66, 33 and 55. The tip spike falls after sc 44, which is exactly between sc 31 and 32 of the 62-sc top and directly above the central tr pair. On each side, the first spike sits 11 sc from the ring and 2 sc before the corner, so both sides are identical and the outline stays symmetrical.
Hanging loop: Join thread at the tip spike of Leaf A, ch 25, and sl st in the same spike. Ch 1, work 35 sc into the loop, and sl st in the first sc. Fasten off. The loop should measure 1.25 in (3.2 cm).
Final Blocking
- Weave in every remaining end through solid stitches, not through the mesh.
- Soak the ornament in fabric stiffener, or mist it heavily with starch.
- Press out the excess with a towel. Don’t wring it.
- Pin the ornament RS up on the board, with the leaf tips 120° apart.
- Pin each of the 7 spikes on every leaf outward so it’s sharp and pointed.
- Let the mesh between the spikes curve gently inward to form the scalloped holly edge.
- Open each 7-tr fan with a pin so the leaflets spread evenly.
- Check the size: 4 in (10.2 cm) wide x 3.75 in (9.5 cm) tall.
- Pin the loop into an open teardrop shape, and shape the berries round with your fingers.
- Let the ornament dry completely, for at least 12 hours, before unpinning.
Final Quality-Control Checklist
- Each leaf has 38 tr in Row 4, with 4 even fans
- Each leaf has 88 sc in Border Rnd 1 and 7 spikes in Rnd 2
- The tip spike sits directly above the central tr pair
- The rings are joined with 3 whipstitches at each contact point
- The three berries sit firmly in a triangle at the center
- The ornament measures 4 in (10.2 cm) x 3.75 in (9.5 cm)
- The loop is 1.25 in (3.2 cm) long and centered on Leaf A
- No ends show on the RS
Troubleshooting
- The fans cup or ruffle: Your trebles are too tight for your chains. Loosen the ch-3 sps slightly, or block more firmly.
- The spikes flop: Use more stiffener, and make sure you work the hdc in the last ch of each spike.
- The tip spike is off-center: Recount Border Rnd 1. Each side must be exactly 13 sc and the top exactly 62 sc.
- The berries are lumpy: Stuff in small pinches and shape the berry before closing Rnd 7.
- The center gaps open: Add 1 extra whipstitch at each ring contact point.
- The leaf is too wide: Check that Row 2 has only 5 dc pairs.
Care
Hand wash in cool water only if needed, then re-block with fresh stiffener. Store the ornament flat in tissue paper so the spikes keep their shape.

Final Notes
The measurement chain is simple. A ring of 0.25 in (0.6 cm) grows to a 1.5 in (3.8 cm) leaf after Row 4. Three leaves and three 0.5 in (1.3 cm) berries join into a 3.5 in (8.9 cm) by 3.25 in (8.3 cm) trefoil. The 0.25 in (0.6 cm) holly border brings it to 4 in (10.2 cm) by 3.75 in (9.5 cm), and the loop adds 1.25 in (3.2 cm), for a total height of 5 in (12.7 cm). If your test leaf hits its checkpoints, the whole ornament will too. Make a few for the tree, a gift topper, or a winter window.
Happy crocheting!