

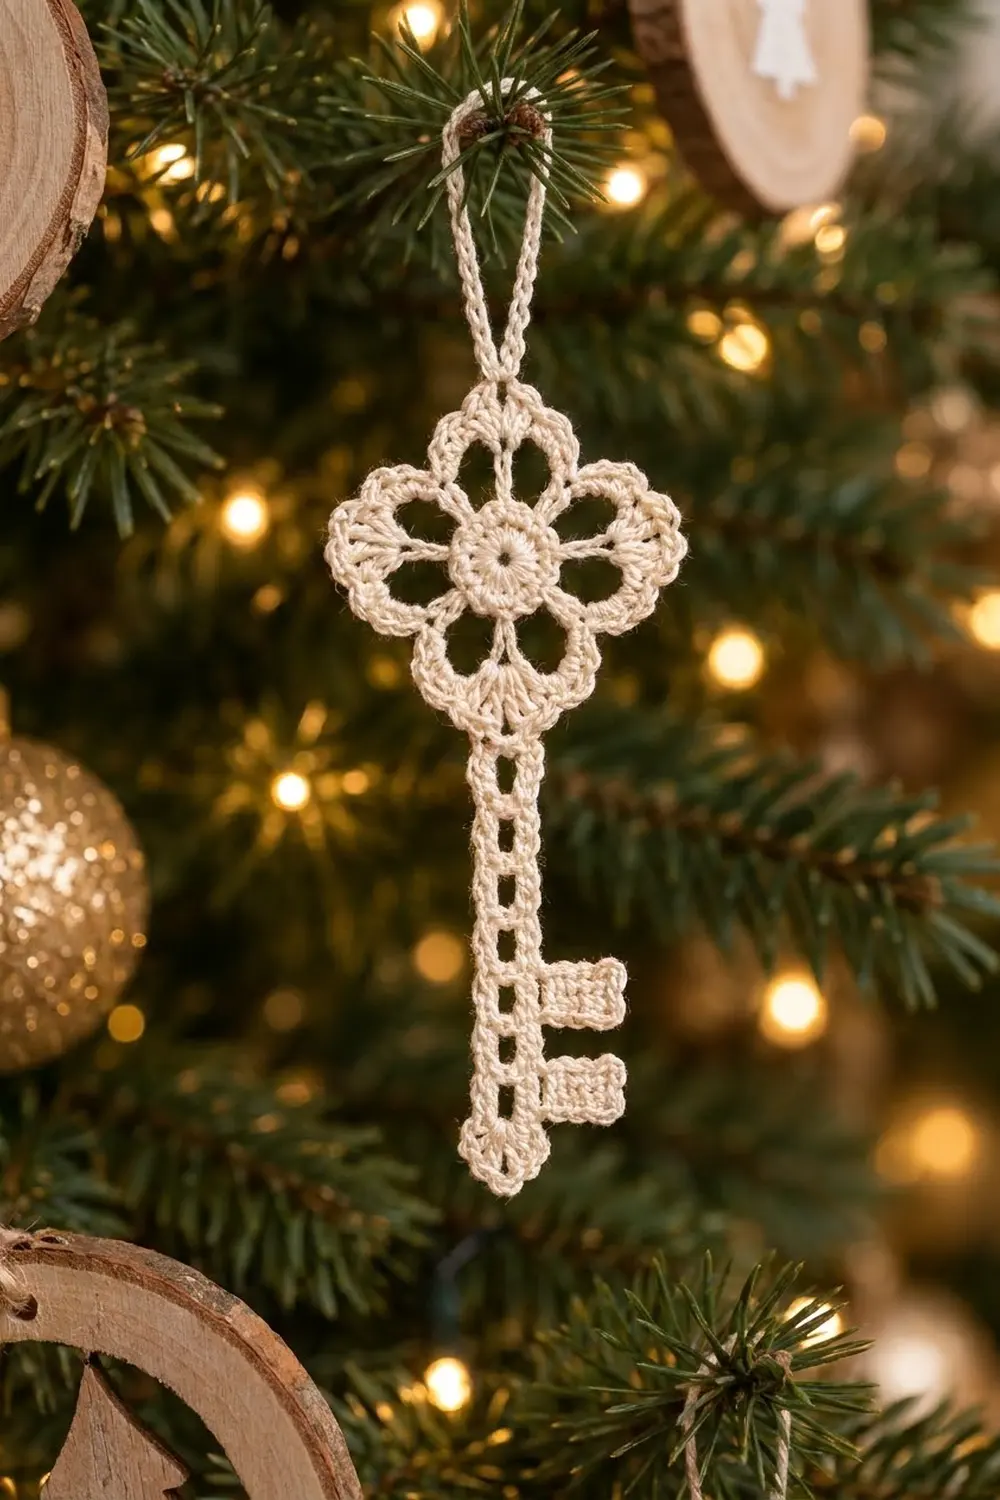
This little lace key has an old-fashioned look. The bow is a four-petal flower with open petals and a solid center. Below it, a narrow open ladder forms the shaft, which ends in a neat point. Two small solid teeth stick out to one side near the bottom. Once it is stiffened and hung on a ribbon or branch, it looks like a key from an antique lock.
The sample is made in ivory size 10 crochet thread. Cream, white or ecru all suit the lace look, and a soft metallic thread is a good choice for festive ornaments. The pattern uses US crochet terms throughout.
The finished key is about 4.5 in (11.4 cm) long without the hanging loop and 1.75 in (4.4 cm) wide across the bow. With the loop, it is about 5.25 in (13.3 cm) long.
You make it in one piece. You work the bow in four rounds from a magic ring. Next, you join the thread at the bottom petal and work the ladder shaft downward in rows, closing it with a pointed tip. Then you add the two teeth to the right side of the shaft and finish with a chain hanging loop at the top petal. There is no sewing and no assembly.
Finished Size and Construction
- Finished size: 4.5 in (11.4 cm) long x 1.75 in (4.4 cm) wide at the bow; 5.25 in (13.3 cm) long including the loop
- Skill level: Intermediate (fine thread, small hook)
- Terminology: US crochet terms
- Yarn weight: Size 10 cotton crochet thread (Lace / 0)
- Hook: 1.75 mm steel hook (US steel size 4)
- Number of pieces: 1
- Layout: One key: a quatrefoil bow, a ladder shaft and two side teeth
- Bow size before the edging round: 1.5 in (3.8 cm) across
- Edging depth: about 1/8 in (0.3 cm) on each side, which brings the bow to 1.75 in (4.4 cm)
- Shaft: 0.4 in (1.0 cm) wide, 2.5 in (6.4 cm) of ladder plus a 0.25 in (0.6 cm) tip
- Width at the teeth: 0.8 in (2.0 cm)
Materials
Thread: Use a mercerized cotton thread in size 10. Mercerized cotton holds crisp stitch definition and takes stiffener well. Avoid fuzzy or acrylic threads, because the open petals and ladder windows will blur.
- Ivory (main color): 6 g, about 42 m (46 yd) per key
This amount includes a safety margin of about 30 percent for swatching, tails and the hanging loop. One standard 50 g ball will make several keys.
Tools:
– 1.75 mm steel crochet hook
– Fine tapestry needle or steel weaving needle
– Small sharp scissors
– Fabric stiffener, or a strong starch solution
– Rustproof pins and a foam blocking board
– Plastic wrap to protect the board
– Optional: ribbon or metallic thread for hanging
Abbreviations (US Terms)
- ch: chain
- sl st: slip stitch
- sc: single crochet
- hdc: half double crochet
- dc: double crochet
- sc2tog: single crochet 2 together (insert hook in next st, yarn over, pull up a loop; insert hook in following st, yarn over, pull up a loop; yarn over, pull through all 3 loops)
- MR: magic ring
- sp: space
- st(s): stitch(es)
- RS: right side
Special stitch: Petal Group. Work (2 sc, hdc, 3 dc, ch 3, 3 dc, hdc, 2 sc) into the same ch-10 loop. This makes 12 stitches and one ch-3 tip space.
Gauge and Checkpoints
The exact gauge is not critical for an ornament, but the bow and shaft need to stay in proportion. Make one bow (Rounds 1-3) first and measure it before you go on.
Base gauge: Round 1 (16 dc in a ring) measures 0.5 in (1.3 cm) across.
Checkpoints:
– After Round 1: 0.5 in (1.3 cm) across
– After Round 3: 1.5 in (3.8 cm) from petal tip to petal tip
– After Round 4 (edging): 1.75 in (4.4 cm) across
– Shaft: every 4 ladder rows measure 1 in (2.5 cm); all 10 rows measure 2.5 in (6.4 cm)
– Finished key without loop: 4.5 in (11.4 cm)
If your work is too big: go down to a 1.5 mm hook, or tighten your chains. Loose ch-10 loops are the usual cause of oversized, floppy petals.
If your work is too small: go up to a 2.0 mm hook. Also check that you are not pulling the dc tops tight, because that shortens the ladder.
The petals should stay open, with a clear gap inside each arch. If they fill in completely, your Round 3 stitches are packed too tightly onto the loop.
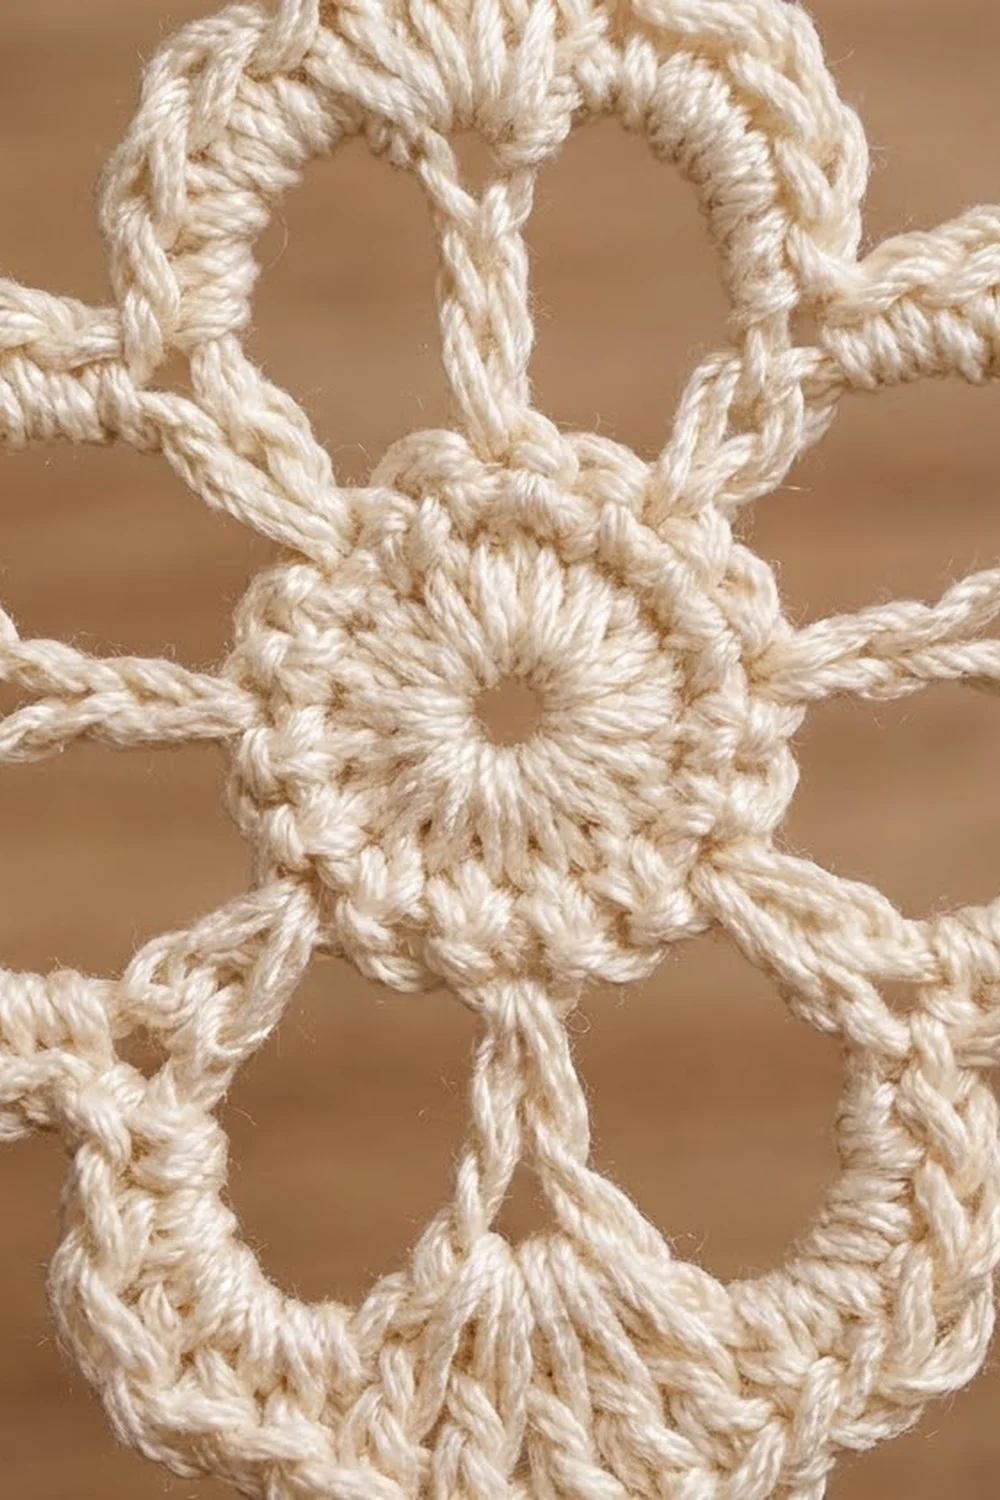
Pattern: Bow (Quatrefoil)
Work in joined rounds with the RS facing. Do not turn.
Round 1: Make a MR. Ch 3 (counts as dc), work 15 dc into the ring. Pull the ring closed and sl st to the top of the beginning ch-3. (16 dc)
Round 2: Ch 1. Sc in the same st as the join and in the next dc. Ch 10, skip next 2 dc, sc in each of next 2 dc. Repeat from * 2 more times. Ch 10, skip the last 2 dc, then sl st to the first sc. (8 sc and 4 ch-10 loops)
The four loops are the base of the petals. Each loop is anchored over only 2 skipped stitches, so it arches outward instead of lying flat.
Round 3: Ch 1. Sc in each of next 2 sc, then work a Petal Group in the next ch-10 loop. Repeat from * 3 more times. Sl st to the first sc. (56 sts: 4 x [2 + 12], plus 4 ch-3 tip spaces)
Spread the stitches evenly along each loop so that a clear opening stays inside the arch. This open center is what makes the petals look like lace.
Checkpoint: The bow should measure 1.5 in (3.8 cm) across from tip to tip. Before you work the edging, turn the motif so the four ch-3 tips point up, down, left and right. The tip pointing down will be the shaft’s starting point.
Border (Bow Edging Round)
The edging round firms up the petal outlines and sharpens each tip. It also pulls in the “valleys” between petals so the quatrefoil shape stays clear.
Edging gauge: One round of sc adds about 1/8 in (0.3 cm) on each side, which takes the bow from 1.5 in (3.8 cm) to 1.75 in (4.4 cm).
Round 4: Ch 1. Sc2tog over the 2 valley sc. Sc in each of the next 6 sts (2 sc, hdc, 3 dc). Work (2 sc, ch 2, 2 sc) in the ch-3 tip space. Sc in each of the next 6 sts (3 dc, hdc, 2 sc). Repeat from * 3 more times. Sl st to the first sc2tog. Fasten off. (68 sts: 4 x 17, plus 4 ch-2 tip spaces)
Count per petal: 6 + 4 + 6 = 16 sc around each petal, plus 1 sc2tog in each valley.
Why the math works: Round 3 has 14 sts per repeat (2 valley sc + 12 petal sts). Round 4 works into every one of those stitches: the 2 valley sc become 1 sc2tog (minus 1), and the 12 petal sts get 12 sc. The ch-3 tip then gets 4 new sc, which is the extra stitches added (plus 4). That gives 13 + 4 = 17 per repeat, and 4 x 17 = 68. The 4 extra stitches at each tip let the edge turn the point without cupping. The sc2tog in each valley keeps the gaps between petals tight and well defined.
Pattern: Shaft (Ladder)
Hold the bow with the RS facing and the bottom petal tip pointing down. Find the bottom tip (2 sc, ch 2, 2 sc).
Row 1: Join the thread with a sl st in the first sc of this tip group. Ch 3 (counts as dc), ch 2. Skip the next sc, the ch-2 space and the next sc, then dc in the last sc of the tip group. (2 dc, 1 ch-2 sp)
This makes the first square window, centered on the petal tip.
Row 2: Ch 5 (counts as dc + ch 2), turn. Dc in the top of the beginning ch-3 of Row 1. (2 dc, 1 ch-2 sp)
Rows 3-10: Ch 5 (counts as dc + ch 2), turn. Dc in the 3rd ch of the turning ch-5 of the previous row. (2 dc, 1 ch-2 sp in each row)
Each row adds one open square to the ladder. The dc posts form the two side rails, and the ch-2 spaces form the rungs.
Checkpoint: 10 rows should measure 2.5 in (6.4 cm) below the bow, and the ladder should be 0.4 in (1.0 cm) wide. Make sure all rows line up straight, without leaning.
Tip:
Row 11: Ch 1, turn. Sc in the first dc, 2 sc in the ch-2 sp, sc in the 3rd ch of the turning ch. (4 sc)
Row 12: Ch 1, turn. Sc2tog twice. (2 sc)
Row 13: Ch 1, turn. Sc2tog. (1 sc)
Fasten off, leaving a 4 in (10.2 cm) tail. Weave the tail up into the nearest rail to sharpen the point.
The 3 tip rows add about 0.25 in (0.6 cm), so the key now measures 4.5 in (11.4 cm) long.
Pattern: Teeth (Make 2)
Both teeth are worked on the right-hand rail of the shaft, with the RS facing and the bow at the top. Tooth 1 sits on Row 7 and Tooth 2 on Row 9. Row 8 stays as an open window between them.
Tooth 1:
Row 1: Join the thread with a sl st around the bottom of the right-hand dc post of Row 7. Ch 5. Sc in the 2nd ch from the hook and in each of the next 3 ch. Sl st around the middle of the same post. (4 sc)
Row 2: Turn. Skip the sl st and sc in each of the 4 sc, working outward. (4 sc)
Row 3: Ch 1, turn. Sc in each of the 4 sc, working back toward the shaft. Sl st around the top of the same post. (4 sc)
Fasten off. The tooth is 4 sc wide and 3 rows tall, about 0.4 in (1.0 cm) wide and 0.25 in (0.6 cm) tall, so it fills the height of one ladder row.
Tooth 2: Repeat Rows 1-3 on the right-hand post of Row 9.
Checkpoint: The key should now measure 0.8 in (2.0 cm) across at the teeth. The two teeth should be parallel, with exactly one open window (Row 8) between them.
Hanging Loop
Join the thread with a sl st in the ch-2 space at the tip of the top petal. Ch 16, then sl st in the same ch-2 space. Fasten off and weave in the ends.
The loop hangs about 0.75 in (1.9 cm) above the bow. For a sturdier loop, work 1 sc in each chain back around it before you fasten off.
Final Blocking
- Weave in all ends along the shaft rails and petal outlines, through at least 1 in (2.5 cm) of stitches.
- Soak the key in fabric stiffener, or in a strong starch solution, until it is fully saturated.
- Gently squeeze out the excess. Do not wring or twist the key.
- Cover the blocking board with plastic wrap and lay the key face up.
- Pin the bow first. Put one pin in each of the 4 petal tips and check that the bow is 1.75 in (4.4 cm) across in both directions.
- Pin one more pin into the open center of each petal to hold the arches round.
- Straighten the shaft and pin the tip so the key is 4.5 in (11.4 cm) long.
- Square off the teeth with one pin at each outer corner.
- Pin the hanging loop into an open oval.
- Let the key dry completely, usually overnight, then remove the pins.
Final Quality-Control Checklist
- Round 1 has 16 dc, and the center ring is closed tight
- Round 2 has 4 even ch-10 loops
- Each petal has 12 stitches (Round 3) and 16 sc (Round 4)
- Each valley has one neat sc2tog
- The bow measures 1.75 in (4.4 cm) across
- The shaft has 10 square windows, and the shaft and tip measure 2.75 in (7.0 cm) together
- The tip comes to a single centered point
- The teeth are on Rows 7 and 9, with Row 8 open between them
- Each tooth is 4 sc wide and 3 rows tall
- The hanging loop is centered on the top petal
- The key is stiff, flat and symmetrical
Troubleshooting
Petals look solid or crowded: The ch-10 loops are too short or too tight. Chain more loosely, or work 11 chains, and spread the Petal Group across the whole loop.
Bow cups or ruffles: For cupping, check that you worked 2 sc on each side of the tip ch-2. For ruffling, check that you used sc2tog in every valley.
Shaft leans to one side: You may be working the dc into the wrong chain of the turning ch-5. Always use the 3rd chain, which sits directly above the rail.
Shaft is off-center under the bow: Rejoin Row 1 so that it spans the full tip group (sc, sc, ch-2, sc, sc), with the first dc on the first sc and the last dc on the last sc.
Teeth droop: Tighten the sl sts around the post, and add an extra layer of stiffener to the teeth.
Tip is blunt: Pull the final sc2tog snug, and weave the tail upward through the center.
Care
Dust the ornament gently with a soft brush. If it gets dirty, hand-wash it in cool water, then re-stiffen and re-block it as above.
Final Notes
The measurement chain is straightforward:
- 16 dc make a 0.5 in (1.3 cm) center.
- 4 Petal Groups grow the bow to 1.5 in (3.8 cm).
- The edging round (68 sts) brings it to 1.75 in (4.4 cm).
- 10 ladder rows add 2.5 in (6.4 cm), and the pointed tip adds 0.25 in (0.6 cm), for a 4.5 in (11.4 cm) key.
- Two 4-sc teeth widen the shaft to 0.8 in (2.0 cm).
- The ch-16 loop brings the total length to 5.25 in (13.3 cm).
Check each stage against these numbers, and every key in your set will come out the same size.
Happy crocheting!