

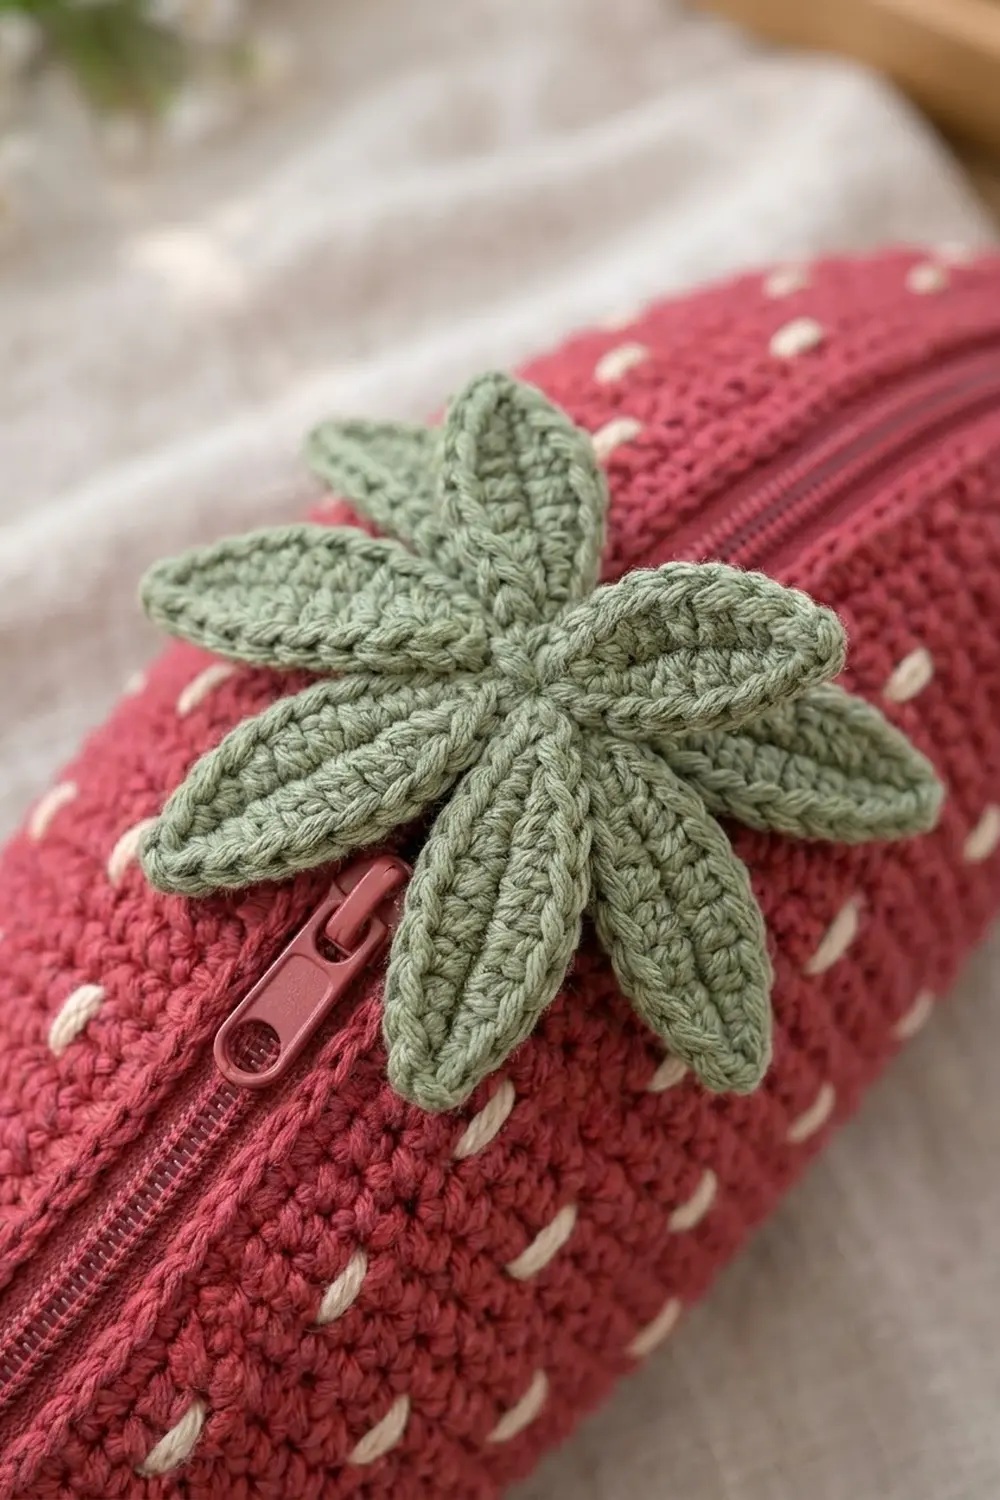
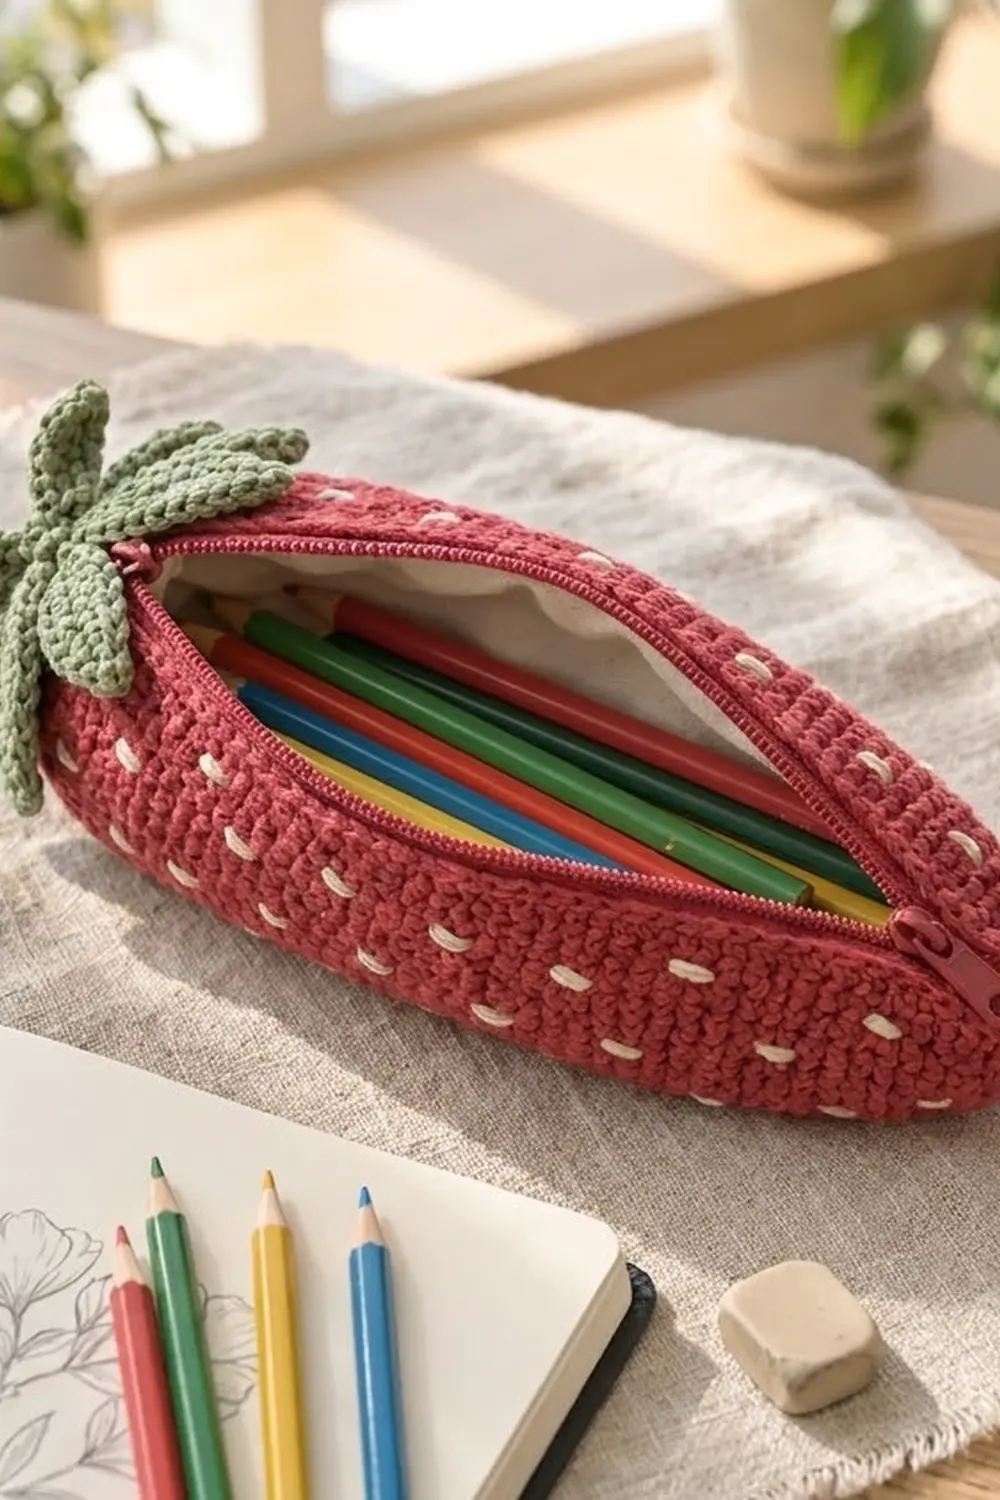
This pouch looks like a long, ripe strawberry. The body is a deep raspberry red with plump cream seeds and a crown of sage-green leaves. A matching red zipper runs straight down the front, so the whole fruit opens to hold pencils, pens, or a small crochet hook kit.
The style is soft and cottage-inspired. Tight single crochet makes a sturdy fabric, simple surface embroidery forms the seeds, and a cream cotton lining keeps sharp pencil tips from poking through the stitches.
This pattern uses US crochet terms. The finished pouch measures 8 in (20.3 cm) long and 4.8 in (12.2 cm) wide when laid flat. That equals a circumference of 9.6 in (24.4 cm) at the widest point. The leaf calyx is about 3.6 in (9.1 cm) across.
The construction is simple. You start at the bottom tip with four joined rounds, then switch to turned rows. Turning at the end of each row leaves a slit for the zipper while the body keeps growing as a tube. Then you shape the top, seam it flat, and edge the opening. Last, you embroider the seeds, add the zipper and lining, and sew the leaf calyx over the top seam.
Finished Size and Construction
- Finished size: 8 in (20.3 cm) long x 4.8 in (12.2 cm) wide, flat
- Skill level: Easy-intermediate (basic sewing required)
- Terminology: US crochet terms
- Yarn weight: DK (weight 3) cotton
- Hook: 3.5 mm (E-4)
- Number of pieces: 1 body + 1 leaf calyx (one finished pouch, no joining of motifs)
- Layout: single pouch, zipper centered on the front face
- Body before edging: zipper slit 7.2 in (18.3 cm) long
- Edging depth: about 0.2 in (0.5 cm) along each side of the slit
- Calyx size: about 3.6 in (9.1 cm) across
Materials
Choose a smooth, mercerized or combed DK cotton. Cotton holds its shape, shows the stitches clearly, and resists fuzzing on a pouch that gets handled every day. Avoid fluffy or very soft acrylic, because the pouch will sag.
- Raspberry red (body): 30 g, about 66 m
- Sage green (leaves): 10 g, about 22 m
- Cream (seeds): 5 g, about 11 m
These quantities include extra yarn for your gauge swatch and sewing tails.
Tools and notions:
- 3.5 mm (E-4) crochet hook
- 7 in (17.8 cm) dusty-red nylon coil zipper
- Cream cotton fabric, about 10 in x 12 in (25.4 cm x 30.5 cm)
- Red sewing thread and a sharp hand-sewing needle
- Blunt tapestry needle
- Stitch markers (at least 2)
- Pins, scissors, and a ruler or tape measure
Abbreviations (US Terms)
- ch – chain
- sl st – slip stitch
- sc – single crochet
- hdc – half double crochet
- dc – double crochet
- inc – 2 sc in the same stitch
- dec – sc2tog (single crochet 2 together)
- st(s) – stitch(es)
- rep – repeat
- RS / WS – right side / wrong side
Special stitch – Seed stitch (embroidery): Thread cream yarn on a tapestry needle. Bring the needle up at the base of one sc and down at the top of the same sc, so the stitch lies along the length of the pouch. Go through the same two holes once more to make a plump seed about 0.2 in (0.5 cm) long.
Gauge and Checkpoints
Gauge: 20 sc x 20 rows = 4 in (10.2 cm) in sc, worked tightly. That is 5 sts and 5 rows per 1 in (2.5 cm).
Before you start, make a swatch of 24 sts by 24 rows and measure the center 4 in (10.2 cm). Then work the body through Row 18 and compare it to the checkpoints below. The pouch is a single piece, so this early check is your best protection.
Checkpoints:
- After Rnd 4: 18 sts; the flattened tip is 1.8 in (4.6 cm) wide and 0.8 in (2.0 cm) long.
- After Row 18: 48 sts; spread flat, the last row measures 9.6 in (24.4 cm) across; total length is 3.6 in (9.1 cm).
- After Row 32: total length is 6.4 in (16.3 cm).
- After Row 40: total length is 8 in (20.3 cm); the slit is 7.2 in (18.3 cm).
If your piece is too big: go down to a 3.25 mm or 3 mm hook. A loose pouch will also show the lining through the stitches.
If your piece is too small: go up to a 3.75 mm hook. Do not add stitches; the zipper length depends on the row count, not the stitch count.
Body
Work with raspberry red. The tip is worked in joined rounds, so the bottom is closed. From Row 5 on, you turn at the end of every row, which leaves a slit between the first and last stitches.
Tip (Joined Rounds)
Rnd 1: Make a magic ring, ch 1, 6 sc in ring, sl st to first sc to join. Pull the ring tight. (6 sts)
Rnd 2: Ch 1, [sc in next st, inc] 3 times, sl st to first sc. (9 sts)
Rnd 3: Ch 1, [sc in next 2 sts, inc] 3 times, sl st to first sc. (12 sts)
Rnd 4: Ch 1, [sc in next st, inc] 6 times, sl st to first sc. (18 sts)
Place a marker at the join. The slit will open directly above this point.
Widening (Turned Rows)
From here on, do not join. Start each row with ch 1, then turn. The ch 1 does not count as a stitch.
Row 5: Ch 1, turn, [sc in next 2 sts, inc] 6 times. (24 sts)
Row 6: Ch 1, turn, sc in each st across. (24 sts)
Row 7: Ch 1, turn, [sc in next 3 sts, inc] 6 times. (30 sts)
Rows 8–9: Ch 1, turn, sc in each st across. (30 sts)
Row 10: Ch 1, turn, [sc in next 4 sts, inc] 6 times. (36 sts)
Rows 11–13: Ch 1, turn, sc in each st across. (36 sts)
Row 14: Ch 1, turn, [sc in next 5 sts, inc] 6 times. (42 sts)
Rows 15–17: Ch 1, turn, sc in each st across. (42 sts)
Row 18: Ch 1, turn, [sc in next 6 sts, inc] 6 times. (48 sts)
Check your measurements now. The 48 sts should span 9.6 in (24.4 cm).
Straight Section
Rows 19–32: Ch 1, turn, sc in each st across. (48 sts in each row, 14 rows)
The fabric now curls into an open tube. Keep the first and last stitch of each row neat, because they become the zipper edges.
Top Shaping
Row 33: Ch 1, turn, [sc in next 6 sts, dec] 6 times. (42 sts)
Row 34: Ch 1, turn, sc in each st across. (42 sts)
Row 35: Ch 1, turn, [sc in next 5 sts, dec] 6 times. (36 sts)
Row 36: Ch 1, turn, sc in each st across. (36 sts)
Row 37: Ch 1, turn, [sc in next 4 sts, dec] 6 times. (30 sts)
Row 38: Ch 1, turn, [sc in next 3 sts, dec] 6 times. (24 sts)
Rows 39–40: Ch 1, turn, sc in each st across. (24 sts)
Fasten off, leaving a 12 in (30.5 cm) tail.
Row total check: Rows 5–40 make 36 rows. At 5 rows per inch, that gives a 7.2 in (18.3 cm) slit. Add 0.8 in (2.0 cm) from Rnds 1–4, and the body is 8 in (20.3 cm) long.
Top Seam
Flatten the top so the slit sits in the center of the front face. Number the Row 40 stitches 1 to 24. The front layer holds sts 19–24 and 1–6 (12 sts). The back layer holds sts 7–18 (12 sts).
Using the tail, whipstitch the two layers together in pairs. Join st 6 to st 7, st 5 to st 8, and so on through st 1 to st 12. Then join st 24 to st 13 and continue through st 19 to st 18. The seam is 2.4 in (6.1 cm) wide, and the leaves will cover it.
Zipper Edging (Border)
The edging firms up the slit so the zipper has a stable edge to sew to.
Border gauge: 1 sc per row end, which equals 5 sc per 1 in (2.5 cm) and matches the row gauge.
Rnd 1: With RS facing, join raspberry red at the top of the slit, at the end of Row 40 on the left-hand edge (Side A). Ch 1. Working down Side A, sc in the end of each row from Row 40 to Row 5. (36 sc on Side A) Do not add a stitch at the bottom point. Working up Side B, sc in the end of each row from Row 5 to Row 40. (36 sc on Side B) Sl st to first sc. (72 sts total)
Rnd 2: Ch 1, sl st loosely through both loops of each sc around. (72 sts) Fasten off and weave in the end.
Why the math works: Each side has one row end for each of the 36 turned rows, so each side gets 36 sc. There are no corner stitches, because the top is a closed seam and the bottom is a point where Side A and Side B meet. At 5 sc per inch, 36 sc measures 7.2 in (18.3 cm). That matches the slit and leaves a little room around the stops of a 7 in (17.8 cm) zipper.
Seeds
Embroider the seeds before you add the zipper and lining, while you can still reach inside.
Work seeds on Rows 7, 10, 13, 16, 19, 22, 25, 28, 31, 34, and 37 (every 3rd row, 11 seed rows). On each seed row, place one seed stitch in every 4th sc. On every other seed row, shift the starting point by 2 sts so the seeds form a staggered diamond pattern. The seeds end up about 0.8 in (2.0 cm) apart across and 0.6 in (1.5 cm) apart vertically.
Skip any seed that would fall in the first 2 or last 2 sts of a row, so the zipper area stays clear. Add 3 seeds around Rnd 4 near the tip.
Carry the cream yarn loosely on the inside, no more than 1 in (2.5 cm) between seeds, and knot the ends inside. The lining will cover them.
Zipper and Lining
Zipper: Close the zipper. Pin it under the edging so the edging just covers the teeth, with the zipper pull at the top, under the leaves. With red thread, backstitch through Rnd 1 of the edging and the zipper tape. Then whipstitch the edges of the tape to the inside of the crochet.
Lining: Flatten the pouch and trace its outline onto paper, 8 in x 4.8 in (20.3 cm x 12.2 cm). Add a 0.4 in (1.0 cm) seam allowance all around and cut two pieces of cream fabric. Cut one piece in half lengthwise and add a 0.4 in (1.0 cm) allowance to each cut edge. With right sides together, sew the two halves to the whole piece around the outer curve. Put the lining into the pouch with the wrong side facing out. Fold the center edges under 0.4 in (1.0 cm) and slip-stitch them to the zipper tape.
Leaf Calyx
Work with sage green.
Rnd 1: Make a magic ring, ch 1, 7 sc in ring, sl st to first sc. (7 sts)
Rnd 2: Ch 1, 2 sc in each st around, sl st to first sc. (14 sts)
Rnd 3 (leaves): *Ch 8, sl st in 2nd ch from hook, sc in next ch, hdc in next ch, dc in next 2 ch, hdc in next ch, sc in last ch, sl st in each of the next 2 sts of Rnd 2; rep from * 6 more times. The last sl st lands in the joining st. (7 leaves of 7 sts each; all 14 sts of Rnd 2 used)
Fasten off, leaving a 12 in (30.5 cm) tail. Each leaf is about 1.5 in (3.8 cm) long, and the calyx spans about 3.6 in (9.1 cm).
Attaching: Center the calyx over the top seam. Sew around Rnd 2 with small stitches, then tack each leaf down about halfway along its length. Leave the tips free so they curl slightly.
Final Blocking
- Open the zipper and take out anything inside.
- Lightly mist the crochet with water. Do not soak the lining.
- Stuff the pouch with a rolled hand towel to shape the teardrop.
- Check the length, 8 in (20.3 cm), and the flat width, 4.8 in (12.2 cm).
- Pin each leaf flat on a towel, curving the tips slightly outward.
- Let it dry completely, at least 12 hours, before you take out the towel.
Final Quality-Control Checklist
- The body is 8 in (20.3 cm) long and 4.8 in (12.2 cm) wide when flat.
- Row 18 and Rows 19–32 each have 48 sts.
- The edging has 36 sc on each side, 72 in total.
- The zipper runs smoothly, with no crochet caught in the teeth.
- The seeds are evenly staggered and stay clear of the zipper.
- The lining lies flat, with no bunching at the tip.
- All 7 leaves are the same size, and the calyx covers the top seam.
- All yarn tails are woven in or hidden under the lining.
Troubleshooting
The slit is wavy. You probably worked 2 sc into some row ends. Redo Rnd 1 of the edging with exactly 36 sc per side.
The zipper is too long. Sew a new stop with thread at 7 in (17.8 cm) and trim the extra tape.
The pouch looks lumpy at the increases. Increases stacked in the same spots can form faint corners. Move each increase over by 1 or 2 sts on each increase row; the stitch counts stay the same.
The lining shows through. Your gauge is too loose. Remake the body with a smaller hook.
The leaves flop. Tack each leaf down closer to its tip, or block with a light spray starch.
The seeds pull the fabric. The cream yarn is carried too tightly inside. Loosen the strands between seeds.
Care
Hand wash in cool water with mild soap. Press the water out in a towel and dry the pouch flat in its shape; do not tumble dry.
Final Notes
Every measurement follows from your gauge of 5 sts and 5 rows per 1 in (2.5 cm). The four tip rounds give 0.8 in (2.0 cm), and the 36 turned rows give a 7.2 in (18.3 cm) slit, for an 8 in (20.3 cm) body. The widest row of 48 sts makes a 9.6 in (24.4 cm) circumference, or 4.8 in (12.2 cm) flat. The edging puts 36 sc on each side to match the 36 rows, which fits a 7 in (17.8 cm) zipper. Check these numbers at each stage and your strawberry will come out just right.
Happy crocheting!