

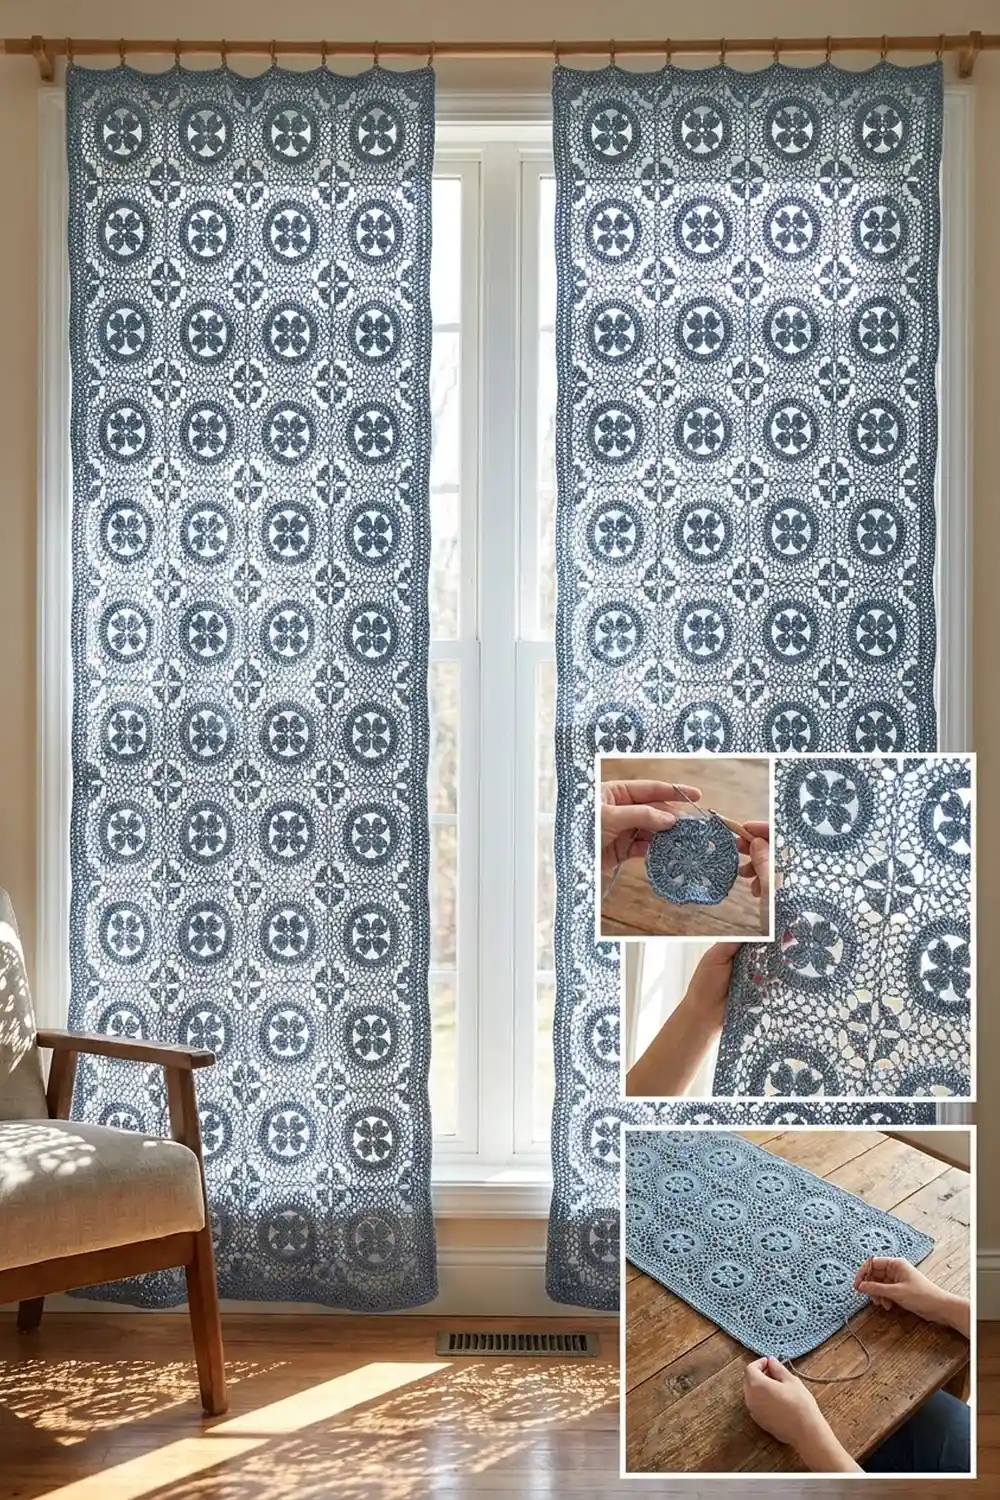
The Seaside Quatrefoil Curtain Panel is made to filter light. Each square motif has a solid four-petal flower at its center, framed by a round ring and an open circle of chain loops. When the motifs are joined, the rings link into a continuous lattice of circles and diamond-shaped windows, so sunlight comes through in soft patches while the room still feels private.
The panel shown is worked in one dusty-blue cotton. A single calm color shows off the texture of the lace, and it suits coastal, Scandinavian or cottage-style rooms. This pattern uses US crochet terms throughout.
One finished panel measures 44 in wide × 86 in long (111.8 × 218.4 cm) after blocking. A standard window takes two panels, as in the photo, so make two complete panels.
Construction is simple and repetitive. You crochet 72 identical 7 in (17.8 cm) square motifs and join them in a 6 × 12 grid with a flat slip-stitch seam. Then you add a 3-round border, about 1 in (2.5 cm) deep, around the whole panel.
Finished Size and Construction
- Finished panel size: 44 × 86 in (111.8 × 218.4 cm)
- Skill level: Intermediate
- Terminology: US crochet terms
- Yarn weight: worsted (#4) cotton or cotton blend
- Hook: 5.0 mm (H-8)
- Number of pieces: 72 motifs per panel (144 for a pair)
- Layout: 6 motifs across × 12 motifs down
- Motif size: 7 × 7 in (17.8 × 17.8 cm)
- Size before border: 42 × 84 in (106.7 × 213.4 cm)
- Border depth: 1 in (2.5 cm) on every side
Materials
Yarn: Use a smooth worsted-weight cotton or cotton blend with about 170 m per 100 g. Cotton holds the shape of the lace well, softens with washing and doesn’t fuzz in sunlight. Avoid 100% acrylic, which stretches a lot under the weight of a long panel.
- Dusty blue: 1,450 g / 2,465 m per panel
- For a pair: 2,900 g / 4,930 m
These quantities include a margin of about 10% for swatching, joining and weaving in ends. Buy all of it from the same dye lot.
Tools:
- 5.0 mm (H-8) crochet hook
- Tapestry needle
- Stitch markers
- Rust-proof pins and blocking mats (or towels)
- Measuring tape
- Spray bottle
- 7 curtain clip rings per panel
Abbreviations (US Terms)
- ch: chain
- sl st: slip stitch
- sc: single crochet
- hdc: half double crochet
- dc: double crochet
- tr: treble crochet
- sk: skip
- sp: space
- st(s): stitch(es)
- RS / WS: right side / wrong side
Special stitch: flat slip-stitch seam. Hold two pieces with WS together and RS facing you. Insert the hook through the back loop of the matching stitch on each piece and work 1 sl st. Keep these stitches loose.
Gauge and Checkpoints
Always make one complete motif and block it before you start production. The motif itself is the gauge swatch.
Gauge: one blocked motif = 7 × 7 in (17.8 × 17.8 cm). In Round 8, 27 sc = 7 in (17.8 cm), which is about 3.9 sc per inch.
Checkpoints, measured flat before blocking:
- After Round 1: 1.5 in (3.8 cm) across
- After Round 3 (the flower): 3.25 in (8.3 cm) from petal tip to petal tip
- After Round 5 (the solid ring): 4.5 in (11.4 cm) across
- After Round 7: 6.5 in (16.5 cm) from side to side
- After Round 8: 7 in (17.8 cm) from side to side
If your motif is too big: go down to a 4.5 mm hook. If it’s too small: go up to a 5.5 mm hook. A difference of 0.25 in (0.6 cm) per motif adds up to 1.5 in (3.8 cm) across the panel and 3 in (7.6 cm) down its length, so get the gauge right before you go on.
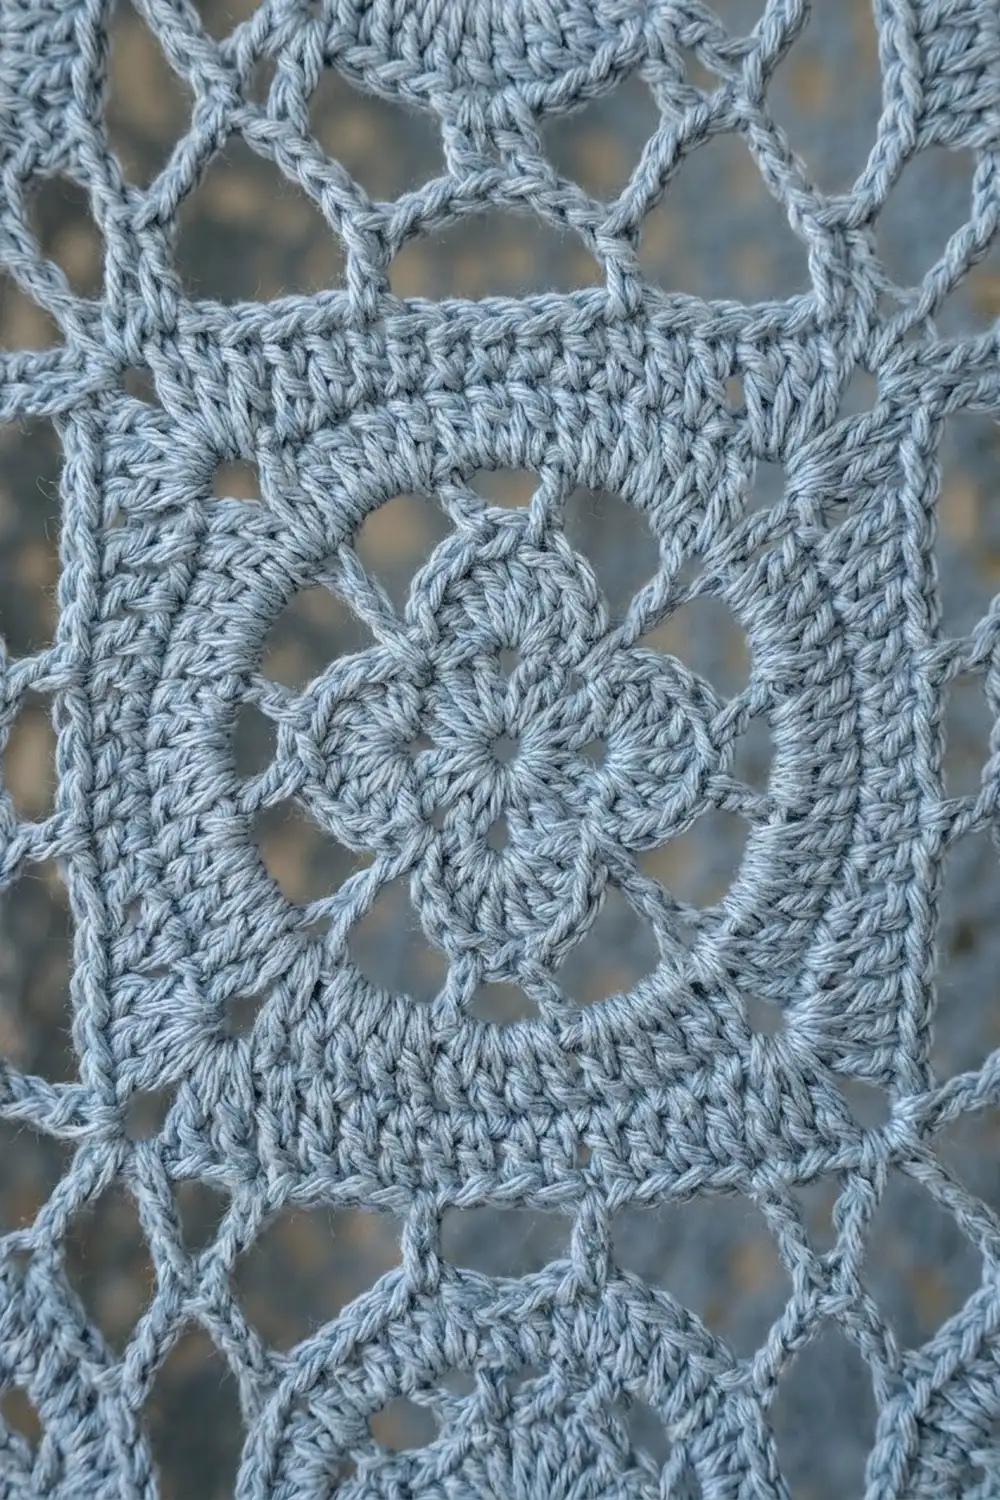
Motif (make 72 per panel)
Round 1: Make a magic ring. Ch 3 (counts as dc), work 15 dc into the ring, and join with a sl st to the top of the beginning ch-3. Pull the ring closed. (16 dc)
Round 2: Ch 3 (counts as dc), work 1 dc in the same st, then 2 dc in each st around. Join. (32 dc)
Round 3 (petals): Ch 1. Sc in next st, hdc in next st, dc in next st, 2 tr in each of the next 2 sts, dc in next st, hdc in next st, sc in next st. Repeat from * 3 more times. Join to the first sc. (4 petals of 10 sts each = 40 sts)
Each petal turns 8 stitches into 10, and the tr stitches at its center push it out into a rounded lobe. Each petal now reads: sc, hdc, dc, 4 tr, dc, hdc, sc.
Round 4 (anchor loops): Sl st in the next 3 sts so you land in the first tr of a petal. Ch 1. Sc in the first tr, ch 3, sk 2 tr, sc in the 4th tr, ch 5, sk the next 6 sts. Repeat from * 3 more times. Join to the first sc. (8 sc, 4 ch-3 sps, 4 ch-5 sps)
The ch-3 loops sit over the petal tips and the ch-5 loops bridge the dips between petals. This evens out the flower into a circle.
Round 5 (solid ring): Sl st into the first ch-3 sp. Ch 3 (counts as dc) and work 4 dc in the same sp, then 7 dc in the next ch-5 sp. Work 5 dc in the next ch-3 sp, then 7 dc in the next ch-5 sp. Repeat from * 2 more times. Join. (4 × [5 + 7] = 48 dc)
Round 6 (open circle): Ch 1, sc in the same st. Ch 5, sk 2 dc, sc in the next dc. Repeat from * 14 more times. Ch 5, sk the last 2 dc, and join to the first sc. (16 sc, 16 ch-5 loops)
Round 7 (squaring): Sl st in each of the first 3 ch to reach the center of the first loop. This loop is your first corner.
- Ch 3 (counts as dc), work 3 dc, ch 3 and 4 dc in the same loop.
- Ch 2, sc in the next loop, ch 5, sc in the next loop, ch 5, sc in the next loop, ch 2.
- Work (4 dc, ch 3, 4 dc) in the next loop, then ch 2, sc in the next loop, ch 5, sc in the next loop, ch 5, sc in the next loop, ch 2. Repeat from * 2 more times.
- Join to the top of the beginning ch-3.
(32 dc, 12 sc, 4 corner ch-3 sps, 8 ch-2 sps, 8 ch-5 sps)
Each side uses 4 of the 16 loops: one corner loop and three side loops.
Round 8 (edge): Ch 1. Sc in the same st and in the next 3 dc, then work (sc, ch 2, sc) in the corner ch-3 sp. Work each side as follows:
- Sc in each of the next 4 dc.
- 2 sc in the ch-2 sp, sc in the sc.
- 5 sc in the ch-5 sp, sc in the sc.
- 5 sc in the ch-5 sp, sc in the sc.
- 2 sc in the ch-2 sp.
- Sc in each of the next 4 dc.
- Work (sc, ch 2, sc) in the corner sp.
Repeat for all four sides, ending the last side with a sc in the final dc before the beginning. Join and fasten off.
Stitches per side: 1 corner sc + 4 + 2 + 1 + 5 + 1 + 5 + 1 + 2 + 4 + 1 corner sc = 27 sc. Each side includes its own 2 corner sc, and the ch-2 corner spaces sit outside that count. The round has 4 × 27 = 108 sc plus 4 ch-2 corner spaces.
Weave in the ends, then block each motif to 7 × 7 in (17.8 × 17.8 cm). Blocking the motifs before joining makes the seams line up much more easily.
Make All Pieces
- Dusty blue motifs: 72 per panel (144 for a pair)
Layout for one panel (each M is one motif, 6 across × 12 down):
Row 1:  M M M M M M
Row 2:  M M M M M M
Row 3:  M M M M M M
Row 4:  M M M M M M
Row 5:  M M M M M M
Row 6:  M M M M M M
Row 7:  M M M M M M
Row 8:  M M M M M M
Row 9:  M M M M M M
Row 10: M M M M M M
Row 11: M M M M M M
Row 12: M M M M M M
Every motif is identical and has no up or down, so you can place them in any orientation.
Joining
Method: Use the flat slip-stitch seam through back loops, worked with RS facing. It leaves a thin, even ridge on the RS that echoes the lattice.
Step 1 – join the rows. Join 6 motifs into a horizontal strip. For each seam, start with a sl st through both corner ch-2 sps. Then work 1 sl st through each of the 27 matching sc pairs, and finish with a sl st through the next pair of corner ch-2 sps. That makes 29 sl st per short seam, and each strip has 5 seams. Make 12 strips.
Step 2 – join the strips. Place two strips together and work along the full width. For each motif, work 1 sl st through the corner sps and 1 sl st through each of the 27 sc pairs. Where four corners meet, work a single sl st through all the stacked corner sps. Each long seam covers 6 × 27 = 162 sc pairs plus 7 corner points. Work all 11 long seams.
Because the stitches match one to one, the edges are always the same length and nothing gets eased or stretched.
Tension: Keep the seams as loose as the motif fabric. If a seam puckers, go up to a 5.5 mm hook just for joining. Lay your work flat every few seams.
Size checkpoint: the joined panel should measure 42 × 84 in (106.7 × 213.4 cm). Every 2 motifs should measure 14 in (35.6 cm).
Border
Border gauge: this is the same sc gauge as the motifs, 27 sc per 7 in (17.8 cm). That makes 162 sc across 42 in (106.7 cm) and 324 sc along 84 in (213.4 cm).
Starting counts: each width side has 6 motifs × 27 sc = 162 sc, and each length side has 12 motifs × 27 sc = 324 sc.
At each seam, go straight from the last sc of one motif to the first sc of the next. Don’t work any stitches into the joined corner spaces at the seams. Only the 4 outer corner spaces of the panel get stitches.
Round 1 (sc): With RS facing, join the yarn in any sc. Work 1 sc in each sc around, and 3 sc in each of the 4 outer corner ch-2 sps. Join.
- Count: (2 × 162 + 2 × 324 = 972, worked 1 per existing stitch) + (4 corners × 3 = 12 added) = 984 sts
- Between the center corner stitches, there are 164 sts on each width side and 326 on each length side.
Round 2 (hdc): Ch 2 (doesn’t count as a stitch). Work 1 hdc in each st, and 3 hdc in each center corner st. Join.
- Count: (980 stitches worked 1 per stitch) + (4 corners × 3 = 12) = 992 sts
- Between the corner centers, there are 166 sts on each width side and 328 on each length side.
Round 3 (dc): Ch 3 (doesn’t count as a stitch). Work 1 dc in each st, and 3 dc in each center corner st. Join and fasten off.
- Count: (988 stitches worked 1 per stitch) + (4 corners × 3 = 12) = 1,000 sts
- Between the corner centers, there are 168 sts on each width side and 330 on each length side.
Why the math works: Round 1 uses exactly one stitch per motif sc, so the border matches the panel’s gauge and lies flat without ruffling or cupping. Each later round adds only 2 stitches per corner, which is exactly what is needed to turn a 90-degree corner as the border gets wider. The three rounds together, sc + hdc + dc, measure about 1 in (2.5 cm). That gives a finished size of 42 + 2 = 44 in by 84 + 2 = 86 in (111.8 × 218.4 cm).
Final Blocking
- Weave in every end along a seam ridge so it can’t be seen through the lace.
- Soak the panel in cool water for 15 minutes, then press out the water. Don’t wring it.
- Roll the panel in towels to remove as much moisture as you can.
- Lay it out on a clean floor or a bed covered with towels. Work in sections if you need to.
- Pin the outer edge to 44 × 86 in (111.8 × 218.4 cm), starting at the four corners.
- Pin every seam intersection in a straight line. The gaps between seams should be 7 in (17.8 cm).
- Open up each ring by gently pressing the ch-5 loops into round arches.
- Leave it to dry completely, which takes 24–48 hours.
- Clip on 7 curtain rings: one at each top corner and one at each of the 5 vertical seams along the top edge. They will be about 7 in (17.8 cm) apart.
Final Quality-Control Checklist
- Each motif measures 7 in (17.8 cm) and has 27 sc per side.
- The panel is exactly 6 × 12 motifs.
- Every seam lies flat and isn’t tighter than the fabric.
- All four-way corner junctions are closed with no holes.
- Border counts are 984 / 992 / 1,000 stitches.
- The finished panel measures 44 × 86 in (111.8 × 218.4 cm).
- No ends show from the RS when you hold the panel up to the light.
- Both panels in the pair are within 0.5 in (1.3 cm) of each other.
Troubleshooting
Petals look flat: Check that each petal has 4 tr. Make sure you worked 2 tr in each of 2 stitches, not 1 tr in each.
Round 5 ruffles: Work 6 dc in each ch-5 sp instead of 7, but then you must work Round 6 to your new count. It’s better to go down one hook size for Rounds 4–5.
Corners of the motif curl: Loosen your tension in Round 8 and block the motifs before joining.
Seams pucker: Rework them with a larger hook, keeping your sl sts as long as the sc they join.
Border waves: You probably worked stitches into the seam corner spaces. Count again: you need 162 sc per width side and 324 per length side.
Panel grows longer when hung: Cotton relaxes under its own weight. Hang the panel for 48 hours, then measure it. If it’s too long, take out the bottom row of motifs, or re-block it while it’s damp with the length pushed in.
Care
Hand wash or machine wash on a cool, gentle cycle inside a large mesh bag. Lay flat to dry and re-pin to 44 × 86 in (111.8 × 218.4 cm) if needed. Don’t hang the panel while it’s wet.
Final Notes
The whole panel depends on one measurement chain. Make 27 sc per side on a 7 in (17.8 cm) motif. Join 6 × 12 motifs into a 42 × 84 in (106.7 × 213.4 cm) panel with 162 and 324 edge stitches. Add a 1 in (2.5 cm) border for a finished 44 × 86 in (111.8 × 218.4 cm) panel. If you check each link in that chain as you go, both panels will match and hang straight.
Happy crocheting!