

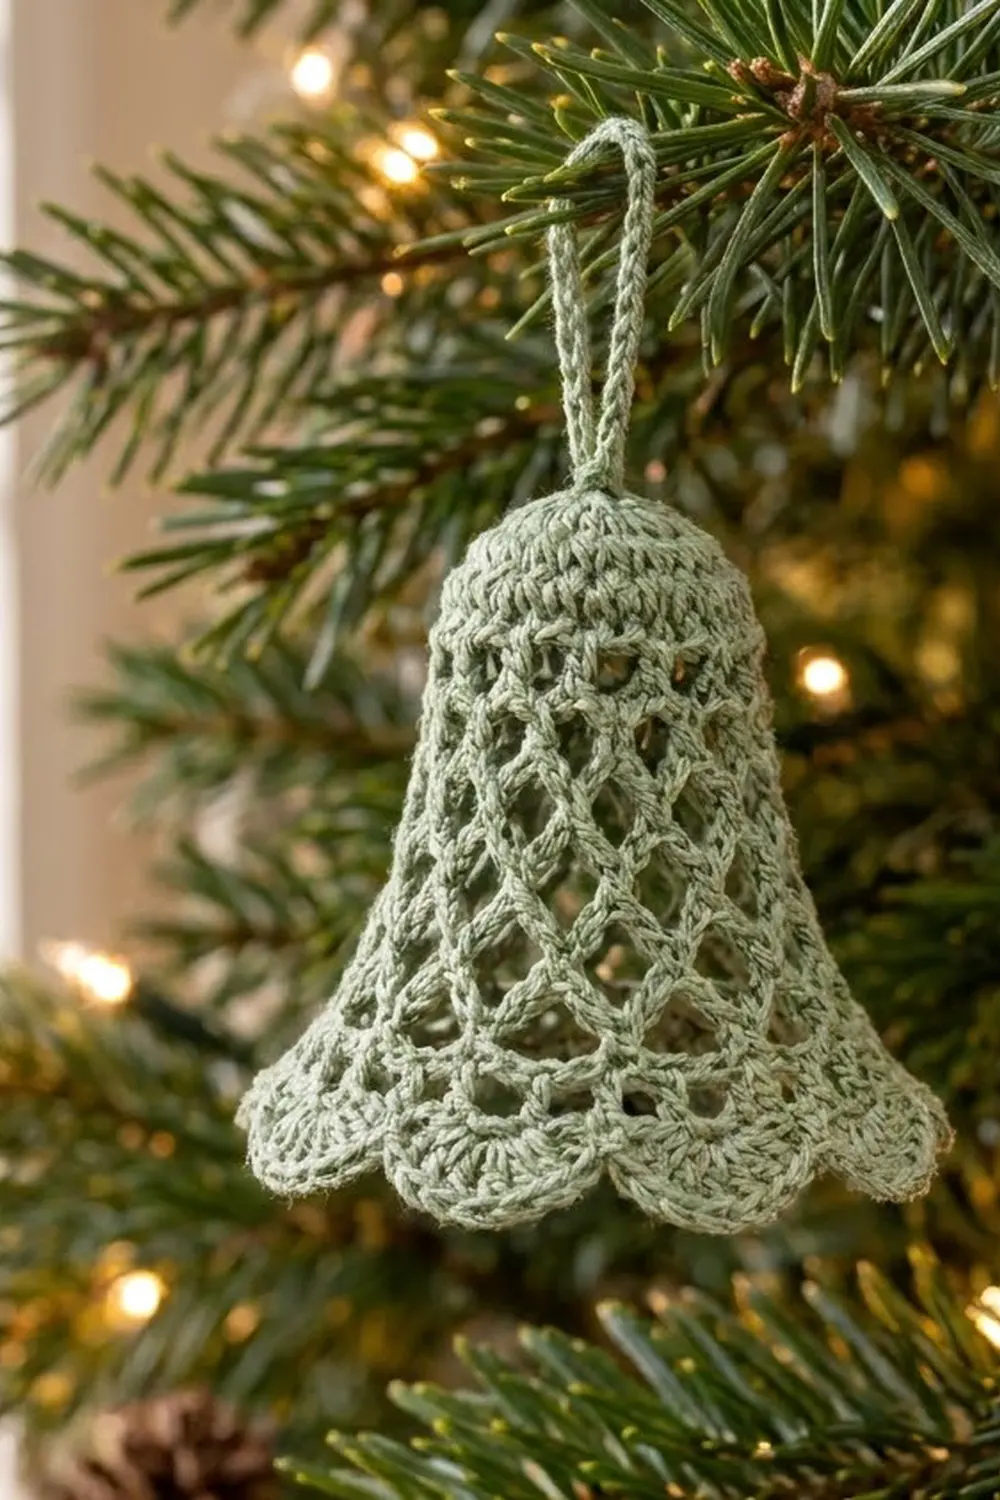
This little bell has a rounded, solid crown at the top. Below it, an airy diamond lattice flares out and ends in a band of scallops at the hem. It is worked in one soft sage-green cotton thread, which gives it a calm, vintage-lace look. It suits a natural or neutral tree, and it also looks good tied to gifts.
The pattern uses US crochet terms. The finished bell is 2.75 in (7.0 cm) tall, not counting the hanging loop, and about 2.9 in (7.4 cm) across the hem once it is shaped. The hanging loop adds about 1 in (2.5 cm) above the crown.
The bell is one seamless piece worked from the top down. You start with a magic ring and work four rounds of double crochet for the crown. Then six rounds of chain loops build the lattice. The loops get longer every two rounds, so the bell flares without any increases. Three hem rounds finish the edge, and a light starch blocking holds the bell shape.
This is a single-piece project, so there is no joining. Make as many bells as you like and finish each one the same way.
Finished Size and Construction
- Finished size: 2.75 in (7.0 cm) tall × 2.9 in (7.4 cm) hem diameter
- Skill level: Easy-Intermediate (working in the round, chain-loop mesh)
- Terminology: US crochet terms
- Yarn weight: Size 3 mercerized cotton crochet thread (lace / light fingering)
- Hook: 2.25 mm (US B-1)
- Number of pieces: 1
- Layout: Single seamless 3D bell, worked top-down in joined rounds
- Piece size: Crown 1.1 in (2.8 cm) wide at Round 4
- Size before border: 2.1 in (5.3 cm) tall, about 2.4 in (6.1 cm) wide at Round 10
- Border depth: 0.65 in (1.7 cm), Rounds 11–13
Materials
Yarn: Use size 3 mercerized cotton thread. It has good stitch definition and a slight sheen, and it takes starch well. Matte cotton thread of the same weight also works, but the lattice will look softer. Avoid acrylic. It does not hold a starched shape well.
- Sage green: 15 g / about 25 m for one bell
The quantity includes a margin of about 25% for your gauge swatch, the hanging loop and the tails.
Tools:
– 2.25 mm (US B-1) crochet hook
– Fine tapestry needle
– Small scissors
– Stitch marker
– Fabric stiffener, liquid starch, or a 1:1 mix of white craft glue and water
– A shaping form: a small funnel, the top of a pill bottle, or a cone of card about 2.5 in (6.4 cm) across at the base, wrapped in plastic wrap
– Rustproof pins
Abbreviations (US Terms)
- ch – chain
- sl st – slip stitch
- sc – single crochet
- dc – double crochet
- sk – skip
- st(s) – stitch(es)
- sp – space
- MR – magic ring
- rep – repeat
Special stitch – Shell: 7 dc worked into the same stitch.
Note: The ch-3 at the start of a dc round counts as the first dc. Join every round with a sl st to the first stitch of that round, either the top of the ch-3 or the first sc. Do not turn your work.
Gauge and Checkpoints
The bell is one piece, so the crown is your gauge test. Work Rounds 1–2 and measure before you go any further.
- Base gauge: 16 sc = 2 in (5.1 cm) in the round. Rounds 1–2 of dc should measure 0.9 in (2.3 cm) across when lying flat.
- Checkpoint A (after Round 2): flat disc 0.9 in (2.3 cm) across.
- Checkpoint B (after Round 4): crown cup 1.1 in (2.8 cm) wide, starting to curve downward.
- Checkpoint C (after Round 10): 2.1 in (5.3 cm) tall and about 2.4 in (6.1 cm) wide when lightly stretched.
- Checkpoint D (after Round 13 and blocking): 2.75 in (7.0 cm) tall, 2.9 in (7.4 cm) hem diameter.
If your piece is too big: go down to a 2.0 mm hook, or tighten your chains. Loose chains are the most common reason the lattice grows.
If your piece is too small: go up to a 2.5 mm hook. Keep the chain counts exactly as written. Changing them breaks the 12-loop repeat.
Small differences of 0.1 in (0.3 cm) are fine. Blocking can absorb them.
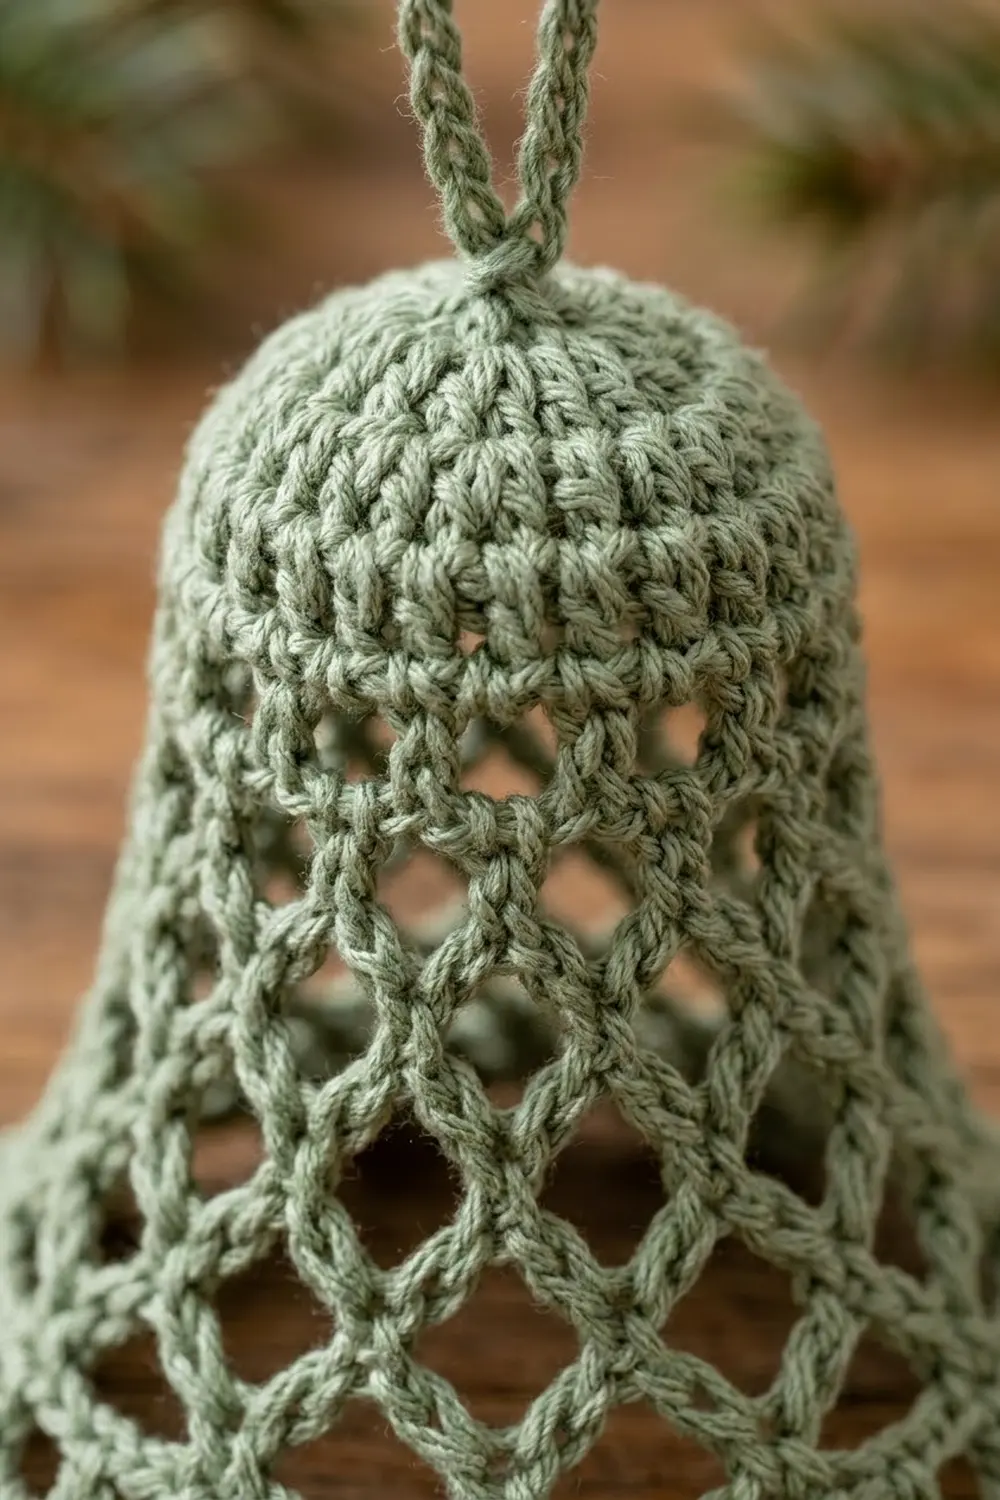
Crown (Solid Top)
Round 1: Make a MR. Ch 3 (counts as dc), work 11 dc into the ring. Pull the ring closed and join. (12 dc)
Round 2: Ch 3, dc in the same st. 2 dc in the next st, dc in the next st, rep from * 4 more times, then 2 dc in the last st. Join.
That makes 6 increases, but check the count: (dc, 2 dc) uses 2 stitches and makes 3. Six repeats would give 18 stitches, but the opening “ch 3, dc in same st” already used the first stitch. The clearer way to work this round is below.
Round 2 (as worked): Ch 3 (counts as dc), 2 dc in the next st. Dc in the next st, 2 dc in the next st, rep from * 4 more times. Join. (18 dc)
Check: 6 repeats × 3 dc = 18 dc. Checkpoint A: about 0.9 in (2.3 cm) across.
Round 3: Ch 3, dc in each st around. Join. (18 dc)
Working straight without increases makes the crown cup downward into its dome shape.
Round 4: Ch 3, dc in the next st, 2 dc in the next st. Dc in each of the next 2 sts, 2 dc in the next st, rep from * 4 more times. Join. (24 dc)
Check: 6 repeats × 4 dc = 24 dc. Checkpoint B: the crown is 1.1 in (2.8 cm) wide.
Lattice Body (Diamond Mesh)
Every lattice round has exactly 12 chain loops. The sc of each new round sits in the middle of a loop from the round before. This offsets the loops and makes the diamonds. The loops get longer every two rounds, and that is what makes the bell flare.
Round 5: Ch 1, sc in the first st, ch 4, sk 1 st. Sc in the next st, ch 4, sk 1 st, rep from * 10 more times. Join with a sl st to the first sc. (12 sc, 12 ch-4 loops)
Check: 24 dc ÷ 2 sts per repeat = 12 loops.
Round 6: Sl st into each of the first 2 ch of the next loop so you are at the loop’s center. Ch 1, sc in the same loop. Ch 4, sc in the next ch-4 loop, rep from * 10 more times. Ch 4 and join to the first sc. (12 sc, 12 ch-4 loops)
Round 7: Sl st into each of the first 2 ch of the next loop. Ch 1, sc in the same loop. Ch 5, sc in the next loop, rep from * 10 more times. Ch 5 and join. (12 sc, 12 ch-5 loops)
Round 8: Sl st into each of the first 2 ch of the next loop. Ch 1, sc in the same loop. Ch 5, sc in the next loop, rep from * 10 more times. Ch 5 and join. (12 sc, 12 ch-5 loops)
Round 9: Sl st into each of the first 3 ch of the next loop. Ch 1, sc in the same loop. Ch 6, sc in the next loop, rep from * 10 more times. Ch 6 and join. (12 sc, 12 ch-6 loops)
Round 10: Sl st into each of the first 3 ch of the next loop. Ch 1, sc in the same loop. Ch 6, sc in the next loop, rep from * 10 more times. Ch 6 and join. (12 sc, 12 ch-6 loops)
Checkpoint C: the bell measures 2.1 in (5.3 cm) from the top of the crown to the bottom of the loops. Pressed flat it looks like a cone, and when lightly stretched open it is about 2.4 in (6.1 cm) wide.
Border (Hem Band and Scallops)
The border is the hem band plus the scallop edge. It is worked straight onto the Round 10 loops.
Border gauge: 16 sc = 2 in (5.1 cm). Round 11 has 72 sc, which gives a hem circumference of 9 in (22.9 cm). That works out to a diameter of about 2.9 in (7.4 cm).
Round 11 (conversion round): Sl st into the next ch-6 loop. Ch 1, then work 6 sc into each ch-6 loop around. Join to the first sc. (12 loops × 6 sc = 72 sc)
This round turns the mesh into solid stitches, so it is counted per loop: 12 loops × 6 sc each.
Push the sc together so they cover each loop evenly. The 6 sc in one loop measure about 0.75 in (1.9 cm). That makes the hem a little wider than Round 10, which adds a slight final flare.
Round 12 (solid band): Ch 3 (counts as dc), dc in each st around. Join. (72 dc)
This round is worked 1-per-stitch, with nothing added: 72 sc in, 72 dc out.
Round 13 (scallops): Ch 1, sc in the first st. Sk 2 sts, Shell (7 dc) in the next st, sk 2 sts, sc in the next st, rep from * 10 more times. Finish with sk 2 sts, Shell in the next st, sk 2 sts, and join with a sl st to the first sc. Fasten off. (12 shells + 12 sc; 12 × 7 dc = 84 dc, + 12 sc = 96 sts)
Why the math works: each scallop repeat uses exactly 6 base stitches: 1 sc, 2 skipped, 1 shell, 2 skipped. 72 ÷ 6 = 12 scallops, with no partial repeat. Each scallop also sits under one of the original 12 lattice columns, so the scallops line up with the diamonds above them.
Checkpoint D (before blocking): the border adds 0.65 in (1.7 cm) of depth. The total height is about 2.75 in (7.0 cm).
Hanging Loop
Join the thread with a sl st through the center of Round 1, between two dc at the top of the crown. Ch 24 and sl st into the same spot. Fasten off.
The loop rises about 1 in (2.5 cm) above the crown. Weave the ends through the crown stitches on the wrong side so they don’t show through the lattice.
Final Blocking
- Weave in all ends before you stiffen the bell. Trim them close.
- Prepare the stiffener. Use commercial stiffener, heavy liquid starch, or white glue mixed 1:1 with water.
- Soak the bell until it is saturated, then squeeze out the extra. Do not wring or twist it.
- Blot it in a towel so no film of stiffener is left across the lattice holes.
- Fit the bell over the plastic-wrapped form. Center the crown on top and let the lattice settle down the sides.
- Open the diamonds. Use a toothpick or tapestry needle to pull each lattice loop into an even diamond, row by row.
- Shape the hem. Ease the band out to a 2.9 in (7.4 cm) circle. Pin the tip of each scallop so that all 12 sit level and flare a little outward.
- Check the height. It should be 2.75 in (7.0 cm) from the top of the crown to the scallop tips.
- Let it dry completely, usually 12–24 hours. Then slide the bell off the form.
- Clear any blocked holes with a needle. Stiffener can harden across the gaps.
Final Quality-Control Checklist
- The crown is a smooth, solid dome with no gaps at the magic ring.
- There are exactly 12 lattice columns, and every diamond is closed.
- The loops lengthen in pairs: 4, 4, 5, 5, 6, 6 ch.
- Round 11 has 72 sc, and every loop is fully covered.
- There are exactly 12 scallops of 7 dc each, evenly spaced.
- Height is 2.75 in (7.0 cm) and hem diameter is 2.9 in (7.4 cm).
- The hanging loop is centered and the bell hangs straight.
- No ends show through the lattice.
Troubleshooting
The crown is flat instead of domed. You probably added increases in Round 3. Round 3 must stay at 18 dc.
The crown ruffles. Your tension is too loose for the increases. Go down a hook size for Rounds 1–4 only.
The lattice leans or spirals. Your joins are drifting. Always sl st to the first sc of the round, then sl st to the center of the next loop before starting the round.
The diamonds look like long slits. Your chains are too tight. Relax your grip, or go up one hook size for Rounds 5–10.
The scallop count comes out wrong. Recount Round 11. If it isn’t exactly 72 sc, rip back and work 6 sc into every loop.
The hem flips inward. Check Round 12 for skipped stitches. When you re-block, pin the scallop tips slightly outward.
The bell sags over time. Stiffen it again with a slightly stronger glue mix.
Care
Store the bells in a box with tissue in each one so they keep their shape. To clean one, dab it with a damp cloth. If you have to wash it, re-stiffen and re-block it afterward.
Final Notes
The measurements build on each other in this order. Rounds 1–2 should be 0.9 in (2.3 cm) across. The crown reaches 1.1 in (2.8 cm) wide with 24 dc. Six rounds of 12 lattice loops take the bell to 2.1 in (5.3 cm) tall. The border turns those loops into 72 sc, which is 12 repeats of 6, for a 2.9 in (7.4 cm) hem. Its 0.65 in (1.7 cm) depth brings the bell to 2.75 in (7.0 cm). If each checkpoint matches, the finished bell will match the size above.
Happy crocheting!