

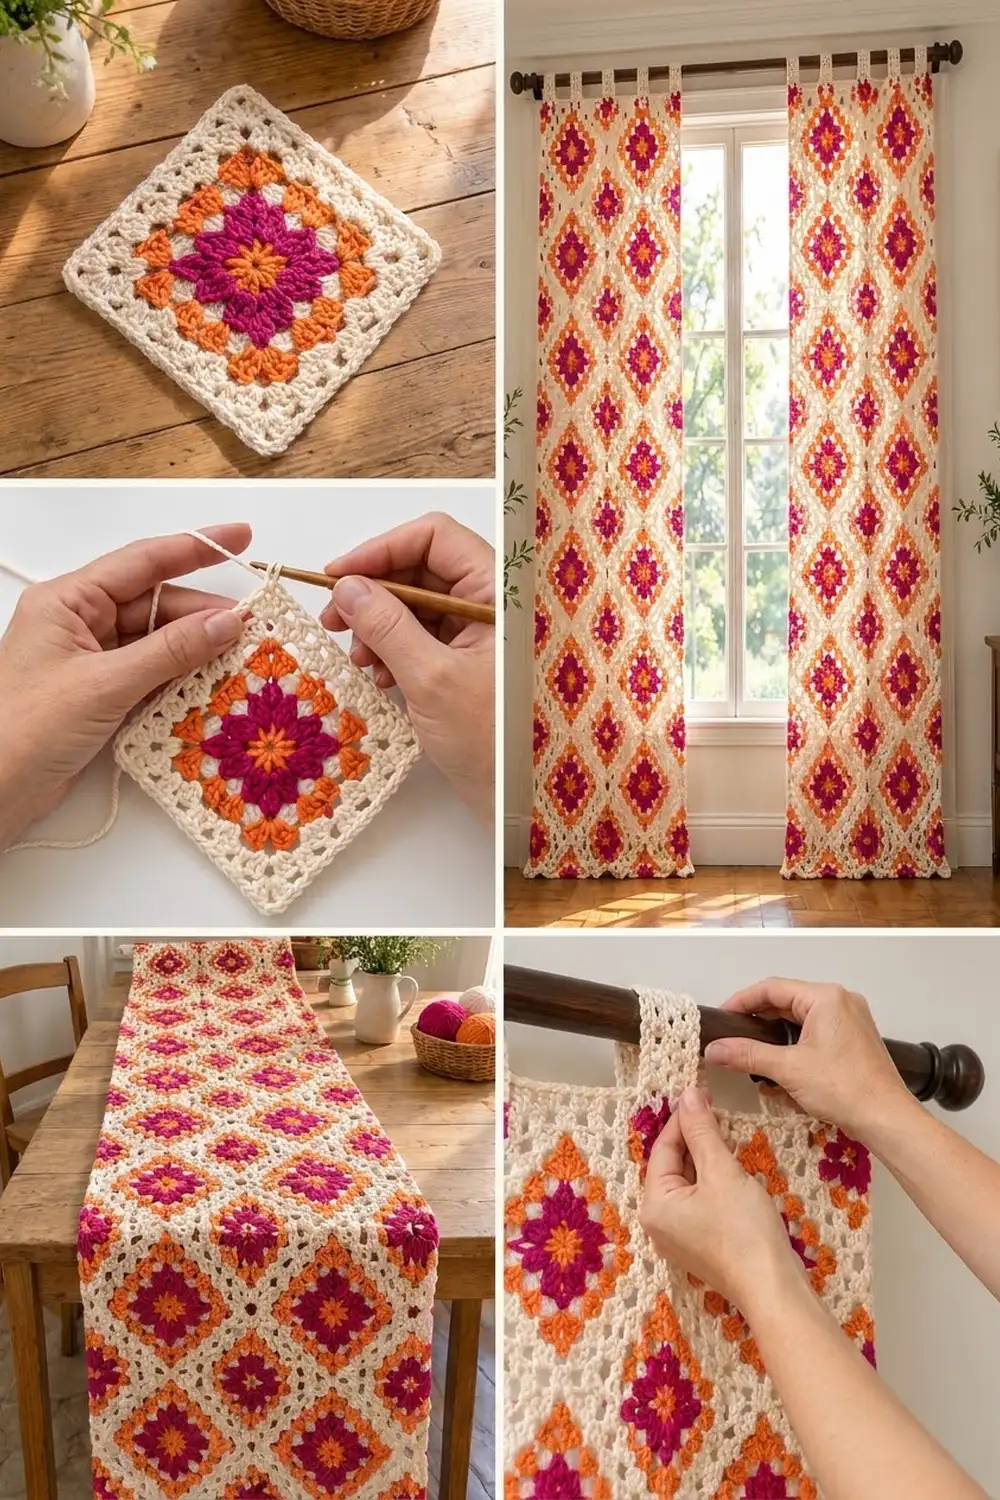
The Marigold Lattice Curtain Panel is a warm, boho-style tab-top curtain made from joined granny squares. Each square has a magenta star with an orange glow at its center, framed by open cream rounds. When you join the squares, the bright centers line up into a lattice of diamonds that glows when light comes through the window.
The palette is cream, magenta, and orange. Cream makes up most of the panel, so it stays light and airy, and the two warm colors give it rhythm. Use a cotton or cotton-blend yarn so the fabric hangs straight and keeps its shape.
This pattern uses US crochet terms. One finished panel is 26 in x 74 in (66.0 cm x 188.0 cm) without the tabs. The tabs add a 3 in (7.6 cm) hanging loop, for a hanging length of about 77 in (195.6 cm). The photo shows a matching pair, so make two panels for one window.
Here is how it goes together. You crochet 48 identical squares, join them into a grid 4 squares wide and 12 squares tall, add a 3-round cream border, then work 6 tabs straight off the top edge.
Finished Size and Construction
- Finished panel size: 26 in x 74 in (66.0 cm x 188.0 cm), plus a 3 in (7.6 cm) tab loop
- Skill level: Easy–Intermediate
- Terminology: US
- Yarn weight: Worsted (#4), cotton or cotton blend
- Hook: US H-8 (5.0 mm)
- Number of pieces: 48 squares per panel (96 for a pair), plus 6 tabs worked onto the border
- Layout: 4 squares wide x 12 squares tall
- Square size: 6 in x 6 in (15.2 cm x 15.2 cm)
- Size before border: 24 in x 72 in (61.0 cm x 182.9 cm)
- Border depth: 1 in (2.5 cm) on each side
Materials
Choose a smooth worsted cotton or cotton blend with about 170 m per 100 g. Cotton keeps the stitches crisp and doesn’t stretch much when the panel hangs. Acrylic will also work, but it may lengthen over time.
Yarn for one panel:
- Cream (Color A): 800 g, about 1,360 m
- Orange (Color B): 175 g, about 298 m
- Magenta (Color C): 125 g, about 213 m
Double these amounts for a pair. The quantities include a margin of roughly 10% for swatching, joining, and weaving in ends.
Tools:
- US H-8 (5.0 mm) crochet hook
- Tapestry needle
- Locking stitch markers
- Scissors
- Measuring tape
- Blocking mats and rust-proof pins
- Spray bottle
Abbreviations (US Terms)
- ch – chain
- sl st – slip stitch
- sc – single crochet
- hdc – half double crochet
- dc – double crochet
- sp(s) – space(s)
- st(s) – stitch(es)
- BLO – back loop only
- rep – repeat
Special stitches:
- 3-dc cluster (cl): *Yarn over, insert hook in the stitch, pull up a loop, yarn over, pull through 2 loops. Rep from * 2 more times in the same stitch (4 loops on hook). Yarn over and pull through all 4 loops.
- Beginning cluster (beg cl): Ch 2, then work a 2-dc cluster in the same stitch (the same steps as above, repeated only twice; you finish by pulling through 3 loops).
Gauge and Checkpoints
Make one complete square before anything else, then block it lightly and measure it. All the later math depends on it.
- Square gauge: One square (Rounds 1–7) = 6 in (15.2 cm) per side.
- Edge gauge: 29 sc along one side = 6 in (15.2 cm), or about 4.8 sc per inch.
Checkpoints while you work:
- After Round 1: about 1.25 in (3.2 cm) across
- After Round 3: about 3 in (7.6 cm) per side
- After Round 6: about 5.5 in (14.0 cm) per side
- After Round 7: 6 in (15.2 cm) per side
If your square is bigger than 6 in (15.2 cm), go down to a US G-6 (4.0 mm) hook. If it’s smaller, go up to a US I-9 (5.5 mm). A difference of just 0.25 in (0.6 cm) per square adds up to 3 in (7.6 cm) over the 12-square length, so it’s worth getting this right.
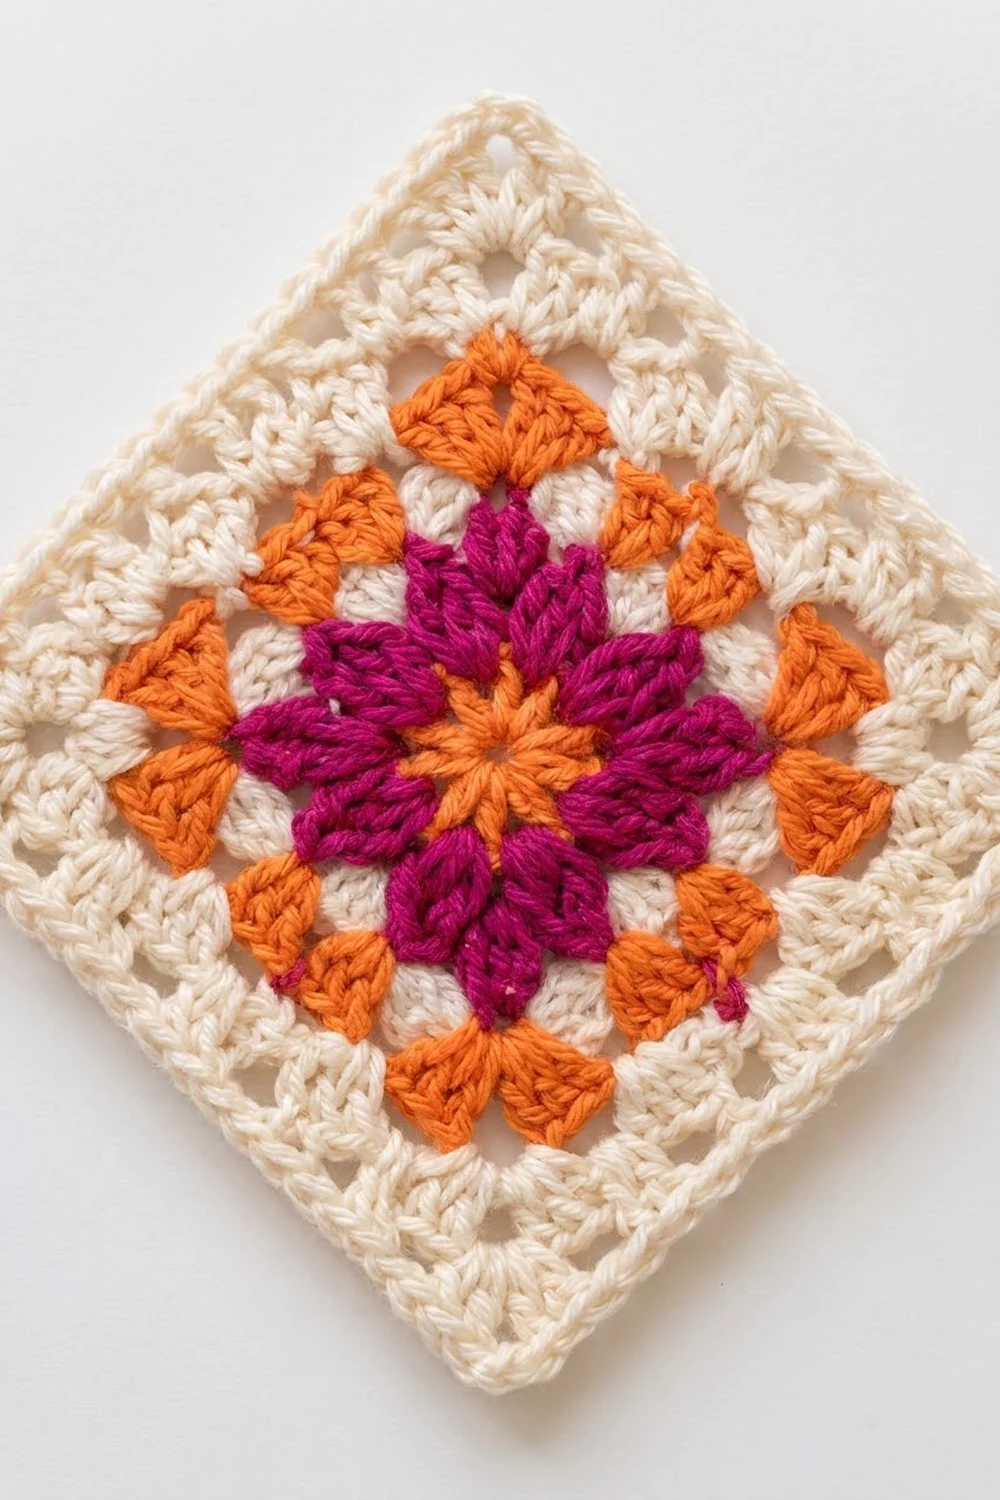
Square Pattern (Make 48)
Round 1 (Color B, orange): Make a magic ring. Ch 3 (counts as dc), then work 11 dc into the ring. Pull the ring closed and join with a sl st to the top of the beginning ch-3. (12 dc) Fasten off.
Round 2 (Color C, magenta): Join magenta in any dc. Work a beg cl in the same st, then ch 2. Work 1 cl in the next dc, ch 2. Rep from * 10 more times. Join with a sl st to the top of the beg cl. (12 clusters, 12 ch-2 sps)* Fasten off.
These clusters are the magenta star petals. Keep the ch-2s loose so the petals sit flat.
Round 3 (Color B, orange): Join orange in any ch-2 sp. Work (ch 3, 2 dc, ch 2, 3 dc) in the same sp to make the first corner. Work 3 dc in each of the next 2 ch-2 sps. In the next ch-2 sp work (3 dc, ch 2, 3 dc) for a corner, then 3 dc in each of the next 2 ch-2 sps. Rep from * 2 more times. Join with a sl st to the top of the beginning ch-3. (48 dc: 12 dc per side, 4 corner ch-2 sps)* Fasten off.
This round turns the circle into a square. There are no chains between the 3-dc groups, which gives the solid orange frame around the star.
Round 4 (Color A, cream): Join cream in any corner ch-2 sp. Work (ch 3, 2 dc, ch 2, 3 dc) in the same sp, then ch 1. Work 3 dc in the next space between 3-dc groups, ch 1. Rep from * 2 more times along the side. [(3 dc, ch 2, 3 dc) in the corner sp, ch 1, (3 dc in the next space between groups, ch 1) 3 times] 3 times. Join with a sl st to the top of the beginning ch-3. (60 dc: 15 dc and 4 ch-1 sps per side)*
Round 5 (cream): Sl st across to the corner sp. Work (ch 3, 2 dc, ch 2, 3 dc) in the corner sp, then ch 1. Work (3 dc, ch 1) in each ch-1 sp along the side. Rep this corner-and-side sequence around and join. (72 dc: 18 dc and 5 ch-1 sps per side)
Round 6 (cream): Work as for Round 5. (84 dc: 21 dc and 6 ch-1 sps per side)
Round 7 (cream, edge round): Ch 1. Work (sc, ch 2, sc) in each corner sp. Along each side, work 1 sc in each dc and 1 sc in each ch-1 sp. Join with a sl st to the first sc. (Each side: 1 + 21 + 6 + 1 = 29 sc between the corner ch-2 sps; 116 sc total plus 4 corner ch-2 sps) Fasten off and weave in all ends.
Count rule: “29 sc per side” includes the sc on each side of that corner’s ch-2 sp. Each of those sc belongs to only one side, so nothing is counted twice.
Make All Pieces
For one panel, make 48 squares. All the squares are identical. Per color, one panel needs:
- Orange: 48 Round 1s and 48 Round 3s
- Magenta: 48 Round 2s
- Cream: 48 sets of Rounds 4–7
For a pair, make 96 squares. Block all the squares to 6 in (15.2 cm) before you join them.
Layout grid (one panel, S = square):
Top (tabs)
S S S S   row 1
S S S S   row 2
S S S S   row 3
S S S S   row 4
S S S S   row 5
S S S S   row 6
S S S S   row 7
S S S S   row 8
S S S S   row 9
S S S S   row 10
S S S S   row 11
S S S S   row 12
Bottom
Joining
Method: Flat slip-stitch join through the back loops, in cream.
Put two squares side by side with their right sides facing up. Insert the hook through the back loop of one sc on the first square, then through the back loop of the matching sc on the second square, and work a sl st.
Stitch-to-stitch logic:
- Start with a sl st through both corner ch-2 sps.
- Join each of the 29 sc to its partner, 1-to-1.
- End with a sl st through the next pair of corner ch-2 sps.
The seam only connects existing stitches. It adds no new stitches to the edge, so the border counts below stay clean.
Order:
- Join 4 squares into a horizontal row. Make 12 rows.
- Join the rows together along their long edges. Each long seam crosses 4 x 29 = 116 sc. At each junction, sl st through all four meeting corner sps.
Tension: Your slip stitches should be as wide as an sc on the square. If the seams pucker, go up one hook size for joining only.
Size checkpoint: A joined row of 4 should measure 24 in (61.0 cm). The joined panel should measure 24 in x 72 in (61.0 cm x 182.9 cm).
Border
Work all border rounds in cream with right sides facing.
Border gauge: 4.8 sc per inch, the same as the square edges, so the border sits flat.
Starting counts:
- Short sides: 4 squares x 29 sc = 116 sc
- Long sides: 12 squares x 29 sc = 348 sc
At the seams, skip the joined corner sps and work only into the sc. At each of the 4 outer panel corners, work into that square’s ch-2 sp.
Border Round 1 (sc): Join in any outer corner sp. Work 3 sc in each outer corner sp and mark the middle sc as the corner stitch. Work 1 sc in each sc along every side. Join.
- Between corner stitches: short side 1 + 116 + 1 = 118 sc; long side 1 + 348 + 1 = 350 sc
- Total: 236 + 700 + 4 corner sts = 940 sts
Border Round 2 (hdc): Ch 1 (does not count as a stitch). Work 1 hdc in each st, and 3 hdc in each marked corner st. Move each marker up to the middle hdc. Join.
- Short sides 120, long sides 352
- Total: 240 + 704 + 4 = 948 sts
Border Round 3 (sc): Ch 1. Work 1 sc in each st, and 3 sc in each corner st. Join.
- Short sides 122, long sides 354
- Total: 244 + 708 + 4 = 956 sts
Fasten off.
Why the math works: Every side starts at exactly (number of squares) x 29. Each round adds only the 2 extra stitches at each corner. Because the border gauge matches the square edges, the 1 in (2.5 cm) border takes the panel from 24 in x 72 in (61.0 cm x 182.9 cm) to 26 in x 74 in (66.0 cm x 188.0 cm) without ruffling or cupping.
Tabs (Make 6)
The top edge has 124 sts from one corner stitch to the other: 122 side sts plus the 2 corner sts. The layout is 6 tabs of 9 sts with 5 gaps of 14 sts, and 6 x 9 + 5 x 14 = 124.
Tab rows:
- Row 1: With the right side facing, join cream in the top-right corner st. Ch 1, then work 1 sc in each of the next 9 sts. Turn. (9 sc)
- Rows 2–13: Ch 3 (counts as dc). Work 1 dc in each st across. Turn. (9 dc)
Fasten off, leaving a 12 in (30.5 cm) tail.
Placing the remaining tabs: Skip 14 sts after the first tab and work the next tab over the following 9 sts. Repeat until you have 6 tabs. The last tab should end in the top-left corner st.
Finishing the tabs: Each tab should measure about 6 in (15.2 cm) long. Fold each one to the back and whipstitch its last row along Border Round 1. This makes a 3 in (7.6 cm) loop that fits a rod up to 1.5 in (3.8 cm) in diameter.
Final Blocking
- Lay the panel flat on mats or a clean towel-covered floor, wrong side up.
- Pin it to 26 in x 74 in (66.0 cm x 188.0 cm), checking that the corners are square.
- Pin every seam line straight. A long ruler or tape line helps.
- Mist evenly until damp, but not soaked.
- Gently open each magenta cluster with your fingertips so the stars lie flat.
- Let the panel dry completely, which takes 12–24 hours.
- Unpin it, then press the tabs flat with a cool iron through a cloth if needed.
Final Quality-Control Checklist
- [ ] All 48 squares measure 6 in (15.2 cm) per side
- [ ] Each square has 29 sc per side on Round 7
- [ ] Every seam joins 29 sts to 29 sts, with no skipped loops
- [ ] The panel measures 24 in x 72 in (61.0 cm x 182.9 cm) before the border
- [ ] Border Round 3 has 122 sts on the short sides and 354 sts on the long sides between corners
- [ ] There are 6 tabs, each 9 sts wide and evenly spaced with 14 sts between
- [ ] All ends are woven in securely, especially at color changes
- [ ] The final size is 26 in x 74 in (66.0 cm x 188.0 cm)
Troubleshooting
- Square is ruffled at Round 3: Your 3-dc groups are too tight against the clusters. Work Round 3 a little looser, or check that you didn’t add chains.
- Square cups: Your ch-1 sps are too short. Loosen the chain a little.
- The Round 7 count isn’t 29: Recount Round 6. It should have 21 dc and 6 ch-1 sps per side.
- Seams pucker: Use a larger hook for joining only.
- Border ripples: Check for extra stitches at the seam junctions. Those corner sps should not be worked.
- Panel grows when hung: Re-block it, and next time use a cotton with less stretch.
- Tabs twist: Make sure every tab row has exactly 9 sts, then re-press the tabs.
Care
Hand wash in cool water with mild detergent, roll in a towel to remove water, and dry flat to the blocked size. Don’t hang the panel while it’s wet, because the weight will stretch it.
Final Notes
The whole curtain follows one measurement chain:
- One square is 6 in (15.2 cm) with 29 sc per side.
- 4 x 12 squares make 24 in x 72 in (61.0 cm x 182.9 cm).
- A 1 in (2.5 cm) border brings the panel to 26 in x 74 in (66.0 cm x 188.0 cm).
- Six 3 in (7.6 cm) tabs hang it from the rod.
If your first square measures right, every later step will too. Make a second panel to match the pair in the photo.
Happy crocheting!