

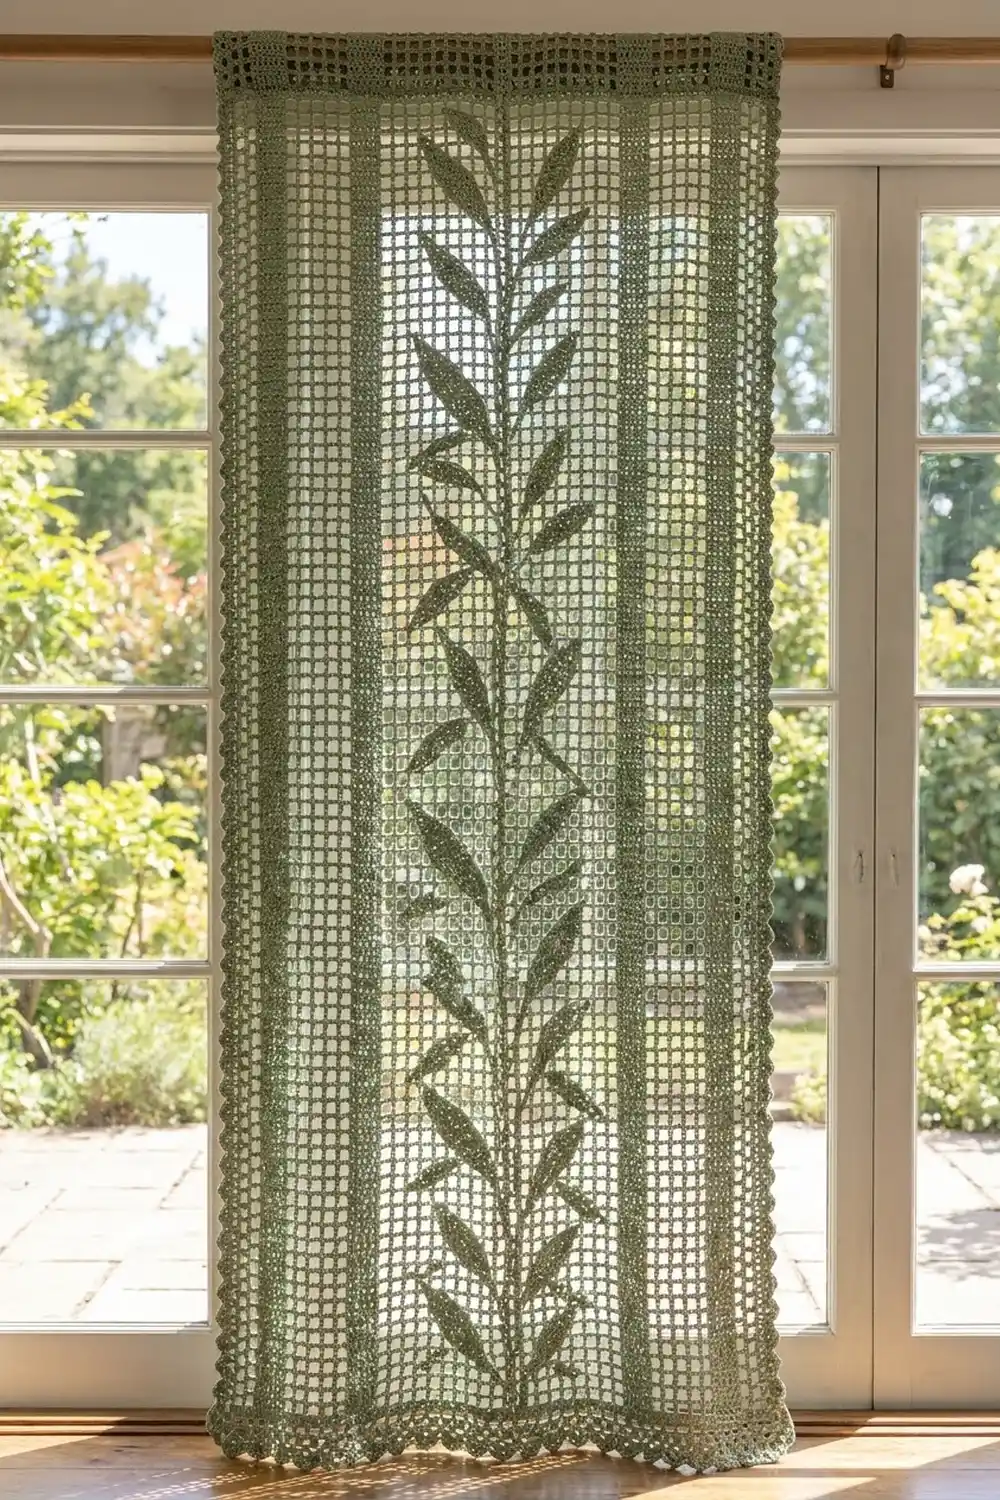
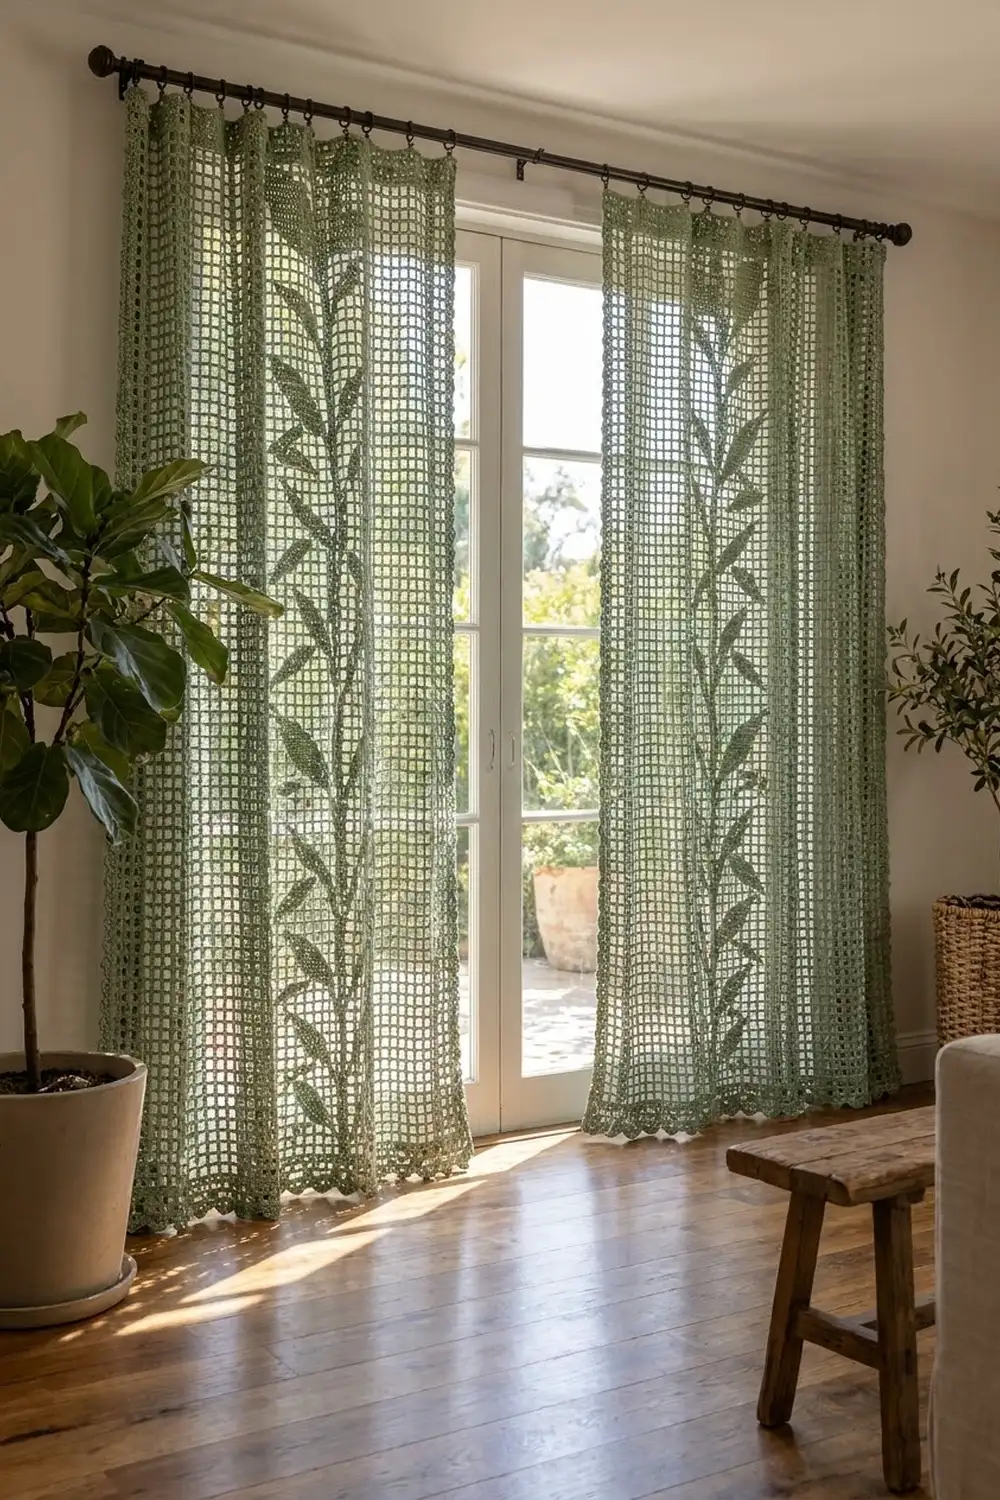
This curtain panel is worked in an airy filet mesh in soft sage green. A slim stem climbs the center of the panel, with pointed leaves branching off it, first to one side and then the other. Light shows through the open squares, and the solid leaves read clearly as a silhouette, both from inside the room and from the garden.
The panel uses one color of DK-weight cotton. The style is quiet and botanical, so it suits farmhouse, cottage, and modern rooms. The pattern uses US crochet terms throughout.
One finished panel measures 30.2 in (76.7 cm) wide and 78.2 in (198.6 cm) long as it hangs. The photo shows two identical panels hung as a pair. Make one panel, then repeat the full pattern for the second.
You work the panel flat from the hem up, in rows of filet mesh. Next comes a solid band that becomes the rod pocket. A two-round border then frames the panel and adds scallops along the hem. Finally, you fold the top band down to make the pocket and stitch it in place.
Finished Size and Construction
- Finished size (one panel, hanging): 30.2 in x 78.2 in (76.7 cm x 198.6 cm)
- Skill level: Intermediate (simple stitches, long chart-reading project)
- Terminology: US crochet terms
- Yarn weight: DK / light (3), cotton
- Hook: 4.0 mm (G-6)
- Number of pieces: 1 per panel (2 panels for the pair shown, not joined)
- Layout: 49 mesh squares wide x 133 rows tall
- Panel size before border: 29.4 in x 79.8 in (74.7 cm x 202.7 cm)
- Border depth: 0.4 in (1.0 cm) on the sides and top; 0.8 in (2.0 cm) at the scalloped hem
- Rod pocket: 2.4 in (6.1 cm) deep, fits a rod up to 1.25 in (3.2 cm) in diameter
Materials
Use a smooth, mercerized or combed cotton in DK weight. Cotton drapes straight, blocks crisply, and holds the square mesh shape better than acrylic. Choose a light-to-mid sage green so the leaves still read against the window light.
- Sage green DK cotton: 450 g / 1,035 m per panel (about nine 50 g / 115 m balls); 900 g / 2,070 m for the pair
- 4.0 mm (G-6) crochet hook
- Tapestry needle
- Stitch markers (at least 4)
- Measuring tape
- Rust-proof pins, blocking mats or a clean bed sheet, and a spray bottle
These yarn quantities include a margin of about 15% for your gauge swatch and small tension differences. Buy all the yarn for both panels from one dye lot.
Abbreviations (US Terms)
- ch – chain
- sl st – slip stitch
- sc – single crochet
- dc – double crochet
- sk – skip
- sp – space
- st(s) – stitch(es)
- RS / WS – right side / wrong side
Special stitches:
- Open mesh (o): ch 2, sk 2 sts (or the ch-2 sp), dc in the next dc. One mesh square is 3 sts wide.
- Block (b): Over an open mesh, work 2 dc in the ch-2 sp, then dc in the next dc. Over a block, dc in each of the next 3 dc.
- Mesh numbering: Number the squares 1 to 49 from right to left as you look at the RS. On RS (odd) rows, you work from square 1 to square 49. On WS (even) rows, you work from square 49 back to square 1.
Each row starts with ch 3, which counts as the first dc. Every row has 148 sts: 50 dc posts plus 49 two-stitch fillings.
Gauge and Checkpoints
Gauge: 5 mesh squares = 3 in (7.6 cm) wide, and 5 rows = 3 in (7.6 cm) tall. Each square is 0.6 in (1.5 cm) on each side. Solid rows have about 5 sts per inch (2.5 cm).
Test swatch: Ch 35. Dc in the 8th ch from the hook, then ch 2, sk 2 ch, dc in next ch; repeat from * 8 more times, for 10 open mesh squares. Work 9 more rows of open mesh. Lay the swatch flat, mist it, and let it dry. It should measure 6.0 in x 6.0 in (15.2 cm x 15.2 cm).
Checkpoints:
- After Row 3: 29.4 in (74.7 cm) wide, 1.8 in (4.6 cm) tall
- After Row 23 (first leaf repeat): 13.8 in (35.1 cm) tall
- After Row 123: 73.8 in (187.5 cm) tall
- After Row 133: 79.8 in (202.7 cm) tall
If your swatch is too big, go down 0.5 mm in hook size. If it is too small, go up 0.5 mm. Square mesh matters more than exact width. If your squares come out taller than they are wide, work the ch-2 a little looser or try a hook one size smaller for the dc only.
Panel Body
Foundation: Ch 152.
Row 1 (RS): Dc in 8th ch from hook (counts as first dc, ch 2, and dc). Ch 2, sk 2 ch, dc in next ch; repeat from * 47 more times. Turn. (49 open mesh, 148 sts)*
Row 2 (WS, solid): Ch 3, 2 dc in next ch-2 sp, dc in next dc; repeat from * across, with the last dc in the 3rd ch of the turning ch. Turn. (49 blocks, 148 dc)*
Row 3: Ch 3, b over square 1, o over squares 2–48, b over square 49. Turn. (2 blocks, 47 open mesh, 148 sts)
When you work open mesh over a solid row, ch 2, sk 2 dc, and dc in the next dc.
Leaf Vine Repeat (Rows 4–123)
The vine repeats every 20 rows, or 12.0 in (30.5 cm). Work Repeat Rows 1–20 six times in total, for panel Rows 4–123. Repeat Row 1 is panel Row 4 (a WS row), so remember to read the squares from 49 down to 1 on that row.
Squares 1, 25, and 49 are blocks in every repeat row. Square 25 forms the stem, and squares 1 and 49 form the side edges. The table lists the extra leaf blocks for each row. Every other square is open mesh.
| Repeat Row | Extra leaf blocks | Total blocks | Open mesh |
|---|---|---|---|
| 1 | 24 | 4 | 45 |
| 2 | 22–24 | 6 | 43 |
| 3 | 20–23 | 7 | 42 |
| 4 | 19–23 | 8 | 41 |
| 5 | 18–22 | 8 | 41 |
| 6 | 17–21 | 8 | 41 |
| 7 | 16–20 | 8 | 41 |
| 8 | 16–19 | 7 | 42 |
| 9 | 15–17 | 6 | 43 |
| 10 | 15 | 4 | 45 |
| 11 | 26 | 4 | 45 |
| 12 | 26–28 | 6 | 43 |
| 13 | 27–30 | 7 | 42 |
| 14 | 27–31 | 8 | 41 |
| 15 | 28–32 | 8 | 41 |
| 16 | 29–33 | 8 | 41 |
| 17 | 30–34 | 8 | 41 |
| 18 | 31–34 | 7 | 42 |
| 19 | 33–35 | 6 | 43 |
| 20 | 35 | 4 | 45 |
Every row still has 148 sts. Repeat Rows 1–10 make a leaf that grows up and out to the left of the stem. Repeat Rows 11–20 make its mirror image to the right. Each leaf ends 10 squares, or 6.0 in (15.2 cm), from the stem, with a single-block point.
Place a marker at the end of each completed repeat so you can count them easily.
Top Band and Rod Pocket (Rows 124–133)
Row 124: Ch 3, b over square 49, o over squares 48–2, b over square 1. Turn. (2 blocks, 47 open mesh, 148 sts)
Rows 125–133: Ch 3, dc in each st across. Turn. (148 dc each row)
Rows 126–133 form the rod pocket: 8 rows, or 4.8 in (12.2 cm). Fasten off after Row 133.
Border
Border gauge: 5 sc = 1 in (2.5 cm). Along the top and bottom, you work 3 sc per mesh square (0.6 in). Along the sides, you work 3 sc per row end (0.6 in). Both give 5 sc per inch, so the edges stay flat on all four sides.
Round 1 (RS): With the RS facing, join the yarn in the first st of Row 133 at the top right corner. Ch 1. Sc in each st across the top. (148 sc) Ch 2 for the corner. Work 3 sc in each row end down the side. (133 rows x 3 = 399 sc) Ch 2 for the corner. Along the foundation chain, sc in the base of the first dc, then 2 sc in the next ch-2 sp, sc in the base of the next dc; repeat across. (1 + 49 x 3 = 148 sc) Ch 2 for the corner. Work 3 sc in each row end up the second side. (399 sc) Ch 2, and join with a sl st to the first sc.
Round 1 total: 1,094 sc plus 4 corner ch-2 sps. The corner chains are not stitches.
Round 2: Ch 1.
- Top: Sc in the same st as the join and in each sc across the top (148 sc). Work (sc, ch 2, sc) in the corner sp. (148 sc + 2 corner sc = 150 sc) The second corner sc for the top edge is made at the end of the round.
- Sides: Sc in each of the 399 sc, then work (sc, ch 2, sc) in the corner sp. (399 sc + 2 corner sc = 401 sc)
- Bottom (scallops): Sc in the first 2 sc. Sk 1 sc, 3 dc in each of the next 2 sc, sk 1 sc, sc in next sc; repeat from * 27 more times. Sk 1 sc, 3 dc in each of the next 2 sc, sk 1 sc, sc in the last 2 sc. Work (sc, ch 2, sc) in the corner sp. (29 scallops of 6 dc each; 148 sts used, plus 2 corner sc)
- Second side: Sc in each of the 399 sc, then work (sc, ch 2, sc) in the last corner sp. Join with a sl st to the first sc of the round. (401 sc)
Fasten off and weave in the ends.
Why the math works: On the bottom edge, the round uses 2 sc + 28 repeats of 5 sts (140) + 1 final scallop of 4 sts + 2 sc. That totals 148 sts, exactly the Round 1 count, so the scallops are centered with 2 plain sc at each end. Each scallop spans about 1 in (2.5 cm). Every per-side count in Round 2 already includes that side’s 2 corner sc, one from each corner group.
Rod Pocket Assembly
With the WS facing, fold the panel along the line between Rows 129 and 130. Rows 130–133 and the top border, 2.8 in (7.1 cm) in total, now lie flat behind Rows 126–129. Whipstitch the border edge to the WS along Row 125, one stitch at a time and keeping the stitches loose. Leave both short ends of the pocket open for the rod.
Final Blocking
- Weave in all the yarn tails along the solid side columns, where they will stay hidden.
- Soak the panel in cool water for 15 minutes, then press out the water. Do not wring.
- Roll the panel in towels to remove extra moisture.
- Lay it flat on mats or a sheet, RS up.
- Pin the side edges straight to 30.2 in (76.7 cm) apart.
- Smooth the panel lengthwise to 78.2 in (198.6 cm), from the fold to the scallop tips.
- Line up the stem so it runs straight up the center. Check it with the measuring tape at several points.
- Pin each scallop out into a rounded fan.
- Let the panel dry completely before you unpin it.
Final Quality-Control Checklist
- Every row has 148 sts and 49 squares.
- The center of the stem (square 25) sits 14.7 in (37.3 cm) from each body edge.
- There are 6 full leaf repeats, and the leaves alternate left and right.
- The edge columns are solid all the way up.
- The hem has 29 evenly spaced scallops.
- Both panels match in length to within 0.5 in (1.3 cm).
- The rod pocket is open at both ends and slides easily over the rod.
Troubleshooting
- Squares are rectangles, not squares: Adjust the ch-2 tension, or change the hook size and re-swatch.
- Leaves slant the wrong way: You read a WS row from the wrong end. On even rows, count from square 49.
- The panel narrows or widens: Count the squares every 10 rows. A skipped or extra mesh is the usual cause.
- Side edges ruffle: Your sc are too loose. Work Round 1 with a hook one size smaller, and keep the same stitch counts.
- Side edges pull in: Your sc are too tight. Go up one hook size for the border only.
- Panel grows longer while it hangs: This is normal for cotton. Block it again, and hem it up by 1 row if needed.
Care
Hand wash in cool water with a mild detergent and dry flat. Avoid hanging the panel wet, because the weight of the water will stretch the mesh.
Final Notes
The measurement chain is simple. Each square is 0.6 in (1.5 cm). So 49 squares make 29.4 in (74.7 cm) of width, and 133 rows make 79.8 in (202.7 cm) of length. The border brings the panel to 30.2 in (76.7 cm) wide, and the rod pocket fold gives a finished hanging length of 78.2 in (198.6 cm). Check your gauge early, count every tenth row, and make your second panel to the same numbers for a matched pair.
Happy crocheting!