

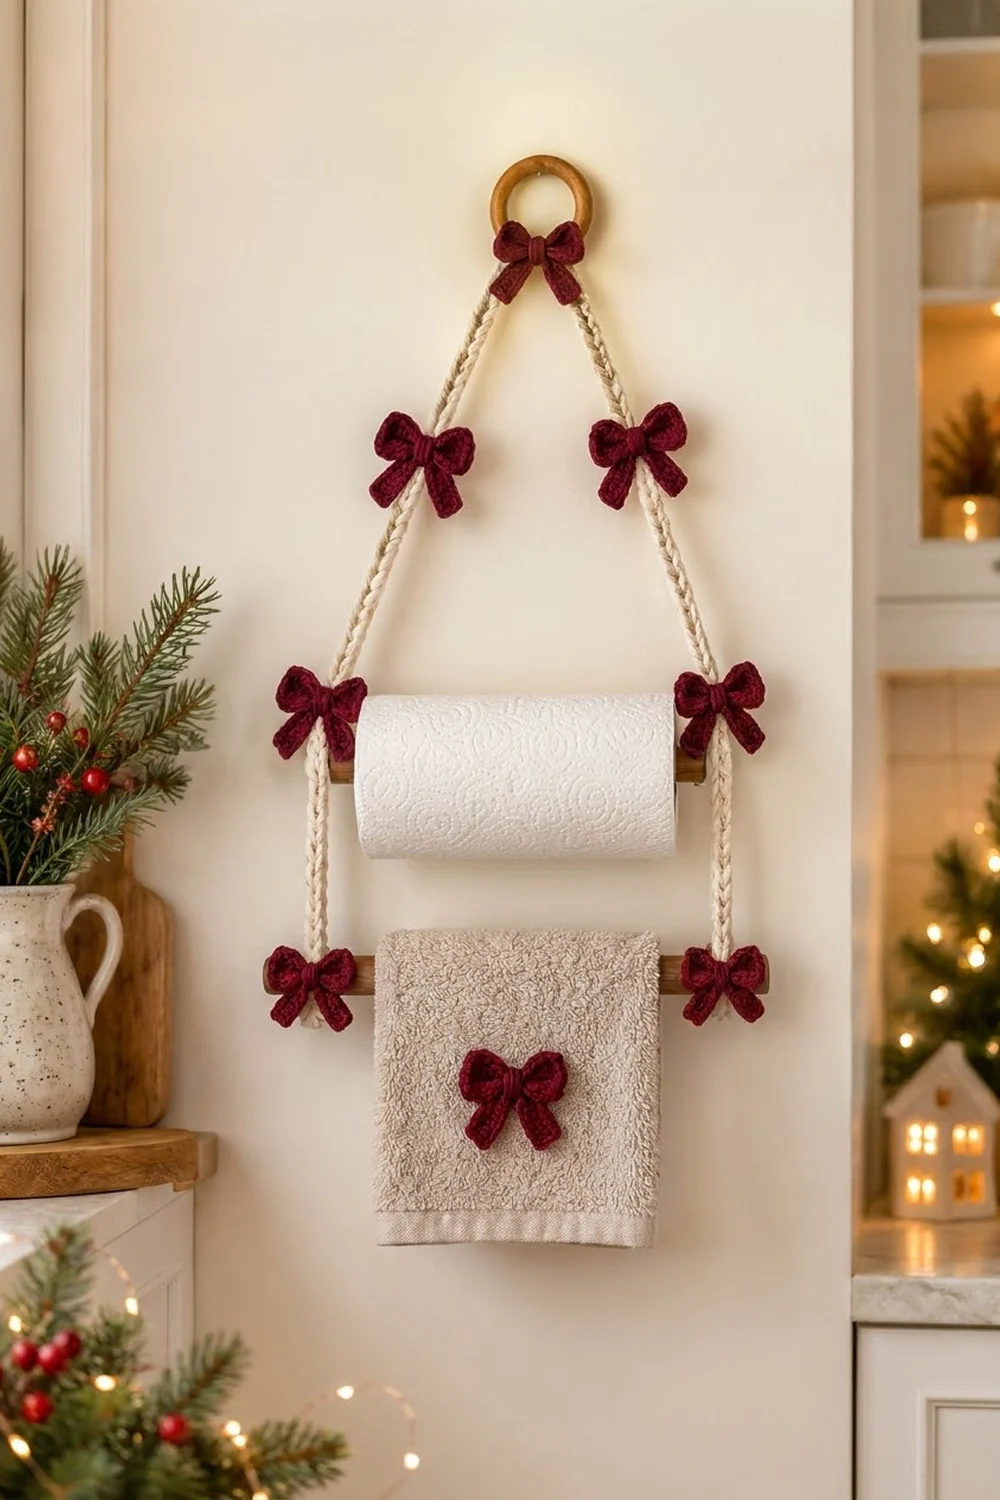
This hanger gives a kitchen or powder room a festive touch. A soft cream cord hangs from a wooden ring, holds a paper-towel roll on one dowel and a hand towel on a second dowel, and has small burgundy bows at every turn. An eighth bow goes on the hand towel so the whole set matches.
The palette is just cream and deep cranberry burgundy, with natural wood. The bows are worked in tight single crochet, so they hold their shape. The cord is a slip stitch cord that looks like a small braid.
This pattern uses US crochet terms. The finished hanger is about 13 in (33.0 cm) wide and 20 in (50.8 cm) tall from the top of the ring to the lower dowel. Each bow is about 3 in × 3 in (7.6 cm × 7.6 cm).
To make it, you crochet one long cord and eight bows, then assemble everything with simple knots and a few sewn stitches. The ring and dowels are bought, not crocheted.
Finished Size and Construction
- Finished size: about 13 in (33.0 cm) wide × 20 in (50.8 cm) tall
- Skill level: Easy
- Terminology: US crochet terms
- Yarn weight: Worsted (#4), cotton or cotton blend
- Hook: 4.0 mm (G-6)
- Number of pieces: 1 cord + 8 bows (each bow has 2 parts: a loop piece and a tail strip)
- Layout: a triangle from the ring to the upper dowel, then two straight drops to the lower dowel
- Piece size (bow): about 3 in × 3 in (7.6 cm × 7.6 cm)
- Loop piece before border: 2.5 in × 2 in (6.4 cm × 5.1 cm)
- Border depth: 0.25 in (0.6 cm) on each side
Materials
Yarn: Use a smooth worsted-weight cotton. It gives clear stitches, holds the bow shape, and survives a kitchen. Acrylic also works, but it is a little softer.
- Cream (MC, cord): 20 g, about 38 m
- Burgundy (CC, bows): 30 g, about 57 m
These quantities include a margin of about 15%, so you can make a gauge swatch and have spare tails for sewing.
Tools and hardware:
- 4.0 mm (G-6) crochet hook
- Tapestry needle
- Scissors and stitch markers
- 1 wooden ring, 2 in (5.1 cm) across
- 2 wooden dowels, each 13 in (33.0 cm) long and 0.75 in (1.9 cm) thick
- Rust-proof pins and a blocking mat
- 1 hand towel
- Optional: a dot of clear fabric glue for the knots
Abbreviations (US Terms)
- ch – chain
- sc – single crochet
- sl st – slip stitch
- st(s) – stitch(es)
- RS – right side
Special stitch: Slip stitch cord (sl st cord). Make a chain. Turn the chain so the back bumps face you. Work 1 sl st into the back bump of each chain. This gives a firm cord about 0.25 in (0.6 cm) thick, with a braided ridge along one face.
Gauge and Checkpoints
Fabric gauge: 16 sc × 16 rows = 4 in (10.2 cm), which is 4 sts and 4 rows per inch.
Cord gauge: 5 sl st cord sts = 1 in (2.5 cm).
Make one bow loop piece before anything else. It is your gauge swatch.
- After Row 1: 10 sc should measure 2.5 in (6.4 cm).
- After Row 8: the piece should measure 2.5 in × 2 in (6.4 cm × 5.1 cm).
- After the border: it should measure 3 in × 2.5 in (7.6 cm × 6.4 cm).
If it is too big: go down to a 3.75 mm hook. If it is too small: go up to a 4.5 mm hook. Don’t add or remove stitches. The border math depends on 10 sts and 8 rows.
For the cord: after the first 50 sts, the cord should measure 10 in (25.4 cm). If it is shorter, keep going until the cord reaches the length in the pattern rather than counting stitches.
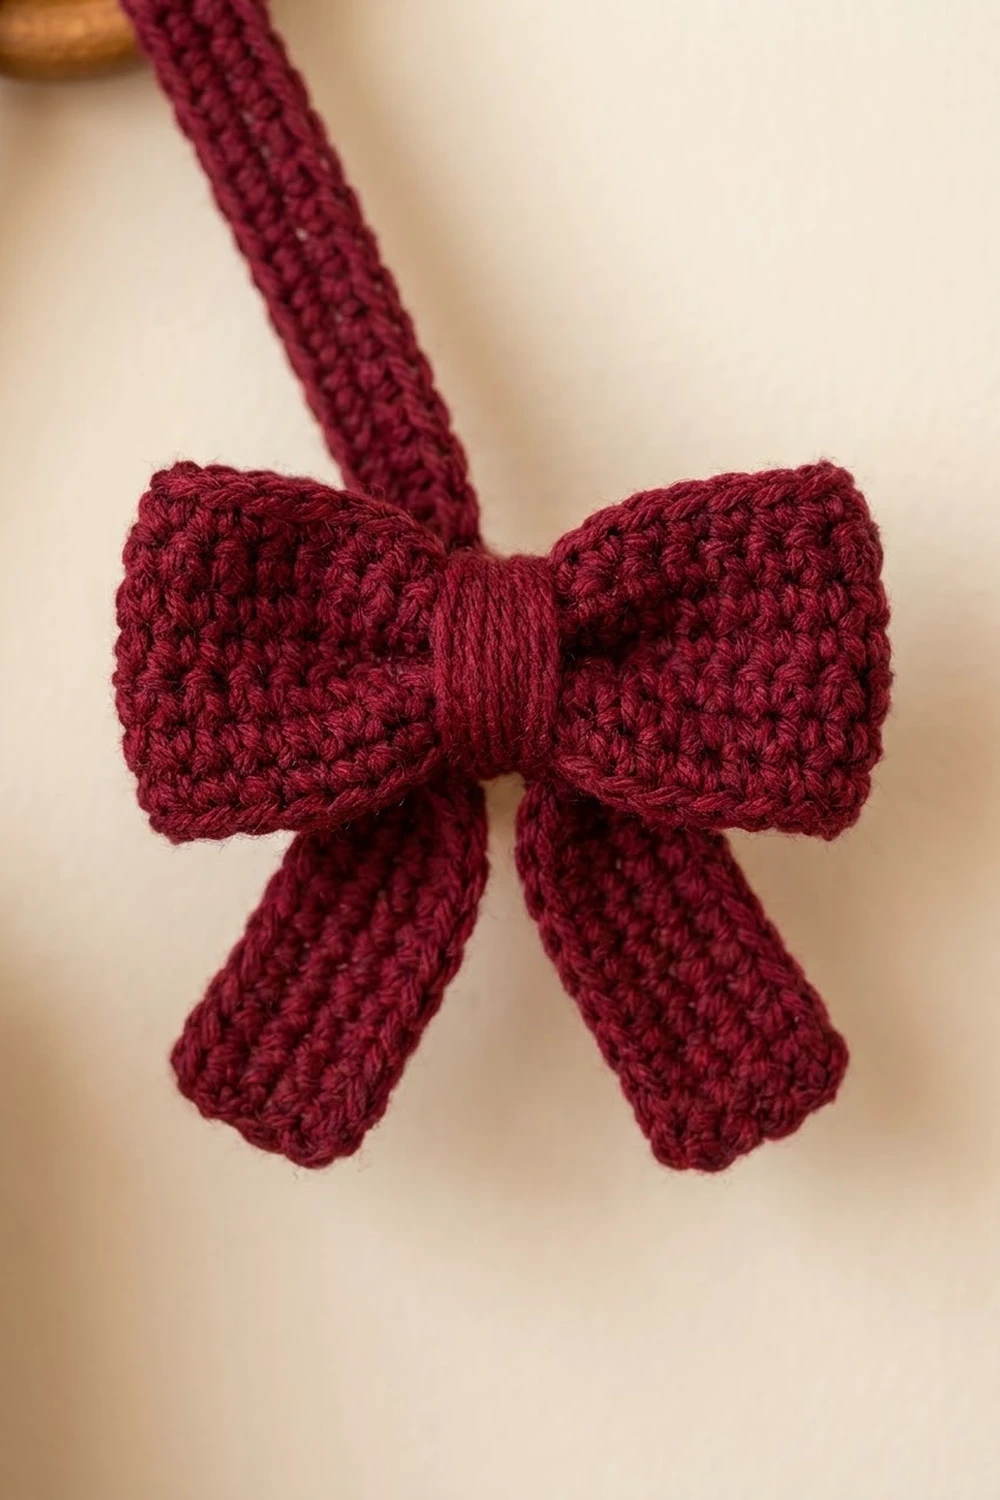
Pattern: Bow Loop Piece (make 8)
Use CC (burgundy).
Row 1 (RS): Ch 11, sc in 2nd ch from hook and in each ch across. (10 sc)
Rows 2–8: Ch 1, turn, sc in each st across. (10 sc per row)
Checkpoint: 2.5 in × 2 in (6.4 cm × 5.1 cm). Don’t fasten off. Go straight to the border below.
Pattern: Bow Tail Strip (make 8)
Use CC.
Row 1: Ch 5, sc in 2nd ch from hook and in each ch across. (4 sc)
Rows 2–14: Ch 1, turn, sc in each st across. (4 sc per row)
Fasten off and leave a 12 in (30.5 cm) tail. Checkpoint: 1 in × 3.5 in (2.5 cm × 8.9 cm). The tail strip has no border. Its straight single crochet edges are neat enough at this size.
Border (Bow Loop Piece Edging)
Border gauge: this is the same as the fabric gauge, 4 sc per inch. Work 1 sc per row end along the short sides.
Border round: Ch 1, turn.
- Top edge: work 3 sc in the first st. This is the corner. Sc in each of the next 8 sts, then 3 sc in the last st (corner). (14 sc)
- First short side: work 1 sc in each row end. (8 sc)
- Bottom edge: work into the free loops of the foundation chain. Work 3 sc in the first loop (corner), sc in the next 8 loops, then 3 sc in the last loop (corner). (14 sc)
- Second short side: work 1 sc in each row end. (8 sc)
Sl st to the first sc. Total: 44 sc, made up of 36 sc worked 1 per existing st or row end, plus 8 extra sc (2 extra at each of the 4 corners).
In this pattern, each long side’s count of 14 includes both of its 3-sc corner groups. The corner groups are not counted again on the short sides.
Fasten off and leave a 24 in (61.0 cm) tail for wrapping the center.
Why the math works: at this gauge, one sc row is as tall as one sc is wide (4 per inch), so 1 sc per row end keeps the short sides flat. The 3-sc corners turn 90° without cupping. The border adds 0.25 in (0.6 cm) on every side, so 2.5 in × 2 in becomes 3 in × 2.5 in (7.6 cm × 6.4 cm).
Assemble the Bows
- Lay the loop piece RS up.
- Fold the tail strip in half at Row 7. Place the fold behind the center of the loop piece, with the fold at the top. Spread the two halves into an inverted V, each about 30° from vertical. Each tail is 1.75 in (4.4 cm) long and reaches about 0.5 in (1.3 cm) below the loop piece.
- Pinch the loop piece at its center, between sts 5 and 6, until the middle is about 0.5 in (1.3 cm) tall.
- Use the 24 in (61.0 cm) border tail to wrap the pinched center 8 times, tightly, catching the tail strip with each wrap.
- Thread the tail onto the needle and pass it under the wraps at the back twice to lock it. Leave the remaining tail for attaching the bow.
- Weave the tail-strip yarn end into the back of the wrap.
Each finished bow is about 3 in × 3 in (7.6 cm × 7.6 cm).
Pattern: Hanger Cord (make 1)
Use MC (cream).
Foundation: Ch 321.
Cord row: Sl st in the back bump of the 2nd ch from hook and in each back bump across. (320 sl st)
Fasten off and leave 6 in (15.2 cm) tails at both ends.
Checkpoint: 64 in (162.6 cm) long. Lay the cord flat without stretching it to measure. If it is short, chain more at the end and slip stitch back along the new chains.
Make All Pieces
- Cream: 1 cord, 64 in (162.6 cm), 320 sts
- Burgundy: 8 loop pieces (44 border sts each) and 8 tail strips (4 sc × 14 rows each), assembled into 8 bows
Layout (bows marked B):
              [B]
             (ring)
            /      \
         [B]        [B]
          /          \
  [B]=====UPPER DOWEL=====[B]
   |    (paper towel)     |
   |                      |
  [B]=====LOWER DOWEL=====[B]
         (towel + [B])
That is 7 bows on the hanger and 1 on the towel.
Joining
Method: knots for the cord, then sewn stitches for the bows.
- Ring: fold the cord in half and mark the center (st 160/161). Attach it to the ring with a lark’s head knot. Each leg is now about 32 in (81.3 cm) long, and about 1 in (2.5 cm) of each leg wraps the ring.
- Upper dowel: measure 12 in (30.5 cm) down each leg from the ring. Tie that point around the upper dowel with a clove hitch, 0.5 in (1.3 cm) in from the dowel end. The clove hitch uses about 5 in (12.7 cm) of cord. The two knots end up 12 in (30.5 cm) apart, so the triangle drops about 10.4 in (26.4 cm) from ring to dowel.
- Lower dowel: measure 7 in (17.8 cm) straight down from each upper knot. Tie a clove hitch on the lower dowel, again 0.5 in (1.3 cm) from the end.
- Ends: you should have about 2 in (5.1 cm) of cord left on each leg. Fold it up behind the knot and sew it to the cord with the 6 in (15.2 cm) yarn tail, matching the back bumps stitch for stitch for 4 sts.
- Bows: use each bow’s tail to make 4 small stitches through the back of the center wrap and into the cord’s back bumps (1 bump per stitch). Sew one bow over the ring knot, one on each leg 6 in (15.2 cm) below the ring, and one over each of the 4 dowel knots.
- Towel bow: sew it to the towel, centered, 3 in (7.6 cm) above the hem.
Tension advice: the cord should hang straight but not be tight. If you pull the knots hard, the cord stretches and the dowels tilt. Snug each sewn stitch, but don’t let it dimple the bow.
Size checkpoint: the hanger should measure about 13 in (33.0 cm) across at the dowels and about 20 in (50.8 cm) from the top of the ring to the lower dowel. Both dowels should hang level. Slide a clove hitch to adjust if needed.
Final Blocking
- Before assembly, pin each loop piece to 3 in × 2.5 in (7.6 cm × 6.4 cm) on a mat.
- Pin each tail strip to 1 in × 3.5 in (2.5 cm × 8.9 cm).
- Steam lightly from about 1 in (2.5 cm) above the pieces. Don’t press with the iron.
- Let them dry completely, then assemble the bows.
- After the bows are assembled, spread the tails into the V with your fingers and steam once more.
- Hang the finished hanger from its ring with both dowels in place for 24 hours so the cord relaxes and straightens.
Final Quality-Control Checklist
- Each loop piece border has 44 sc (14 + 8 + 14 + 8)
- Each loop piece measures 3 in × 2.5 in (7.6 cm × 6.4 cm)
- Each tail strip has 14 rows and measures 3.5 in (8.9 cm)
- All 8 center wraps are tight and locked at the back
- The cord was 64 in (162.6 cm) before knotting
- The diagonal legs are each 12 in (30.5 cm) and the vertical legs are each 7 in (17.8 cm)
- Both dowels hang level
- All yarn ends are woven in
- The bows face forward
Troubleshooting
- Loop piece is wavy: your border is too loose or has too many sts. Count 14/8/14/8 and drop to a smaller hook for the border.
- Corners curl: you worked 2 sc instead of 3 in a corner.
- Bow looks flat: pinch the center tighter and add 2 more wraps.
- Tails splay unevenly: take out the wrap, re-center the fold, and wrap again.
- Cord twists: steam it, then hang it with the dowels in place.
- Dowels tilt: slide one clove hitch until both legs measure the same.
- Cord is too short: add chains at one end and slip stitch back along them.
Care
Spot clean, or hand wash the bows and cord in cool water and lay them flat to dry. Take the hardware off before washing, and wash the towel separately.
Final Notes
Here is the measurement chain:
- A 2.5 in × 2 in (6.4 cm × 5.1 cm) loop piece borders to 3 in × 2.5 in (7.6 cm × 6.4 cm).
- With the 3.5 in (8.9 cm) tail strip, that makes a 3 in × 3 in (7.6 cm × 7.6 cm) bow.
- A 64 in (162.6 cm) cord gives 12 in (30.5 cm) diagonal legs and 7 in (17.8 cm) drops.
- The finished hanger is 13 in × 20 in (33.0 cm × 50.8 cm).
Check your gauge at the first loop piece and the rest of the measurements will follow.
Happy crocheting!