

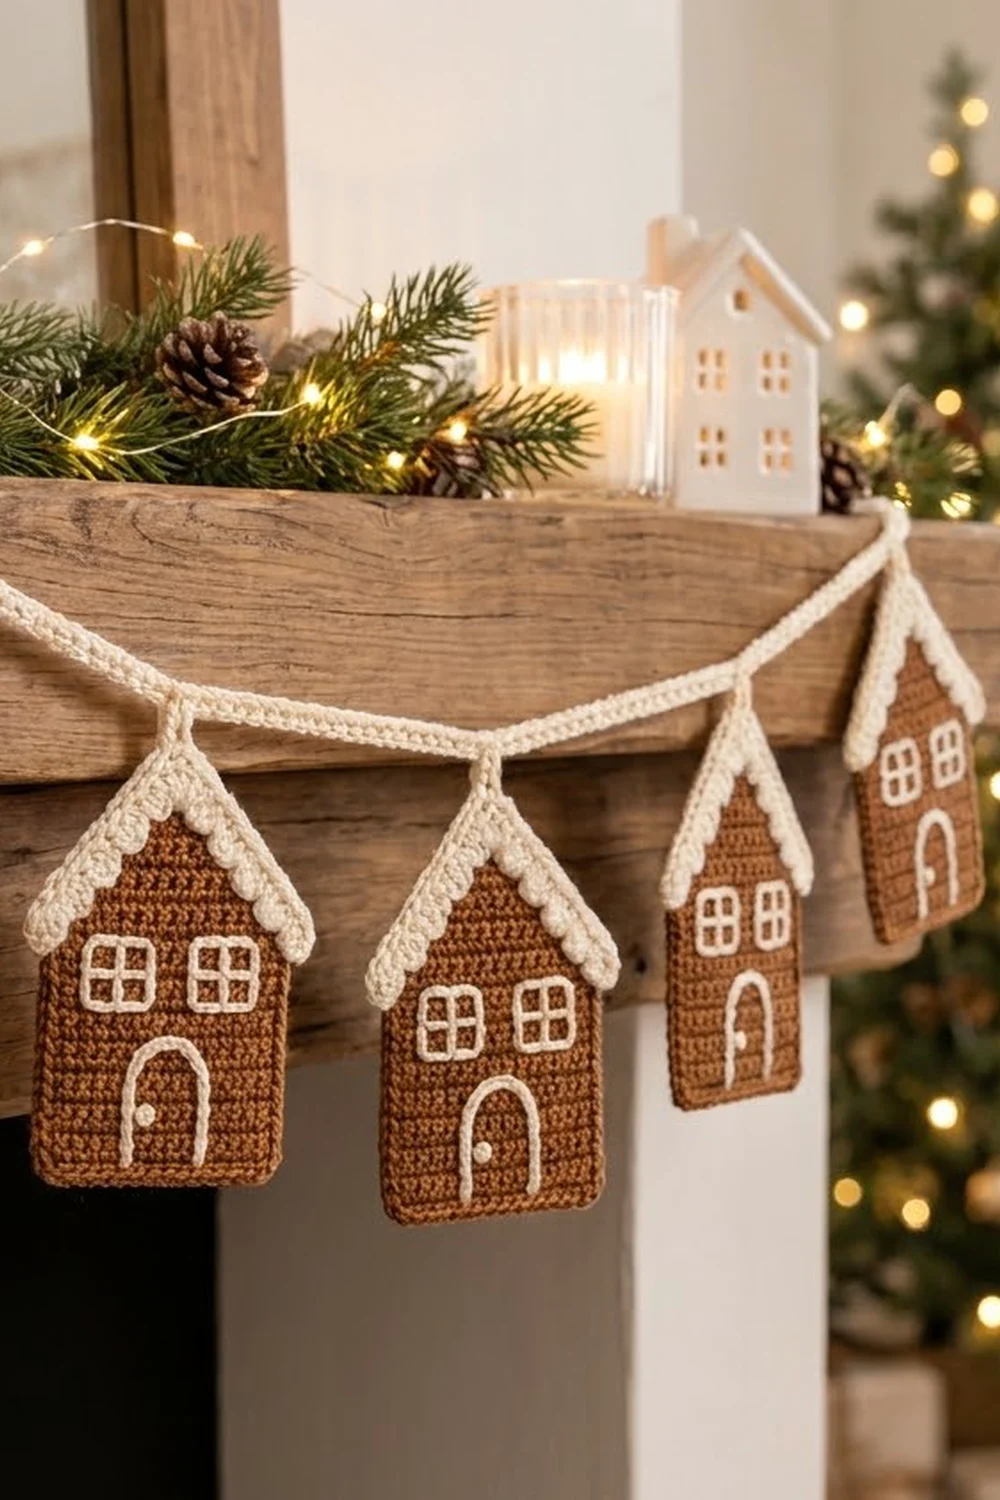
This garland strings five little gingerbread houses along a cream chain cord. Each house is a flat, sturdy single crochet piece in cinnamon brown, finished with a scalloped cream “icing” roof, two four-pane windows, and an arched door with a tiny doorknob.
The palette is just two colors: warm brown for the gingerbread and cream for the icing, embroidery, and cord. The style is cozy and clean, made for mantels, shelves, and doorways during the holidays.
The pattern uses US crochet terms. Each finished house measures about 3.4 in wide x 4.5 in tall (8.6 x 11.4 cm) including the icing. The full garland is 40 in (101.6 cm) long, with the houses filling the center 19.4 in (49.3 cm).
Construction is simple. You work each house bottom-up in rows of single crochet, decrease to a point for the roof, and edge it with one round of brown sc. You embroider the windows and door, chain the cord with built-in hanger drops, and finish each roof with a cream scallop trim.
Finished Size and Construction
- Finished garland: 40 in (101.6 cm) long; houses span 19.4 in (49.3 cm)
- Skill level: Easy / advanced beginner
- Terminology: US crochet terms
- Yarn weight: DK (light worsted, #3)
- Hooks: 3.5 mm (E/4) for houses; 4.5 mm (7) for the cord
- Number of pieces: 5 identical houses + 1 cord
- Layout: 5 houses in a single row, hung from the cord
- Piece size (bordered house, before icing): 3.4 in wide x 4.2 in tall (8.6 x 10.7 cm)
- Size before border: 3.0 in wide x 3.8 in tall (7.6 x 9.7 cm)
- Border depth: brown edging about 0.2 in (0.5 cm) per side; cream icing about 0.4 in (1.0 cm) deep, adding 0.3 in (0.8 cm) at the peak
Materials
Choose a smooth DK yarn with good stitch definition. A cotton or cotton-acrylic blend works best: it holds the pointed roof shape and shows the embroidery crisply. Avoid fuzzy or highly textured yarn.
- Brown (cinnamon / gingerbread): 40 g, about 95 m (104 yd)
- Cream (icing): 20 g, about 48 m (52 yd)
Quantities include a comfortable margin for gauge swatching and weaving in ends.
Tools:
– 3.5 mm (E/4) crochet hook
– 4.5 mm (7) crochet hook
– Tapestry needle (blunt tip)
– Scissors
– Stitch marker
– Ruler or tape measure
– Blocking mat and rust-proof pins
– Spray bottle with water
Abbreviations (US Terms)
- ch – chain
- sl st – slip stitch
- sc – single crochet
- dc – double crochet
- sc2tog – single crochet 2 together
- sc3tog – single crochet 3 together
- st(s) – stitch(es)
- RS / WS – right side / wrong side
Special stitches:
- sc2tog: (Insert hook in next st, yarn over, pull up a loop) twice, yarn over, pull through all 3 loops.
- sc3tog: (Insert hook in next st, yarn over, pull up a loop) 3 times, yarn over, pull through all 4 loops.
- Icing scallop: 3 dc in the same stitch.
Gauge and Checkpoints
Gauge: 20 sc and 22 rows = 4 in (10.2 cm) with a 3.5 mm hook.
Make one complete house before starting the others. It is your real gauge swatch, and every later measurement depends on it.
Checkpoints:
– After Row 14 (body): 3.0 in wide x 2.5 in tall (7.6 x 6.4 cm)
– After Row 21 (roof point): 3.8 in (9.7 cm) tall at the peak
– After the brown edging: 3.4 x 4.2 in (8.6 x 10.7 cm)
– After the icing: 4.5 in (11.4 cm) tall at the peak
If your house is too big, go down to a 3.25 mm hook. If it’s too small, go up to a 3.75 mm hook. A difference of 0.2 in (0.5 cm) or more in width is worth fixing. Check that your rows lie flat before you adjust; tight tension can make a piece look narrow when it’s really just puckered.
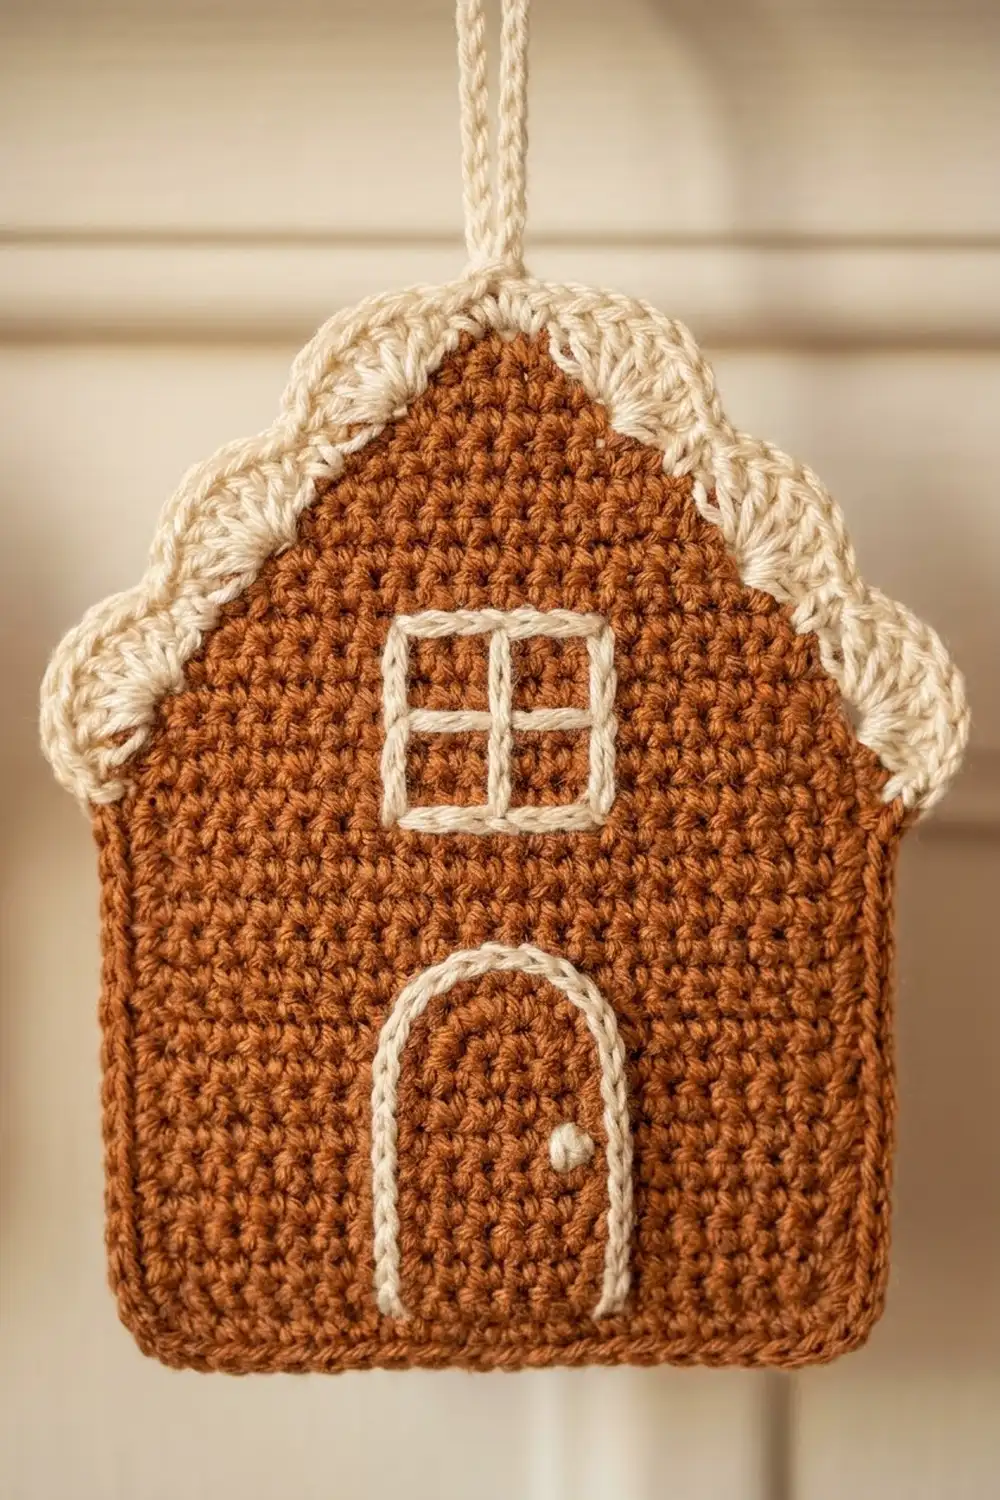
House (Make 5)
Use brown and the 3.5 mm hook. The house is worked in rows. Ch 1 at the start of each row does not count as a stitch.
Body
Foundation: Ch 16.
Row 1 (RS): Sc in 2nd ch from hook and in each ch across, turn. (15 sts)
Rows 2–14: Ch 1, sc in each st across, turn. (15 sts)
Checkpoint: 3.0 in wide x 2.5 in tall (7.6 x 6.4 cm).
Roof
Each roof row decreases 1 st at each end, so the gable rises evenly on both sides.
Row 15: Ch 1, sc2tog, sc in next 11 sts, sc2tog, turn. (13 sts)
Row 16: Ch 1, sc2tog, sc in next 9 sts, sc2tog, turn. (11 sts)
Row 17: Ch 1, sc2tog, sc in next 7 sts, sc2tog, turn. (9 sts)
Row 18: Ch 1, sc2tog, sc in next 5 sts, sc2tog, turn. (7 sts)
Row 19: Ch 1, sc2tog, sc in next 3 sts, sc2tog, turn. (5 sts)
Row 20: Ch 1, sc2tog, sc in next st, sc2tog, turn. (3 sts)
Row 21: Ch 1, sc3tog. (1 st) Do not fasten off.
Checkpoint: 3.8 in (9.7 cm) from bottom edge to peak. Each roof slope covers 6 row ends (Rows 15–20) plus the single peak stitch.
Brown Edging Round
This is a trim round. It places 1 sc in each existing stitch or row end, plus 2 extra sc at the peak and at each bottom corner.
Edging Rnd: Ch 1, 3 sc in the Row 21 st (peak). Working down the first roof slope, sc 1 in each row end of Rows 20–15 (6 sc). Continue down the side, sc 1 in each row end of Rows 14–1 (14 sc). Rotate. Working in the underside of the foundation ch, 3 sc in the first ch (corner), sc in next 13 ch, 3 sc in last ch (corner). Rotate. Sc 1 in each row end of Rows 1–14 (14 sc), then sc 1 in each row end of Rows 15–20 (6 sc). Join with sl st to first sc. Fasten off and weave in ends.
Count: 56 sc worked 1-per-existing (1 peak + 12 roof + 28 side + 15 foundation) + 6 extra (2 at peak, 2 at each bottom corner) = 62 sts.
Per side: peak 3 sc; each roof slope 6 sc; each body side 14 sc; bottom 19 sc (3 + 13 + 3, corners included).
Checkpoint: 3.4 x 4.2 in (8.6 x 10.7 cm). If the sides ripple, you may skip 1 row end at the middle of each body side. If you do, your edging count changes, but the icing count does not.
Embroidery
Use cream and a tapestry needle. Work chain-stitch embroidery on the RS, following the grid of sc stitches. Number the 15 columns left to right with RS facing, and count rows from the bottom (Row 1).
Windows (make 2): Outline a square around the block of stitches in columns 3–5, Rows 9–11. Add one vertical straight stitch through the center of column 4 and one horizontal straight stitch through Row 10, forming four panes. Repeat for columns 11–13, Rows 9–11. Each window is about 0.6 in (1.5 cm) square.
Door: Start at the bottom edge between columns 5 and 6. Chain-stitch straight up to the top of Row 5. Curve across Rows 6–7 over columns 6–10, then come down between columns 10 and 11 to the bottom edge. Leave the bottom open. The door is 1.0 in (2.5 cm) wide and 1.3 in (3.3 cm) tall.
Doorknob: Work a French knot (wrap twice) in column 9, Row 3.
Keep the embroidery tension relaxed so the brown fabric doesn’t pucker. Weave all ends on the WS through the backs of stitches.
Make All Pieces
- Houses: 5, in brown, each finished through the brown edging and embroidery.
- Brown per house: about 7 g; cream embroidery per house: about 1 g.
- Cord: 1, in cream, made during joining.
Layout (front view, left to right):
[ 12 in tail ]—H1—[4 in]—H2—[4 in]—H3—[4 in]—H4—[4 in]—H5—[ 12 in tail ]
The 4 in (10.2 cm) spacing is measured from hanger to hanger (center to center). Each house is 3.4 in (8.6 cm) wide, so the gap between neighboring houses is 0.6 in (1.5 cm).
Joining
The houses are joined by working the cord and attaching each house with a short hanger drop as you go. No seams are sewn.
Cord gauge: Holding 2 strands of cream together with the 4.5 mm hook, 4 ch = 1 in (2.5 cm). Chain a few inches first to check, then pull it out.
Stitch-to-stitch logic: Each hanger attaches to the center sc of the 3 peak sts in the brown edging. That stitch sits exactly on the centerline of the house, so every house hangs straight.
Cord: Holding 2 strands of cream, ch 48 (leading tail, 12 in / 30.5 cm).
Hanger: Ch 2. With RS of the house facing you, sl st into the center peak sc. Sl st in each of the 2 hanger ch, working back up to the cord.
Continue: Ch 16, work Hanger into the next house. Repeat from * 3 more times (5 houses attached).
Tail: Ch 48. Fasten off.
Total cord count: 48 + (16 x 4) + 48 = 160 ch, plus 2 ch per hanger.
Tension advice: Keep your chains even and slightly loose. Tight chains shorten the cord and crowd the houses. Pull each hanger sl st snug so the house doesn’t twist.
Size checkpoint: Lay the garland flat. The cord should be 40 in (101.6 cm) long and the hangers 4 in (10.2 cm) apart, center to center. The row of houses spans 19.4 in (49.3 cm): 4 gaps x 4 in plus one house width of 3.4 in.
Border (Icing Roof Trim)
Each house gets a cream scalloped icing border along both roof slopes. Work it on each house now that it’s hanging. If you prefer, you can work this border on all five houses before Joining. The counts are identical, and you then attach each hanger to the center icing sc instead.
Border gauge: Each scallop (3 dc in one st) plus its following sc covers 2 edging sts, about 0.4 in (1.0 cm) of slope.
Stitches used: 17 edging sts per house:
– 1 left eave st (the last body-side sc before the roof)
– 6 left roof sc
– 3 peak sc
– 6 right roof sc
– 1 right eave st
Icing Row (RS): With the 3.5 mm hook and a single strand of cream, join with sc in the left eave st. 3 dc in next st, sc in next st. Repeat from * 7 more times, ending with sc in the right eave st. Fasten off and weave in ends.
At the peak, the 9th st is the center peak sc. Work that sc beside the hanger, inserting under both loops of the edging stitch.
Count: 17 sts worked 1-per-existing (9 sc + 8 shell bases) + 16 extra (2 per scallop x 8) = 33 sts.
Per slope: 4 scallops on each side, with the center sc shared at the peak.
Why the math works: The pattern needs an odd number of stitches (sc, then pairs of shell + sc). 17 = 1 + (2 x 8), so the row starts and ends with sc at the eaves. It places sc at stitches 1, 3, 5, 7, 9, 11, 13, 15, and 17. Stitch 9 is the exact center, so the scallops sit symmetrically and a sc anchors the peak right where the hanger is. The eave sc on each side extends the icing one stitch past the roof line, creating the slight overhang.
Final Blocking
- Lay the garland flat on a blocking mat, RS up.
- Mist each house lightly until damp, not soaked.
- Pin each house to 3.4 in (8.6 cm) wide at the body and 4.5 in (11.4 cm) tall at the iced peak.
- Pin the bottom corners square and the body sides straight.
- Shape each roof slope into a clean line, with the scallops fanned evenly.
- Pin the cord straight, with hangers 4 in (10.2 cm) apart.
- Let it dry completely before you unpin it, usually 6–12 hours.
Final Quality-Control Checklist
- [ ] Each house: 15 sts in the body, 21 rows, 62-st brown edging
- [ ] Each house: 3.4 x 4.2 in (8.6 x 10.7 cm) before icing
- [ ] Icing: 33 sts, 8 scallops, 4 per slope, symmetrical at the peak
- [ ] Two four-pane windows level and the same size
- [ ] Door centered, open at the bottom, knob on the right
- [ ] All houses hang straight from the center peak sc
- [ ] Cord 40 in (101.6 cm), hangers 4 in (10.2 cm) apart
- [ ] All ends woven in securely on the WS
Troubleshooting
Roof leans to one side: You likely missed a decrease. Recount Rows 15–20 (13, 11, 9, 7, 5, 3).
Body sides ripple after edging: Your rows are short compared to your stitches. Skip 1 row end at mid-side, or go down a hook size for the edging only.
Edging corners curl: Make sure you have exactly 3 sc in each bottom corner and at the peak.
Icing flips forward: Work the dc slightly looser, or block the scallops flat with pins.
Embroidery puckers: Loosen your stitches. Lightly steam from the WS to relax the fabric.
House twists on the cord: Re-anchor the hanger in the exact center peak sc and pull the sl st snug.
Cord too short: Your chain is tight. Use a 5.0 mm hook for the cord.
Care
Spot clean or hand wash in cool water with mild soap. Lay flat to dry, reshaping each house, and store flat or loosely rolled.
Final Notes
The measurement chain is short and reliable. 20 sc = 4 in (10.2 cm) gives a 15-st body 3.0 in (7.6 cm) wide. Twenty-one rows bring the peak to 3.8 in (9.7 cm). The brown edging takes each house to 3.4 x 4.2 in (8.6 x 10.7 cm), and the icing finishes it at 4.5 in (11.4 cm). Five houses hung 4 in (10.2 cm) apart span 19.4 in (49.3 cm) on a 40 in (101.6 cm) cord. Check your first house, and the other four will follow.
Happy crocheting!