

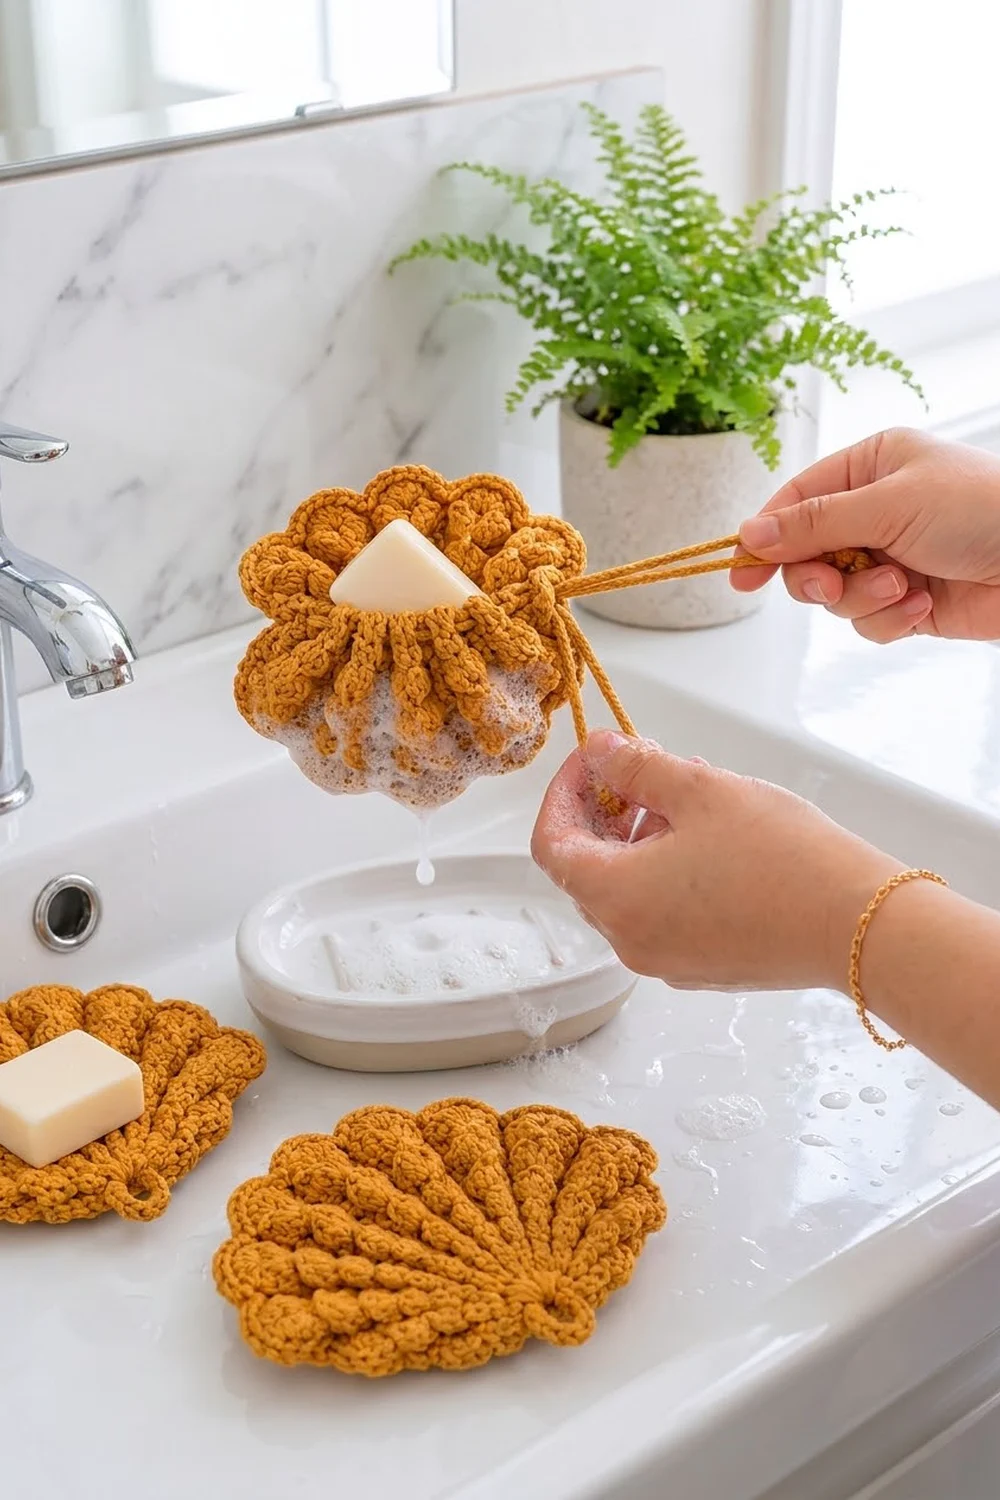
This soap saver looks like a seashell. Nine bobble ribs fan out from a narrow base and each one ends in a soft scallop. A small hanging loop sits at the bottom point, so the scrubber can drip-dry on a hook between uses.
The sample is a warm mustard gold cotton, but any solid color works well. The texture does the decorating, and the bobbles give the front a gentle scrubbing surface. The back is plain single crochet. The pattern uses US crochet terms throughout.
The finished shell measures 7 in (17.8 cm) wide and 5 in (12.7 cm) tall without the loop, or 5.75 in (14.6 cm) tall including the loop.
You work the body flat in rows, from the base up. Rows alternate between right-side single crochet rows and wrong-side bobble rows, with increases built into the ribs. Next come two border rounds, including the scallops and the hanging loop. Last, you weave a slip-stitch drawstring around the edge. Pull it to cup the shell around a bar of soap.
Finished Size and Construction
- Finished size: 7 in (17.8 cm) wide x 5 in (12.7 cm) tall, plus a 0.75 in (1.9 cm) loop
- Skill level: Easy-intermediate
- Terminology: US crochet terms
- Yarn weight: Worsted (#4) cotton
- Hook: 4.5 mm (US 7)
- Number of pieces: 1 shell plus 1 drawstring cord
- Layout: Single piece; no joining
- Body size before border: 6.5 in (16.5 cm) wide x 4.5 in (11.4 cm) tall
- Border depth: about 0.25 in (0.6 cm) at the sides and 0.5 in (1.3 cm) at the scalloped top
Materials
Yarn: Use 100% cotton or a cotton blend in worsted weight. Cotton holds up to hot water, gets firmer when wet, and doesn’t trap lather the way acrylic does. A smooth, tightly plied cotton shows the bobbles most clearly.
- Mustard gold: 35 g (about 55 m / 60 yd), enough for the shell and drawstring
Quantities include a margin of about 25% for swatching and tails.
Tools:
– 4.5 mm (US 7) crochet hook
– Tapestry needle
– Scissors
– Stitch markers (2–4)
– Measuring tape
– Rust-proof pins and a blocking mat or folded towel
Abbreviations (US Terms)
- ch – chain
- sc – single crochet
- dc – double crochet
- sl st – slip stitch
- sk – skip
- st(s) – stitch(es)
- RS / WS – right side / wrong side
- rnd – round
Special stitch – Bobble (bob): Yarn over, insert hook in the stitch, yarn over and pull up a loop, yarn over and draw through 2 loops. Repeat from * to * 3 more times in the same stitch (5 loops on hook). Yarn over and draw through all 5 loops. A bobble counts as 1 stitch.
Bobbles are always worked on WS rows, so they push away from you and pop out on the RS.
Shell: 5 dc in the same stitch.
Gauge and Checkpoints
Gauge: 16 sc and 18 rows = 4 in (10.2 cm) in plain single crochet.
There is only one piece, so treat Rows 1–10 as your test. Measure as you go:
- After Row 2: base width 2.75 in (7.0 cm)
- After Row 10: height about 2.25 in (5.7 cm); width across the top edge about 5 in (12.7 cm)
- After Row 20: height 4.5 in (11.4 cm); width 6.5 in (16.5 cm)
- After the border: 7 in (17.8 cm) x 5 in (12.7 cm)
If your piece is too big, go down to a 4 mm (US G-6) hook. If it’s too small, go up to a 5 mm (US H-8) hook. If the height is right but the fan curls up at the sides, your bobble rows are tighter than your sc rows. Relax your tension on the bobbles and finish each one firmly.

Shell Body
The rows follow a fixed structure: 1 edge stitch, then 9 rib stitches separated by 8 gaps, then 1 edge stitch. Each row’s total is 2 + 9 + (8 x gap size). The rib stitches always sit directly above the rib stitches of the row before, which builds the 9 radiating columns.
Row 1 (RS): Ch 12. Sc in the 2nd ch from hook and in each ch across. Turn. (11 sts)
This row is 1 edge, 9 ribs, and 1 edge, with gap size 0.
Row 2 (WS): Ch 1 (does not count as a st here or in later rows). Sc in each st across. Turn. (11 sts)
Row 3 (RS – increase row): Ch 1, sc in the first st, [2 sc in next st] 8 times, sc in next st, sc in the last st. Turn. (19 sts)
In each 2-sc pair, the first sc continues the rib and the second sc is a new gap stitch. Gap size is now 1.
Row 4 (WS – bobble row): Ch 1, sc in the first st, [bob in next st (rib), sc in next st (gap)] 8 times, bob in next st, sc in the last st. Turn. (19 sts: 9 bobbles)
Row 5 (RS): Ch 1, sc in each st across. Turn. (19 sts)
Row 6 (WS): Repeat Row 4. (19 sts: 9 bobbles)
Row 7 (RS – increase row): Ch 1, sc in the first st, [2 sc in next st (rib), sc in next st] 8 times, sc in next st (rib), sc in the last st. Turn. (27 sts) Gap size is now 2.
Row 8 (WS): Ch 1, sc in the first st, [bob in next st, sc in next 2 sts] 8 times, bob in next st, sc in the last st. Turn. (27 sts: 9 bobbles)
Row 9 (RS): Ch 1, sc in each st across. Turn. (27 sts)
Row 10 (WS): Repeat Row 8. (27 sts)
Checkpoint: height about 2.25 in (5.7 cm), width about 5 in (12.7 cm).
Row 11 (RS – increase row): Ch 1, sc in the first st, [2 sc in next st, sc in next 2 sts] 8 times, sc in next st, sc in the last st. Turn. (35 sts) Gap size is now 3.
Row 12 (WS): Ch 1, sc in the first st, [bob in next st, sc in next 3 sts] 8 times, bob in next st, sc in the last st. Turn. (35 sts: 9 bobbles)
Row 13 (RS): Ch 1, sc in each st across. Turn. (35 sts)
Rows 14–16: Repeat Rows 12 and 13, then Row 12 once more. (35 sts each)
Row 17 (RS – increase row): Ch 1, sc in the first st, [2 sc in next st, sc in next 3 sts] 8 times, sc in next st, sc in the last st. Turn. (43 sts) Gap size is now 4.
Row 18 (WS): Ch 1, sc in the first st, [bob in next st, sc in next 4 sts] 8 times, bob in next st, sc in the last st. Turn. (43 sts: 9 bobbles)
Row 19 (RS): Ch 1, sc in each st across. Turn. (43 sts)
Row 20 (WS): Repeat Row 18. Turn to the RS, but don’t fasten off. (43 sts)
Checkpoint: 6.5 in (16.5 cm) wide x 4.5 in (11.4 cm) tall. Each rib now has 9 stacked bobbles. In Row 20, the ribs fall on sts 2, 7, 12, 17, 22, 27, 32, 37 and 42, and sts 1 and 43 are the edge stitches.
Border
Border gauge: The sides use 1 sc per row end, skipping 2 row ends per side. Nineteen sc rows measure about 4.25 in (10.8 cm), and 17 sc at 4 sts per inch also measure 4.25 in (10.8 cm), so the sides lie flat without ruffling.
Rnd 1 (RS): Ch 1. Work 3 sc in the first st of Row 20 (corner), sc in the next 41 sts, and 3 sc in the last st (corner). That gives 47 sts on the top edge, including both corner groups.
Work down the side in the row ends of Rows 19 to 1: 1 sc in each row end, but skip the row ends of Rows 13 and 7. (17 sts)
Along the base, sc in the free loop of each foundation ch. (11 sts)
Work up the other side the same way, skipping the row ends of Rows 7 and 13. (17 sts)
Sl st to the first sc. (92 sts: 47 + 17 + 11 + 17)
Rnd 2 (scallops and loop): Ch 1.
Top edge: Sc in the same st, 3 sc in the next st (corner center), sc in the next st. Shell in the next st (above a rib), sk 1, sc in the next 2 sts, sk 1. Repeat from * to * 7 more times, then work a shell in the next st (rib 9). Sc in the next st, 3 sc in the next st, sc in the next st.
Top total: 71 sts (5 corner sts + 8 x 7 + 5 shell sts + 5 corner sts)
Side: Sc in each of the 17 sts. (17 sts)
Base and loop: Sc in the next 5 sts. In the 6th st, sc, ch 10, and sl st into that same sc to form a ring. Work 16 sc into the ring, then sc in the last 5 base sts. (11 base sts; the 16 loop sc are not counted)
Other side: Sc in each of the 17 sts. (17 sts)
Sl st to the first sc and fasten off. (116 sts plus the loop)
Why the math works: Rnd 1’s top edge is Row 20’s 43 sts plus 2 extra sts at each corner (43 + 4 = 47). In Row 20, the ribs are 5 sts apart. Each scallop repeat (shell, sk 1, 2 sc, sk 1) uses exactly 5 sts, so every shell lands directly above a rib.
The top count checks out: the 3 corner sts on one side, 8 repeats of 5 (40 sts), 1 last shell st and the 3 corner sts on the other side make 3 + 40 + 1 + 3 = 47.
Checkpoint: 7 in (17.8 cm) x 5 in (12.7 cm).
Drawstring
With a 4.5 mm hook, ch 150, which is about 30 in (76.2 cm). Sl st in the back bump of the 2nd ch from the hook and of each ch across, then fasten off. Tie an overhand knot about 0.5 in (1.3 cm) from each end and trim close.
To weave it in: Start at the base corner on one side and weave the cord over and under every 2 sts of Border Rnd 1, beneath the scallops. Go up the side, across the top and down the other side, so it exits at the opposite base corner. Then run the starting tail across the back along Row 1, so both knotted tails come out together. Even out the tails. Pulling the tails gathers the shell into a round cup.
Final Blocking
- Weave in all the ends along WS sc rows, away from the bobbles.
- Soak the shell in lukewarm water for 10 minutes, then press out the water in a towel. Don’t wring it.
- Lay it RS up on the mat with the drawstring loose.
- Pin the base straight to 2.75 in (7.0 cm), plus the border.
- Pin the outer corners so the total width is 7 in (17.8 cm).
- Pin each scallop tip so the shell is 5 in (12.7 cm) tall.
- Pinch each bobble from the back to make it round, and straighten the ribs.
- Let it dry completely.
Final Quality-Control Checklist
- 9 ribs, each with 9 bobbles, all on the RS
- Row 20 has 43 sts
- Border Rnd 1 has 92 sts, with 47 on the top edge
- Border Rnd 2 has 116 sts, plus 16 sc in the loop
- One shell sits directly above each rib
- The loop is centered on the base and firmly anchored
- The sides lie flat and the corners are crisp
- The drawstring slides freely and both knots are secure
- The shell measures 7 in (17.8 cm) x 5 in (12.7 cm)
Troubleshooting
Bobbles are on the wrong side: You worked them on RS rows. Bobbles belong on even-numbered (WS) rows only.
Ribs drift sideways: Double-check the order on the increase rows. The rib is always the stitch that receives the 2 sc.
Fan curls into a cone: Your bobbles are too tight. Loosen up, or block the piece firmly.
Edges ruffle: You probably worked into every row end. Skip the 2 row ends per side as written.
Scallops are off-center: Recount the 47-st top edge of Rnd 1 before you start Rnd 2.
Loop stretches out: Pack the 16 sc tightly, or use ch 8 with 14 sc instead.
Drawstring won’t gather: Weave it through every 2 sts, not wider gaps.
Care
Rinse out the soap after each use and hang it by the loop to dry. Machine-wash warm in a mesh bag, then reshape and air-dry.
Final Notes
Everything follows from one measurement chain. Gauge of 16 sc and 18 rows = 4 in (10.2 cm) gives a 2.75 in (7.0 cm) base, 2.25 in (5.7 cm) of height at Row 10, and a 6.5 in (16.5 cm) x 4.5 in (11.4 cm) body at Row 20. The border brings it to the finished 7 in (17.8 cm) x 5 in (12.7 cm).
If you check your counts at 11, 19, 27, 35 and 43 sts, then 92 and 116 around the border, the scallops will land on the ribs every time.
Happy crocheting!