

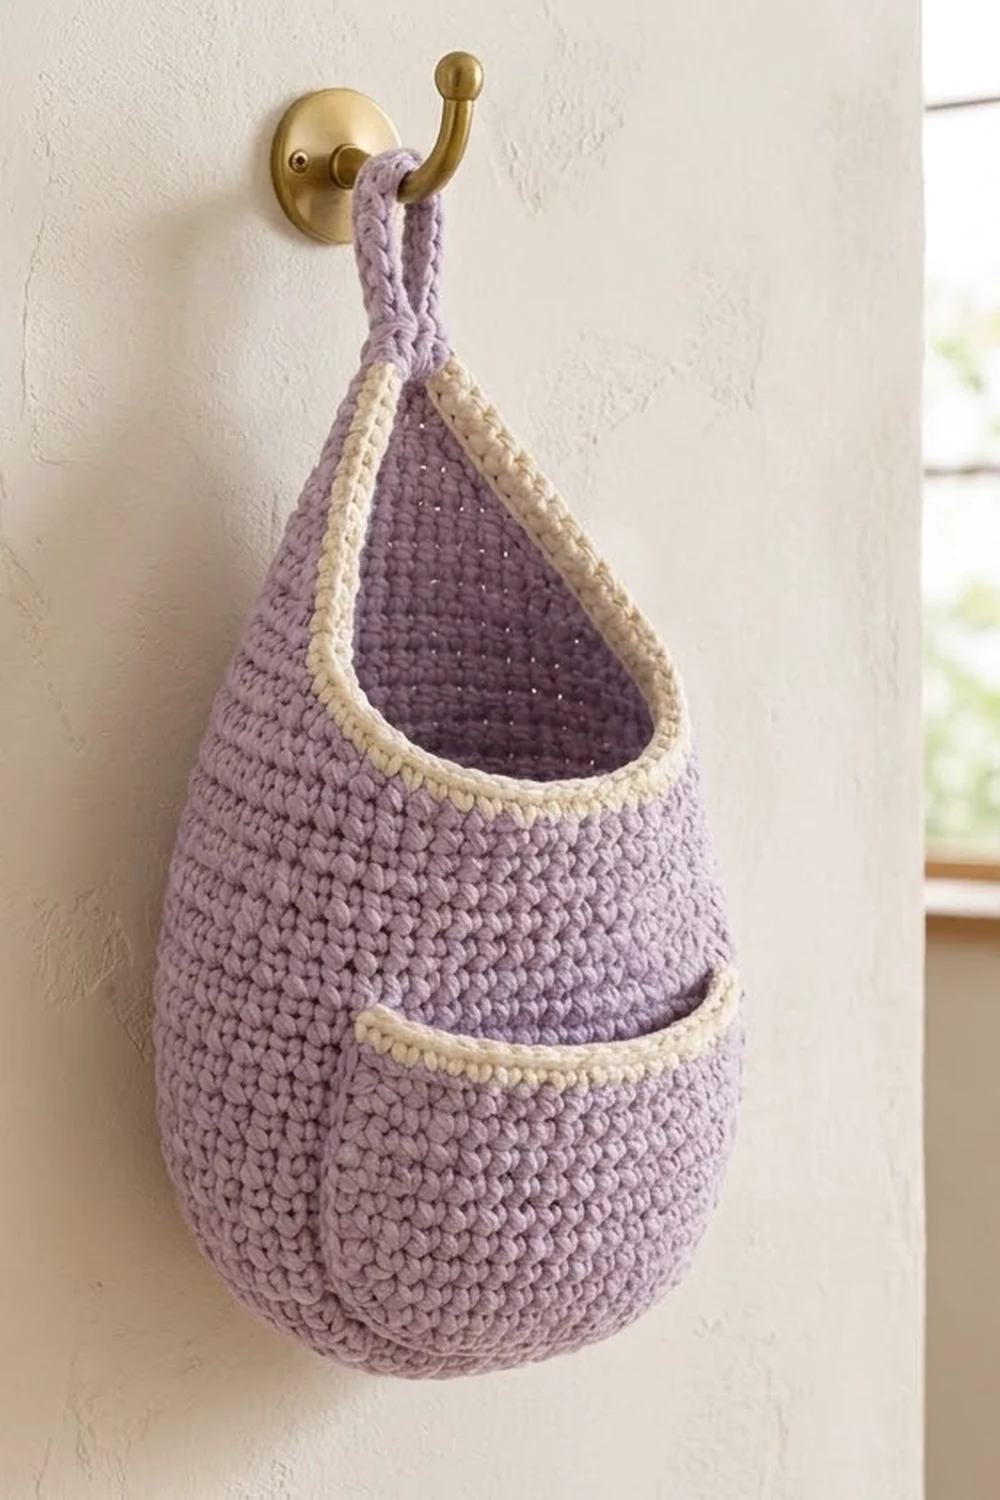
The Lavender Dewdrop is a teardrop-shaped wall basket. It has a soft lavender body, a cream-trimmed opening and a roomy front pocket. Hang it beside your bed for a phone and glasses, or in the bathroom for a comb and travel bottles.
The fabric is dense single crochet in bulky cotton-blend yarn, so the basket holds its shape without stiffener. Cream single crochet outlines the opening and the top of the pocket.
The pattern uses US crochet terms. The finished basket measures about 9.25 in (23.5 cm) wide, 11.5 in (29.2 cm) tall and 3.5 in (8.9 cm) deep. The hanging loop adds about 2 in (5.1 cm), for a total of about 13.5 in (34.3 cm).
Construction is simple. You start with an oval base, then work straight walls in joined rounds. Next you work the back half in decreasing rows up to a point and add a hanging loop. A cream edging goes around the opening. Last, you make a small pocket and sew it to the front.
Finished Size and Construction
- Finished size: 9.25 in (23.5 cm) wide × 11.5 in (29.2 cm) tall × 3.5 in (8.9 cm) deep, plus a 2 in (5.1 cm) loop
- Skill level: Easy to Intermediate
- Terminology: US
- Yarn weight: Bulky (#5)
- Hook: 6.0 mm (US J-10)
- Number of pieces: 2 (body and pocket)
- Layout: pocket centered on the front of the body
- Piece sizes: base 7.75 × 3.5 in (19.7 × 8.9 cm); pocket 6.75 × 4.5 in (17.1 × 11.4 cm)
- Size before edging: 11 in (27.9 cm) tall
- Edging depth: 2 rounds, about 0.5 in (1.3 cm)
Materials
Choose a bulky cotton or cotton-blend yarn with good stitch definition. Cotton keeps the walls firm and doesn’t stretch much under weight. Acrylic also works, but the basket will be softer.
- Lavender (main color): 130 g / 145 m
- Cream (contrast color): 25 g / 28 m
Both quantities include a margin of about 15% for your swatch and differences in tension.
Tools:
– 6.0 mm (US J-10) crochet hook
– Tapestry needle
– 4 locking stitch markers
– Scissors
– Measuring tape
– Pins for placing the pocket
– Spray bottle and towels for blocking
Abbreviations (US Terms)
- ch – chain
- sc – single crochet
- sl st – slip stitch
- st(s) – stitch(es)
- inc – 2 sc in the same stitch
- sc2tog – single crochet 2 together (one decrease)
- BLO – back loop only
- Rnd / Row – round / row
Special note: in this pattern, ch 1 at the start of a round or row never counts as a stitch.
Gauge and Checkpoints
Gauge: 12 sc × 13 rounds = 4 in (10.2 cm) in single crochet worked in the round.
Work tightly. A firm fabric is what lets the basket stand without stiffener.
Test piece first. Use the base (Rnds 1–5) as your gauge swatch. It should measure about 7.75 × 3.5 in (19.7 × 8.9 cm). If it does, keep going. If it doesn’t, adjust before you start the walls.
Checkpoints:
– After Rnd 5: base 7.75 × 3.5 in (19.7 × 8.9 cm), 56 sts
– After Rnd 15: walls about 3 in (7.6 cm) tall above the base ridge
– After Rnd 25: walls 6 in (15.2 cm) tall; basket 9.25 in (23.5 cm) wide when flattened
– After back Row 16: point about 5 in (12.7 cm) above the wall top; top of point 1.25 in (3.2 cm) wide
– Pocket before trim: 6.75 × 4 in (17.1 × 10.2 cm)
Too big? Change to a 5.5 mm hook. Too small? Change to a 6.5 mm hook. Don’t change any stitch counts, because the edging and pocket placement depend on them.

Body
Oval Base
With lavender, ch 16.
Rnd 1: Sc in 2nd ch from hook and in next 13 ch, 3 sc in last ch. Rotate and work along the other side of the chain: sc in next 13 ch, 2 sc in the same ch as the first sc. Sl st to first sc. (32 sts)
Rnd 2: Ch 1, inc in first st, sc in next 13, inc in each of next 3, sc in next 13, inc in each of last 2. Sl st to first sc. (38 sts)
Rnd 3: Ch 1, (inc, sc in next st) once, sc in next 13, (inc, sc in next st) 3 times, sc in next 13, (inc, sc in next st) 2 times. Sl st to first sc. (44 sts)
Rnd 4: Ch 1, (sc, inc, sc) once, sc in next 13, (sc, inc, sc) 3 times, sc in next 13, (sc, inc, sc) 2 times. Sl st to first sc. (50 sts)
Rnd 5: Ch 1, (sc in next 2, inc, sc in next st) once, sc in next 13, (sc in next 2, inc, sc in next st) 3 times, sc in next 13, (sc in next 2, inc, sc in next st) 2 times. Sl st to first sc. (56 sts)
Checkpoint: 7.75 × 3.5 in (19.7 × 8.9 cm).
Walls
Rnd 6: Ch 1, sc in BLO of each st around. Sl st to first sc. (56 sts)
This round leaves a ridge of front loops on the outside, which makes the sharp turn from base to wall.
Rnds 7–25: Ch 1, sc in each st around. Sl st to first sc. (56 sts each round)
At the end of Rnd 25, fasten off.
Checkpoint: the walls are 6 in (15.2 cm) tall above the ridge, and the basket is 9.25 in (23.5 cm) wide when flattened.
Marking the Split
Flatten the basket so the two long sides of the oval become the front and the back.
- Place marker A in the center stitch of the left curved end.
- Place marker B in the center stitch of the right curved end.
- Count to check: there should be 27 sts between A and B on each long side (27 + 27 + 2 marked sts = 56).
- Choose one long side as the back. The other side is the front.
Back Panel (worked in rows)
Row 1: With the outside facing, join lavender with a sc in marked st A. Sc in the next 27 sts along the back, stopping just before marker B. (28 sts)
Row 2: Ch 1, turn, sc2tog, sc in next 24, sc2tog. (26 sts)
Row 3: Ch 1, turn, sc in each st across. (26 sts)
Row 4: Ch 1, turn, sc2tog, sc in next 22, sc2tog. (24 sts)
Rows 5–14: Ch 1, turn, sc2tog, sc across to the last 2 sts, sc2tog. Each row is 2 sts shorter than the one before it:
– Row 5: 22
– Row 6: 20
– Row 7: 18
– Row 8: 16
– Row 9: 14
– Row 10: 12
– Row 11: 10
– Row 12: 8
– Row 13: 6
– Row 14: 4
Rows 15–16: Ch 1, turn, sc in each st across. (4 sts)
Hanging Loop
At the end of Row 16, don’t fasten off.
- Ch 14.
- Sl st into the first st of Row 16 to form a ring that sits over the point.
- Work 20 sc into the ch-14 space.
- Sl st into the last st of Row 16.
- Fasten off and weave in the end.
The 20 sc pack the chain tightly, which makes a firm, rounded loop about 2 in (5.1 cm) long.
With lavender, ch 19.
Row 1: Sc in 2nd ch from hook and in each ch across. (18 sts)
Rows 2–12: Ch 1, turn, sc in each st across. (18 sts each row)
Checkpoint: 6 × 3.75 in (15.2 × 9.5 cm).
Edge Round (sides and bottom): Ch 1. Rotate the work and edge the sides and bottom:
– Sc in the end of each row down the side: 12
– Along the foundation chain: inc in the first ch, sc in the next 16 ch, inc in the last ch: 20
– Sc in the end of each row up the other side: 12
That makes 44 sts. Fasten off, leaving a 30 in (76.2 cm) tail for sewing.
The single increase at each bottom corner rounds the corner softly instead of making it square.
Checkpoint: 6.75 × 4 in (17.1 × 10.2 cm).
Make All Pieces
- Lavender: 1 body and 1 pocket
- Cream: body edging and pocket trim (see Border)
Placement layout (front view):
        [ loop ]
          /\
         /  \      back panel
        /    \
   |  open front  |   ← cream edge, Rnd 25
   |  ┌────────┐  |   ← pocket top, 1.25 in (3.2 cm) below the front edge
   |  │ POCKET │  |
   |  └────────┘  |   ← pocket bottom, 0.25 in (0.6 cm) above the base ridge
    \____________/    base
Joining (Sewing On the Pocket)
Add the pocket trim (see Border) before you sew the pocket on.
Placement:
1. Center the pocket on the front, between markers A and B.
2. The 20 bottom sts of the pocket line up with the 20 center front sts of the body, leaving 4 front sts free on each side.
3. The bottom edge sits on Rnd 7, just above the base ridge, about 0.25 in (0.6 cm) up.
4. Pin the pocket in place.
Stitch-to-stitch logic: whipstitch through the pocket’s edge stitches and the body underneath.
– Along the bottom, sew 1 pocket stitch to 1 body stitch (20 to 20).
– Up each side, sew 1 pocket edge stitch to 1 body round. Because the pocket rows and the body rounds use the same gauge, the 12 side stitches cover Rnds 8–19.
– Stop where the cream trim begins. The top of the pocket stays open.
Tension: sew snugly but don’t pull hard. Too much tension puckers the body behind the pocket. Put one hand inside the basket while you sew so you don’t catch the back wall.
Size checkpoint: the top of the pocket should sit about 1.25 in (3.2 cm) below the front edge of the body.
Border
Border gauge: the same as the body, 12 sc per 4 in (10.2 cm).
Body Edging (cream)
Rnd 1: With the outside facing, join cream with a sc in marked st B. Work around the opening:
– Front: sc in B and in the next 27 front sts, including the st at marker A: 28
– Left side of the back panel: work up the 16 row ends, with 1 sc in each row end and 2 sc in the ends of Rows 4, 8, 12 and 16: 20
– Top: working across the 4 sts of Row 16 (behind the base of the loop), inc, sc in next 2, inc: 6
– Right side: work down the 16 row ends the same way as the left side: 20
Sl st to first sc.
Rnd 1 total: (64 sts worked one per stitch or row end) + (10 extra stitches) = 74 sts.
Rnd 2: Ch 1. Sc in each st around, but work a sc2tog at each inside corner where a side meets the front (the last st of one section together with the first st of the next). Sl st to first sc.
Rnd 2 count:
| Section | Stitches |
|---|---|
| Front | 26 |
| Each side | 19 |
| Top | 6 |
| Corner decreases | 2 |
| Total | 72 |
Fasten off.
Why the math works: each side edge runs diagonally for about 6.4 in (16.3 cm). At 12 sts per 4 in, that edge needs about 19–20 sts. Working only 1 sc per row end gives 16, which would pull the opening tight, so Rnd 1 adds 4 stitches per side. The 2 extra stitches at the top let the edging turn around the point without cupping. The two sc2tog in Rnd 2 keep the inside corners from flaring.
Pocket Trim (cream)
Row 1: With the outside facing, join cream in the end of the edge round at one top corner. Work across the top:
– Sc in that edge-round end
– Sc in each of the 18 sts of Row 12
– Sc in the edge-round end at the other corner
That gives (18 sts worked one per stitch) + (2 edge stitches) = 20 sts.
Row 2: Ch 1, turn, sc in each st across. (20 sts)
Fasten off.
The pocket now measures 6.75 × 4.5 in (17.1 × 11.4 cm). The 20 trim stitches match the 20 bottom stitches, so the pocket keeps its rectangular shape.
Final Blocking
- Weave in all ends inside the basket, through stitches of the same color.
- Mist the basket lightly until it’s damp, but not soaked.
- Stuff it firmly with rolled towels to shape the teardrop.
- Pinch the back panel gently up toward the loop so it tapers evenly.
- Smooth the cream edging so it lies flat, with both inside corners crisp.
- Press the pocket flat against the stuffing and straighten its trim.
- Let it dry completely, upright, for 24 hours.
- Remove the towels and check the measurements: 9.25 in (23.5 cm) wide and 11.5 in (29.2 cm) tall.
Final Quality-Control Checklist
- The base has 56 sts and lies flat without ruffling
- The ridge between base and walls goes all the way around
- The walls are 6 in (15.2 cm) tall, with 56 sts in every round
- Both sides of the back panel taper evenly to 4 sts
- The loop is centered and firmly attached
- The body edging has 72 sts, and the corners lie flat
- The pocket is centered, level and 0.25 in (0.6 cm) above the ridge
- The pocket top is 1.25 in (3.2 cm) below the front edge
- No ends show on the outside
Troubleshooting
- The base ruffles: you’re increasing too loosely, or you’ve placed extra increases. Recount against the round totals.
- The base cups: your tension is too tight on the curved ends. Go up 0.5 mm for the base only.
- The walls lean outward: check that Rnd 6 was worked in BLO and that you didn’t add stitches.
- The back panel leans to one side: decrease at both ends of every decrease row.
- The edging ripples: work the extra side stitches more loosely, or skip one extra stitch per side.
- The edging pulls the opening tight: check that you added the 4 extra stitches on each side.
- The pocket gapes: sew it more snugly along the bottom.
- The pocket puckers the body: loosen your whipstitch and resew.
Care
Hand wash in cool water, press out the water in a towel, and dry the basket flat or stuffed with towels. Don’t wring it or tumble dry it.
Final Notes
The measurements build on each other:
– Gauge: 12 sc × 13 rounds = 4 in (10.2 cm)
– Base: 56 sts, 7.75 × 3.5 in (19.7 × 8.9 cm)
– Walls: 6 in (15.2 cm)
– Back panel: 5 in (12.7 cm), tapering from 28 sts to 4
– Edging: 74 sts, then 72, adding 0.5 in (1.3 cm)
– Finished body: 11.5 in (29.2 cm) tall, or 13.5 in (34.3 cm) with the loop
– Pocket: 6.75 × 4.5 in (17.1 × 11.4 cm)
If you hit each checkpoint, the finished basket will hang with the same shape as the photo.
Happy crocheting!