

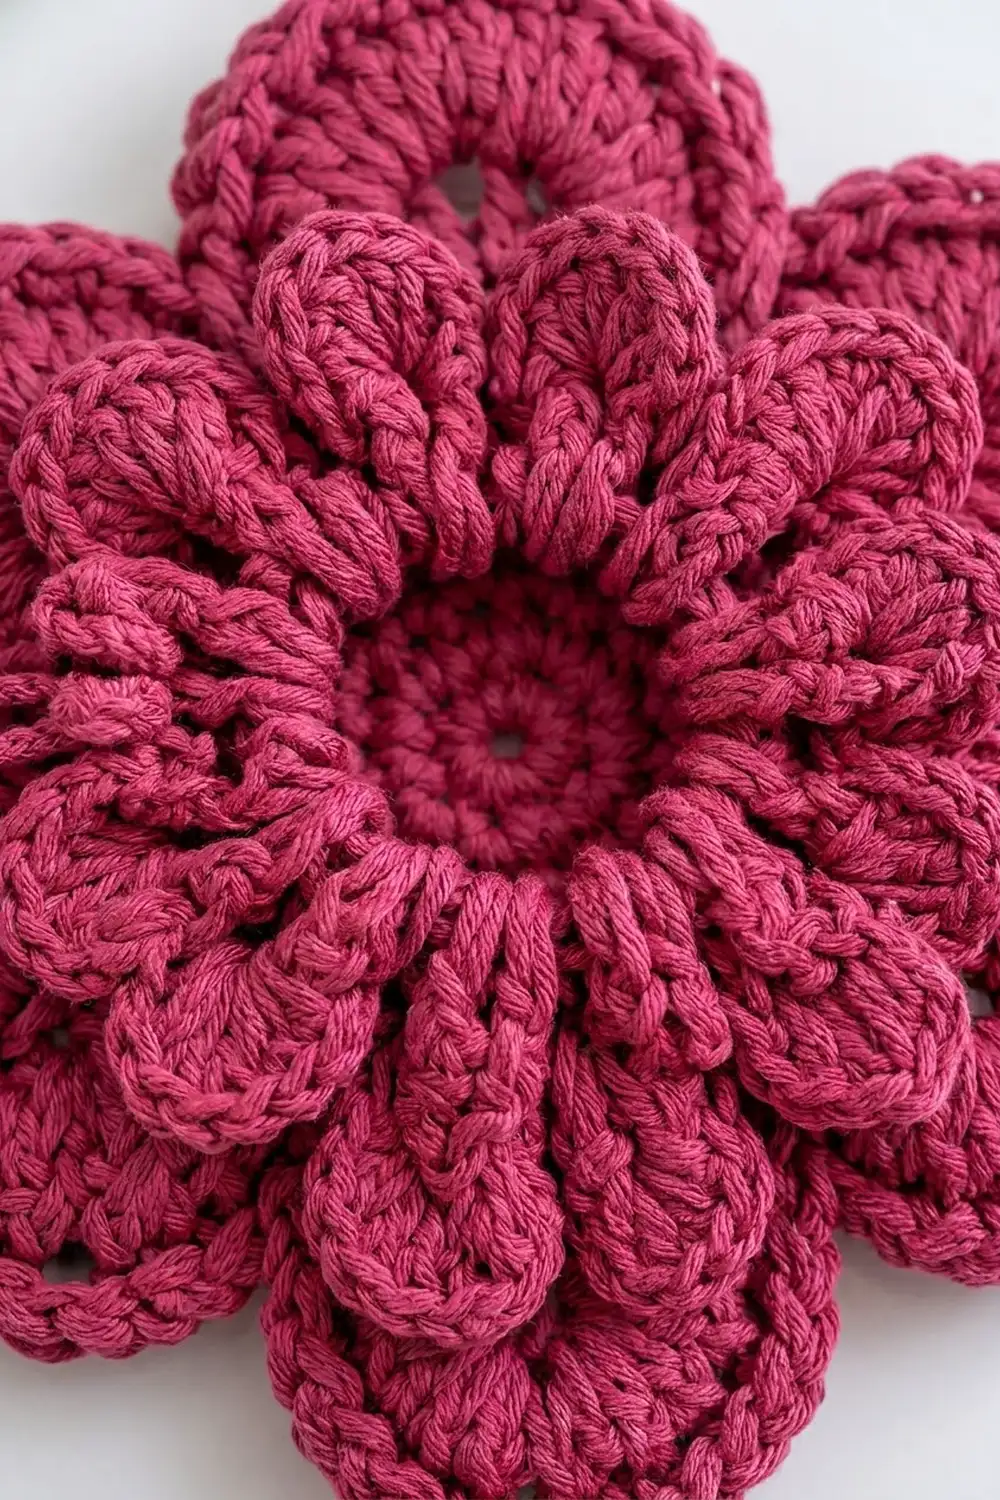
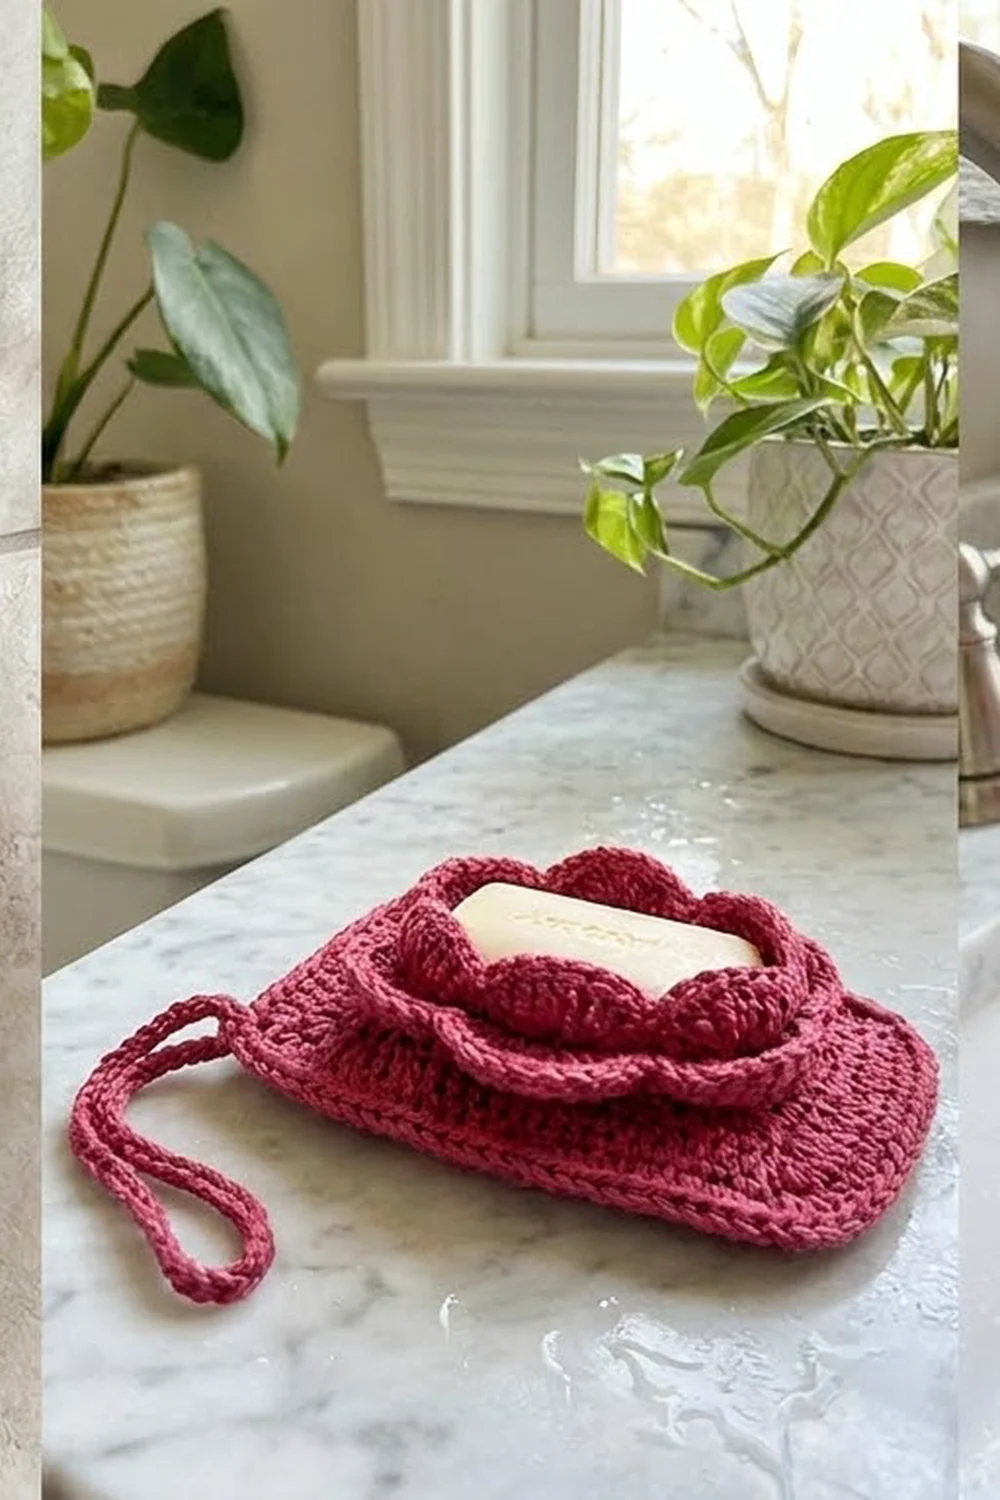
The Berry Blossom Soap Saver is a six-petal flower pouch that holds a bar of soap. The back is a flat, solid flower. The front has a round opening ringed by two layers of cupped petals. A drawstring pulls the opening shut around the soap, and a small loop at one petal tip lets the saver drip-dry on a hook.
The sample uses one color, a deep raspberry-berry cotton. Firm cotton stitches give the front a sculpted, rosette look and give the back a gentle scrubbing texture. A corded reverse single crochet edge outlines every petal.
This pattern uses US crochet terms. The finished soap saver measures 6 in (15.2 cm) from petal tip to opposite petal tip and about 4.75 in (12.1 cm) from valley to valley.
You work the back in the round from a magic ring. The front starts from a chain ring that becomes the soap opening. Both panels end with the same 84-stitch petal edge. You join them with a round of single crochet, then add a reverse single crochet edge with a hanging loop, and thread in the drawstring.
Finished Size and Construction
- Finished size: 6 in (15.2 cm) tip to tip; 4.75 in (12.1 cm) valley to valley
- Skill level: Intermediate
- Terminology: US crochet terms
- Yarn weight: Worsted (#4) cotton
- Hook: 4.0 mm (G-6)
- Number of pieces: 2 panels (front and back) plus 1 drawstring
- Layout: Front stacked on back, wrong sides together, petals aligned
- Piece size: Each panel measures 5.5 in (14.0 cm) tip to tip
- Size before border: 5.5 in (14.0 cm) tip to tip
- Border depth: 0.25 in (0.6 cm) on each edge, over 2 rounds
Materials
Yarn: Choose a smooth, tightly plied 100% cotton or cotton-blend worsted yarn. Cotton holds the petal shapes, handles hot water, and scrubs gently. Avoid acrylic, which stays slippery when soapy, and avoid loose single-ply cotton, which fuzzes quickly.
- Raspberry / berry pink: 55 g, about 95 m (104 yd)
- Back panel: about 18 g
- Front panel and petal layers: about 25 g
- Border, loop, and drawstring: about 5 g
These amounts include about a 15% margin for swatching and differences in tension.
Tools:
- 4.0 mm (G-6) crochet hook
- Tapestry needle
- 2 or more stitch markers
- Scissors
- Ruler or tape measure
- Pins and a blocking surface
- A bar of soap for test-fitting, about 2.5 x 1.5 in (6.4 x 3.8 cm)
Abbreviations (US Terms)
- ch: chain
- sl st: slip stitch
- sc: single crochet
- sc2tog: single crochet 2 together
- hdc: half double crochet
- dc: double crochet
- tr: treble crochet
- rsc: reverse single crochet
- BLO: back loop only
- FL: front loop
- st(s): stitch(es)
- rnd(s): round(s)
- MR: magic ring
Special stitch: reverse single crochet (rsc). Work from left to right (right to left if you crochet left-handed). Insert the hook into the next stitch to the right, yarn over, and pull up a loop. Yarn over again and pull through both loops. This makes the corded edge.
Join note: To end each round, sl st into the first stitch, then ch 1. The ch 1 does not count as a stitch.
Gauge and Checkpoints
Gauge: 16 sc and 16 rnds = 4 in (10.2 cm) in sc worked in the round. Each sc round adds about 0.25 in (0.6 cm) to the radius of a flat circle.
Make the back panel first as your test piece, and check it at each stage before you start the front.
- Back Rnd 4 (24 sts): 2 in (5.1 cm) across
- Back Rnd 8 (48 sts): 4 in (10.2 cm) across
- Back Rnd 10 (84 sts): 5.5 in (14.0 cm) tip to tip
- Front Rnd 1 (30 sts): opening about 2 in (5.1 cm) across when relaxed
- Front Rnd 4 (48 sts): 4 in (10.2 cm) across, the same as back Rnd 8
If your piece is too big, switch to a 3.75 mm (F-5) hook. If it is too small, switch to a 4.5 mm (7) hook. The panel should lie flat. If it ripples, try a smaller hook. If it cups, try a larger one.
Back Panel
Work joined rounds with the right side facing.
Rnd 1: MR, 6 sc in ring, join. (6 sts)
Rnd 2: 2 sc in each st around, join. (12 sts)
Rnd 3: Sc in next st, 2 sc in next st; repeat from * 6 times total, join. (18 sts)
Rnd 4: Sc in next 2 sts, 2 sc in next st; repeat 6 times, join. (24 sts)
Rnd 5: Sc in next 3 sts, 2 sc in next st; repeat 6 times, join. (30 sts)
Rnd 6: Sc in next 4 sts, 2 sc in next st; repeat 6 times, join. (36 sts)
Rnd 7: Sc in next 5 sts, 2 sc in next st; repeat 6 times, join. (42 sts)
Rnd 8: Sc in next 6 sts, 2 sc in next st; repeat 6 times, join. (48 sts)
Checkpoint: 4 in (10.2 cm) across.
Rnd 9 (petal base): Sc in next st, hdc in next st, dc in next st, 2 dc in each of next 2 sts, dc in next st, hdc in next st, sc in next st; repeat 6 times, join. (10 sts per petal; 60 sts)
Rnd 10 (petal shaping): Sc in sc, hdc in hdc, dc in dc, 2 dc in each of next 4 dc, dc in dc, hdc in hdc, sc in sc; repeat 6 times, join. (14 sts per petal; 84 sts)
Petal check: 1 + 1 + 1 + 8 + 1 + 1 + 1 = 14 sts per petal. The tip falls between the 7th and 8th stitch. The valley falls between the last sc of one petal and the first sc of the next.
Fasten off and weave in the ends. Checkpoint: 5.5 in (14.0 cm) tip to tip.
Front Panel
The front has the same outer edge as the back but starts from a chain ring. Two rounds are worked in BLO, which leaves free front loops for the petal layers.
Foundation: Ch 30, then sl st to the first ch to form a ring without twisting the chain.
Rnd 1: Ch 1, sc in each ch around, join. (30 sts)
Checkpoint: The opening should measure about 2 in (5.1 cm) across when relaxed. Cotton sc stretches enough to let the test bar through.
Rnd 2: In BLO, sc in next 4 sts, 2 sc in next st; repeat 6 times, join. (36 sts) This leaves the FLs of Rnd 1 free for Layer 1.
Rnd 3: In both loops, sc in next 5 sts, 2 sc in next st; repeat 6 times, join. (42 sts)
Rnd 4: In BLO, sc in next 6 sts, 2 sc in next st; repeat 6 times, join. (48 sts) This leaves the FLs of Rnd 3 free for Layer 2.
Checkpoint: 4 in (10.2 cm) across, matching back Rnd 8.
Rnd 5 (petal base): In both loops, repeat back Rnd 9. (10 sts per petal; 60 sts)
Rnd 6 (petal shaping): Repeat back Rnd 10. (14 sts per petal; 84 sts)
Do not fasten off. Put a marker in the live loop and set the panel aside. Use a separate length of yarn for each petal layer.
Petal Layer 1 (Inner)
With the right side facing, join yarn in a free FL of Rnd 1 directly in line with a Rnd 6 valley.
Layer 1: Sc in next FL, 2 dc in next FL, 3 dc in next FL, 2 dc in next FL, sc in next FL; repeat 6 times, join. (9 sts per petal; 54 sts)
Each petal uses 5 FLs, so the 6 petals use all 30 FLs. Nine stitches packed into a short span make each petal cup upward around the opening. Fasten off.
Petal Layer 2 (Middle)
With the right side facing, join yarn in a free FL of Rnd 3 in line with the same valley, so all the tiers stack directly in line.
Layer 2: Sc in next FL, hdc in next FL, 2 dc in next FL, (dc, tr, dc) in next FL, 2 dc in next FL, hdc in next FL, sc in next FL; repeat 6 times, join. (11 sts per petal; 66 sts)
Each petal uses 7 FLs, so the 6 petals use all 42 FLs. These petals sit between the cupped inner tier and the flat outer petals, which creates the stacked rosette. Fasten off and weave in the layer ends on the wrong side.
Make All Pieces
Make the following pieces, all in raspberry:
- 1 back panel (84-st edge)
- 1 front panel with 2 petal layers (84-st edge, live loop held)
- 1 drawstring (see below)
Stacking layout, side view:
[ Layer 1 petals ]  <- cupped, around opening
[ Layer 2 petals ]
[ Front panel    ]  <- 84-st petal edge
[ Back panel     ]  <- 84-st petal edge, solid
Joining
Place the front on the back with wrong sides together. Line up all 6 petal tips and all 6 valleys, then pin each tip.
Pick up the live loop on the front. From here, insert the hook through the next front stitch and the matching back stitch together.
Joining Rnd (Border Rnd 1): Ch 1, then work 1 sc through each pair of matching sts around and join. (14 sts per petal; 84 sts)
Each joined sc uses 1 front stitch and 1 back stitch. Both panels have 84 stitches, so the joined edge also has 84. Stacking the panels adds no stitches.
Keep your tension even and slightly relaxed, especially around the petal tips where the 2-dc increases sit. Pulling tight curls the petals and puckers the edge. Checkpoint: 5.75 in (14.6 cm) tip to tip.
Border
Border gauge: The border uses the body gauge, 16 sts = 4 in (10.2 cm). Each border round adds about 0.125 in (0.3 cm) to every edge.
Border Rnd 1: The joining round above. (14 sts per petal; 84 sts)
Border Rnd 2 (rsc with loop): Ch 1 and do not turn. Rsc in each st around. On the petal you want at the top, work the 7th rsc, then ch 12 and sl st into the same st to make the hanging loop. Continue with the 8th rsc of that petal. Join at the end. (14 rsc per petal; 84 rsc plus one ch-12 loop)
Why the math works: Every petal carries 14 stitches from back Rnd 10 and front Rnd 6. The join keeps 14 per petal (6 x 14 = 84), and the rsc round works 1 stitch into each of those 84. The valleys get no extra stitches, so the edge lies flat. The ch-12 loop is not counted, because its sl st goes into a stitch that already has its own rsc.
The loop stands about 1.25 in (3.2 cm) tall. Fasten off and weave the tail into the border.
Drawstring
Ch 65, about 16 in (40.6 cm) long. Turn and sl st into the back bump of each ch to make a firm cord. Fasten off.
Weave the cord in and out between every other stitch of front Rnd 2, just outside the opening, for 18 passes. Bring both ends out together on the right side. Tie an overhand knot 0.5 in (1.3 cm) from each end and trim the tails close.
Final Blocking
- Soak the saver in lukewarm water, then squeeze gently without wringing.
- Roll it in a towel to remove the excess water.
- Lay it back side down.
- Pin each petal tip 3 in (7.6 cm) from the center, for 6 in (15.2 cm) tip to tip.
- Shape the Layer 1 and Layer 2 petals with your fingers so they cup upward.
- Leave the drawstring open and let the saver dry completely.
Final Quality-Control Checklist
- Back lies flat at 5.5 in (14.0 cm) before joining
- Both panels have 84 edge sts, 14 per petal
- All 6 tips and 6 valleys line up
- Layer 1 has 54 sts and Layer 2 has 66 sts
- Border has 84 rsc plus one ch-12 loop at a petal tip
- Finished size is 6 in (15.2 cm) tip to tip
- The drawstring closes the opening fully
- All ends are woven in on the wrong side
Troubleshooting
Back ripples: The increases are too loose. Use a smaller hook.
Back cups: The tension is too tight. Use a larger hook.
Soap won’t fit: Make a 36-ch ring instead. Work Rnd 1 as sc in next 4 ch, sc2tog 6 times. That returns you to 30 sts with a wider opening.
Petal layers lie flat: Check that you worked into the FLs and put each dc group into a single stitch. Shape the petals while they are damp.
Edges don’t match: Recount 14 sts per petal on both panels. A missing or extra stitch shows up as a twisted valley.
Drawstring slips: Make sure it passes between every other stitch, and tie bigger end knots.
Care
Rinse out the soap after each use and hang the saver by its loop to dry. Machine wash warm in a mesh bag and lay flat to dry.
Final Notes
Measurement chain:
– The back reaches 4 in (10.2 cm) at 48 sts and 5.5 in (14.0 cm) at 84 sts.
– The front matches those numbers at Rnds 4 and 6, around a 2 in (5.1 cm) opening.
– Joining brings the saver to 5.75 in (14.6 cm).
– The rsc edge finishes it at 6 in (15.2 cm).
If every checkpoint matches, the panels line up petal for petal.
Happy crocheting!