

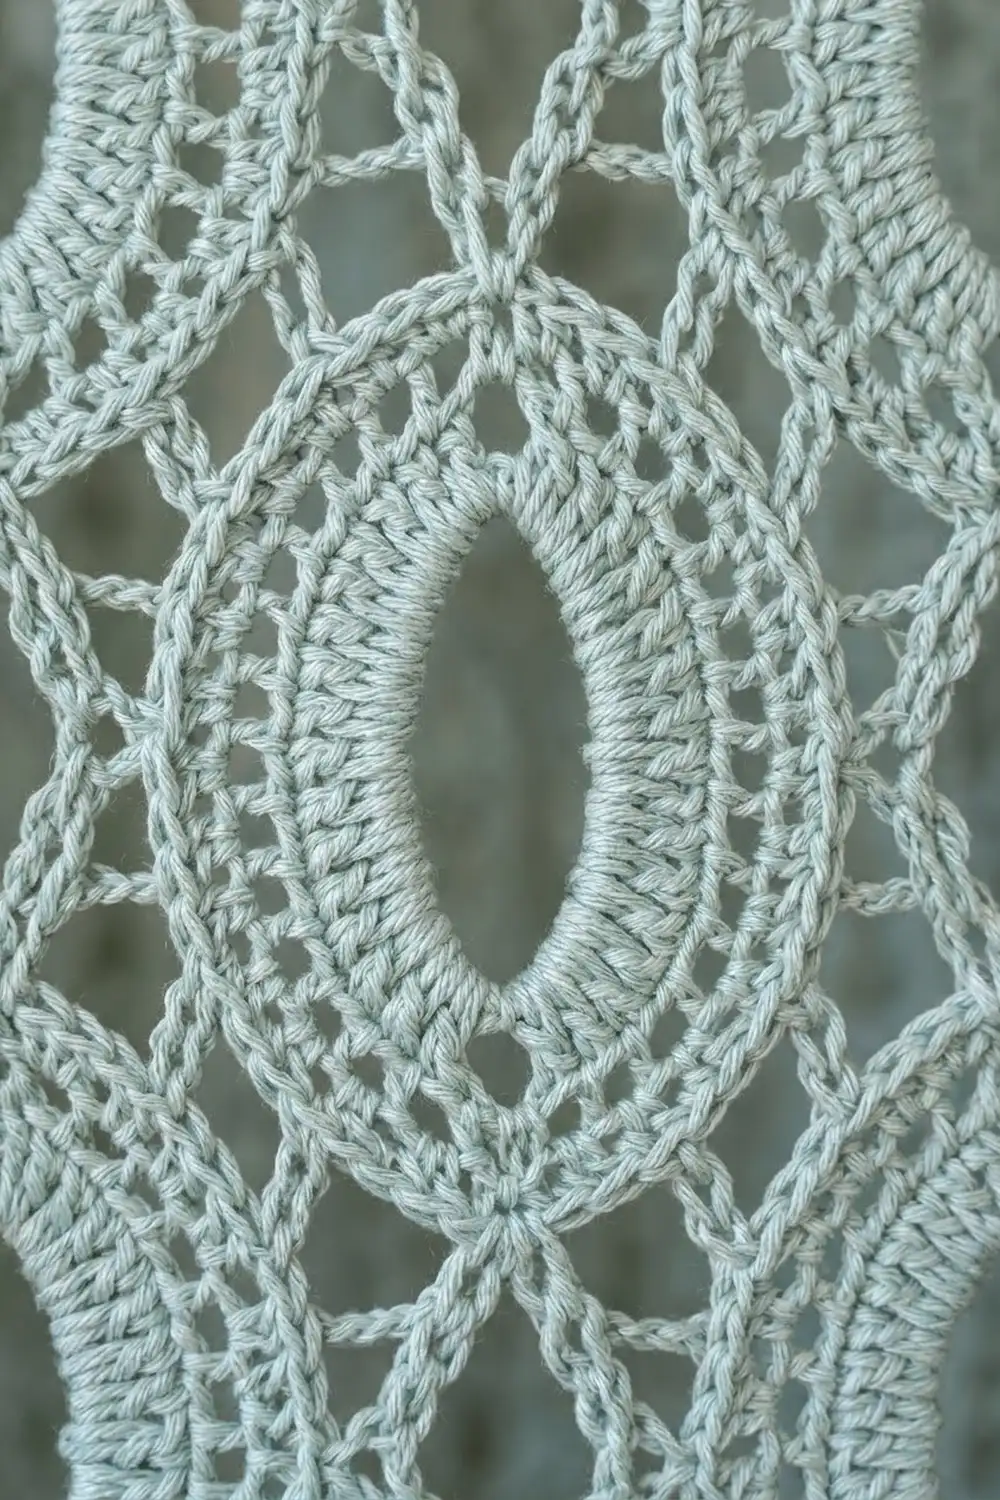
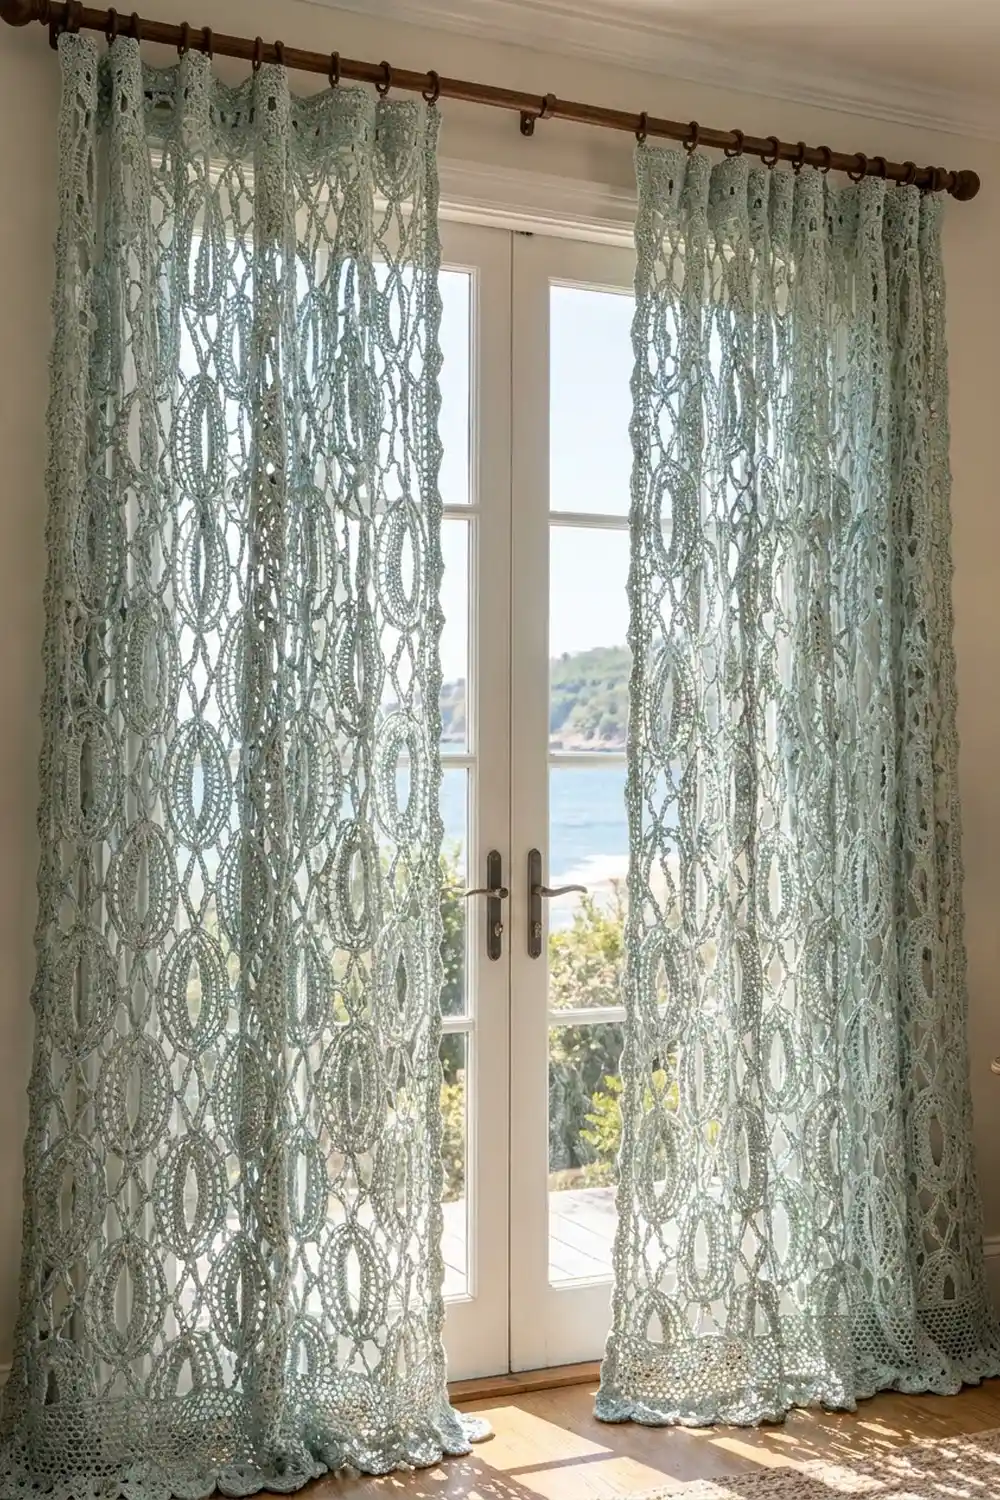
This curtain panel is built from rows of almond-shaped lace motifs. Each motif has a pointed oval opening framed by a raised, ridged ring, an outer ring of chain loops, and openwork corners. When the motifs are joined, the corners form a diamond-shaped chain lattice between the ovals, and light from the window shows through every opening.
The sample uses one soft sea-glass green, a pale sage-aqua that suits coastal, cottage, and sunroom spaces. One color keeps the focus on texture: the ridges of the post stitches, the loop rings, and a scalloped edge along the bottom of the panel.
The pattern uses US crochet terms. One finished panel measures 43 in wide x 87 in long (109.2 cm x 221.0 cm) after blocking. The photo shows a matching pair hung on a rod, so make two panels for a set.
You will crochet 96 rectangular oval motifs, join them in a grid 8 motifs wide by 12 motifs tall, and add a three-round border that ends in shells. Every stage has a measurement checkpoint so the finished panel comes out the right size.
Finished Size and Construction
- Finished panel size: 43 in x 87 in (109.2 cm x 221.0 cm)
- Skill level: Intermediate
- Terminology: US crochet terms
- Yarn weight: DK (weight 3) cotton
- Hook: 4.0 mm (G-6)
- Number of pieces: 96 motifs per panel (192 for a pair)
- Layout: 8 motifs across x 12 motifs down
- Motif size: 5 in x 7 in (12.7 cm x 17.8 cm)
- Size before border: 40 in x 84 in (101.6 cm x 213.4 cm)
- Border depth: 1.5 in (3.8 cm) on every side
Materials
Use a smooth mercerized or combed DK cotton, about 110 m per 50 g. Cotton shows the stitch texture well, holds its shape when hung, and stands up to washing. Do not use fuzzy or very stretchy yarn. It hides the lattice and lets a long panel sag.
- Sea Glass (pale sage-aqua): 1,000 g / 2,200 m per panel, or 2,000 g / 4,400 m for a pair (about 40 balls of 50 g)
These amounts include roughly a 10% margin for gauge swatches, joining, and differences between dye lots. Buy everything from a single dye lot.
Tools:
- 4.0 mm (G-6) crochet hook
- Tapestry needle
- Stitch markers (at least 4)
- Measuring tape
- Rust-proof pins and blocking mats or a clean carpeted floor
- Spray bottle
- 10–12 curtain clip rings for hanging
Abbreviations (US Terms)
- ch: chain
- sl st: slip stitch
- sc: single crochet
- hdc: half double crochet
- dc: double crochet
- dtr: double treble crochet (yo 3 times, insert hook, pull up a loop, [yo, pull through 2 loops] 4 times)
- fpdc: front post double crochet
- sk: skip
- sp(s): space(s)
- st(s): stitch(es)
- BLO: back loop only
Special stitch (fpdc): Yo, insert hook from front to back to front around the post of the stitch, yo, pull up a loop, [yo, pull through 2 loops] twice. This pushes the stitch forward and makes the raised ridge around each oval.
Gauge and Checkpoints
Make one complete motif before starting the rest and measure it. The motif is your gauge.
Edge gauge: 5 sc = 1 in (2.5 cm) along the final edging round of the motif.
Checkpoints for one motif (lightly pressed flat):
- After Round 3: about 2.5 in x 4.5 in (6.4 cm x 11.4 cm), a pointed oval
- After Round 4: about 3.5 in x 5.5 in (8.9 cm x 14.0 cm)
- After Round 6: 5 in x 7 in (12.7 cm x 17.8 cm), a rectangle
If your motif is too big: go down to a 3.75 mm hook and work the chains a little tighter. If it is too small: go up to a 4.5 mm hook. A difference of 0.25 in (0.6 cm) per motif adds up to 2 in (5.1 cm) across the width and 3 in (7.6 cm) down the length, so fix the gauge before you go on.
Oval Motif (Make 96 per Panel)
Foundation: Ch 30, sl st into first ch to form a ring, without twisting. Lay the ring flat as a long, narrow loop. The joining ch is the top point.
Round 1: Ch 1, 3 sc in same ch as join (top point), sc in next 14 ch, 3 sc in next ch (bottom point), sc in next 14 ch, join with sl st to first sc. (34 sc)
The 3-sc groups make the two pointed ends of the almond-shaped opening.
Round 2: Sl st in next sc (center sc of top point). Ch 3 (counts as dc), (dc, ch 2, 2 dc) in same st, dc in next 16 sts, (2 dc, ch 2, 2 dc) in next st (center sc of bottom point), dc in next 16 sts, join to top of beginning ch-3. (40 dc and 2 ch-2 sps)
Round 3: Sl st in next dc and into ch-2 sp. Ch 3 (counts as dc), (dc, ch 2, 2 dc) in same sp, fpdc around each of next 20 sts, (2 dc, ch 2, 2 dc) in next ch-2 sp, fpdc around each of next 20 sts, join. (48 sts: 40 fpdc + 8 dc, and 2 ch-2 sps)
The fpdc row makes the raised ridge that circles the opening.
Round 4 (loop ring): Sl st in next dc and into ch-2 sp. Ch 1, (sc, ch 3, sc) in same sp, [ch 3, sk next st, sc in next st] 12 times, ch 3, (sc, ch 3, sc) in next ch-2 sp, [ch 3, sk next st, sc in next st] 12 times, ch 3, join to first sc. (28 sc and 28 ch-3 loops)
Name the loops for Round 5: P1 is the top point loop. A1–A13 run down the first side. P2 is the bottom point loop. B1–B13 run up the second side.
Round 5 (squaring round): Sl st into P1. Ch 1, sc in P1, ch 3, hdc in A1, ch 3, dc in A2, ch 5, (dtr, ch 4, dtr) in next sc (corner), ch 4, dc in A3, ch 3, hdc in A4, [ch 3, sc in next loop] 5 times (A5–A9), ch 3, hdc in A10, ch 3, dc in A11, ch 4, (dtr, ch 4, dtr) in next sc (corner), ch 5, dc in A12, ch 3, hdc in A13, ch 3, sc in P2. Repeat along the B side: ch 3, hdc in B1, ch 3, dc in B2, ch 5, corner, ch 4, dc in B3, ch 3, hdc in B4, [ch 3, sc in next loop] 5 times, ch 3, hdc in B10, ch 3, dc in B11, ch 4, corner, ch 5, dc in B12, ch 3, hdc in B13, ch 3, join to first sc. (36 sts: 12 sc, 8 hdc, 8 dc, 8 dtr; plus 24 ch-3 sps, 4 side ch-4 sps, 4 ch-5 sps, 4 corner ch-4 sps)
Moving from short sc up to tall dtr fills the gap between the curved oval and the square corners. The long chains leave the openwork that becomes the lattice.
Round 6 (edging): Ch 1. Working around: sc in each st, 2 sc in each ch-3 sp, 3 sc in each side ch-4 sp, 4 sc in each ch-5 sp, and (sc, ch 2, sc) in each corner ch-4 sp. Join to first sc. Fasten off and weave in ends.
Count per side, including the 2 corner sc of that side:
- Top and bottom (short sides): 1 + 4 + 1 + 2 + 1 + 2 + 1 + 2 + 1 + 2 + 1 + 4 + 1 = 23, plus 2 corner sc = 25 sc
- Long sides: 1 + 3 + 9 + (8 x 2) + 3 + 1 = 33, plus 2 corner sc = 35 sc
- Total: (2 x 25) + (2 x 35) = 120 sc and 4 ch-2 corner sps
At 5 sc per inch, 25 sc = 5 in (12.7 cm) and 35 sc = 7 in (17.8 cm).
Make All Pieces
Make 96 motifs in Sea Glass for one panel, or 192 for a pair. Block the motifs in batches of 10–12, pinned to 5 in x 7 in (12.7 cm x 17.8 cm), before joining. Every oval should stand upright with the points at top and bottom.
Layout grid (one panel, M = motif):
Row 1:  M M M M M M M M
Row 2:  M M M M M M M M
Row 3:  M M M M M M M M
  ...   (rows 4–11 the same)
Row 12: M M M M M M M M
8 across x 12 down = 96 motifs.
Joining
Method: slip stitch through the back loops. Hold two motifs right sides together with the edges lined up. Insert the hook through the BLO of the facing sc on both motifs and sl st. This gives a flat seam on the right side and a thin ridge on the wrong side.
Step 1 (columns): Join 12 motifs short end to short end to make one vertical column, matching the 25 sc of one motif to the 25 sc of the next, one to one. Start and finish each seam in the corner ch-2 sps. Make 8 columns.
Step 2 (columns together): Join the columns along their long edges. For each motif, sl st 35 sc to 35 sc, then sl st through both pairs of corner ch-2 sps where four motifs meet, and carry on into the next motif. Each long seam covers 12 x 35 = 420 sc.
Tension: each sl st should be about as long as an sc. If the seams pull tight, the panel will cup and the lattice diamonds will pinch shut. Go up to a 4.5 mm hook for joining if needed.
Checkpoint: lay the joined panel flat. It should measure 40 in x 84 in (101.6 cm x 213.4 cm). The four-way corner junctions should open into small diamonds between the ovals.
Border
Border gauge: the same as the motif edge, 5 sc = 1 in (2.5 cm).
Starting count per side: short sides 8 x 25 = 200 sc; long sides 12 x 35 = 420 sc. Seams add no stitches. Skip the corner ch-2 sps at every seam junction along the outer edge, because those spaces are not counted.
Round 1: With right side facing, join yarn in any panel corner ch-2 sp. Ch 1, (sc, ch 2, sc) in corner sp, sc in each sc along side (skip seam-junction sps), repeat around, join.
- Short sides: 200 (1 per existing st) + 2 (corner sc) = 202 sc
- Long sides: 420 (1 per existing st) + 2 (corner sc) = 422 sc
Round 2 (mesh): Sl st into corner sp. Ch 3 (counts as dc), (ch 3, dc) in same sp, [ch 1, sk next st, dc in next st] across side, ending with dc in last corner sc, (dc, ch 3, dc) in next corner sp, repeat around, omitting last corner group, join.
- Short sides: 202 / 2 = 101 dc and 101 ch-1 sps
- Long sides: 422 / 2 = 211 dc and 211 ch-1 sps
Round 3 (scallops): Sl st into corner ch-3 sp. Ch 3, 6 dc in same sp (corner shell), sc in first ch-1 sp, [5 dc in next ch-1 sp, sc in next ch-1 sp] across side, 7 dc in next corner ch-3 sp, repeat around, omitting last corner shell, join. Fasten off.
- Short sides: 51 sc + 50 shells
- Long sides: 106 sc + 105 shells
- 4 corner shells of 7 dc
Why the math works: each side’s Round 1 count is even, so the mesh divides exactly. Both mesh counts (101 and 211) are odd, so every side begins and ends with an sc next to a corner shell, and the scallops mirror each other at all four corners. The 8 x 12 layout was chosen for this reason.
The border adds about 0.25 in (0.6 cm) in Round 1, 0.5 in (1.3 cm) in Round 2, and 0.75 in (1.9 cm) in Round 3, for a total of 1.5 in (3.8 cm) per side.
Final Blocking
- Weave in all remaining ends along seam ridges, where they will not show.
- Soak the panel in cool water with a little wool wash for 15 minutes.
- Press out the water gently. Roll the panel in towels to remove more. Do not wring.
- Lay it flat on mats or a clean, covered floor, right side up.
- Pin the four corners first to 43 in x 87 in (109.2 cm x 221.0 cm).
- Pin the long edges every 6 in (15.2 cm), then pin out each scallop along the bottom.
- Straighten the columns so each oval stands upright and each lattice diamond is open.
- Let it dry completely, usually 24–48 hours, before unpinning.
Final Quality-Control Checklist
- Panel measures 43 in x 87 in (109.2 cm x 221.0 cm)
- All 96 motifs measure 5 in x 7 in (12.7 cm x 17.8 cm)
- Every oval opening points up and down
- Fpdc ridges sit on the right side of every motif
- Seams lie flat with no puckering
- Lattice diamonds are open at every junction
- Border counts: 202 / 422 sc, 101 / 211 mesh sps
- Shells are evenly spaced and the corner shells match
- All ends are secured
Troubleshooting
Oval looks round instead of pointed: Make sure Round 1 has 3 sc in the two point chains and that Round 2 places its ch-2 sps exactly at the points.
Motif cups: The fpdc are probably too tight. Pull up a slightly taller loop on each post.
Corners curl or ruffle: Count Round 5 again. The dtr belongs in the sc between loops 2 and 3, and between loops 11 and 12.
Edge count is off: Recount Round 6 one side at a time against the 25 / 35 breakdown above.
Panel narrower than 40 in (101.6 cm): The joining is too tight. Undo and rejoin with a larger hook.
Scallops do not end in sc at a corner: Check the Round 1 side count. It must be 202 or 422.
Care
Hand wash or machine wash cold on a delicate cycle inside a mesh laundry bag. Reshape while damp and dry flat or hang to dry, out of strong direct sun.
Final Notes
The measurement chain is short. One motif at 5 sc per inch gives 5 in x 7 in (12.7 cm x 17.8 cm). Eight across and twelve down give 40 in x 84 in (101.6 cm x 213.4 cm). A 1.5 in (3.8 cm) border brings the panel to 43 in x 87 in (109.2 cm x 221.0 cm). If you check the first motif, the joined panel, and the border counts, the curtain will hang straight. Make a second panel to complete the pair shown.
Happy crocheting!