

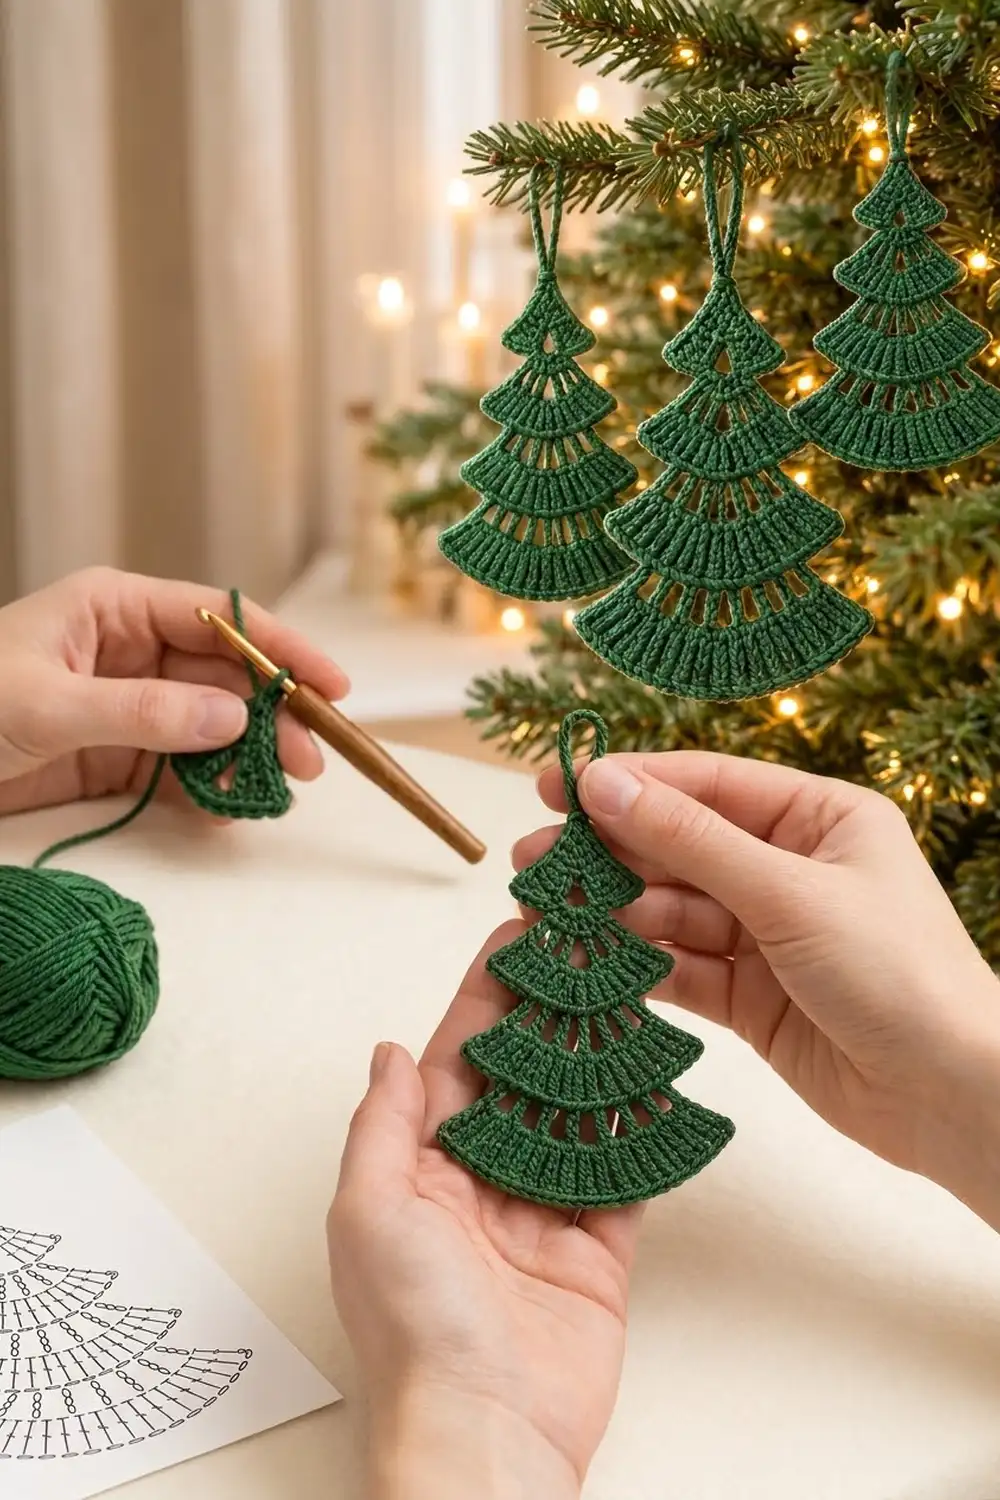
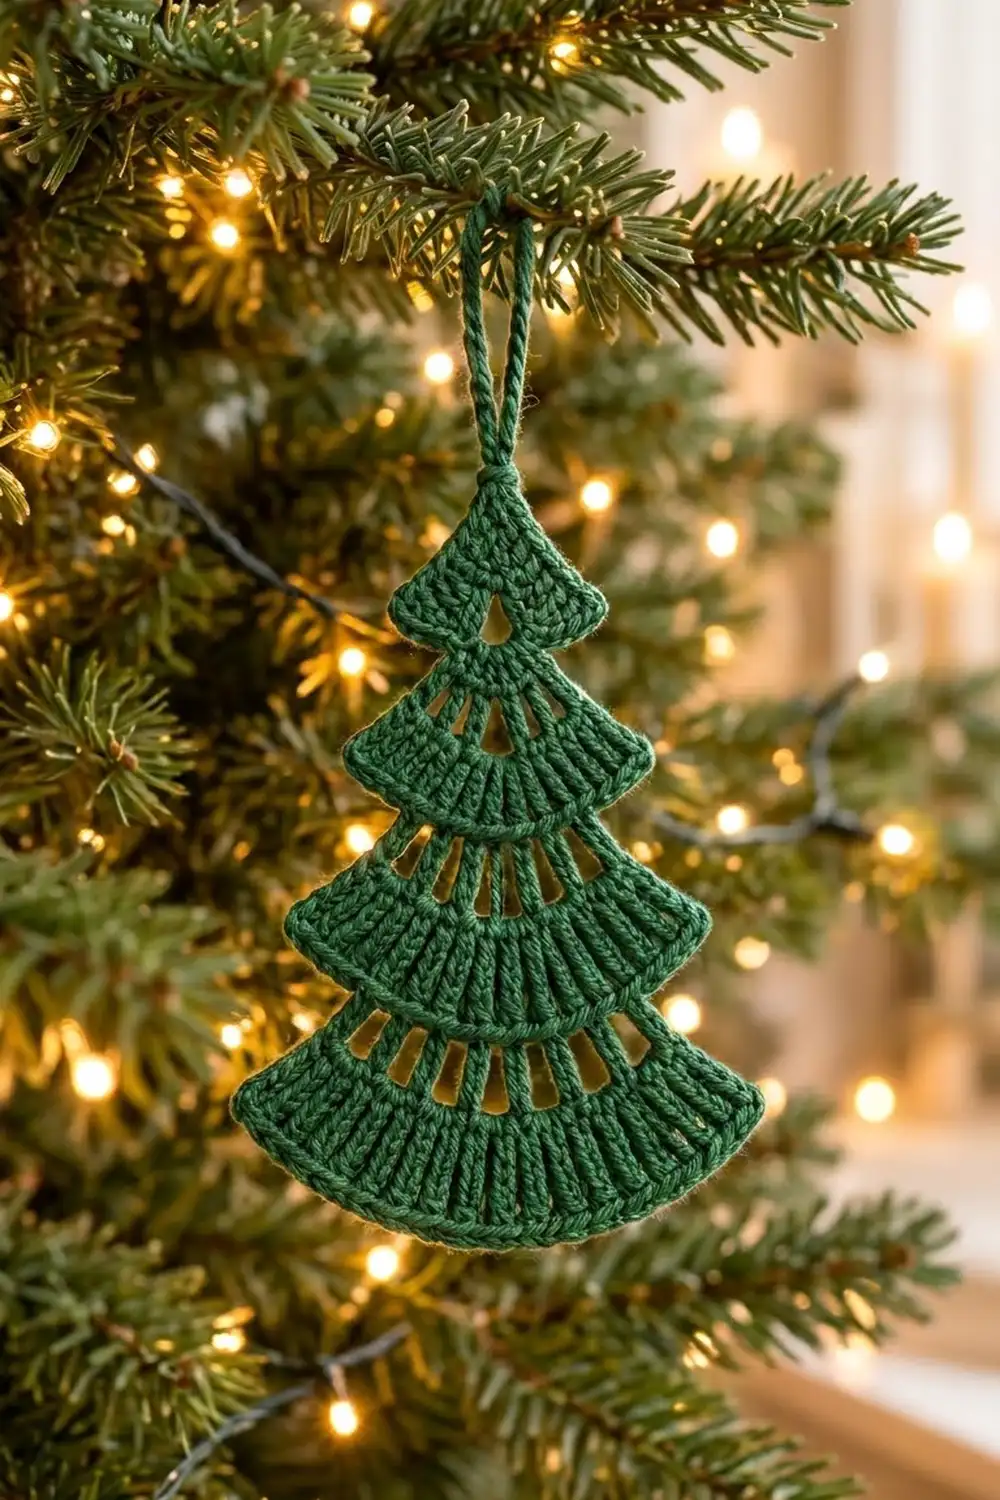
This little tree ornament is made of four stacked fan-shaped tiers. Each tier has a row of narrow “windows” and then a dense ribbed band. The edges step out from tier to tier, so the tree looks layered and branch-like even though it is one flat piece.
The sample is a single forest green, which looks good with warm tree lights. Any solid evergreen shade works. Pine, emerald or a deep sage show the stitch texture well. Variegated yarn hides the windows, so avoid it.
The pattern uses US crochet terms. The finished ornament is about 4.6 in (11.7 cm) wide and 5.25 in (13.3 cm) tall. The hanging loop adds about 1.25 in (3.2 cm), so the total height is about 6.5 in (16.5 cm).
You work the tree flat in turned rows, from the tip down to the base. The windows are made with treble posts and chain gaps, which are closed by the next double crochet row. Each tier ends in a single crochet hem. At the next tier you skip a few hem stitches, which creates the step. The loop is made last from the starting tail.
Finished Size and Construction
- Finished size: 4.6 in (11.7 cm) wide × 5.25 in (13.3 cm) tall, plus a 1.25 in (3.2 cm) loop
- Skill level: Easy+ / Intermediate
- Terminology: US
- Yarn weight: Fine (#2) sport-weight cotton
- Hook: 2.5 mm
- Number of pieces: 1
- Layout: One flat tree with four stacked tiers, worked top-down
- Piece size: 4.6 in (11.7 cm) × 5.25 in (13.3 cm)
- Size before border (after Row 18): 4.3 in (10.9 cm) wide
- Border depth: about 0.15 in (0.4 cm) for the hem, plus a slip-stitch rim under 1/8 in (0.3 cm)
Materials
Yarn: Use a smooth, tightly plied mercerized cotton or cotton blend. The windows only look crisp if the stitches stay sharp. Fuzzy or very soft yarn will blur them.
- Forest Green: 12 g / 36 m (39 yd)
This amount includes a margin of about 30% for your gauge swatch, the loop and weaving in ends.
Tools:
– 2.5 mm crochet hook
– Tapestry needle
– Scissors
– Rustproof pins and a blocking mat
– Spray bottle with water
– Optional: fabric stiffener
Abbreviations (US Terms)
- ch – chain
- sl st – slip stitch
- sc – single crochet
- dc – double crochet
- tr – treble crochet
- st(s) – stitch(es)
- sp – space
- sk – skip
- tch – turning chain
- RS / WS – right side / wrong side
Special stitch – Post Pair (PP): Work 2 tr in the same stitch. Every window row uses post pairs as the columns between the windows. At the start of a row, ch 4 counts as the first tr, so “ch 4, tr in same st” counts as one post pair.
Note: At the start of each dc row, ch 3 counts as a dc. At the start of each hem row, ch 1 does not count as a stitch.
Gauge and Checkpoints
Gauge: 28 dc and 14 dc rows = 4 in (10.2 cm). One tr row is about 0.4 in (1.0 cm) tall. One sc row is about 0.15 in (0.4 cm) tall.
Tier 1 (Rows 1–4) is your test piece. Work it, then lay it flat and measure before you go on.
Checkpoints:
– After Row 4: 2.0 in (5.1 cm) wide, 1.0 in (2.5 cm) tall
– After Row 9: 2.6 in (6.6 cm) wide, 2.4 in (6.1 cm) tall
– After Row 14: 3.4 in (8.6 cm) wide, 3.8 in (9.7 cm) tall
– After Row 19: 4.6 in (11.7 cm) wide, 5.25 in (13.3 cm) tall
If Tier 1 is too big (more than 2.1 in / 5.3 cm wide), go down to a 2.25 mm hook. If it is too small (less than 1.9 in / 4.8 cm wide), go up to a 2.75 mm hook.
Width matters more than height. If only the height is off, pull your dc up a little more or less. Don’t change the hook for that.
Pattern
Leave a 24 in (61.0 cm) starting tail. You will use it for the hanging loop.
Tier 1 (Top Triangle)
Row 1 (RS): Ch 4. In the 4th ch from hook, work (dc, ch 2, 2 dc). The skipped 3 ch count as the first dc. (4 dc, 1 ch-2 sp)
Row 2: Ch 3, turn. Dc in the same st. Dc in the next dc, ch 3, sk the ch-2 sp, dc in the next dc. Work 2 dc in the top of the tch. (6 dc, 1 ch-3 sp)
Row 3: Ch 3, turn. Dc in the same st. Dc in each of the next 2 dc. Work 4 dc in the ch-3 sp. Dc in each of the next 2 dc. Work 2 dc in the top of the tch. (12 dc: 2 + 2 + 4 + 2 + 2)
The 4 dc in the ch-3 sp close the opening at the bottom. This leaves the triangular window, pointing up, in the center of the tier.
Row 4 (Hem): Ch 1, turn. Work 2 sc in the first dc, sc in each of the next 10 dc, and 2 sc in the top of the tch. (14 sc = 12 worked once each + 2 extra)
Tier 2 (3 Windows)
Row 5 (Window Row): Ch 1, turn. Sl st in each of the first 3 sc, so your hook sits in st 3. Ch 4, tr in the same st (first PP). Then work [ch 2, sk 2 sc, PP in next sc] 3 times. Leave the last 2 sc unworked. (8 tr in 4 PP, 3 ch-2 sp)
The post pairs sit in sts 3, 6, 9 and 12. Two hem stitches are left free on each side, and those free stitches make the step.
Row 6 (Closing Row): Ch 3, turn. Dc in the same st, then dc in the next tr. Work [2 dc in the ch-2 sp, dc in each of the next 2 tr] 2 times. Work 2 dc in the last ch-2 sp, dc in the next tr, and 2 dc in the top of the tch. (16 dc = 8 tr worked once each + 6 in sps + 2 extra)
Rows 7–8: Ch 3, turn. Dc in each st across, ending in the top of the tch. (16 dc)
Row 9 (Hem): Ch 1, turn. Work 2 sc in the first st, sc in each of the next 14 sts, and 2 sc in the last st. (18 sc = 16 + 2 extra)
Tier 3 (5 Windows)
Row 10 (Window Row): Ch 1, turn. Sl st in each of the first 2 sc, so your hook sits in st 2. Ch 4, tr in the same st. Work [ch 2, sk 2 sc, PP in next sc] 5 times. Leave the last sc unworked. (12 tr in 6 PP, 5 ch-2 sp)
The post pairs sit in sts 2, 5, 8, 11, 14 and 17.
Row 11 (Closing Row): Ch 3, turn. Dc in the next tr. Work [2 dc in the ch-2 sp, dc in each of the next 2 tr] 4 times. Work 2 dc in the last ch-2 sp, dc in the next tr, and dc in the top of the tch. (22 dc = 12 tr worked once each + 10 in sps)
Rows 12–13: Ch 3, turn. Dc in each st across. (22 dc)
Row 14 (Hem): Ch 1, turn. Work 2 sc in the first st, sc in each of the next 20 sts, and 2 sc in the last st. (24 sc = 22 + 2 extra)
Tier 4 (7 Windows)
Row 15 (Window Row): Ch 1, turn. Sl st in each of the first 2 sc. Ch 4, tr in the same st. Work [ch 2, sk 2 sc, PP in next sc] 7 times. Leave the last sc unworked. (16 tr in 8 PP, 7 ch-2 sp)
The post pairs sit in sts 2, 5, 8 and so on up to st 23.
Row 16 (Closing Row): Ch 3, turn. Dc in the next tr. Work [2 dc in the ch-2 sp, dc in each of the next 2 tr] 6 times. Work 2 dc in the last ch-2 sp, dc in the next tr, and dc in the top of the tch. (30 dc = 16 + 14)
Rows 17–18: Ch 3, turn. Dc in each st across. (30 dc)
Row 19 (Hem): Ch 1, turn. Work 2 sc in the first st, sc in each of the next 28 sts, and 2 sc in the last st. (32 sc = 30 + 2 extra)
Don’t fasten off yet. Go on to the Border.
Hanging Loop
Work the loop after the border and blocking (see below). With the RS facing, put your hook into the foundation ch at the tip and pull up a loop of the starting tail. Ch 18, then sl st into the same foundation ch. Work 24 sc into the ch-18 loop, covering the chain completely. Sl st into the tip and fasten off. Weave the end down into Tier 1.
The covered loop is about 1.25 in (3.2 cm) tall.
Border
This ornament doesn’t need a separate edging all the way around. Its border is the four tier hems plus a slip-stitch rim along the base.
Border gauge: 7 sc = 1 in (2.5 cm), the same as the dc stitch gauge.
Hem counts per tier:
– Tier 1: 12 dc become 14 sc
– Tier 2: 16 dc become 18 sc
– Tier 3: 22 dc become 24 sc
– Tier 4: 30 dc become 32 sc
Row 20 (Base Rim): Ch 1, turn. Loosely sl st in each sc across. (32 sl st) Fasten off.
Why the math works: Each hem has one sc for every stitch below it, so the band lies flat and doesn’t ruffle or cup. The 2 extra sc, one at each end, push the corners out by about 0.15 in (0.4 cm). That small lip is what makes the edge of each tier stand out from the next one.
The next window row then skips 2 sts per side (Tier 2) or 1 st per side (Tiers 3 and 4). It starts on a stitch count of 3n + 1: 10, 16 and 22 sts give 3, 5 and 7 windows. Because of this, every tier is centered exactly under the one above.
The base rim also works 1 sl st per sc. It firms up the bottom edge without changing the 32-st width.
Final Blocking
- Weave in all ends except the starting tail.
- Spray the ornament until it is damp, but not dripping.
- Lay it WS down on the mat. Pin the tip, then the two corners of the base, 4.6 in (11.7 cm) apart.
- Pin each tier’s hem corners so that they flare slightly outward and upward. Let the middle of each hem dip about 1/8 in (0.3 cm) to form a soft arc.
- Open each window by sliding a pin straight down through its center.
- Check that the height from the tip to the base rim is 5.25 in (13.3 cm).
- If you want, brush on fabric stiffener for a crisper result.
- Let it dry completely, then make the hanging loop.
Final Quality-Control Checklist
- Tier 1 has one centered triangular window.
- Tiers 2, 3 and 4 have 3, 5 and 7 windows, and each tier is centered.
- The hem counts are 14, 18, 24 and 32 sc.
- Each tier’s corners stick out past the start of the tier below.
- The base measures 4.6 in (11.7 cm) wide, and the tree is 5.25 in (13.3 cm) tall.
- The loop is fully covered and attached exactly at the tip.
- No ends show on the RS.
Troubleshooting
The windows lean to one side. You likely worked the first post pair into the last sl st by mistake, or you missed it. Make sure your hook is in st 3 (Tier 2) or st 2 (Tiers 3 and 4) before you ch 4.
The hem ruffles. Your sc are looser than your dc. Go down half a hook size for the hem rows only.
The tier sides curl. The dc rows are tight. Pull each loop up fully, then block with stiffener.
The window count is wrong. Count the stitches in the hem before you start the next window row: 14, 18 and then 24.
The tree tilts. Count the unworked stitches at the end of the window row. It should be 2 sts in Tier 2 and 1 st in Tiers 3 and 4.
Care
Hand wash in cool water. Press out the water in a towel and re-block it flat to dry. If you used stiffener, you will need to reapply it after washing.
Final Notes
The size depends on one chain of measurements. Tier 1 should be 2.0 in (5.1 cm) wide. Tier 2 grows to 2.6 in (6.6 cm), Tier 3 to 3.4 in (8.6 cm) and Tier 4 to 4.6 in (11.7 cm). The finished tree is 5.25 in (13.3 cm) tall, plus a 1.25 in (3.2 cm) loop. If Tier 1 matches the gauge, the rest of the tree will match too.
Happy crocheting!