

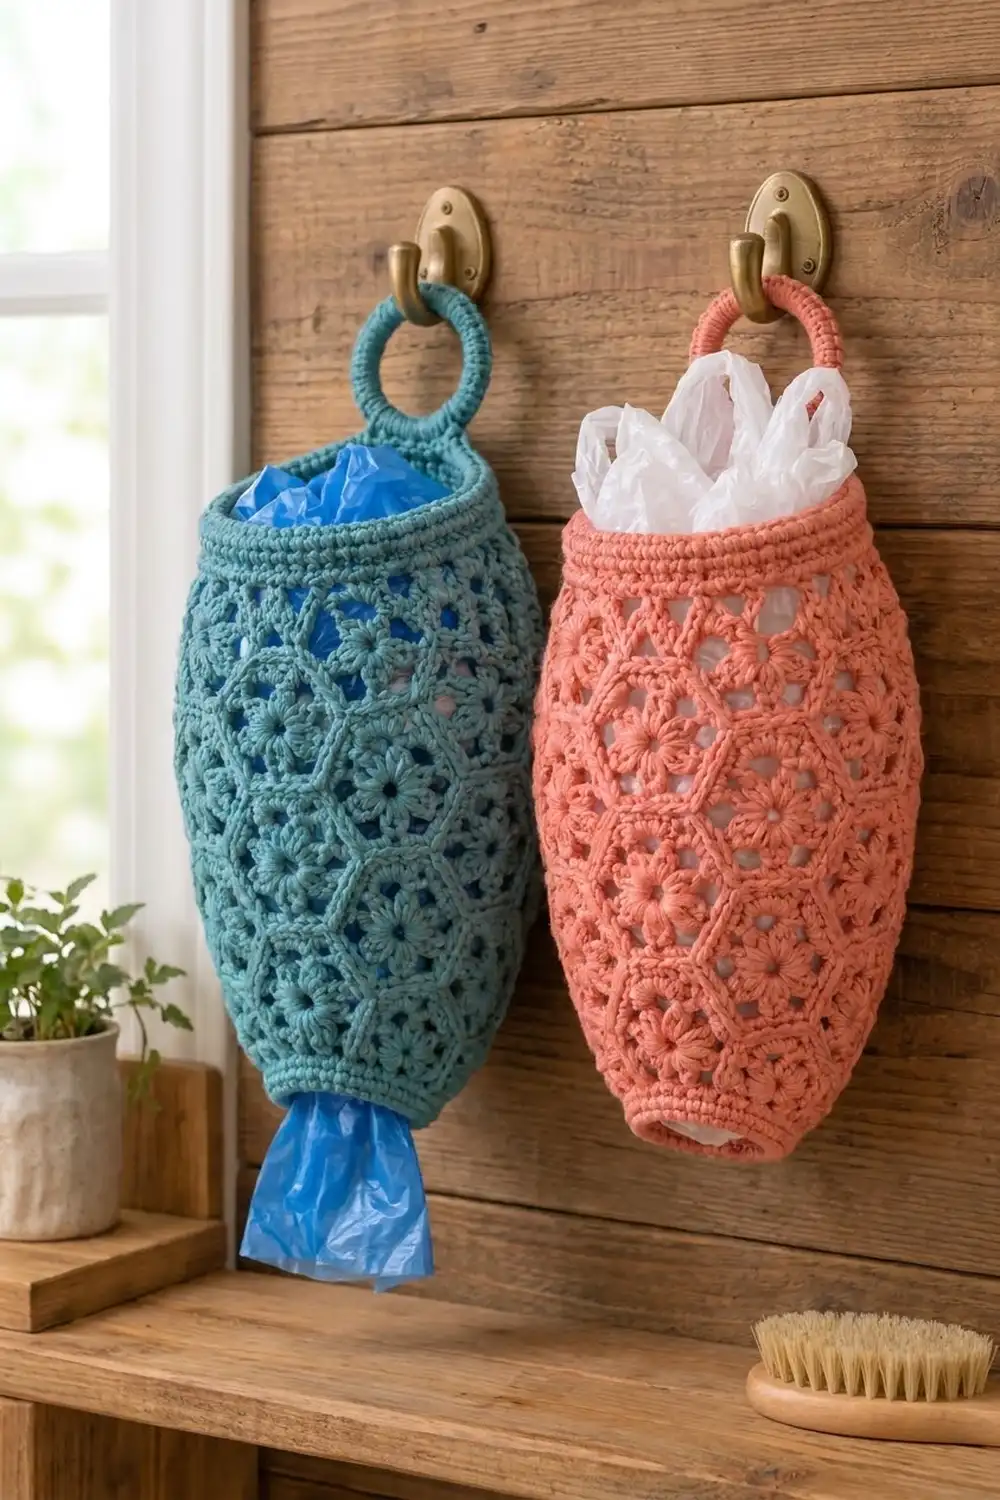
Turn the pile of grocery bags under your sink into something you’re happy to leave on the wall. The Honeycomb Bloom Bag Holder is a tube made of flower hexagons. You stuff bags in the top and pull them out, one at a time, through a snug cuff at the bottom.
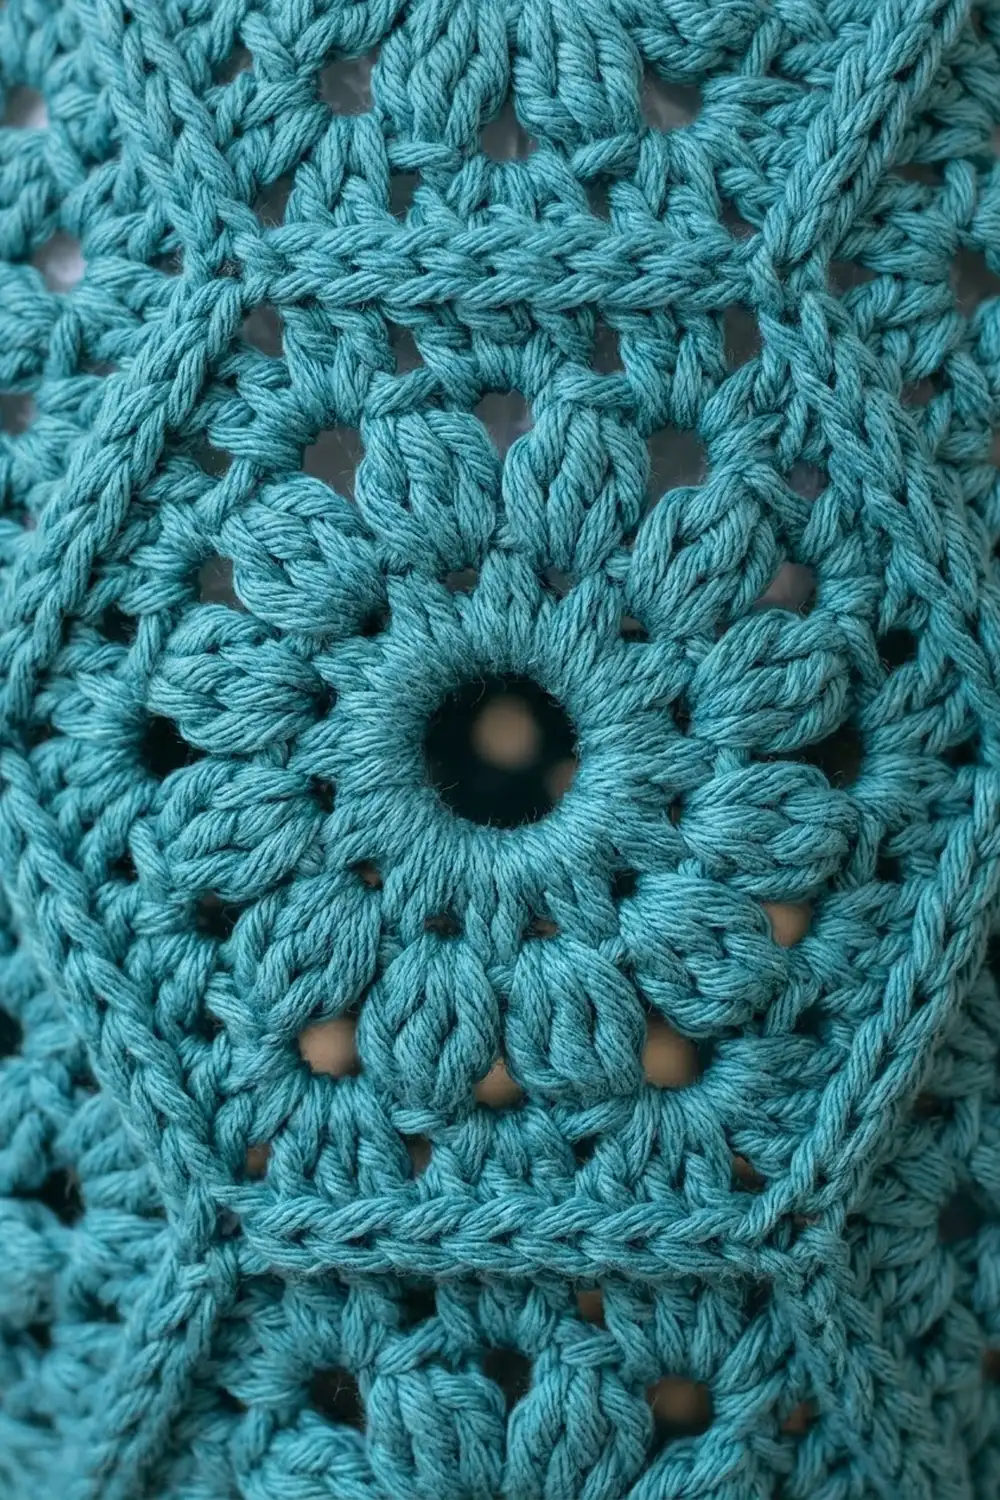
Each hexagon has an open center, a ring of puffy cluster petals and a solid single crochet frame. Joined together, the hexagons make a honeycomb pattern with raised seam lines. The holder shown is worked in a single solid color, such as teal or coral. Make one in each color for a matching pair.
This pattern uses US crochet terms. The finished holder is about 16.8 in (42.7 cm) long without the ring, and about 20 in (50.8 cm) including it. The body is 21 in (53.3 cm) around.
Construction is simple. You crochet 24 hexagons and join them into a tube of 4 staggered tiers, with 6 hexagons in each tier. Then you work a shaped band at the top and a narrower cuff at the bottom, add the strap, and attach a covered ring.
Finished Size and Construction
- Finished size: 16.8 in (42.7 cm) long without the ring, about 20 in (50.8 cm) with it; 21 in (53.3 cm) around the body, or 10.5 in (26.7 cm) wide laid flat
- Skill level: Intermediate
- Terminology: US
- Yarn weight: Worsted (#4) cotton
- Hook: 4.0 mm (G-6)
- Number of pieces: 24 hexagons + 1 covered ring
- Layout: 4 tiers of 6 hexagons, joined into a tube
- Piece size: 3.5 in (8.9 cm) from flat side to flat side; 4 in (10.2 cm) from point to point; sides 2 in (5.1 cm)
- Size before border: joined tube is 13 in (33.0 cm) tall from peak to peak and 21 in (53.3 cm) around
- Border depth: top band 1.8 in (4.6 cm); bottom cuff 2 in (5.1 cm)
Materials
Use a smooth, firm worsted cotton or cotton blend. Cotton keeps the stitches crisp and doesn’t stretch out under the weight of the bags. Avoid fuzzy or very stretchy yarns, because they blur the petals and the holder will sag.
- Main color (teal or coral): 175 g, about 315 m (based on 100 g = 180 m)
The quantity includes a margin of about 20% for gauge differences and swatching.
Tools:
– 4.0 mm (G-6) crochet hook
– 1 plastic or wooden ring, 2.5 in (6.4 cm) across
– Tapestry needle
– Stitch markers
– Rustproof pins and a blocking mat
– Measuring tape
– Hexagon template, 3.5 in (8.9 cm) from flat side to flat side, drawn on card
Abbreviations (US Terms)
- ch – chain
- sl st – slip stitch
- sc – single crochet
- hdc – half double crochet
- dc – double crochet
- tr – treble crochet
- sc2tog – single crochet 2 together
- sp – space
- st(s) – stitch(es)
- RS / WS – right side / wrong side
- rep – repeat
Special stitches
- Cluster (cl): *Yarn over, insert hook in the stitch, pull up a loop, yarn over and pull through 2 loops. Repeat from * 2 more times in the same stitch (4 loops on hook). Yarn over and pull through all 4 loops.
- Beginning cluster (beg cl): Ch 2. Work the cluster as above, but repeat from * only once more (3 loops on hook), then yarn over and pull through all 3 loops.
- tr2tog across a valley: Yarn over twice, insert hook in the first ch-2 space, pull up a loop, [yarn over, pull through 2] twice. Yarn over twice, insert hook in the second ch-2 space, pull up a loop, [yarn over, pull through 2] twice. Yarn over and pull through all 3 loops. This counts as 1 stitch.
Gauge and Checkpoints
Gauge: 18 sc and 20 rounds = 4 in (10.2 cm). That works out to 4.5 sts and 5 rounds per inch.
Make one test hexagon before anything else. It tells you more than a flat swatch does. Measure it after each round:
- After Round 1: 1.25 in (3.2 cm) across
- After Round 2: 2.25 in (5.7 cm) across
- After Round 3: 3 in (7.6 cm) from flat side to flat side
- After Round 4: 3.5 in (8.9 cm) from flat side to flat side; 4 in (10.2 cm) from point to point; each side 2 in (5.1 cm)
If your hexagon is too big: go down 0.5 mm in hook size. Even 0.125 in (0.3 cm) too much per hexagon adds 0.75 in (1.9 cm) to the body’s circumference.
If your hexagon is too small: go up 0.5 mm in hook size.
Get the size right on your test hexagon before you make the other 23.
Hexagon Motif (Make 24)
Work in the round with the RS facing you. Do not turn.
Round 1: Make a magic ring. Ch 3 (counts as dc), then work 11 dc into the ring. Pull the ring snug, but leave a small open center. Join with a sl st to the top of the beginning ch-3. (12 dc)
Round 2: Work a beg cl in the same stitch, then ch 2. Cl in the next dc, ch 2. Rep from * 10 more times. Join with a sl st to the top of the beg cl. (12 clusters, 12 ch-2 spaces)*
The clusters are the puffy petals. The ch-2 spaces make the small gaps between them.
Round 3: Sl st into the first ch-2 space. Ch 3 (counts as dc), then work (dc, ch 2, 2 dc) in the same space to make a corner. Work 3 dc in the next ch-2 space. Work (2 dc, ch 2, 2 dc) in the next ch-2 space, then 3 dc in the next ch-2 space. Rep from * 4 more times. Join to the top of the beginning ch-3. (42 dc, 6 corner ch-2 spaces; 7 dc per side)*
Round 4: Ch 1. Sc in each dc up to the corner, then work (sc, ch 2, sc) in the corner ch-2 space. Rep from * around. Join to the first sc. (54 sc, 6 corner ch-2 spaces)*
Each side has 9 sc: the 7 sc worked in the dc, plus 1 corner sc at each end. The corner sts are already included in this count, so don’t add them again later.
Fasten off and weave in the tail.
Pre-block: Pin each hexagon to your template, mist it with water and let it dry. Hexagons that are all the same size join much more neatly.
Make All Pieces
- Hexagons: 24 in the main color
- Covered ring: 1 in the main color (see Hanging Ring below)
Layout (the tube unrolled, point-up hexagons):
Tier 4 (top):      H19  H20  H21  H22  H23  H24
Tier 3:         H13  H14  H15  H16  H17  H18
Tier 2:            H7   H8   H9   H10  H11  H12
Tier 1 (bottom): H1   H2   H3   H4   H5   H6
Each tier is shifted half a hexagon from the tier below it. This way, each hexagon sits in the dip between two hexagons underneath. In every tier, H6, H12, H18 and H24 wrap around and join back to the first hexagon of that tier, which closes the tube.
Joining
Method: Slip stitch join on the RS. Hold the two hexagons with WS together and the RS facing out. Insert the hook through both loops of both edges. This makes the raised ridge you see between the hexagons.
Stitch-to-stitch logic: Every seam has 11 sl sts:
- 1 sl st through both corner ch-2 spaces
- 9 sl sts, matching sc to sc
- 1 sl st through the next pair of corner ch-2 spaces
Because both sides have the same count, the seam never needs easing.
Order:
- Tier 1: Join H1 to H6 in a strip, along their vertical sides (5 seams). Then join H6 back to H1 to close the ring (6 seams in total).
- Tier 2: Join each hexagon from H7 to H12 along its lower-left and lower-right sides to the two hexagons below it. Join it to its tier neighbor along the vertical side.
- Tiers 3 and 4: Join them the same way.
Totals:
- 24 vertical seams (6 per tier × 4 tiers)
- 36 diagonal seams (12 between each pair of tiers × 3)
- 60 seams in total, or 660 sl sts
Where three corners meet, work the corner sl st through all the ch-2 spaces that are there.
Tension: Keep the slip stitches about as loose as your sc. Tight seams pucker and make the tube shorter. If you tend to pull tight, use a 4.5 mm hook for joining only.
Checkpoint: Lay the tube flat. It should measure 13 in (33.0 cm) from the top peaks to the bottom points, and 10.5 in (26.7 cm) wide, which is 21 in (53.3 cm) around.
Border: Top Band, Bottom Cuff and Hanging Ring
Border gauge: 4.5 sc per inch and 5 rounds per inch, the same as the main gauge.
Both open ends of the tube have a zigzag edge. Each end hexagon has 2 slanted sides of 9 sc, with its peak corner between them. Between hexagons there are valleys, where two joined corner ch-2 spaces meet.
Per-hexagon edge count: 9 sts + 1 peak st + 9 sts + 1 valley st = 20 sts.
There are 6 hexagons along each edge, so the edge starts with 6 × 20 = 120 sts. The valley stitch belongs to the hexagon on its left, so no stitches are added at the seams on top of this count.
Top Band
Round 1 (leveling): Join the yarn in any top valley. Ch 4 (counts as the first leg of tr2tog), then finish the tr2tog across both valley ch-2 spaces.
Working up the next slanted side (9 sts): tr in each of the next 2 sc, dc in the next 2 sc, hdc in the next 3 sc, sc in the next 2 sc.
At the peak: sc in the peak ch-2 space.
Working down the next slanted side (9 sts): sc in the next 2 sc, hdc in the next 3 sc, dc in the next 2 sc, tr in the next 2 sc.
Repeat around: *tr2tog across the next valley, then work up the next slanted side, the peak and down the following slanted side exactly as above. Rep from * 4 more times. Join.
Round 1 count: 108 sts worked one per existing sc (6 hexagons × 18 side sc) + 6 peak sts + 6 valley sts = 120 sts.
The taller stitches fill the valleys, so the edge comes out level.
Round 2: Ch 1. Sc in the next 3 sts, sc2tog. Rep from * 23 more times. Join. (96 sts)*
Round 3: Ch 1. Sc in the next 2 sts, sc2tog. Rep from * 23 more times. Join. (72 sts)*
Round 4: Ch 1. Sc in the next 4 sts, sc2tog. Rep from * 11 more times. Join. (60 sts)*
Rounds 5–9: Ch 1, sc in each st around. Join. (60 sts)
Don’t fasten off yet; the strap starts from the last round.
Why the math works: At 4.5 sts per inch, 96 sts measure 21.3 in (54.1 cm). That matches the body’s 21 in (53.3 cm) circumference. Round 1 is a little dense, so it doesn’t pull the valleys in, and Round 2 brings it back to body size straight away. After that, 72 sts give 16 in (40.6 cm) and 60 sts give 13.3 in (33.8 cm). That taper creates the rolled top rim. Nine rounds at 5 per inch make the 1.8 in (4.6 cm) band.
Strap
Mark the 6 center back sts of Round 9. Work the strap in rows over those 6 sts.
Row 1: Sl st to the first marked st. Ch 1, sc in the 6 marked sts, then turn. (6 sc)
Rows 2–8: Ch 1, sc in each st across, then turn. (6 sc)
The finished strap is 1.33 in (3.4 cm) wide and 1.6 in (4.1 cm) long. Leave a 12 in (30.5 cm) tail and set the strap aside while you cover the ring.
Hanging Ring
Join the yarn over the ring. Work 44 sc tightly over it, packing the stitches so the ring is completely hidden. Add or skip 1–2 sc if your ring needs it. Join and fasten off.
To attach the ring, pass the strap through it. Fold Rows 5–8 down behind the strap and whipstitch Row 8 across Row 3, so the ring is held in the fold.
Bottom Cuff
Round 1 (leveling): Join the yarn in a bottom valley. Work exactly as for top Round 1, using the bottom points as the peaks. (108 + 6 + 6 = 120 sts)
Round 2: Work as top Round 2. (96 sts)
Round 3: Work as top Round 3. (72 sts)
Round 4: Ch 1. Sc in the next st, sc2tog. Rep from * 23 more times. Join. (48 sts)*
Round 5: Ch 1. Sc in the next 2 sts, sc2tog. Rep from * 11 more times. Join. (36 sts)*
Rounds 6–10: Ch 1, sc in each st around. Join. (36 sts)
Fasten off.
The cuff measures 8 in (20.3 cm) around, or 4 in (10.2 cm) laid flat. That’s about 2.5 in (6.4 cm) across, which is snug enough to hold bags in but still lets one pull out easily. Ten rounds make the 2 in (5.1 cm) cuff depth.
Final Blocking
- Weave in all the ends along the seam ridges, so they’re hidden on the inside.
- Soak the holder in cool water for 10 minutes, then press the water out gently in a towel. Don’t wring it.
- Stuff the tube firmly with a rolled towel or plastic bags so it takes on its rounded barrel shape.
- Check that the body measures 21 in (53.3 cm) around and 13 in (33.0 cm) from the band to the cuff.
- Shape the top rim and the bottom cuff into even circles with your fingers.
- Hang the holder or stand it up, and let it dry completely. That takes 24–36 hours for cotton.
Final Quality-Control Checklist
- All 24 hexagons measure 3.5 in (8.9 cm) from flat side to flat side.
- Each hexagon has 54 sc and 6 corner spaces.
- There are 60 seams, each with 11 sl sts, with the ridges on the RS.
- The tiers are staggered the whole way around, with no gaps where corners meet.
- The top band follows 120 → 96 → 72 → 60 sts and is 1.8 in (4.6 cm) deep.
- The bottom cuff follows 120 → 96 → 72 → 48 → 36 sts and is 2 in (5.1 cm) deep.
- The strap is centered at the back and the ring is completely covered.
- The total length is 16.8 in (42.7 cm), or about 20 in (50.8 cm) with the ring.
Troubleshooting
- Petals look flat: Pull up taller loops on the clusters, and don’t tug the ch-2 spaces tight.
- Hexagon edges bow outward: Your Round 3 is too loose. Go down a hook size for Rounds 3–4 only.
- Tube puckers along the seams: Your joins are too tight. Rejoin those seams with a larger hook.
- Top edge is wavy after Round 1: That’s normal, and Round 2 will pull it in. If it’s still wavy after Round 2, replace the tr in Round 1 with dc.
- Bags fall out of the bottom: Add 1 round of sc2tog evenly (6 decreases) to the cuff, for 30 sts.
- Bags won’t pull out: Leave out cuff Round 5 so the cuff stays at 48 sts.
Care
Hand wash in cool water and lay flat or hang to dry. Reshape the holder while it’s damp, and avoid using a dryer.
Final Notes
This holder works because each measurement builds on the one before it. Your gauge of 4.5 sc per inch gives a 3.5 in (8.9 cm) hexagon. Six hexagons make a 21 in (53.3 cm) ring, and four staggered tiers make a 13 in (33.0 cm) body. Each edge then starts at exactly 6 × 20 = 120 sts and decreases to a 60-st rim and a 36-st cuff. Check your test hexagon carefully, and the rest of the project should come out at the right size.
Happy crocheting!