

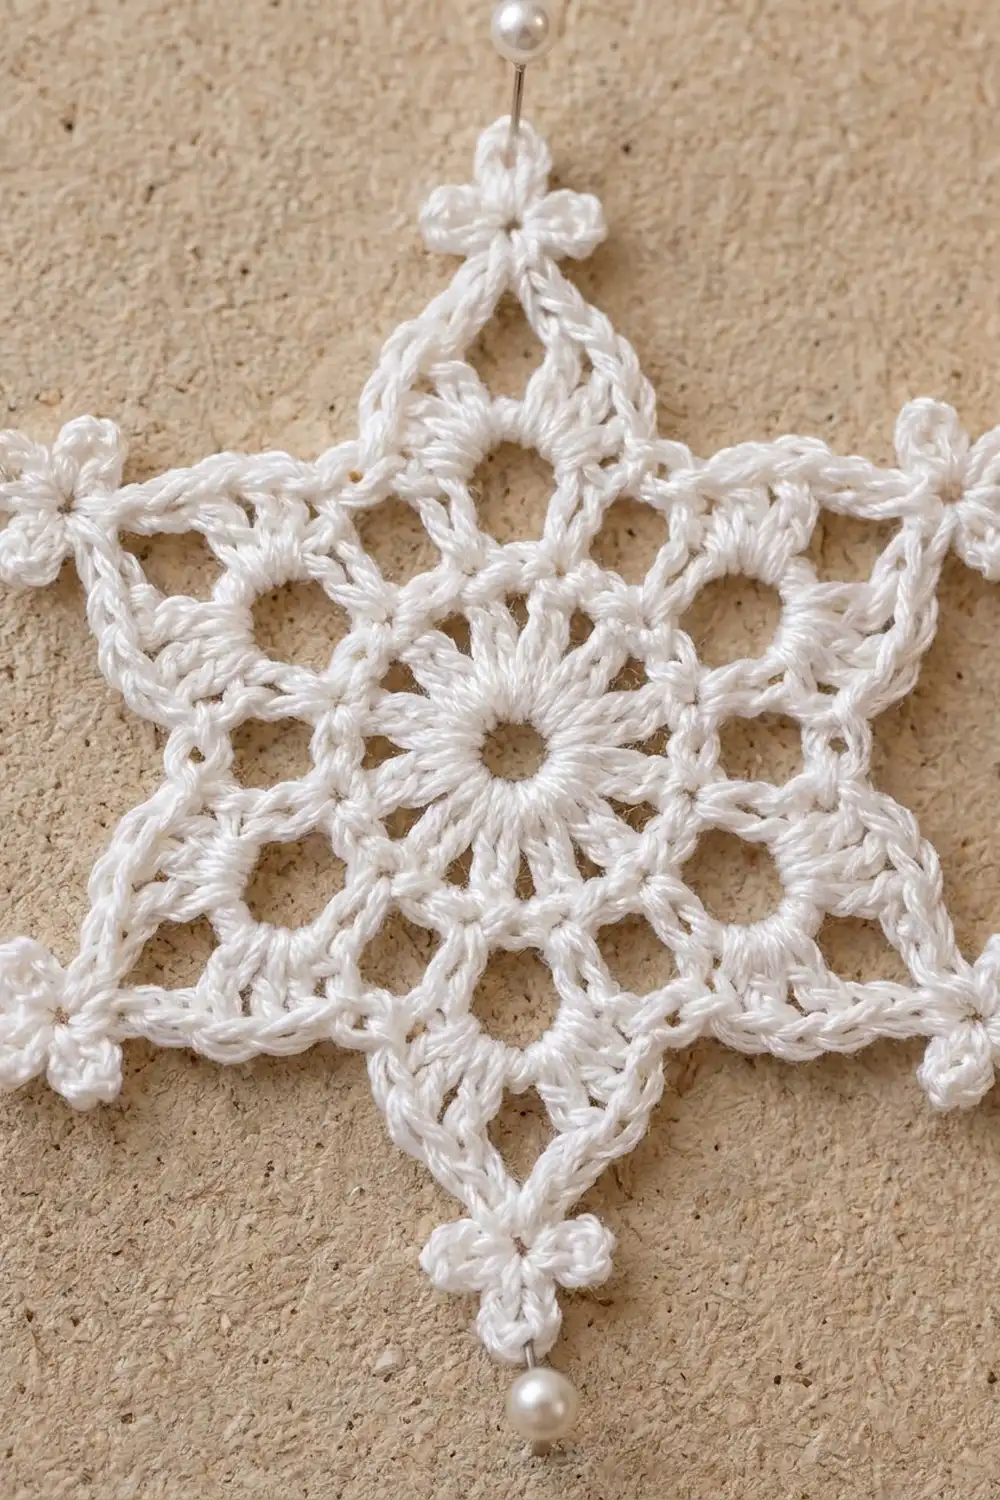
This little snowflake is crisp white lace with six star points, and each point ends in a three-picot trefoil. The center is a small solid ring of double crochet with a tiny hole in the middle. Around it are six round openings, then a solid scalloped ring, then six triangular openings, one inside each point.
It is worked in white size 10 crochet cotton. That keeps it light enough to hang from a thin branch, and after blocking it is stiff enough to hold its shape for years. The look is classic and quiet, so it suits a traditional tree, a branch garland on a mantel, or a gift tag.
The pattern uses US crochet terms. The finished ornament measures about 3.5 in (8.9 cm) from tip to tip after blocking. A thread hanging loop adds about 4.5 in (11.4 cm).
The construction is simple. You work 8 joined rounds from a magic ring, without turning. Rounds 1 to 5 build the round center, Round 6 makes 12 chain loops, Round 7 builds the six chain points with their trefoil tips, and Round 8 is a single crochet edging that firms up every point. A thread loop and firm blocking finish the piece.
Finished Size and Construction
- Finished size: 3.5 in (8.9 cm) tip to tip, blocked
- Skill level: Intermediate (fine thread, picots, careful counting)
- Terminology: US crochet terms
- Yarn weight: Lace (size 10 crochet cotton)
- Hook: 1.75 mm (US steel 6)
- Number of pieces: 1 single motif
- Layout: One six-pointed snowflake, worked in the round
- Piece size: 3.5 in (8.9 cm) tip to tip
- Size before border (after Round 7): 3.25 in (8.3 cm) tip to tip
- Border depth (Round 8): about 0.125 in (0.3 cm) on each side
Materials
Choose a mercerized cotton crochet thread in size 10. Mercerized thread has a slight sheen, shows the lace clearly, and holds a sharp point once stiffened. Avoid acrylic or fuzzy blends, which will not block crisply.
- White, size 10 crochet cotton: about 5 g (about 28 m) per ornament
This amount includes the hanging loop plus a margin for tails and a test piece. If you are making a set, multiply it by the number of ornaments.
Tools:
- 1.75 mm (US steel 6) crochet hook
- Fine tapestry needle that fits size 10 thread
- Small sharp scissors
- Stitch marker or a short scrap of contrasting thread
- Ruler or tape measure
- Foam blocking board, or a corkboard covered in plastic wrap
- Rust-proof pins (at least 12)
- Fabric stiffener, or a homemade sugar or starch solution
Abbreviations (US Terms)
- ch – chain
- sl st – slip stitch
- sc – single crochet
- dc – double crochet
- st(s) – stitch(es)
- sp(s) – space(s)
- sk – skip
- rep – repeat
- rnd – round
Special stitch – Trefoil: *Ch 4, sl st in 4th ch from hook (one picot made); rep from * 2 more times (3 picots), then sl st in the last chain you worked before the first picot. The three picots fan out like a small clover and form the tip of each point.
Gauge and Checkpoints
Exact gauge matters less for an ornament than for a garment, but it still controls the size and how well the points hold. Make one complete test snowflake and block it before you make more.
Gauge: Rounds 1 to 3 measure 1.25 in (3.2 cm) across, unblocked.
Checkpoints (unblocked, measured flat):
- After Round 1: 0.6 in (1.5 cm) across
- After Round 3: 1.25 in (3.2 cm) across
- After Round 5: 1.75 in (4.4 cm) across
- After Round 6: 2 in (5.1 cm) across
- After Round 7: 3.25 in (8.3 cm) tip to tip
- After Round 8 and blocking: 3.5 in (8.9 cm) tip to tip
If your piece is too big: go down to a 1.5 mm (US steel 8) hook, or tighten your chains. Loose chains in Round 7 are the most common cause of oversized points.
If your piece is too small or cupping: go up to a 2 mm (US steel 4) hook. If only the center cups, your single crochets in Round 3 or Round 5 may be too tight, so relax your tension there.
Pattern
Leave a 6 in (15.2 cm) tail at the start. Do not turn at the end of any round. Each round starts with ch 1, which does not count as a stitch, unless stated otherwise.
Round 1 – Solid Center Ring
Make a magic ring. Ch 3 (counts as first dc), then work 17 dc into the ring. Pull the ring closed, leaving a small center hole about 0.125 in (0.3 cm) wide. Sl st in top of beginning ch-3 to join.
Count: 18 dc.
Round 2 – First Ring of Openings
Ch 1, sc in same st as join. *Ch 5, sk next 2 sts, sc in next st; rep from * 4 more times, ch 5, sk last 2 sts, sl st in first sc to join.
Count: 6 sc and 6 ch-5 sps. Check: 6 repeats × 3 sts used (1 worked, 2 skipped) = 18 sts, which matches Round 1.
Round 3 – Scalloped Ring
Sl st into first ch-5 sp. Ch 1, work 7 sc in each ch-5 sp around. Sl st in first sc to join.
Count: 42 sc (0 sts worked into Round 2 sc + 7 sc in each of 6 sps = 42).
Each ch-5 arch, now covered, closes off one of the six round openings against the center ring.
Round 4 – Second Ring of Openings
Sl st in next 3 sts so your hook sits in the 4th (center) sc of the first 7-sc group. Ch 1, sc in same st. *Ch 6, sc in center (4th) sc of next 7-sc group; rep from * 4 more times, ch 6, sl st in first sc to join.
Count: 6 sc and 6 ch-6 sps.
The ch-6 sps bridge the dips between scallops and form the next ring of openings.
Round 5 – Solid Ring
Sl st into first ch-6 sp. Ch 1, work 8 sc in each ch-6 sp around. Sl st in first sc to join.
Count: 48 sc (8 sc in each of 6 sps). Think of these as six groups of 8 sc. Mark the first sc of the round as stitch 1 of Group 1.
Round 6 – Point Foundation Loops
Ch 1, sc in same st as join (stitch 1 of the group). *Ch 5, sk next 3 sts, sc in next st (stitch 5); ch 5, sk next 3 sts, sc in next st (stitch 1 of the next group); rep from * 6 times total. On the last repeat, replace the final sc with a sl st in the first sc to join.
Count: 12 sc and 12 ch-5 loops. Check: 12 × 4 sts used (1 worked, 3 skipped) = 48, which matches Round 5.
Name the loops as you go. Loop A runs from stitch 1 to stitch 5 of a group. Loop B runs from stitch 5 to stitch 1 of the next group. There are 6 of each, alternating around.
Round 7 – Points and Trefoil Tips
Ch 1, sc in same st as join (the sc at the start of a Loop A).
*Ch 7, work 1 Trefoil, ch 7, skip Loop A entirely and sc in next sc (the sc at the end of Loop A). Work 5 sc in Loop B. Sc in next sc (the start of the next Loop A). Rep from * 6 times total, leaving out the final sc on the last repeat. Sl st in first sc to join.
Count: 42 sc, 12 ch-7 legs, and 6 Trefoils. Check: each repeat has 1 sc + 1 sc + 5 sc = 7 sc, and 6 × 7 = 42.
Here is what this round builds. The two ch-7 legs rise from the two ends of Loop A and meet at the Trefoil. Loop A stays empty and forms the base of a triangle. The space framed by Loop A and the two legs is the triangular opening inside each point. The 5 sc in Loop B make the solid valley between two points.
At this stage, the snowflake should measure 3.25 in (8.3 cm) from one Trefoil tip to the opposite tip when gently flattened.
Border
Round 8 is the edging. It covers the bare chain legs with single crochet, so each point gets a firm, raised outline and a clean, beaded edge.
Border gauge: about 12 sc per 1 in (2.5 cm) along a leg, so each 7-sc leg is about 0.6 in (1.5 cm) long.
Round 8 – Single Crochet Edging
Ch 1, sc in same st as join.
*Work 7 sc in the next ch-7 leg, working up toward the tip. Do not work into the Trefoil; keep it in front of your hook and let it stand free. Work 7 sc in the next ch-7 leg, working down. Sc in next sc (at the end of Loop A). Sc in each of the next 5 sc across the valley. Sc in next sc (at the start of the next Loop A). Rep from * 6 times total, leaving out the final sc on the last repeat. Sl st in first sc to join.
Count: 126 sc (42 sts worked 1 per existing sc + 84 sc added into the legs = 126). Per point repeat: 7 + 7 + 1 + 5 + 1 = 21 sc, and 6 × 21 = 126.
Fasten off, leaving a 6 in (15.2 cm) tail.
Why the math works: Each ch-7 leg gets exactly 1 sc per chain, so the leg is covered without stretching or ruffling and the point stays straight. Each existing sc from Round 7 gets exactly 1 sc, so the valleys and the ends of Loop A keep their length and lie flat. No stitches are added at the tip, because the Trefoil already forms the point. Round 8 adds only height, about 0.125 in (0.3 cm) on each side, taking the piece from 3.25 in (8.3 cm) to 3.5 in (8.9 cm).
Hanging Loop
Cut a 10 in (25.4 cm) strand of the same thread. Pass it through the center picot of one Trefoil, bring the ends level, and tie them together with an overhand knot. The finished loop hangs about 4.5 in (11.4 cm) long. Trim the ends to 0.25 in (0.6 cm). If your stiffener is sticky, add the loop after blocking.
Final Blocking
- Weave in ends. Run both tails through the back of solid sc rounds, never across an opening. Weave each tail in two directions, then trim close.
- Wet the piece. Dip the snowflake in cool water and press it gently between towels. It should be damp, not dripping.
- Apply stiffener. Soak the damp snowflake in fabric stiffener for 1 minute. Squeeze out the excess and blot so no film fills the openings.
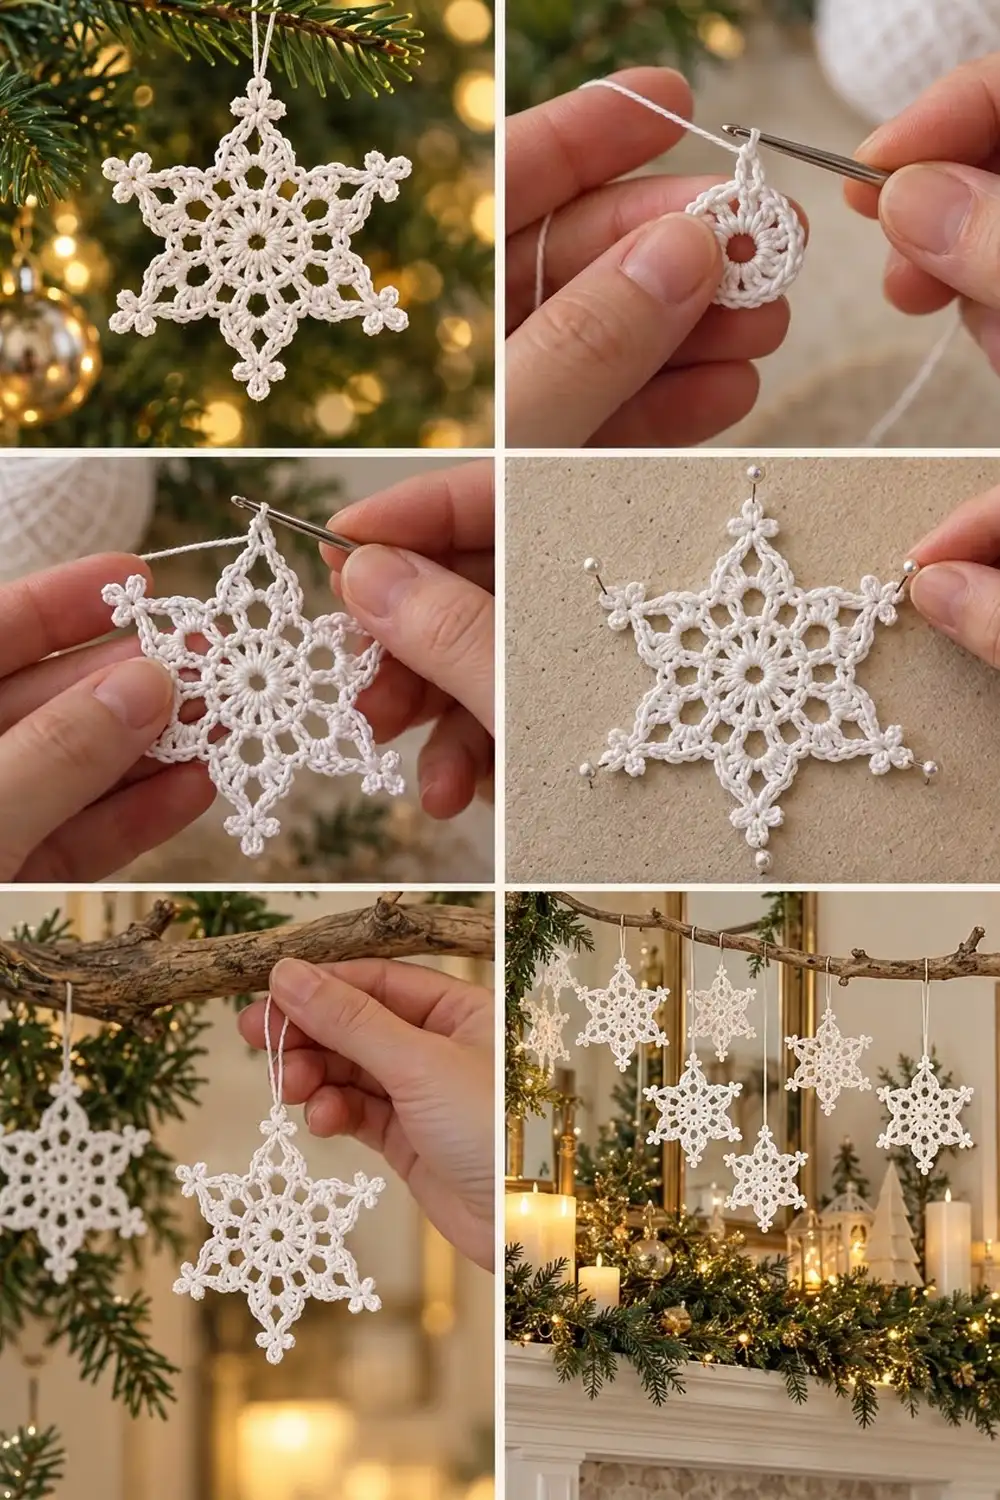
- Pin the tips. On your covered board, pin the center picot of each Trefoil so the six tips form a regular hexagon 3.5 in (8.9 cm) across. Pin opposite tips in pairs.
- Shape the details. Put a pin through each triangular opening to open it into a clean triangle. Fan the three picots of each Trefoil apart with a pin tip. Poke the center hole open.
- Clear the holes. If stiffener bridges any opening, pop it with a pin before it dries.
- Dry fully. Leave the piece pinned for 12 to 24 hours, until completely hard.
- Unpin and check. Measure again: it should be 3.5 in (8.9 cm) tip to tip.
Final Quality-Control Checklist
- Round 1 has 18 dc and a small, closed center hole.
- Six round openings sit evenly around the center.
- Round 5 has 48 sc, and the ring lies flat.
- There are 6 points, each with a clear triangular opening.
- Each point has a Trefoil with 3 distinct picots.
- Round 8 has 126 sc, with 7 sc on each leg.
- The snowflake measures 3.5 in (8.9 cm) tip to tip.
- All tails are hidden in solid stitches.
- The piece is stiff and flat, and it hangs straight.
Troubleshooting
Center ring ruffles. You may have too many dc in Round 1, or the ring isn’t fully closed. Count 18 dc and pull the magic ring tight.
Round 3 scallops cup upward. Your sc are too tight in the ch-5 sps. Loosen your tension, or go up a hook size for Rounds 3 and 5 only.
Points lean to one side. One leg is longer than the other. Count your ch-7s, and check that both legs in Round 8 have exactly 7 sc.
Triangular openings close up. Loop A was worked into by mistake in Round 7 or 8. Loop A must stay empty.
Trefoil looks like one lump. Your picot chains are too tight. Keep each ch 4 relaxed, and fan the picots apart during blocking.
Ornament is floppy after drying. The stiffener was too thin or got rinsed out. Re-soak, re-pin, and let it dry again.
Stitch count is off in Round 8. Count each point on its own: there should be 21 sc per point. Fix any point that is off before joining.
Care
Store the ornament flat in a box with tissue paper, away from humidity. To clean it, hand-rinse in cool water, then re-stiffen and re-pin to 3.5 in (8.9 cm).
Final Notes
This snowflake is one motif built in 8 rounds. Its measurements grow in clear steps: 0.6 in (1.5 cm) after Round 1, 1.25 in (3.2 cm) after Round 3, 1.75 in (4.4 cm) after Round 5, 2 in (5.1 cm) after Round 6, 3.25 in (8.3 cm) after the points in Round 7, and 3.5 in (8.9 cm) after the edging and blocking.
The stitch counts follow the same steps: 18 dc, then 6 loops, 42 sc, 6 loops, 48 sc, 12 loops, 42 sc with 6 points, and finally 126 sc. If every checkpoint matches, the finished snowflake will match too.
Once your test ornament is blocked and measured, the rest go quickly. Make a few, give each its own loop, and hang them at different heights on a tree or branch for a soft, wintry display.
Happy crocheting!