

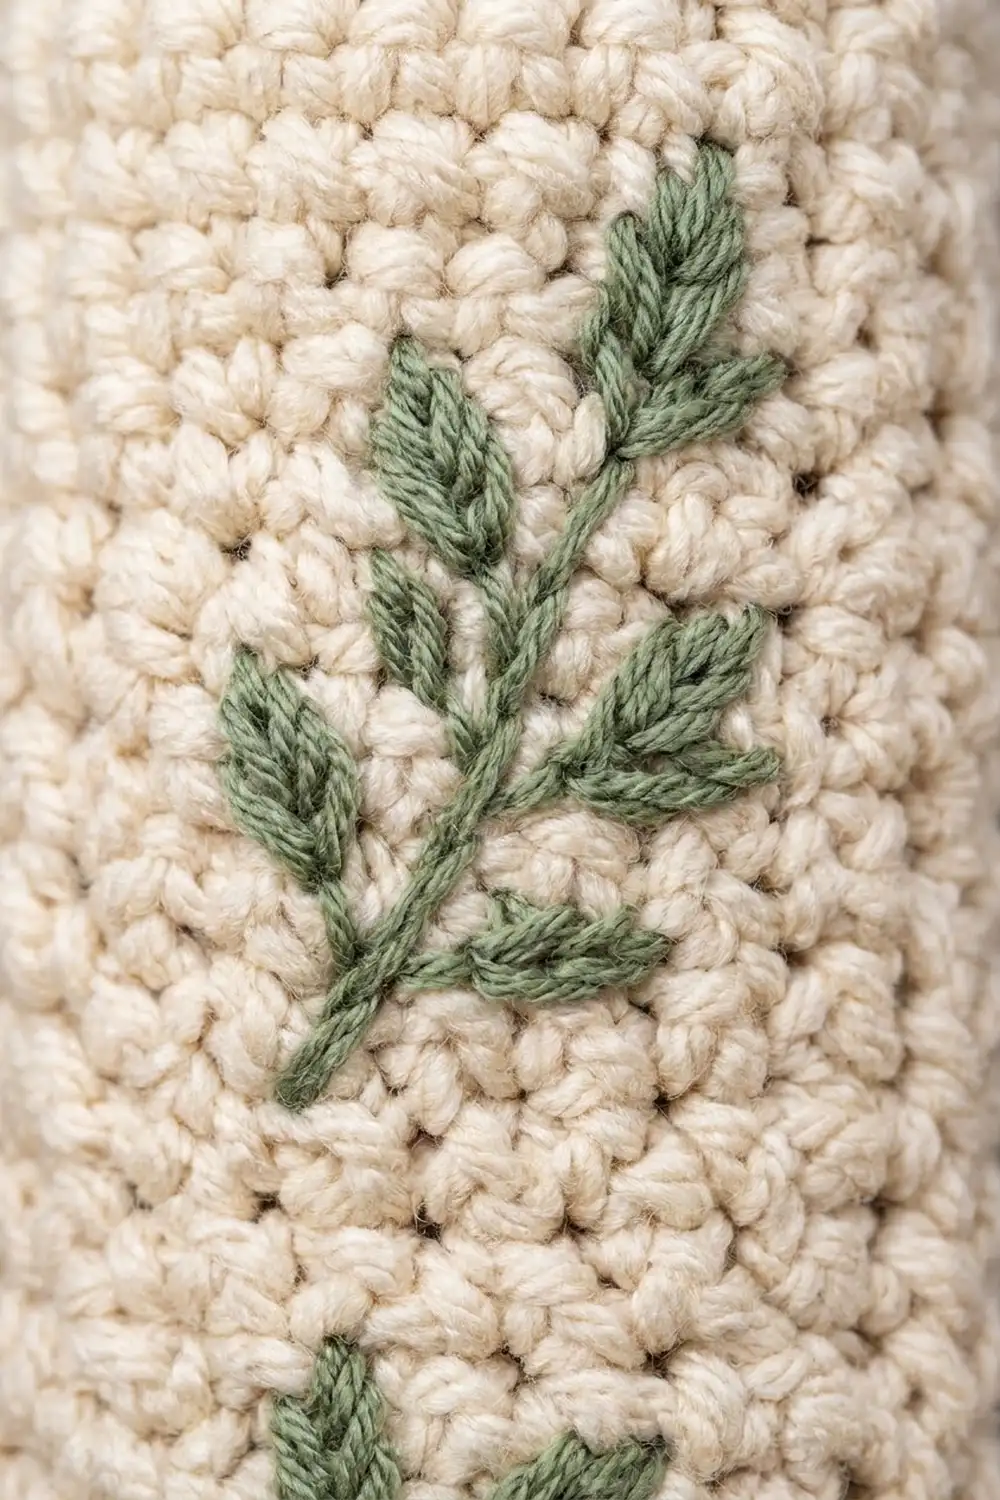
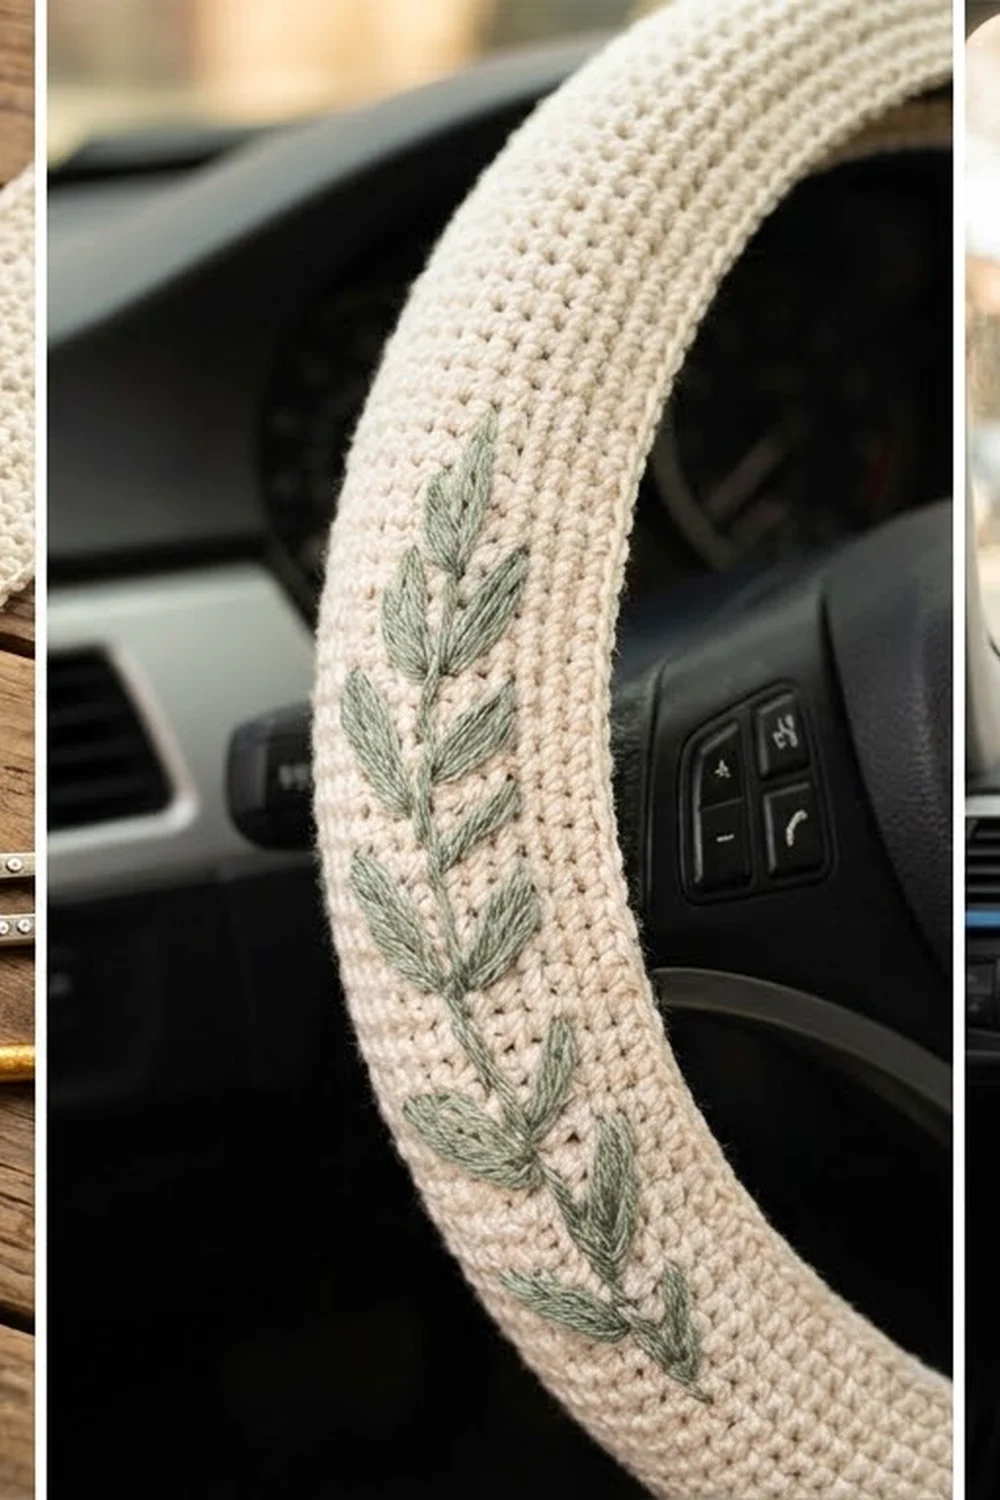
This steering wheel cover is a soft, dense band of cream single crochet with small sage green leaf sprigs embroidered all the way around it. On the wheel it looks calm and handmade, and the fabric gives you a cushioned, slightly textured grip.
The palette is just two colors: warm cream for the base and muted sage green for the leaves. The style is simple and natural, so it suits most car interiors, including tan leather and dark dashboards.
The pattern uses US crochet terms. The finished cover is one strip, 4 in (10.2 cm) wide by 42 in (106.7 cm) long. It is sized for a standard wheel about 15 in (38.1 cm) across with a rim about 1.25 in (3.2 cm) thick.
You crochet one long flat strip in rows, embroider the leaf sprigs, and seam the short ends to make a ring. Next you work an edging round along each long edge. Finally, you wrap the strip around the rim and lace the two edges together on the back of the wheel.
Finished Size and Construction
- Finished size: 4 in (10.2 cm) wide x 42 in (106.7 cm) long, joined into a ring
- Fits: steering wheels 14.5–15.5 in (36.8–39.4 cm) in outer diameter, with a rim about 4 in (10.2 cm) around
- Skill level: Easy, with beginner embroidery
- Terminology: US crochet terms
- Yarn weight: Worsted (#4)
- Hook: 4.0 mm (G-6)
- Number of pieces: 1 (a single strip)
- Layout: one long strip seamed end to end into a ring, then wrapped and laced around the rim
- Piece size before edging: 3.5 in (8.9 cm) wide x 42 in (106.7 cm) long
- Edging depth: about 0.25 in (0.6 cm) on each long edge
- Embroidery: 21 sage leaf sprigs, one every 2 in (5.1 cm)
Materials
Choose a smooth worsted weight yarn. Cotton or a cotton-acrylic blend gives a firm grip that won’t slip and stands up to constant hand contact. Avoid very fuzzy yarns, which pill quickly on a wheel.
- Color A (Cream): 100 g, about 190 m, for the strip, seam, edging, and lacing
- Color B (Sage Green): 15 g, about 28 m, for the embroidered sprigs
These quantities include a margin of about 20–25% to cover gauge differences, a gauge check, and the lacing yarn.
Tools:
- 4.0 mm (G-6) crochet hook
- Blunt tapestry needle with a large eye
- Sharp embroidery needle (optional, for neater leaves)
- Scissors
- Flexible tape measure
- Locking stitch markers (at least 21)
- Spray bottle or steamer, and pins for blocking
Abbreviations (US Terms)
- ch: chain
- sc: single crochet
- sl st: slip stitch
- st(s): stitch(es)
- RS / WS: right side / wrong side
- rnd: round
Embroidery stitches:
- Stem stitch: Bring the needle up, go down a short distance ahead, and come back up halfway along that stitch. Keep the working yarn on the same side every time. This makes a smooth, slightly raised line.
- Lazy daisy (detached chain): Bring the needle up at the leaf base and go back down in the same spot, leaving a loop. Come up at the leaf tip inside the loop, then go down just outside the loop to tack it in place. Each lazy daisy makes one small leaf.
Gauge and Checkpoints
Gauge: 16 sc and 18 rows = 4 in (10.2 cm) in sc worked in rows with a 4.0 mm hook. That is 4 sts and 4.5 rows per inch.
Test one piece first. Work the first 18 rows of the strip, then stop and measure. The piece should be 3.5 in (8.9 cm) wide by 4 in (10.2 cm) long. Because this test is the start of the real strip, you can keep going once it measures correctly.
Checkpoints along the strip:
- Row 18: 4 in (10.2 cm) long
- Row 45: 10 in (25.4 cm) long
- Row 90: 20 in (50.8 cm) long
- Row 135: 30 in (76.2 cm) long
- Row 189: 42 in (106.7 cm) long
Measure on a flat surface without stretching. The width should stay at 3.5 in (8.9 cm) the whole way.
If your piece is too big: Switch to a 3.75 mm (F-5) hook. A loose cover twists and slides while you drive.
If your piece is too small: Switch to a 4.5 mm (7) hook. Check the width first, because width decides whether the edges meet on the back of the rim.
If only your row gauge is off: Keep the 14-stitch width and work more or fewer rows until the strip reaches 42 in (106.7 cm). Keep the total number of rows a multiple of 9 so the sprigs stay evenly spaced.
Measure Your Wheel
Before you start, take two measurements of your wheel.
- Rim thickness: Wrap the tape around the rim itself. A typical rim is about 4 in (10.2 cm) around. The finished strip with edging is 4 in (10.2 cm) wide, so its edges meet exactly.
- Centerline circumference: Measure around the middle of the rim, halfway between its outer and inner edges. A 15 in (38.1 cm) wheel with a 1.25 in (3.2 cm) rim has a centerline diameter of 13.75 in (34.9 cm), which is about 43.2 in (109.7 cm) around.
The 42 in (106.7 cm) strip is about 1.2 in (3.0 cm) shorter than that centerline. This small amount of negative ease (the cover is slightly smaller than the wheel) keeps it snug so it can’t rotate.
Pattern: The Strip
Use Color A. You work the strip flat in rows of sc. Every row has 14 sts.
Foundation: Ch 15.
Row 1 (RS): Sc in 2nd ch from hook and in each ch across, turn. (14 sc)
Row 2: Ch 1 (does not count as a st), sc in each st across, turn. (14 sc)
Rows 3–189: Repeat Row 2. (14 sc in every row)
Count your stitches about every 10 rows. A strip this long can easily gain or lose a stitch without you noticing, and one extra stitch makes the cover 0.25 in (0.6 cm) too wide.
Fasten off, leaving a 16 in (40.6 cm) tail for the seam. The leaves are much easier to embroider while the strip is still flat.
Strip checkpoint: 14 sts wide, 189 rows long, 3.5 in (8.9 cm) x 42 in (106.7 cm).
Pattern: Marking the Sprig Positions
The sprigs run lengthwise down the center of the strip, so they face you on the front of the wheel.
- Place a marker in Row 5.
- Place another marker every 9 rows after that, in Rows 5, 14, 23, 32, 41, 50, 59, 68, 77, 86, 95, 104, 113, 122, 131, 140, 149, 158, 167, 176, and 185.
- That gives you 21 markers. Check: 5 + (20 x 9) = 185.
Each marker shows the center row of one sprig. Nine rows equal 2 in (5.1 cm), so the sprigs are evenly spaced 2 in (5.1 cm) apart.
The spacing still works across the seam. From Row 185 to Row 189 is 4 rows. The seam joins Row 189 to Row 1, and from Row 1 to Row 5 is 4 more rows, for 9 row steps in total.
Pattern: Embroidering the Leaf Sprigs
Use Color B and a tapestry or embroidery needle, and work on the RS. Keep your tension relaxed so the cream fabric doesn’t pucker.
Number the stitch columns 1–14 across the strip. The stem runs along the line between sts 7 and 8, at the exact center.
For each sprig:
- Stem: Start 3 rows below the marked center row. Work stem stitch along the center line, one short stitch per row, for 6 rows, ending 3 rows above the center row. The stem is about 1.3 in (3.3 cm) long.
- Leaf pairs: Work 3 pairs of lazy daisy leaves along the stem, one leaf on each side. Place the first pair at the bottom row of the stem, the second pair 2 rows higher, and the third pair 2 rows higher again. Angle each leaf outward and slightly toward the tip so it spans about 2 stitches sideways. Each leaf is about 0.5 in (1.3 cm) long.
- Tip leaf: Work 1 lazy daisy straight up from the top of the stem.
Each sprig has 1 stem and 7 leaves. A finished sprig is about 1.5 in (3.8 cm) long and 1.25 in (3.2 cm) wide, which leaves a 0.5 in (1.3 cm) cream gap between sprigs.
Direction: Point every sprig the same way along the strip, so they all seem to grow in one direction around the wheel.
Weave in the Color B ends on the WS behind the sprig itself. Don’t carry them across the gaps, where they could show through.
Pattern: Joining the Ends
With the RS facing out, bring Row 189 around to meet Row 1 so the strip forms a ring. Make sure the strip isn’t twisted.
Thread the Color A tail onto a tapestry needle. Whip stitch the 14 sts of Row 189 to the 14 foundation loops of Row 1, one stitch to one stitch. Fasten off and weave in the end.
Ring checkpoint: The ring measures 42 in (106.7 cm) around and is still 3.5 in (8.9 cm) wide. Each long edge is now one continuous loop of 189 row-ends.
Edging
The edging tidies each long edge and gives you a firm line of stitches to lace through.
Edging gauge: 1 sc in each row-end. This gives 4.5 edging sts per inch, which matches the strip’s row gauge.
Edge 1, Rnd 1: With the RS facing, join Color A with a sl st in any row-end next to the seam. Ch 1, sc in the same row-end and in each row-end around. Join with a sl st to the first sc. (189 sc) Fasten off.
Edge 2, Rnd 1: Repeat on the other long edge. (189 sc) Fasten off.
Counts per side: Each long edge has exactly 189 sc. The short ends get no edging of their own, because they’re now the seam inside the continuous ring.
Why the math works: 189 rows at 4.5 rows per inch is 42 in (106.7 cm). 189 edging sts at 4.5 sts per inch is also 42 in (106.7 cm). Because the edge length matches the body length, the edging doesn’t ruffle or pull in. Each edging round adds about 0.25 in (0.6 cm), so the width becomes 3.5 + 0.25 + 0.25 = 4 in (10.2 cm). That equals the 4 in (10.2 cm) rim circumference, so the two edges meet neatly on the back.
Final Blocking and Fitting
- Lay it flat. Flatten the ring on a towel, RS up. It forms a doubled band about 21 in (53.3 cm) long.
- Mist it. Spray lightly with water, or hold a steamer just above the fabric without touching it. Never press acrylic with a hot iron.
- Shape it. Gently pat the band to 4 in (10.2 cm) wide along its whole length, pinning if needed. Straighten each sprig so its leaves lie flat.
- Let it dry. Let it dry completely, then turn the ring over and repeat on the other half.
- Position it on the wheel. Lay the ring over the front of the wheel with the sprigs facing you. Put the end seam at the bottom of the wheel, where it shows least.
- Wrap it. Fold both long edges around the rim toward the back so they meet behind the rim, on the side facing the hub.
- Lace it. Cut about 3 yd (2.7 m) of Color A. Start at one spoke and whip stitch the two edges together through the back loops of opposite edging sts, matching stitch to stitch. When you reach a spoke, stop lacing, pass the yarn behind the spoke, and start again on the other side. Work in short sections of 6–8 in (15.2–20.3 cm), pulling firmly but not too tight.
- Finish it. Secure the lacing ends with a few stitches into the edging and weave them in on the inside.
Final Quality-Control Checklist
- Every row has 14 sc
- The strip measures 3.5 in (8.9 cm) x 42 in (106.7 cm) before edging
- There are 21 sprigs, centered on Rows 5 through 185, 9 rows apart
- Each sprig has 1 stem and 7 lazy daisy leaves
- The fabric around the embroidery is not puckered
- The end seam is flat and not twisted
- Each long edge has 189 sc
- The finished width is 4 in (10.2 cm)
- The edges meet behind the rim with no gap
- The cover doesn’t rotate when you turn the wheel firmly
Troubleshooting
The edges don’t meet behind the rim. Your strip is too narrow or your rim is thicker than average. Add a second sc edging round on each edge, which adds about 0.25 in (0.6 cm) per side.
The edges overlap. Lace them with the overlap tucked under, or remake the strip with a 3.75 mm (F-5) hook.
The cover slides around the rim. The ring is too long. Unpick the end seam, remove 4–5 rows, and sew the seam again.
The ring won’t stretch over the wheel. The ring is too short. Unpick the seam and add rows until the strip reaches 42 in (106.7 cm).
The leaves look puckered. Your embroidery tension is too tight. Steam the area and ease the fabric flat with your fingers, then work the remaining leaves more loosely.
The edging ruffles. You worked more than 1 sc in some row-ends. Rework it so each edge has 189 sc.
The lacing shows. Make sure the edges meet on the inside of the rim, toward the hub, not on the outer edge.
Care
Unlace the cover, hand wash it in cool water with mild soap, and dry it flat. Fit it back on while it’s still slightly damp for a snug, custom fit.
Final Notes
Every measurement in this pattern follows from the gauge of 4 sts and 4.5 rows per inch. Fourteen stitches make a 3.5 in (8.9 cm) wide strip, and 189 rows make it 42 in (106.7 cm) long. Twenty-one sprigs spaced every 9 rows divide that length into even 2 in (5.1 cm) sections. One edging round of 189 sc on each long edge brings the width to 4 in (10.2 cm), which matches the rim.
Check the width early, count stitches often, and keep the embroidery relaxed. You’ll end up with a soft, neat cover that makes every drive a little cozier.
Happy crocheting!