

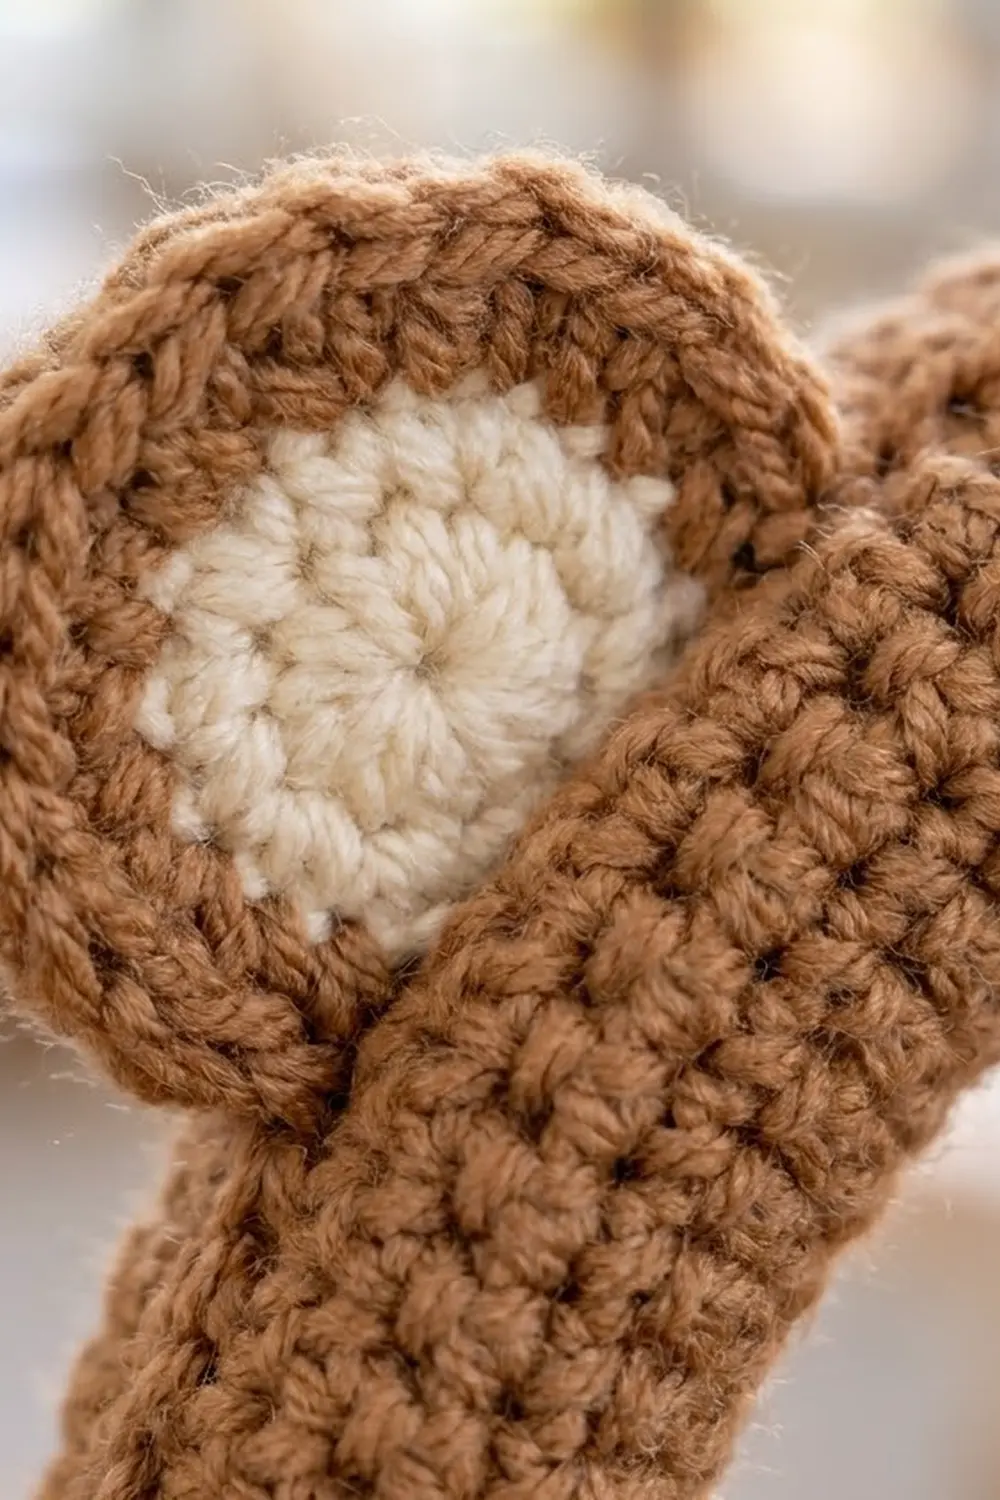
Turn plain over-ear headphones into a cozy little bear with this quick cover. A soft caramel-brown band wraps the headband, and two round ears with cream centers sit on top.
The design uses just two colors: warm caramel brown and soft cream. The dense single crochet fabric looks neat and gives good cushioning on top of your head. It also hides the plastic headband completely. The look is playful and simple, and it suits desk setups, gaming corners, and gifts.
This pattern uses US crochet terms. The finished cover panel measures 3.5 in (8.9 cm) wide by 10.5 in (26.7 cm) long. Each ear measures 2.25 in (5.7 cm) across.
Construction is simple. You work one flat rectangle in rows of single crochet and add a one-round border. Then you wrap it around the headband and whipstitch the long edges together on the underside. You make two ears in the round, cream first and then brown, finish them with a reverse single crochet edge, and sew them to the top of the band.
Finished Size and Construction
- Finished cover size: 3.5 in × 10.5 in (8.9 cm × 26.7 cm) flat
- Fits headbands: about 3.25–3.5 in (8.3–8.9 cm) around and 10–11 in (25.4–27.9 cm) between sliders
- Skill level: Easy
- Terminology: US crochet terms
- Yarn weight: Medium (#4, worsted/aran)
- Hook: 4.0 mm (G-6)
- Number of pieces: 3 (1 cover panel + 2 ears)
- Layout: One panel wrapped into a tube; 2 ears along the top edge
- Cover panel before border: 3 in × 10 in (7.6 cm × 25.4 cm)
- Border depth: 1 round of sc, 0.25 in (0.6 cm) on every side
- Ear size: 2.25 in (5.7 cm) across
Materials
Pick a smooth worsted-weight yarn with good stitch definition. Acrylic, a cotton blend, or soft wool blends all work. A slightly fuzzy yarn gives the soft halo shown, but avoid very fluffy yarn because it hides your stitches when you seam. If your yarn label lists about 180–200 m per 100 g, you are in the right range.
Yarn:
– Color A, caramel brown: 25 g, about 45 m (cover panel, ear outer rounds, seaming)
– Color B, cream: 5 g, about 9 m (ear centers)
These quantities include a margin of roughly 25 percent for gauge swatching and sewing tails.
Tools:
– 4.0 mm (G-6) crochet hook
– Tapestry needle
– Scissors
– Stitch markers (2–3)
– Measuring tape or ruler
– Rust-proof pins and a blocking mat or folded towel
– Spray bottle with water
Abbreviations (US Terms)
- ch – chain
- sc – single crochet
- inc – 2 sc in the same stitch
- sl st – slip stitch
- st(s) – stitch(es)
- MR – magic ring
- rnd(s) – round(s)
- rev sc – reverse single crochet (crab stitch)
- BLO – back loop only
Special stitch: reverse single crochet (rev sc). Work from left to right if you are right-handed. Insert the hook into the next stitch to the right, yarn over, and pull up a loop. Yarn over again and pull through both loops on the hook. This makes a twisted, corded edge that gives the ears their bumpy outline.
Gauge and Checkpoints
Gauge: 16 sc and 16 rows = 4 in (10.2 cm) in sc worked in rows with a 4.0 mm hook. That works out to 4 sts and 4 rows per 1 in (2.5 cm).
Because stitches and rows are the same size here, the border works out cleanly: 1 border stitch per stitch and 1 border stitch per row, with no ruffling.
Test one piece first. Make one ear before starting the cover. It is small and quick, and it shows whether your gauge is right:
- After Rnd 3 (cream): 1.25 in (3.2 cm) across
- After Rnd 5 (brown): 2 in (5.1 cm) across
- After Rnd 6 (rev sc): 2.25 in (5.7 cm) across
Cover checkpoints:
- After Row 1: 3 in (7.6 cm) wide
- After Row 20: 5 in (12.7 cm) long
- After Row 40: 3 in × 10 in (7.6 cm × 25.4 cm)
- After the border: 3.5 in × 10.5 in (8.9 cm × 26.7 cm)
If your piece is too big, go down to a 3.5 mm hook. If it is too small, go up to a 4.5 mm hook. Check gauge again before you go on. A cover that is too loose will slide and twist on the band, so a slightly firm fabric is better than a loose one.
Fitting to your headphones: Wrap a tape measure around the thickest part of the headband to get its circumference. Then measure the band’s length from slider to slider. If your numbers are outside the fit range above, change the panel width by 4 sts per 1 in (2.5 cm) and the length by 4 rows per 1 in (2.5 cm). The border section explains how to recount.
Cover Panel
Use Color A. Work in rows. Turning chains do not count as stitches.
Foundation: Ch 13.
Row 1: Sc in the 2nd ch from the hook and in each ch across. (12 sts)
Row 2: Ch 1, turn. Sc in each st across. (12 sts)
Rows 3–40: Repeat Row 2. (12 sts in each row)
Check the panel after Row 20: it should measure 5 in (12.7 cm) long. After Row 40 it should measure 3 in × 10 in (7.6 cm × 25.4 cm). Do not fasten off. Go straight on to the border.
Keep your edges straight. Always work the last sc into the last stitch of the row, not into the turning chain. Count 12 sts every few rows. One extra or missing stitch changes the width by 0.25 in (0.6 cm), and that will show once the cover is wrapped.
Ears (Make 2)
Work in continuous rounds without joining. Put a stitch marker in the first stitch of each round.
With Color B:
Rnd 1: Make a MR. Work 6 sc into the ring. Pull the ring closed. (6 sts)
Rnd 2: Inc in each st around. (12 sts)
Rnd 3: (Sc in next st, inc in next st) 6 times. (18 sts)
The cream center should measure 1.25 in (3.2 cm) across. To change color, work the last yarn over of the final sc of Rnd 3 with Color A. Fasten off Color B and weave in its tail.
With Color A:
Rnd 4: (Sc in next 2 sts, inc in next st) 6 times. (24 sts)
Rnd 5: Sc in next st, inc in next st, (sc in next 3 sts, inc in next st) 5 times, sc in next 2 sts. (30 sts)
Staggering the increases in Rnd 5 keeps the ear round instead of hexagonal. The ear should now measure 2 in (5.1 cm) across.
Rnd 6 (edge): Sl st in the next st to even out the step. Ch 1. Work rev sc in each st around. (30 rev sc) Join with a sl st to the first rev sc.
This edge round works 1 stitch per stitch, so the count stays at 30. It adds about 0.125 in (0.3 cm) all around, for a finished size of 2.25 in (5.7 cm). Fasten off and leave a 12 in (30.5 cm) tail of Color A for sewing.
Make All Pieces
Here are the pieces you need:
- Color A: 1 cover panel (with border), plus Rnds 4–6 and the sewing tails on both ears
- Color B: centers (Rnds 1–3) for 2 ears
- Total: 3 pieces
Placement layout (cover laid flat, right side up, top long edge shown):
[end]---2.5 in---( EAR )---5.5 in---( EAR )---2.5 in---[end]
       6.4 cm             14.0 cm             6.4 cm
|<------------------- 10.5 in / 26.7 cm ------------------->|
The ear centers sit 2.75 in (7.0 cm) out from the center of the cover on each side. That puts them 5.5 in (14.0 cm) apart and 2.5 in (6.4 cm) in from each end. The three distances add up to 10.5 in (26.7 cm), the full length of the cover.
Border
Use Color A. You start straight after Row 40.
Border gauge: Work the border at the same 4 sts per 1 in (2.5 cm). Along the top and bottom you work 1 sc per stitch. Along the sides you work 1 sc per row end. Since 4 rows = 1 in (2.5 cm), side stitches match the side length exactly.
Border Rnd 1: Ch 1, turn.
- Top edge (across Row 40): 3 sc in the first st (corner), sc in the next 10 sts, 3 sc in the last st (corner).
- First long side: Rotate the piece. Work 1 sc in the end of each row from Row 39 down to Row 2. (38 sc)
- Bottom edge (across the foundation ch): 3 sc in the first free loop (corner), sc in the next 10 loops, 3 sc in the last loop (corner).
- Second long side: Work 1 sc in the end of each row from Row 2 up to Row 39. (38 sc)
- Join with a sl st to the first sc.
Stitch count: 108 sts total, made up of 4 corners × 3 sc = 12, plus 10 + 10 along the short edges, plus 38 + 38 along the long edges.
Per side, counting each corner’s center stitch on both sides it touches:
- Short sides: 1 corner + 1 + 10 + 1 + 1 corner = 14 sts
- Long sides: 1 corner + 1 + 38 + 1 + 1 corner = 42 sts
Check: (2 × 14) + (2 × 42) − 4 shared corners = 108. ✓
Why the math works: The panel was 12 sts × 40 rows. Rows 1 and 40 are covered by the corner groups, which leaves 38 row ends on each long side. Each corner’s 3 sc include 1 center stitch plus 1 extra stitch on each neighboring side. That means each side gains exactly 2 stitches: 12 + 2 = 14 wide and 40 + 2 = 42 long. At 4 sts per 1 in (2.5 cm), that gives 3.5 in × 10.5 in (8.9 cm × 26.7 cm).
If you resized the panel, your short side has (sts + 2) stitches and your long side has (rows + 2) stitches. Each long side gets (rows − 2) row-end sc between the corners.
Fasten off and leave a 24 in (61.0 cm) tail for seaming.
Joining
Step 1: Attach the ears first. It is easier to sew the ears on while the panel is flat.
- Lay the panel right side up and mark the ear positions from the layout.
- Count 8 of the 30 edge stitches at the bottom of one ear, centered on that ear’s lowest point.
- Hold the ear upright with its bottom edge resting just inside the top long border. With the ear’s tail, whipstitch those 8 stitches to the border stitches underneath, 1 stitch to 1 stitch.
- Add 3–4 small tacking stitches behind the ear, about 0.5 in (1.3 cm) above the seam, so the ear stays upright.
- Repeat for the second ear and weave in the ends.
Step 2: Seam the cover onto the headband.
- If your headphones allow it, slide the ear cups to their longest setting so you can reach the whole band.
- Wrap the panel around the band with the ears on top, facing forward. The two long edges meet on the underside of the band.
- With the 24 in (61.0 cm) tail, whipstitch the long edges together. Go through the outer loop of each border stitch, matching stitch to stitch: 42 stitches on one long side to 42 on the other, corner to corner.
- Leave the short ends open, so the cover sits just above the sliders.
Tension advice: Pull each stitch snug enough to close the gap, but not so tight that the seam puckers. Every few stitches, slide the cover along the band. It should move with gentle pressure but not spin around the band.
Size checkpoint: The closed tube should measure 3.5 in (8.9 cm) around and 10.5 in (26.7 cm) long, with the seam lying flat on the underside.
Final Blocking
- Before seaming, mist the cover panel and both ears lightly with water until they feel damp.
- Pin the panel to 3.5 in × 10.5 in (8.9 cm × 26.7 cm), with the corners square and the edges straight.
- Pin each ear flat to a 2.25 in (5.7 cm) circle, keeping the cream center centered.
- Let all pieces dry completely, for 4–8 hours.
- Unpin the pieces, then attach the ears and seam the cover as described above.
- If the ears tilt after seaming, mist the base of each ear and shape it upright with your fingers. Let it dry on the headphones.
Final Quality-Control Checklist
- The panel measures 3 in × 10 in (7.6 cm × 25.4 cm) before the border and 3.5 in × 10.5 in (8.9 cm × 26.7 cm) after.
- The border has 108 sts: 14 per short side and 42 per long side, including the corners.
- Each ear has 30 sts in Rnds 5 and 6 and measures 2.25 in (5.7 cm) across.
- The cream centers are round, centered, and 1.25 in (3.2 cm) across.
- The ears sit 5.5 in (14.0 cm) apart and 2.5 in (6.4 cm) from each end.
- The seam runs straight along the underside, matched 42 to 42.
- All tails are woven in on the wrong side.
Troubleshooting
The cover twists on the band. It is too loose. Remake it with a smaller hook, or with 1 fewer stitch per row (11 sts, so 13 per short side).
The cover won’t close around the band. Add 1–2 sts to the foundation and recount the border.
The ears cup or curl. Your increases are too tight. Go up 0.5 mm for Rnds 4–6, or block the ears flat again.
The ears ruffle. Check that you have 30 sts. An extra increase adds ripples.
The long edges wave. You worked more than 1 sc per row end. Each long side should have 38 sc between the corners.
The ears flop forward. Add more tacking stitches behind each ear.
The color change shows a jog. Switch colors on the last yarn over of Rnd 3, then slip stitch over the step at Rnd 6.
Care
Remove the cover by snipping and resewing the seam, or spot clean it in place with a damp cloth and mild soap. Lay it flat to dry and keep it away from heat.

Final Notes
The measurements build on each other in a simple chain. A gauge of 4 sts and 4 rows per 1 in (2.5 cm) gives a 12 × 40 panel of 3 in × 10 in (7.6 cm × 25.4 cm). One border round grows that to 14 × 42 stitches per side, or 3.5 in × 10.5 in (8.9 cm × 26.7 cm). Two ears of 30 stitches finish at 2.25 in (5.7 cm). You place them 5.5 in (14.0 cm) apart and seam the cover 42 to 42 around the band. Check each step against your tape measure and your cub will fit just right.
Happy crocheting!