

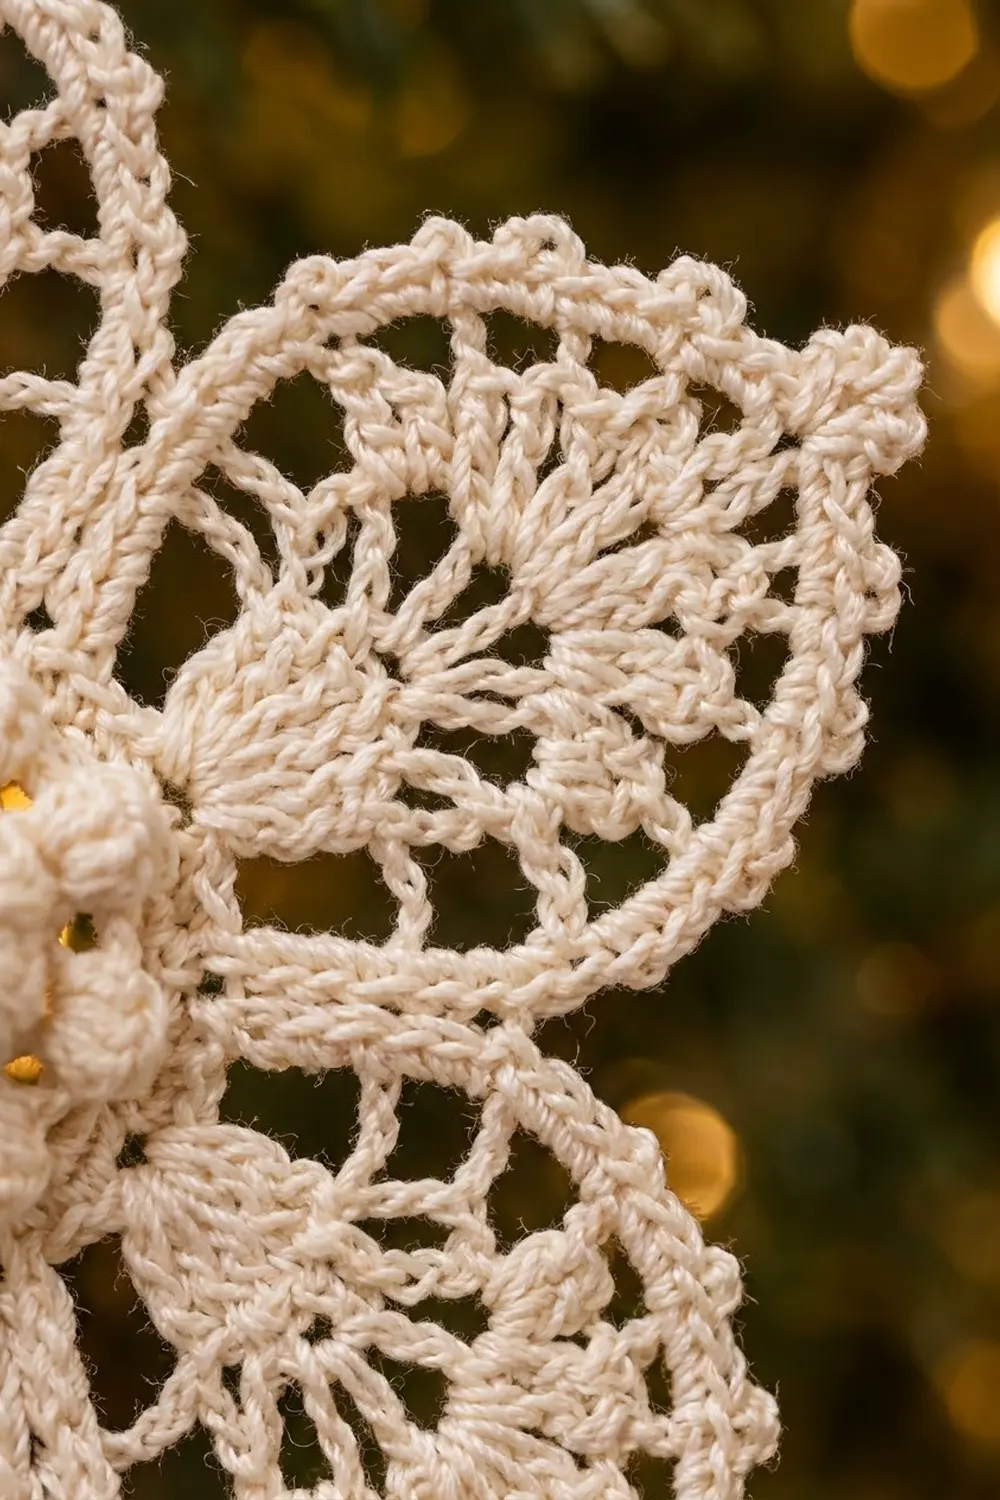
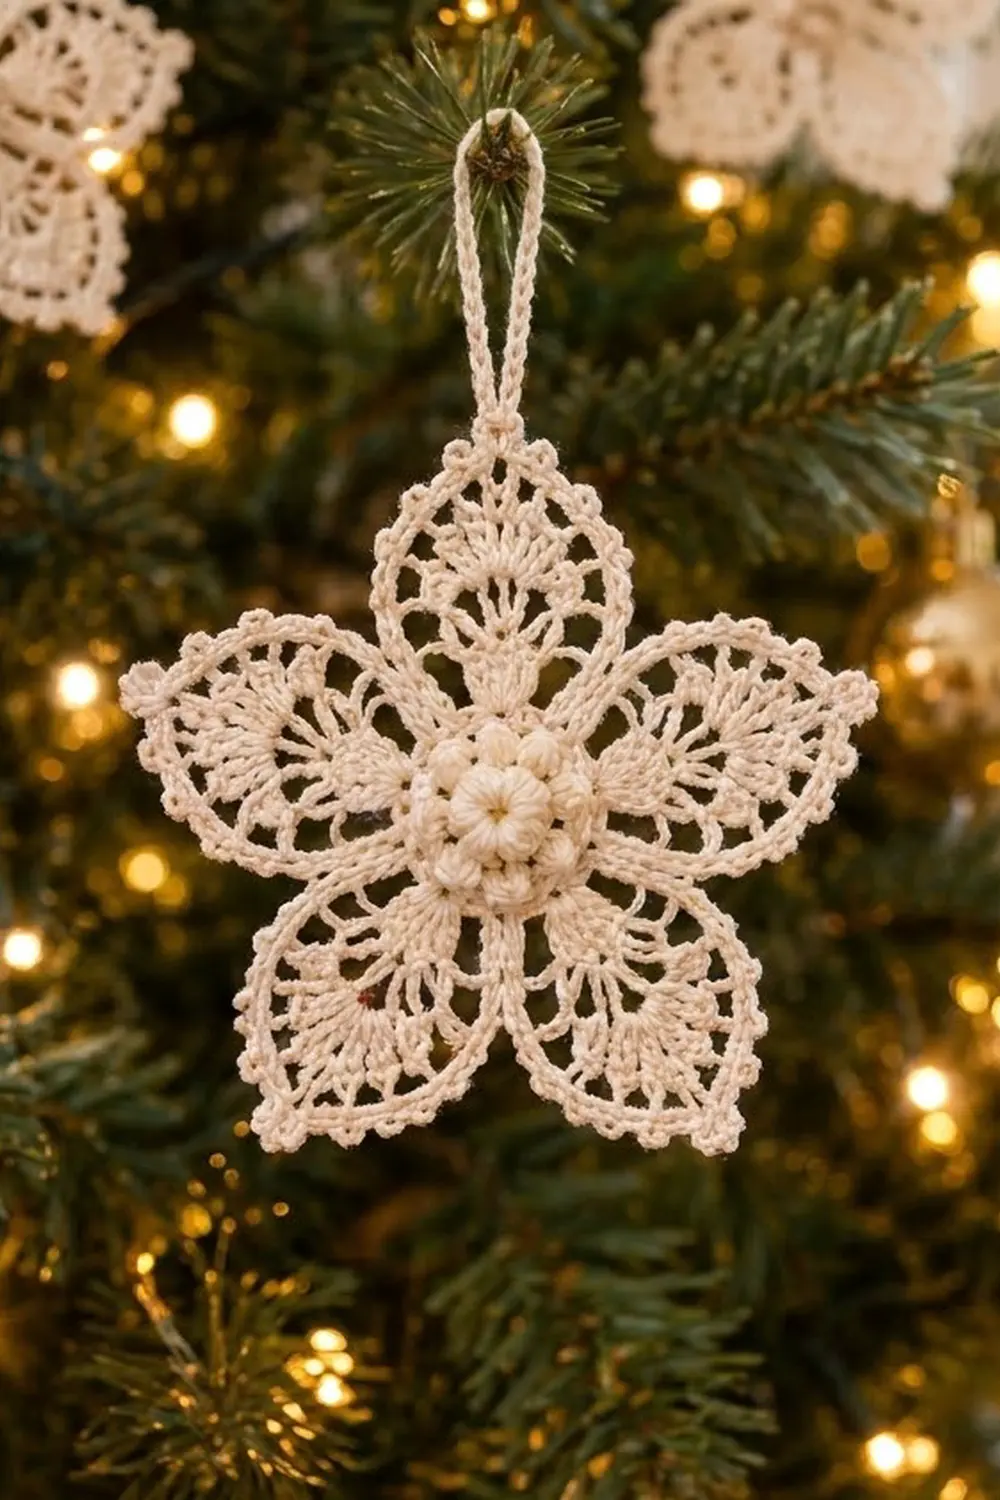
The Snowpetal Lace Star is a delicate five-petal ornament made with fine cotton thread. It has a raised center of popcorn “pearls”, and five pointed petals filled with airy fans and edged with tiny picots. It looks like a snowflake and a winter flower at the same time.
It is worked in a single creamy ivory shade, which gives it a soft heirloom look on a lit tree. It is also a good gift tag, package topper, or window decoration. The pattern uses US crochet terms throughout.
The finished ornament is about 4 in (10.2 cm) from petal tip to petal tip, plus a 1.25 in (3.2 cm) hanging loop. It is one piece, worked in the round from the center out, so there’s no sewing or joining. Only two ends need weaving in.
Here’s the order of work: a small ring, a round of popcorns for the center, a round of chain loops that set up the five petals, a round of treble fans, and then a two-round lace edging with picots. Last, you add a covered hanging loop at one tip. Starching and pinning give the star its crisp shape.
Finished Size and Construction
- Finished size: 4 in (10.2 cm) tip to tip, after blocking
- Hanging loop: 1.25 in (3.2 cm) tall
- Skill level: Intermediate (thread work, popcorns, picots)
- Terminology: US crochet terms
- Yarn weight: Size 10 cotton crochet thread (Lace, weight 0)
- Hook: 1.75 mm steel hook
- Number of pieces: 1 (a single motif)
- Layout: Radial, with 5 petals around a round center
- Center size (Rounds 1–4): 1 in (2.5 cm) across
- Size before border: 3.25 in (8.3 cm) tip to tip after Round 6
- Border depth: 0.375 in (1.0 cm) on each side (Rounds 7–8)
Materials
Yarn advice: Use mercerized cotton thread in size 10. Mercerized thread has a slight sheen, shows stitches clearly, and holds starch well. Acrylic or very soft cotton won’t hold the pointed tips. Choose a warm ivory or cream to match the photo. Bright white works too, but the look is colder.
- Cream / ivory, size 10 cotton thread: 6 g, about 25 m (27 yd) per ornament
Quantities include a margin of about 20% for your test swatch, joins, and weaving in. One standard 100 g ball makes well over a dozen ornaments.
Tools:
- 1.75 mm steel crochet hook
- Fine tapestry needle with a small eye, or a sewing needle with a large eye
- Small sharp scissors
- Fabric stiffener, liquid starch, or a 1:1 mix of white glue and water
- Foam blocking board or corkboard covered with plastic wrap
- Rustproof pins (about 20)
- Ruler or tape measure
Abbreviations (US Terms)
- ch – chain
- sl st – slip stitch
- sc – single crochet
- dc – double crochet
- tr – treble crochet
- sp – space
- st(s) – stitch(es)
- MR – magic ring
- pc – popcorn (see below)
- rep – repeat
Special stitches
Popcorn (pc): Work 4 dc into the same stitch. Take the hook out of the working loop. Put the hook from front to back through the top of the first dc of the group. Catch the dropped loop and pull it through. Ch 1 to close. The ch-1 does not count as a stitch. Popcorns pop toward you, so they sit on the right side and make the pearly center.
Picot: Ch 3, sl st in the 3rd ch from the hook.
Tip picot: Ch 4, sl st in the 4th ch from the hook.
Gauge and Checkpoints
Gauge isn’t critical for an ornament, but it decides the final size. Make one complete test ornament before you make a batch. Measure it at each checkpoint below.
Base gauge: Rounds 1–2 (20 dc) measure 0.75 in (1.9 cm) across.
Checkpoints:
- After Round 4: The center is 1 in (2.5 cm) across and lies flat.
- After Round 6: The star is 3.25 in (8.3 cm) tip to tip, gently stretched.
- After Round 7: It is 3.75 in (9.5 cm) tip to tip.
- After Round 8 and blocking: It is 4 in (10.2 cm) tip to tip.
If your ornament is too big: Go down to a 1.5 mm hook, or pull the chain loops a little tighter. Loose chains are the most common cause of oversized lace.
If your ornament is too small: Go up to a 2.0 mm hook. You can also switch to size 8 thread for a slightly bolder ornament of about 4.25 in (10.8 cm).
If the center cups or ruffles: Check your counts first. Then check tension on the popcorns. Tight popcorns pull the center into a bowl shape.
Pattern
The right side faces you the whole time. Do not turn at the end of rounds.
The Popcorn Center
Round 1: Make a MR. Ch 1, work 10 sc into the ring. Pull the tail to close the ring firmly. Sl st to the first sc to join. (10 sc)
Round 2: Ch 3 (counts as the first dc). Work 1 dc in the same st. Work 2 dc in each of the remaining 9 sts. Sl st to the top of the beginning ch-3. (20 dc)
This is a growth round. Every stitch gets 2 dc, so the count doubles from 10 to 20.
Round 3 (popcorns): Ch 1, sc in the first st, pc in the next st. Sc in the next st, pc in the next st. Rep from * 8 more times. Sl st to the first sc. (10 sc + 10 pc = 20 sts)
Use a fingertip to push each popcorn toward the right side as you go. The 10 popcorns form the raised ring of pearls.
Round 4 (conversion round): Ch 1. Work 1 sc in each sc, and 1 sc in the closing ch at the top of each popcorn. Sl st to the first sc. (20 sc: 20 worked 1-per-existing-stitch + 0 added)
This round smooths the top of the popcorns and gives a firm base for the petals.
Checkpoint: The center is 1 in (2.5 cm) across and lies flat.
Setting Up the Petals
Round 5: Ch 1, sc in the same st as the join. Ch 10, skip the next 3 sts, sc in the next st. Rep from * 3 more times. Ch 10, skip the last 3 sts, and sl st to the first sc. (5 sc + 5 ch-10 sps)
Count check: 5 sc worked + (5 × 3) skipped = 20 sts. All 20 stitches of Round 4 are used.
Each ch-10 loop becomes the frame of one petal. The 5 sc sit in the valleys between the petals.
The Petal Fans
Round 6: Ch 1, sc in the same st as the join. In the next ch-10 sp, work (tr, ch 1) 10 times, then 1 more tr. Sc in the next sc. Rep from * 4 more times. On the last repeat, end with a sl st to the first sc instead of the final sc.
(Per petal: 11 tr + 10 ch-1 sps. Between petals: 1 sc. Round total: 55 tr + 50 ch-1 sps + 5 sc = 110 sts)
Fan the trebles evenly along the loop as you work them. Push them together slightly so the fan spreads out from the petal base. That spread makes the ribbed, spoke-like texture inside each petal.
Checkpoint: 3.25 in (8.3 cm) tip to tip, gently stretched. This is your size before the border.
Border
The border is two rounds. Round 7 is a chain-loop outline that pulls each fan into a pointed leaf shape. Round 8 covers every loop with sc and picots.
Border gauge: One ch-4 loop covered with (2 sc, picot, 2 sc) is about 0.25 in (0.6 cm) long. Together, the two border rounds add 0.375 in (1.0 cm) all around.
Round 7: Petal Outline
In this round, number the 10 ch-1 sps of each petal from 1 to 10, and the 11 tr from 1 to 11. Tr 6 is the center tr of the fan, at the tip of the petal.
Start at the joining sc between two petals.
For each petal:
- Ch 4, sc in ch-1 sp 1.
- (Ch 4, sc in the next ch-1 sp) 4 times. You are now in sp 5.
- Ch 4, then work (sc, ch 5, sc) in the top of tr 6. This is the tip.
- Ch 4, sc in ch-1 sp 6.
- (Ch 4, sc in the next ch-1 sp) 4 times. You are now in sp 10.
- Ch 4, sc in the sc between petals.
Rep for all 5 petals. On the last petal, finish step 6 with a sl st to the joining sc instead of a sc.
Per petal: 12 ch-4 loops + 1 ch-5 tip loop.
Round total: 60 ch-4 loops + 5 ch-5 tip loops.
Count check for one petal: step 1 gives 1 loop, step 2 gives 4, step 3 gives 1 ch-4 loop plus the tip loop, step 4 gives 1, step 5 gives 4, and step 6 gives 1. That is 6 loops before the tip and 6 after, so 12 ch-4 loops. The two sides match, which keeps each petal symmetrical.
Checkpoint: 3.75 in (9.5 cm) tip to tip.
Round 8: Picot Edging
Sl st into the first ch-4 loop.
For each petal:
- In each of the 6 ch-4 loops before the tip, work (2 sc, picot, 2 sc).
- In the ch-5 tip loop, work (3 sc, tip picot, 3 sc).
- In each of the 6 ch-4 loops after the tip, work (2 sc, picot, 2 sc).
Rep for all 5 petals. Sl st to the first sc. Do not fasten off yet if you want the hanging loop to start here. Otherwise fasten off.
Per petal: (12 × 4 sc) + 6 sc at the tip = 54 sc, plus 12 picots + 1 tip picot.
Round total: 270 sc + 60 picots + 5 tip picots.
Why the math works: Every ch-4 loop in Round 7 is anchored in a ch-1 sp of the fan. The outline therefore follows the fan exactly, with no extra stretch and no extra slack.
Each ch-4 loop takes 4 sc, which is the natural fill for a 4-chain loop. That keeps the edge flat instead of ruffled.
The tip loop is 1 chain longer and takes 6 sc plus a longer picot. That small extra length is what makes the sharp point.
In the valleys, the last loop of one petal and the first loop of the next meet at the same sc. This pulls in a neat notch between the petals.
Checkpoint: About 4 in (10.2 cm) tip to tip before blocking. It may be a little smaller while unstarched.
Hanging Loop
- Choose one petal tip to be the top of the ornament. Join the thread with a sl st into that tip picot. If you didn’t fasten off, sl st along the edge to reach it.
- Ch 30, then sl st into the same tip picot to form a loop.
- Ch 1 and work 36 sc around the chain loop, covering it completely.
- Sl st into the tip picot and fasten off.
Packing 36 sc around 30 chains makes a firm, rope-like loop that stands up instead of drooping. The finished loop is about 1.25 in (3.2 cm) tall.
Weave in both ends. Run them through the backs of the sc in the border and through the popcorn center, where they are hidden. Don’t trim them until after blocking.
Final Blocking
- Dampen: Soak the ornament in the stiffener solution until it is fully wet. Gently squeeze out the excess. Do not wring it.
- Draw a guide: On paper under the plastic wrap, draw a circle 4 in (10.2 cm) across. Mark 5 points evenly around it, one every 72 degrees.
- Pin the center: Lay the ornament right side up. Center the popcorn ring in the circle and press it flat with your fingertips.
- Pin the tips: Put a pin through each tip picot, right on a marked point. Pin opposite petals first to keep the star balanced.
- Pin the valleys: Put one pin in each notch between petals. Each pin should be 1.5 in (3.8 cm) from the center of the ornament.
- Open the fans: Use a pin tip to tease the treble spokes apart evenly. Open any picots that are folded under.
- Shape the loop: Slide a pencil or straw through the hanging loop so it dries open and upright.
- Dry: Leave it for 12–24 hours, until it feels stiff and dry all the way through.
- Finish: Remove the pins and trim the woven ends close.
Final Quality-Control Checklist
- The popcorn center has 10 even, raised pearls and lies flat.
- Round 4 has 20 sc and Round 5 has 5 even petal loops.
- Each petal has 11 trebles that spread evenly.
- Each petal has 6 outline loops on each side of the tip.
- All 5 tips are sharp and stand out the same amount.
- All 65 picots are open and pointing outward.
- The ornament is 4 in (10.2 cm) tip to tip in every direction.
- The hanging loop is firm, upright, and 1.25 in (3.2 cm) tall.
- No ends or knots show on the right side.
- After drying, the ornament holds its shape when hung.
Troubleshooting
The center bulges into a dome. The popcorns are too tight, or Round 2 has more than 20 dc. Recount, and relax your tension on the popcorns.
The popcorns sink to the back. Make sure you put the hook into the first dc from front to back. Pushing each one forward with a fingertip also helps.
The petals are different lengths. Count the trebles. Each fan needs exactly 11 tr and 10 ch-1 sps. Also check that every Round 5 loop has exactly 10 chains.
The edge ruffles. The Round 7 chains are too loose, or a loop got extra sc in Round 8. Keep each loop at exactly 4 sc.
The edge cups and pulls the petals inward. The chains are too tight. Go up half a hook size for Rounds 7–8 only.
The tips are rounded. Make sure the tip sc went into the top of tr 6, not into a space. Pin the tip picot firmly while blocking.
The ornament goes soft over time. Re-dip it in stiffener and block it again.
Care
Store the ornaments flat in a box with tissue paper between them. To clean one, dab it with a damp cloth, or rinse it gently and re-starch and re-block it, since washing removes the stiffener.
Final Notes
The size is built up in a short chain of measurements. The 20 dc of Round 2 measure 0.75 in (1.9 cm). The popcorn center grows to 1 in (2.5 cm). The five treble fans take the star to 3.25 in (8.3 cm). The outline loops bring it to 3.75 in (9.5 cm), and the picot edging and blocking finish it at 4 in (10.2 cm), with a 1.25 in (3.2 cm) loop on top.
If each checkpoint matches, every ornament in your batch will come out the same. Make one, measure it, and then make as many as your tree needs.
Happy crocheting!