

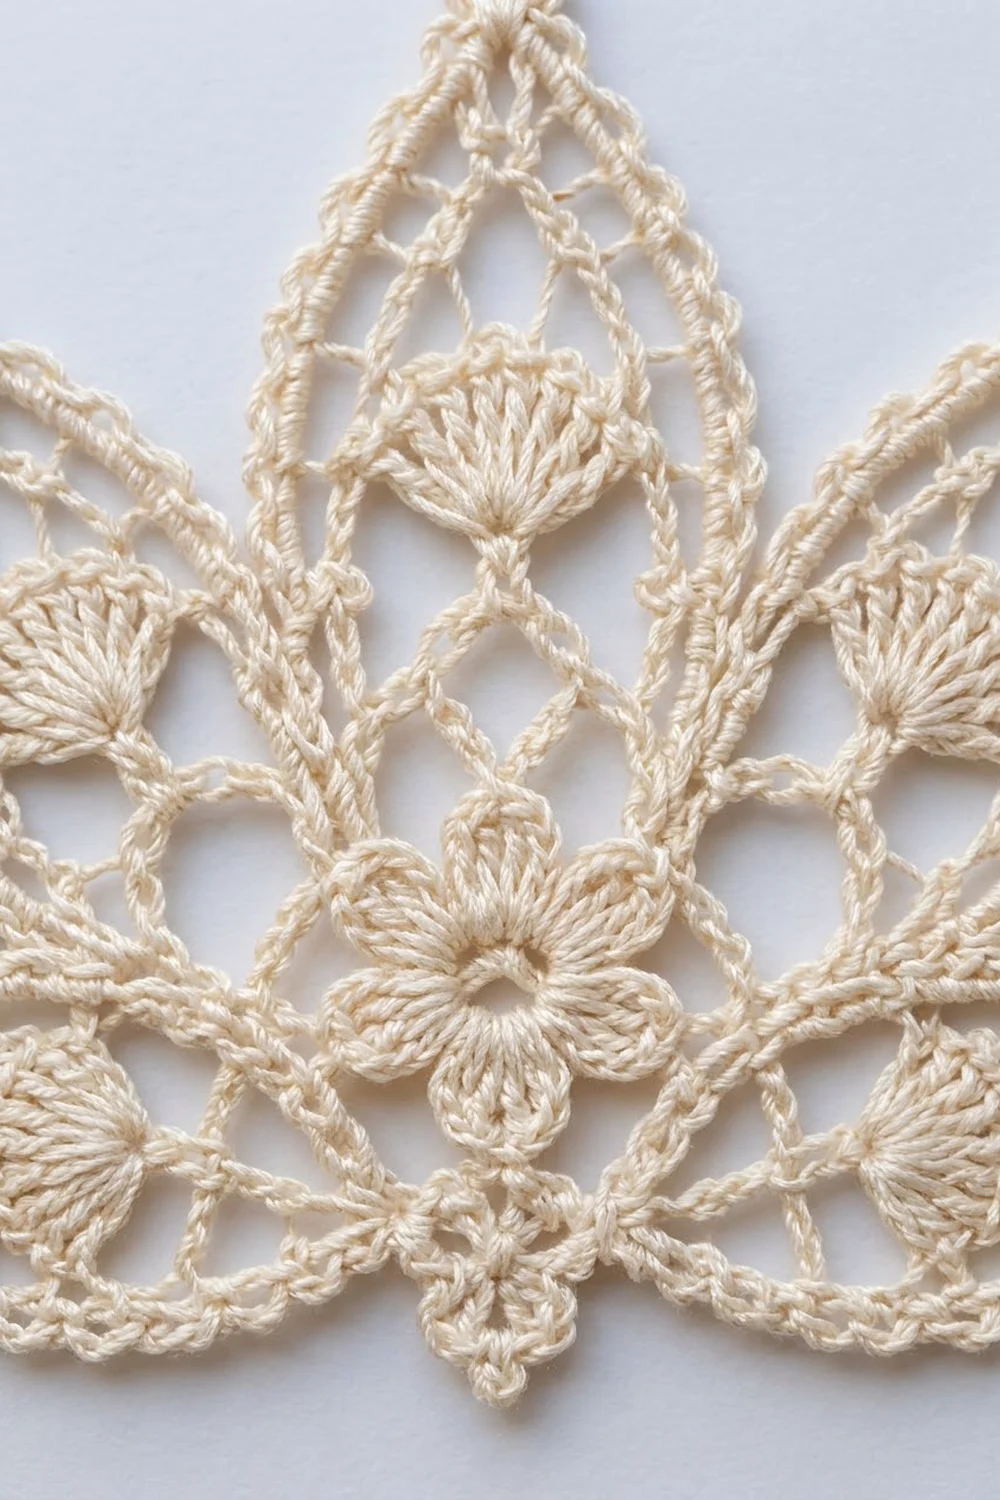
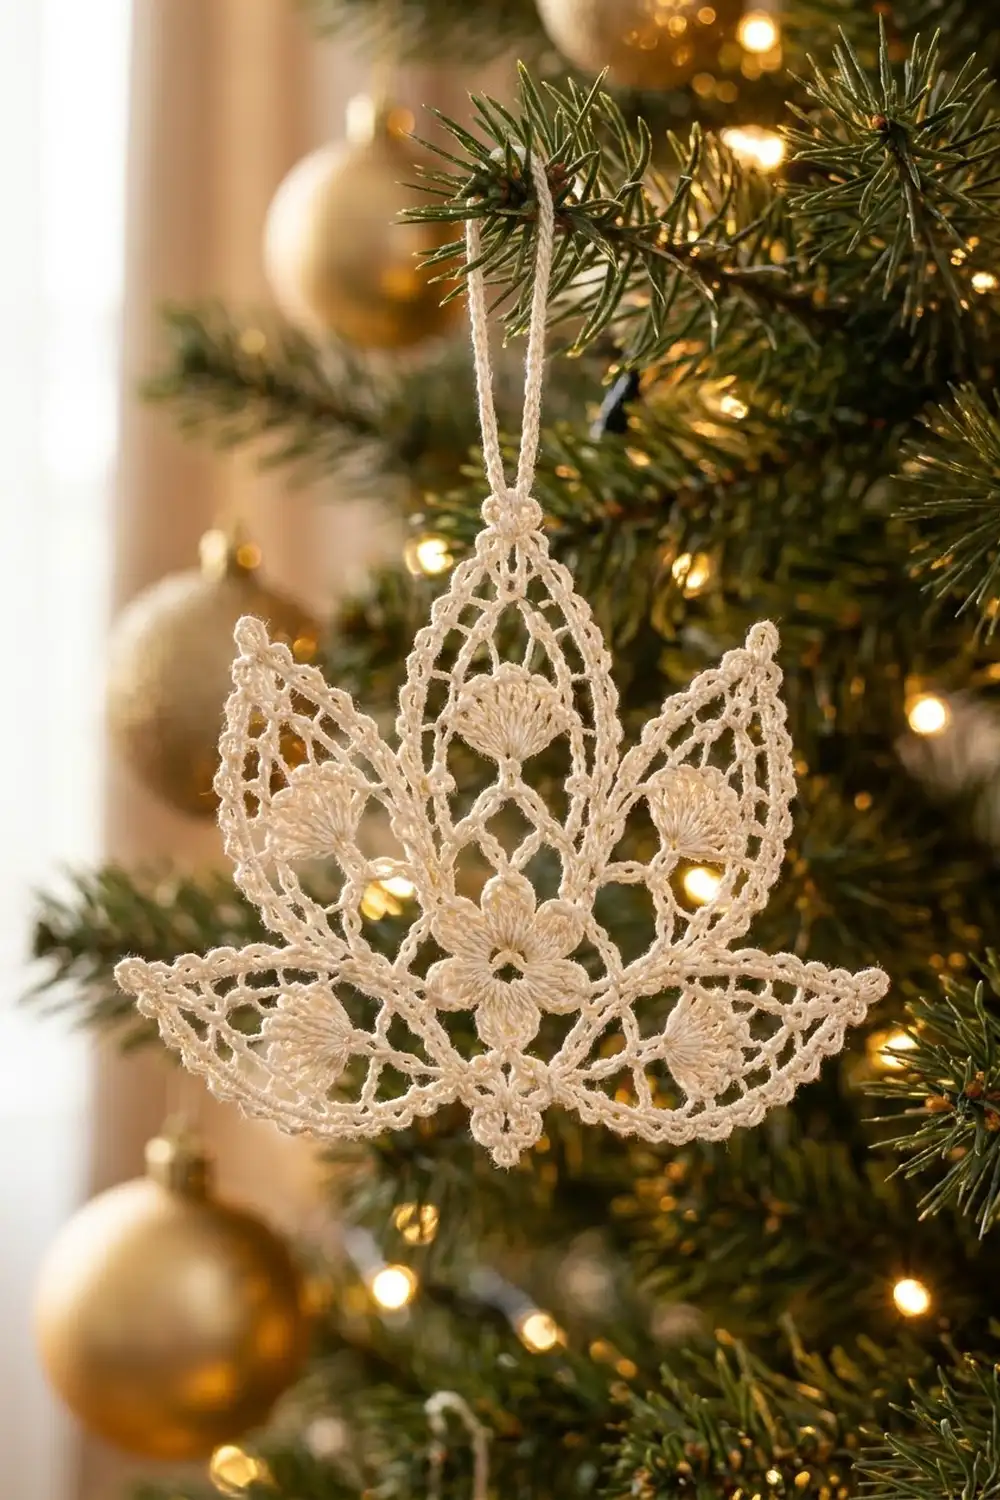
This ivory lotus ornament is a small piece of thread lace made for hanging on a tree. A five-petal flower sits in the center. Five pointed lotus petals fan out around it: one tall center petal, two upper side petals, and two long lower petals that reach out sideways. Each petal has a small shell fan near its base and open chain mesh above, and the whole outline is trimmed with picots.
The sample is worked in one color, a soft cream cotton thread, which suits the vintage, heirloom style of the design. In warm tree lights it reads like old lace, and a whole set looks lovely hanging together on one tree.
The pattern uses US crochet terms. The finished ornament measures about 5 in (12.7 cm) wide and 4 in (10.2 cm) tall, plus a 1.5 in (3.8 cm) hanging loop.
Construction is simple to follow. You crochet the center flower in the round, add a ring of chain loops behind it, and turn that into a 45-stitch base round. Each of the five petals is worked in short rows off its own group of base stitches. One continuous picot edging round then outlines everything, adds a trefoil picot at the bottom point, and makes the hanging loop at the top.
Finished Size and Construction
- Finished size: 5 in (12.7 cm) wide x 4 in (10.2 cm) tall, not counting the hanging loop
- Hanging loop: 1.5 in (3.8 cm) tall
- Skill level: Intermediate (thread crochet, short rows, picots)
- Terminology: US crochet terms
- Yarn weight: Size 10 crochet cotton thread (lace weight, 0)
- Hook: 1.5 mm steel hook
- Number of pieces: 1 (worked in one piece; nothing to sew together)
- Layout: Center flower, base round, 5 petals, bottom trefoil, hanging loop
- Piece size before edging: 4.7 in (11.9 cm) wide x 3.5 in (8.9 cm) tall
- Edging depth: about 0.15 in (0.4 cm) along the outline; the trefoil adds about 0.2 in (0.5 cm) at the bottom point
Materials
Yarn: Use a mercerized size 10 cotton thread. It holds crisp stitch definition and starches well. Choose a cream, ivory, or natural white for this look. Steer clear of very fuzzy or stretchy threads, because the mesh will lose its shape.
- Cream / ivory (Main Color): 8 g, about 32 m (35 yd)
This quantity includes a margin of roughly 50% over what one ornament uses, so you have spare thread for a swatch and for weaving in ends.
Tools:
- 1.5 mm steel crochet hook
- Fine tapestry needle or small-eye beading needle for weaving in ends
- 4 locking stitch markers
- Small sharp scissors
- Ruler or tape measure marked in inches and cm
- Blocking board or foam mat, plus rust-proof pins
- Fabric stiffener or spray starch
Abbreviations (US Terms)
- ch – chain
- sl st – slip stitch
- sc – single crochet
- hdc – half double crochet
- dc – double crochet
- sk – skip
- sp(s) – space(s)
- st(s) – stitch(es)
- RS – right side
- tch – turning chain
Special stitches
- Picot: Ch 3, sl st in 3rd ch from hook.
- Tip picot: Ch 5, sl st in 5th ch from hook.
- Trefoil picot: (Ch 5, sl st in 5th ch from hook) 3 times, then sl st in top of the last sc made. This makes three small rings in a cluster.
- Fan: 7 dc worked in the same stitch.
Gauge and Checkpoints
Thread gauge is personal and it changes how big the ornament comes out, so make one test ornament before you start a set. Measure it before you starch and block.
- After Round 3 (center flower): 1 in (2.5 cm) across, tip to tip
- After Round 5 (base round): 1.5 in (3.8 cm) across
- Upper side petal, base to tip: 1.25 in (3.2 cm)
- Lower petal, base to tip: 1.6 in (4.1 cm)
- Center petal, base to tip: 2 in (5.1 cm)
- Before edging: 4.7 in (11.9 cm) wide x 3.5 in (8.9 cm) tall
- After edging and blocking: 5 in (12.7 cm) x 4 in (10.2 cm)
Too big? Switch to a 1.25 mm hook, or work the chains more tightly. Too small? Switch to a 1.75 mm hook. Small differences of about 0.1 in (0.3 cm) can be blocked out, so there’s no need to change hooks for those.
Center Flower
Round 1: Ch 6, then sl st to the first ch to form a ring. Ch 1 and work 15 sc in the ring. Sl st to the first sc. (15 sc)
Round 2: Ch 1. Sc in the same st, ch 4, sk 2. (Sc in next st, ch 4, sk 2) 4 times. Sl st to the first sc. (5 sc, 5 ch-4 sps)
Round 3: Sl st in the first ch-4 sp. In each ch-4 sp around, work (sc, hdc, 3 dc, hdc, sc). Sl st to the first sc. (5 petals of 7 sts each = 35 sts)
This gives you the rounded five-petal flower with a small open center.
Round 4: Sl st across to the center dc of the first petal (that is, in sc, hdc, and next dc, then sl st in center dc). Ch 1 and sc in the same center dc. (Ch 7, sc in center dc of next petal) 4 times, then ch 7 and sl st to the first sc. (5 sc, 5 ch-7 loops = 40 sts)
The ch-7 loops arc out between the flower petal tips and frame the flower.
Round 5 (conversion round): Ch 1. Work 1 sc in each sc and 8 sc in each ch-7 loop. Sl st to the first sc. (5 sc worked 1-per-sc + 40 sc worked 8-per-loop = 45 sc)
Checkpoint: 1.5 in (3.8 cm) across. Fasten off.
Base Round Stitch Map
Lay the piece RS up. Turn it so that one of the 5 single-stitch spots from Round 4 sits at the bottom. Then count the 45 stitches in the direction you work. Number the stitch right after the bottom center point as st 1:
- Sts 1–3: bottom zone, first half
- Sts 4–10: lower petal A (7 sts)
- St 11: gap
- Sts 12–18: upper side petal A (7 sts)
- St 19: gap
- Sts 20–26: center petal (7 sts)
- St 27: gap
- Sts 28–34: upper side petal B (7 sts)
- St 35: gap
- Sts 36–42: lower petal B (7 sts)
- Sts 43–45: bottom zone, second half
Check the math: 3 + 7 + 1 + 7 + 1 + 7 + 1 + 7 + 1 + 7 + 3 = 45. The center petal’s middle stitch, st 23, sits directly opposite the bottom point, so the design comes out symmetrical. Put markers in sts 4, 12, 28, and 36. Use one marker again for st 20.
Petals
Work every petal with RS facing. Join the thread in the first st of that petal’s 7-st group. The petals all start with the same rows and only differ in how many extension rows they get.
Row 1 (fan row): Ch 1, sc in the same st (st 1 of the group). Ch 2, sk 2, fan (7 dc) in the next st, ch 2, sk 2, sc in the last st of the group. (2 sc, 2 ch-2 sps, 7 dc)
Row 2: Ch 5 and turn; the ch-5 counts as dc + ch 2. Sc in the first dc of the fan. (Ch 3, sk 1 dc, sc in next dc) 3 times. Ch 2, dc in the last sc. (2 dc, 4 sc, 2 ch-2 sps, 3 ch-3 sps)
Row 3: Ch 1, turn, sc in the first dc. (Ch 4, sc in next ch-3 sp) 3 times. Ch 4, sc in the 3rd ch of the tch. (5 sc, 4 ch-4 loops)
Extension pair (Rows E1 and E2), only for the lower and center petals:
- Row E1: Ch 5 and turn (counts as dc + ch 2). Sc in the first loop. (Ch 4, sc in next loop) 3 times. Ch 2, dc in the last sc. (2 dc, 4 sc, 3 ch-4 loops, 2 ch-2 sps)
- Row E2: Ch 1, turn, sc in the first dc. (Ch 4, sc in next ch-4 loop) 3 times. Ch 4, sc in the 3rd ch of the tch. (5 sc, 4 ch-4 loops)
Row 4: Ch 1, turn, sl st in the first 2 ch of the first loop, then sc in the same loop. (Ch 4, sc in next loop) 3 times. (3 ch-4 loops)
Row 5: Repeat Row 4, ending with (ch 4, sc in next loop) 2 times. (2 ch-4 loops)
Row 6: Repeat Row 4, ending with ch 4, sc in the next loop once. (1 ch-4 loop)
Row 7 (tip): Ch 1, turn, sl st in the first 2 ch of the loop, then work (sc, ch 3, sc) in the loop. Fasten off. (1 ch-3 tip sp)
Petal row totals:
- Upper side petals A and B: Rows 1–7, no extension pair = 7 rows
- Lower petals A and B: Rows 1–3, 1 extension pair, Rows 4–7 = 9 rows
- Center petal: Rows 1–3, 2 extension pairs, Rows 4–7 = 11 rows
The order to work them in: lower petal A, upper side petal A, center, upper side petal B, lower petal B.
Checkpoint: Measured unstretched, the upper side petals are 1.25 in (3.2 cm) long, the lower petals 1.6 in (4.1 cm), and the center petal 2 in (5.1 cm). The full piece is 4.7 in (11.9 cm) wide x 3.5 in (8.9 cm) tall.
Edging
Edging gauge: 3 sc fit along the side of each petal row. Every mesh row and dc row is about as tall as 3 sc, so that ratio keeps the petal edges flat without ruffling or cupping.
Work the edging RS facing in one continuous round. On each petal, go up one side, around the tip, and down the other side. Work the up side as (3 sc in the row-end, picot) for every row except the tip row. Work the down side as the mirror image, (picot, 3 sc in the row-end), so the picots line up on both sides.
Edging Round:
- Bottom zone, first half: Join with a sc in st 1, then sc in sts 2 and 3. (3 sc)
- Lower petal A (9 rows): Up: (3 sc, picot) 8 times, across Rows 1–8. Tip: in the ch-3 sp, work (2 sc, tip picot, 2 sc). Down: (picot, 3 sc) 8 times. (Per side: 24 sc, 8 picots. Petal total: 52 sc, 17 picots)
- Gap: Sc in st 11. (1 sc)
- Upper side petal A (7 rows): Up: (3 sc, picot) 6 times. Tip: (2 sc, tip picot, 2 sc). Down: (picot, 3 sc) 6 times. (Per side: 18 sc, 6 picots. Petal total: 40 sc, 13 picots)
- Gap: Sc in st 19. (1 sc)
- Center petal (11 rows): Up: (3 sc, picot) 10 times. Tip: in the ch-3 sp, work 2 sc, ch 30, and sl st in the top of the last sc to form the loop. Work 36 sc over the loop, then 2 more sc in the ch-3 sp. Down: (picot, 3 sc) 10 times. (Per side: 30 sc, 10 picots. Petal total: 64 sc and 20 picots, plus the hanging loop of 36 sc)
- Gap: Sc in st 27. (1 sc)
- Upper side petal B: Work the same as upper side petal A. (40 sc, 13 picots)
- Gap: Sc in st 35. (1 sc)
- Lower petal B: Work the same as lower petal A. (52 sc, 17 picots)
- Bottom zone, second half: Sc in sts 43, 44, and 45. (3 sc)
- Trefoil: Work a trefoil picot, then sl st to the first sc of the round. Fasten off.
Edging totals:
- Sc: 6 (bottom) + 4 (gaps) + 52 + 40 + 64 + 40 + 52 (petals) = 258 sc, plus 36 sc on the loop
- Picots: 17 + 13 + 20 + 13 + 17 = 80 picots, plus 1 trefoil and 1 hanging loop
Why the math works: Each side of a petal gets 3 sc for each of its rows except the tip row. That gives 6 x 3 = 18 sc, 8 x 3 = 24 sc, and 10 x 3 = 30 sc, so each petal stays symmetrical. The trefoil falls between st 45 and st 1, which is the exact bottom center. The hanging loop sits on the center tip, directly above it, so the ornament hangs straight.
Checkpoint: 5 in (12.7 cm) wide x 4 in (10.2 cm) tall, with the loop standing 1.5 in (3.8 cm) above the center tip.
Final Blocking
- Weave in all ends along the edging sc, then trim them close.
- Soak the ornament in fabric stiffener, or in a strong starch solution. Press out the excess with a towel.
- Lay it RS up on the blocking board.
- Pin the bottom trefoil and the center petal tip so they sit on one vertical line 4 in (10.2 cm) apart.
- Pin the lower petal tips out sideways, slightly below the flower, so they are 5 in (12.7 cm) apart.
- Pin the upper side petal tips halfway between the center and lower petals.
- Pin out every picot and open up each fan and mesh loop with a pin tip.
- Let it dry completely, at least 12 hours. Then unpin it.
Final Quality-Control Checklist
- The flower has 5 even petals with a small open center.
- Each petal has one 7-dc fan near its base and open mesh above.
- The petals have 7, 9, and 11 rows, placed symmetrically.
- The edging has 258 sc and 80 picots, plus the trefoil and the loop.
- The picots on both sides of each petal line up.
- The ornament measures 5 in (12.7 cm) x 4 in (10.2 cm).
- It hangs straight from the loop.
- There are no visible ends or knots.
Troubleshooting
- Petal edges ruffle: You have more than 3 sc per row-end. Pull back and work exactly 3.
- Petal edges cup or pull: Your sc are too tight. Loosen your tension on the edging.
- The ornament hangs crooked: The loop is off center, or the two halves have different row counts. Count the petal rows on both sides.
- The fans look flat: Tug each fan open while it is wet, and pin the center dc.
- The mesh loops look uneven: Check that each loop has exactly 4 ch, and keep the sl st moves into the loops snug.
- The flower cups up: Your Round 4 chains are too tight. Try ch 8 in place of ch 7, and still work 8 sc per loop.
Care
Hand wash in cool water with a mild soap. Re-starch and pin it to shape while damp, then store it flat, wrapped in tissue paper.
Final Notes
Here’s how the measurements build up: the flower is 1 in (2.5 cm) across, the base round is 1.5 in (3.8 cm), and the petals are 1.25 in (3.2 cm), 1.6 in (4.1 cm), and 2 in (5.1 cm) long. Before edging the piece is 4.7 in (11.9 cm) x 3.5 in (8.9 cm), and after edging and blocking it is 5 in (12.7 cm) x 4 in (10.2 cm). If you check each stage on your test ornament, every copy you make will come out the same.
Happy crocheting!