

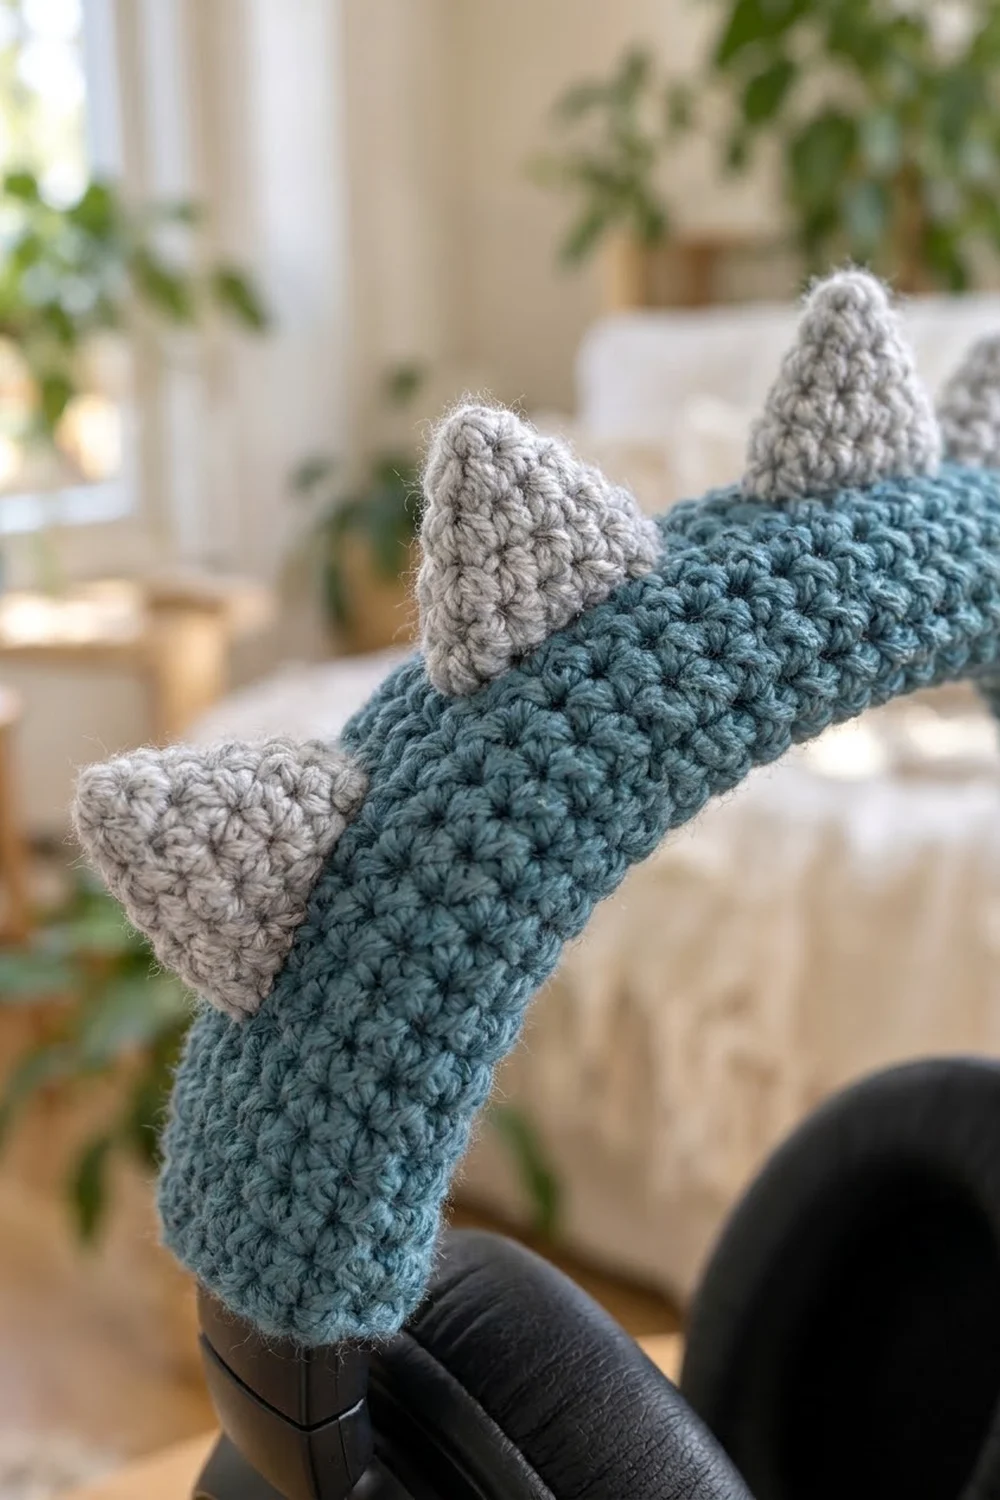
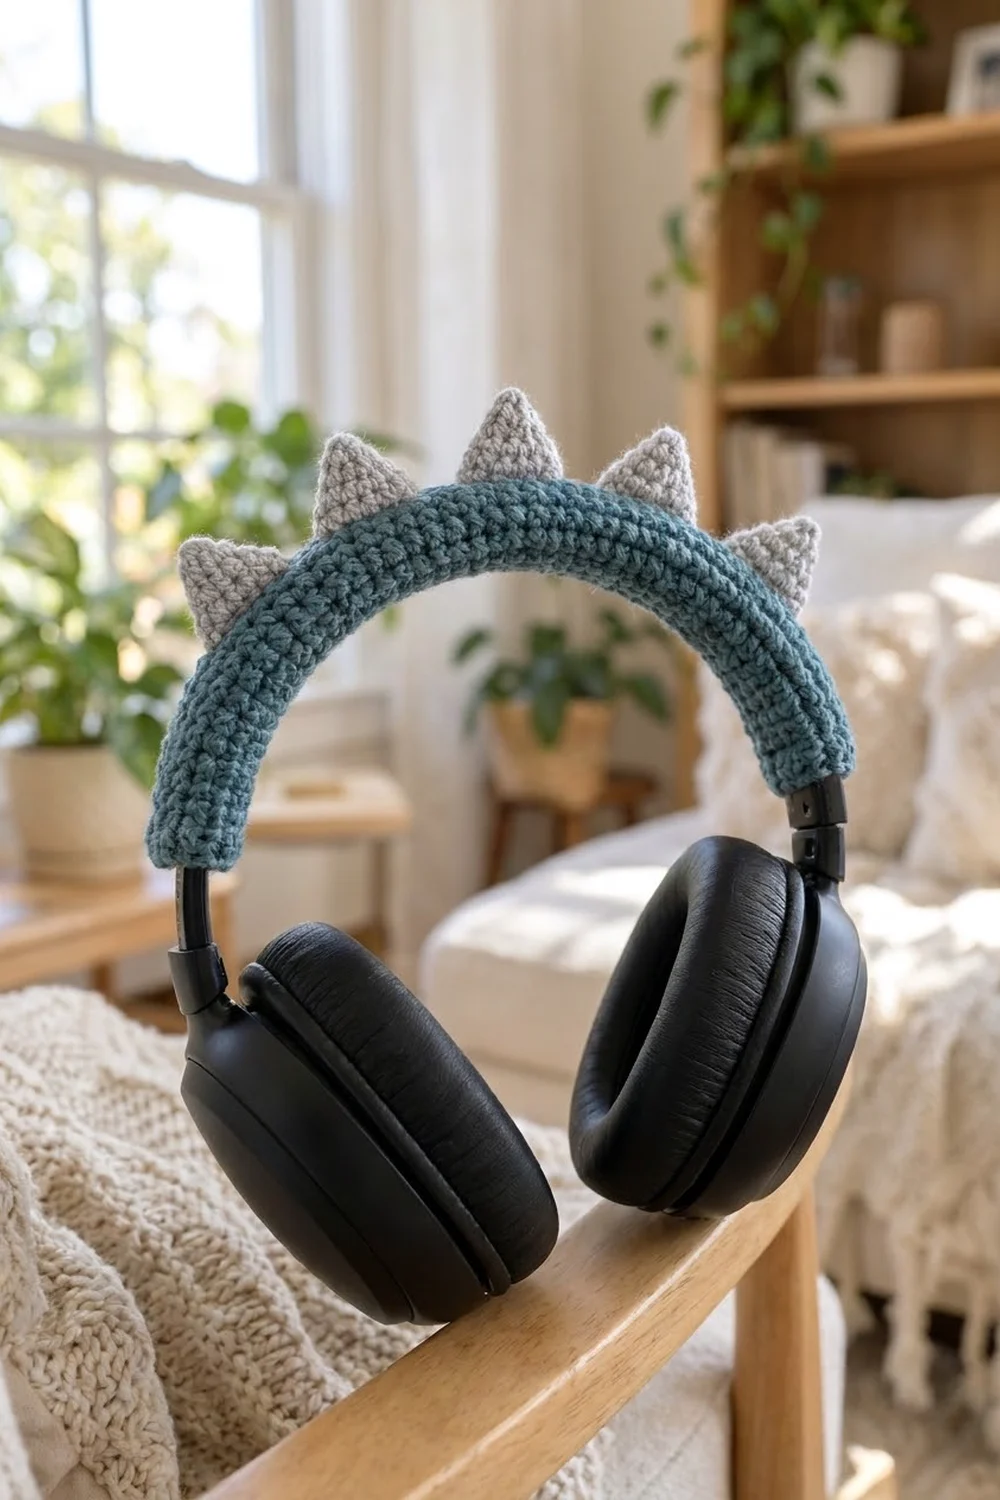
Give your over-ear headphones a little personality with this cozy dinosaur-spike headband cover. A soft teal single crochet strip wraps around the headband and is seamed on the underside. Five gray spikes stand in a row along the top, like a friendly little stegosaurus.
The palette is calm and modern: a muted teal for the cover and a light heather gray for the spikes. Dense single crochet gives a firm, tidy fabric that won’t stretch out or slide around. It also looks good next to black headphone hardware.
This pattern uses US crochet terms. The finished cover measures 4 in (10.2 cm) wide by 9¾ in (24.8 cm) long when laid flat. Wrapped, that gives a circumference of about 4 in (10.2 cm).
Construction is simple. You work a flat rectangle in rows, add one round of border, make five stuffed cone spikes, and sew the spikes along the centerline. Then you wrap the cover around the headband and whipstitch it closed underneath, right on the headphones, so you never need to take them apart.
Finished Size and Construction
- Finished size (flat): 4 in × 9¾ in (10.2 cm × 24.8 cm)
- Wrapped circumference: about 4 in (10.2 cm)
- Skill level: Easy
- Terminology: US crochet terms
- Yarn weight: Medium / worsted (#4)
- Hook: 4.0 mm (G-6)
- Number of pieces: 6 (1 cover strip + 5 spikes)
- Layout: 5 spikes in a single line along the top center of the strip
- Strip size before border: 3½ in × 9¼ in (8.9 cm × 23.5 cm)
- Border depth: ¼ in (0.6 cm) on every side, from 1 round of sc
- Spike size: about 1¼ in (3.2 cm) tall, with a 1¼ in (3.2 cm) flattened base
Materials
Choose a smooth worsted-weight yarn with good stitch definition. An acrylic, cotton-acrylic blend, or superwash wool all work well. Avoid fuzzy or very splitty yarns, because the spikes need crisp, firm stitches to hold their points.
- Color A, teal (cover): 20 g, about 40 m (44 yd)
- Color B, light gray (spikes): 8 g, about 16 m (17 yd)
These quantities include a margin for your swatch, seaming, and small differences in tension.
Tools:
- 4.0 mm (G-6) crochet hook
- Tapestry needle
- Small amount of polyester fiberfill
- Stitch markers (at least 6)
- Scissors
- Measuring tape
- Pins or clips for placing the spikes
Abbreviations (US Terms)
- ch – chain
- sc – single crochet
- inc – increase (2 sc in the same stitch)
- MR – magic ring
- st(s) – stitch(es)
- rnd – round
- sl st – slip stitch
- [ ] – repeat the instructions in brackets the stated number of times
Special technique – corner group: Work 3 sc in the same stitch. This turns a square corner without cupping.
Gauge and Checkpoints
Gauge: 16 sc × 16 rows = 4 in (10.2 cm) in single crochet. That is 4 sts and 4 rows per inch, so each sc is about ¼ in (0.6 cm) wide and tall.
The square gauge matters. It is what lets the border use exactly 1 sc per row end without ruffling.
Test one piece first. Make one spike before you start the strip, and check it against the measurements below. It takes only a few minutes and confirms your tension for both colors.
Checkpoints:
- Strip Row 1: 3½ in (8.9 cm) wide
- Strip Row 8: 2 in (5.1 cm) long
- Strip Row 20: 5 in (12.7 cm) long
- Strip Row 37: 9¼ in (23.5 cm) long
- After the border: 4 in × 9¾ in (10.2 cm × 24.8 cm)
- Each spike: about 1¼ in (3.2 cm) tall, with a base about 1¼ in (3.2 cm) wide when flattened
If your piece is too big, go down to a 3.75 mm hook. If it is too small, go up to a 4.5 mm hook. Change the hook rather than the stitch counts, because the spike spacing depends on the row count.
Cover Strip
With Color A:
Foundation: Ch 15.
Row 1: Sc in the 2nd ch from the hook and in each ch across. (14 sts)
Rows 2–37: Ch 1, turn, sc in each st across. (14 sts)
Check the length at Row 8: 2 in (5.1 cm). Check again at Row 20: 5 in (12.7 cm).
At the end of Row 37, the strip should measure 3½ in × 9¼ in (8.9 cm × 23.5 cm). Do not fasten off; go straight on to the border.
Spikes (Make 5)
With Color B: Work in continuous rounds and mark the first stitch of each round.
Rnd 1: 4 sc in MR. (4 sts)
Rnd 2: [Sc 1, inc] 2 times. (6 sts)
Rnd 3: [Sc 2, inc] 2 times. (8 sts)
Rnd 4: [Sc 3, inc] 2 times. (10 sts)
Rnd 5: Sc in each st around. (10 sts)
Sl st in the next st and fasten off, leaving a 12 in (30.5 cm) tail for sewing.
Increasing only twice per round, on opposite sides, gives the spike two flat faces instead of a round cone. When you press it flat, it becomes a clean triangle.
Stuff each spike lightly with a small pinch of fiberfill, just enough to fill the tip. Flatten the opening so 5 sts lie on the front and 5 on the back. The flattened base should be about 1¼ in (3.2 cm) wide, which matches 10 sts at 4 sts per inch folded in half.
Make All Pieces
- Color A: 1 cover strip (14 sts × 37 rows, plus border)
- Color B: 5 spikes
Spike layout (top view of the flat strip, Row 1 at the left):
Row:   1 ... 7 ... 13 ... 19 ... 25 ... 31 ... 37
             ▲      ▲      ▲      ▲      ▲
       |-----+------+------+------+------+-----|
         6r    6r     6r     6r     6r     6r
Each ▲ marks the center of one spike on the centerline, between stitch 7 and stitch 8. The spikes are 6 rows apart, which is 1½ in (3.8 cm) center to center.
There are also 6 rows from each end of the strip to the nearest spike. That makes the line symmetrical, with the middle spike on Row 19, the exact center of 37 rows.
Each base is 1¼ in (3.2 cm) wide and the spacing is 1½ in (3.8 cm), so there is a gap of about ¼ in (0.6 cm) between neighboring spikes. That is the small gap you see in the finished piece.
Border
The border is 1 round of sc in Color A. Work it directly from the last stitch of Row 37.
Border gauge: same as the main fabric, 4 sc per inch. Each sc row end is ¼ in (0.6 cm) tall and each sc is ¼ in (0.6 cm) wide, so 1 sc per row end exactly matches 1 sc per stitch.
Border Rnd 1: Ch 1, do not turn. Work around the strip as follows:
- Short side 1 (top of Row 37): Make a corner group in the first st. Sc in each of the next 12 sts, then make a corner group in the last st. Count: 12 sts worked 1 per stitch + 6 sts from the corner groups = 18 sc.
- Long side 1: Sc in each of the 37 row ends. 37 sc
- Short side 2 (foundation chain): Working into the free loops of the foundation chain, make a corner group in the first loop. Sc in each of the next 12 loops, then make a corner group in the last loop. 18 sc
- Long side 2: Sc in each of the 37 row ends. 37 sc
Join with a sl st to the first sc. Fasten off, leaving a 30 in (76.2 cm) tail for seaming.
Round total: 102 sts worked 1 per existing stitch or row end (14 + 37 + 14 + 37) + 8 extra stitches from the four corner groups (2 extra at each corner) = 110 sc. This also matches the per-side sums: 18 + 37 + 18 + 37 = 110.
Why the math works: Each short side starts as 14 sts, and that already includes its 2 corner stitches. Those corners just grow from 1 sc to 3 sc each.
The long sides take exactly 1 sc per row end. Because the gauge is square, that adds no stitches and no ruffles.
The border adds ¼ in (0.6 cm) to every edge. The strip goes from 3½ in × 9¼ in (8.9 cm × 23.5 cm) to 4 in × 9¾ in (10.2 cm × 24.8 cm).
Joining
There are two joining steps. First sew the spikes on while the strip is flat, then wrap the strip around the headband and seam it.
1. Attaching the spikes
Lay the strip right side up. Place a marker between stitch 7 and stitch 8 on Rows 7, 13, 19, 25, and 31. Center one flattened spike on each marker, with its base running along the length of the strip so the triangle faces the front of the headphones.
Using the spike’s tail, whipstitch around the base. Take one stitch through each of the 10 Rnd 5 stitches, catching the cover fabric underneath each time: 5 stitches along the front of the base and 5 along the back. Make each stitch go into the cover about ⅛ in (0.3 cm) to either side of the centerline.
Pull each stitch just snug. The spike should stand upright without puckering the teal fabric. Weave in the tail on the wrong side.
2. Seaming around the headband
Most headbands can’t be removed, so seam the cover in place. Center the strip over the top of the headband, wrong side against the band, with the spikes on top. Wrap the long edges down around the band so they meet on the underside.
Using the long Color A tail, whipstitch the two long edges together through the back loops of the border stitches. Match them stitch for stitch:
- Corner center sc to corner center sc: 1 stitch
- The 37 long-side sc on one edge to the 37 on the other: 37 stitches
- Corner center sc to corner center sc at the far end: 1 stitch
That is 39 whipstitches in total. Because both long sides have exactly 37 sc, the seam lines up perfectly with no easing.
Tension: Pull each stitch firm enough to close the gap, but not so tight that the seam ridges up. The two border edges should just touch.
Size checkpoint: The wrapped cover should be about 4 in (10.2 cm) around. It should fit the band snugly with no gaps, and it should not slide when you turn the headphones over. Leave the short ends open; they rest just above the sliders.
Fit note: Before you start, measure around your headband at its thickest point. If it is noticeably larger or smaller than 4 in (10.2 cm), add or remove 2 foundation chains for each ½ in (1.3 cm) of difference. Keep the spike line on the new center stitch.
If your headband’s top arc is longer or shorter than 9¾ in (24.8 cm), add or remove rows in multiples of 2, splitting them evenly between both ends so the spikes stay centered.
Final Blocking
- Before seaming, lightly mist the flat strip with water. Don’t block the spikes; they should stay crisp and firm.
- Pin the strip to 4 in × 9¾ in (10.2 cm × 24.8 cm) on a blocking mat, keeping the corners square.
- Let it dry completely, usually 2 to 4 hours.
- Unpin it, attach the spikes, and seam the cover around the headband.
- If the seam looks bumpy, press it gently between your fingers. Never apply steam on the headphones.
- Pinch each spike tip to sharpen the point.
Final Quality-Control Checklist
- The strip has 14 sts across and 37 rows.
- The strip measures 3½ in × 9¼ in (8.9 cm × 23.5 cm) before the border.
- The border has 110 sc: 18 on each short side and 37 on each long side.
- The flat piece measures 4 in × 9¾ in (10.2 cm × 24.8 cm) after the border.
- Each spike ends with 10 sts and is about 1¼ in (3.2 cm) tall.
- The spikes sit on Rows 7, 13, 19, 25, and 31, between stitch 7 and stitch 8.
- The spikes are 1½ in (3.8 cm) apart, and the line is symmetrical.
- The seam is on the underside, with 39 whipstitches and no gaps.
- All tails are woven in on the wrong side.
Troubleshooting
The border ruffles along the long sides. Your row gauge is shorter than your stitch gauge. Redo the border with a hook 0.5 mm smaller, or skip 1 row end every 8 rows. If you skip row ends, skip the same number on both long sides so the seam still matches.
The corners cup inward. Check that each corner has a full 3-sc group.
The spikes lean or flop over. Add a little more stuffing to the tip, and make sure all 10 base stitches are sewn into the cover.
The spikes look round instead of triangular. Check that you worked exactly 2 increases per round, stacked one above the other, then flatten the base before sewing.
The cover slides around the band. Your fabric is too loose. Remake the strip with a smaller hook, or remove 2 foundation chains.
The cover won’t close around the band. Add 2 foundation chains for each ½ in (1.3 cm) that you’re short.
The seam shows from the side. Work the seam through back loops only, and keep the edges just touching.
Care
Spot clean with a damp cloth and mild soap. If you need to wash the whole cover, snip the seam, hand wash the cover off the headphones, lay it flat to dry, and then seam it back on.
Final Notes
Everything in this cover comes from one gauge of 4 sc and 4 rows per inch. Fourteen stitches give a width of 3½ in (8.9 cm), and 37 rows give a length of 9¼ in (23.5 cm). One round of border adds ¼ in (0.6 cm) on every side, for 4 in × 9¾ in (10.2 cm × 24.8 cm).
Five 10-stitch spikes, set 6 rows apart, line up along the center. A 39-stitch seam closes the cover into a snug 4 in (10.2 cm) tube. If you check each measurement as you go, the cover will fit like it was made for your headphones, because it was.
Happy crocheting!