

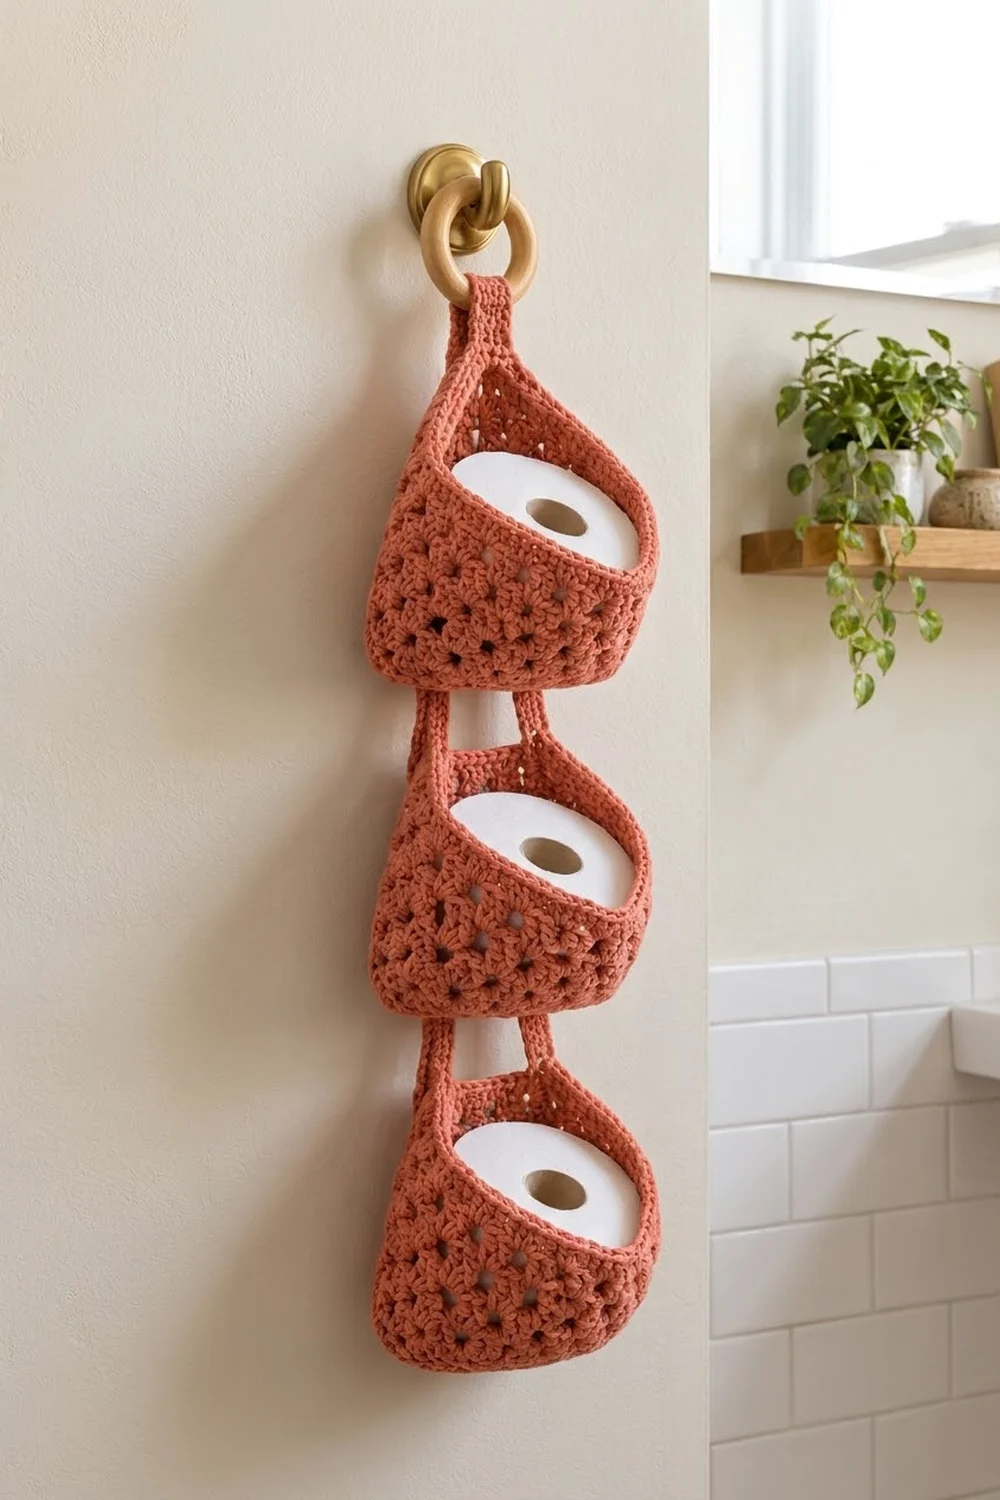
The Coral Cascade holder stacks three soft granny pouches in one tidy column on your bathroom wall. Each pouch holds one standard toilet roll on its side. The column hangs from a single wooden ring, so it takes up almost no wall space.
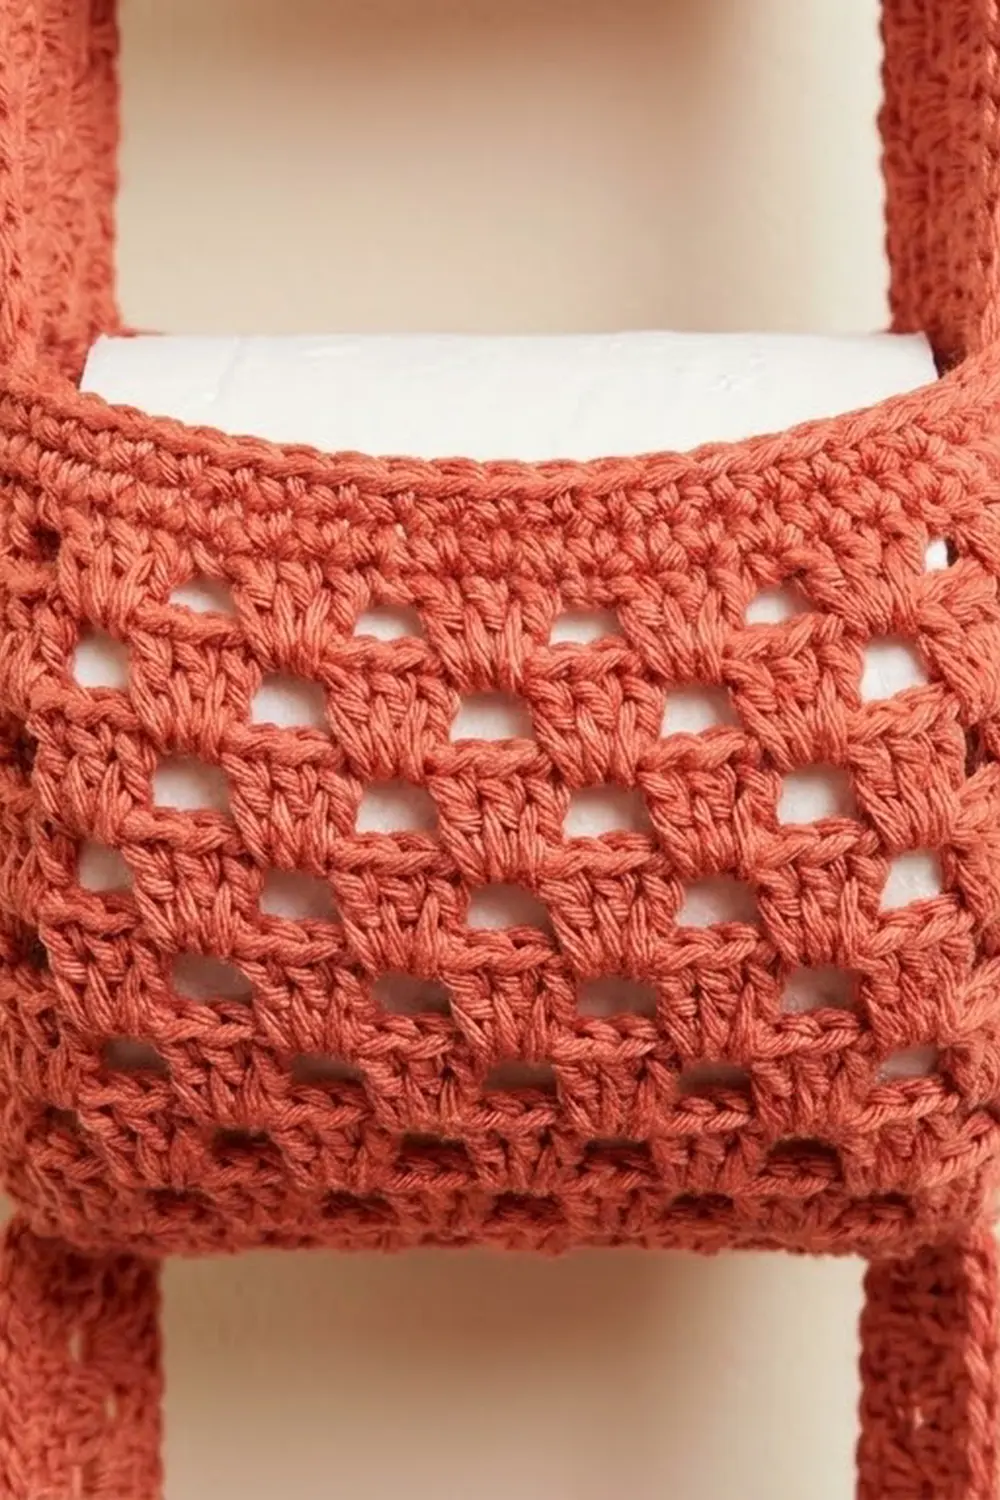
The design uses one warm coral cotton yarn throughout. The openwork granny clusters keep it light and airy. The solid single-crochet rims and straps give it enough structure to hold its shape, even with a full roll inside.
This pattern uses US crochet terms. The finished holder is about 7 in (17.8 cm) wide and about 22 in (55.9 cm) long from the bottom of the lowest pouch to the top of the ring loop.
Each pouch begins as a flat granny triangle. You then work walls upward in rounds, finish with two rounds of single crochet, and work a flat strap up from the back corner. The three pouches are sewn strap-to-pouch in a column, and a reverse single crochet border finishes each rim.
Finished Size and Construction
- Finished size: about 7 in (17.8 cm) wide × 22 in (55.9 cm) long, hanging
- Skill level: Easy-intermediate
- Terminology: US crochet terms
- Yarn weight: Worsted (#4) cotton
- Hook: 5.0 mm (H-8)
- Number of pieces: 3 pouches, each with a built-in strap
- Layout: 1 column × 3 pouches, joined vertically
- Piece size: triangle base 7 in (17.8 cm) per side; pouch height 4.25 in (10.8 cm) before border
- Size before border: each pouch 7 in (17.8 cm) per base side × 4.25 in (10.8 cm) tall
- Border depth: 0.25 in (0.6 cm), reverse single crochet on each rim
- Pouch height after border: 4.5 in (11.4 cm)
Materials
Yarn: Use a smooth worsted-weight cotton or cotton blend. Cotton holds its shape under the weight of a roll and handles bathroom humidity well. Acrylic works too, but it will stretch more.
- Coral / terracotta: 200 g, about 380 m (415 yd)
These quantities include a margin of roughly 20%. One pouch uses about 50 g, and the straps use about 10 g in total.
Tools:
- 5.0 mm (H-8) crochet hook
- One wooden ring, 3 in (7.6 cm) across
- Tapestry needle
- 4 locking stitch markers
- Scissors
- Measuring tape
- Blocking pins and a spray bottle
Abbreviations (US Terms)
- ch – chain
- sl st – slip stitch
- sc – single crochet
- dc – double crochet
- sp – space
- sk – skip
- st(s) – stitch(es)
- BLO – back loop only
- rnd – round
- rev sc – reverse single crochet
Special stitch – reverse single crochet (rev sc): Work from left to right (right to left if you crochet left-handed). Insert the hook into the next stitch to the right, yarn over, and pull up a loop. Yarn over again and pull through both loops. This makes a rounded, corded edge.
Granny group: 3 dc worked into the same stitch or space.
Gauge and Checkpoints
Gauge: 14 sc and 16 rows = 4 in (10.2 cm) in single crochet with the 5.0 mm hook.
Make one complete pouch before you start the others. It is your real gauge swatch. Check these measurements as you go:
- After Rnd 3: triangle side about 3.25 in (8.3 cm)
- After Rnd 6: triangle side about 6.5 in (16.5 cm)
- After Rnd 7: triangle side about 7 in (17.8 cm)
- After Rnd 14: wall height about 3.75 in (9.5 cm), measured from the base fold
- After Rnd 16: wall height about 4.25 in (10.8 cm)
- Strap: 2.3 in (5.8 cm) wide; 12 rows = 3 in (7.6 cm)
If your piece is too big: change to a 4.5 mm hook. Do not leave out rounds, because every stitch count depends on them.
If your piece is too small: change to a 5.5 mm hook. Test it with a standard roll; it should lie on its side inside the pouch with room to spare.
Pouch Pattern (Make 3)
Granny Triangle Base
Rnd 1: Make a magic ring. Ch 3 (counts as dc), 2 dc in ring, ch 3, [3 dc in ring, ch 3] twice. Join with sl st to the top of the beginning ch-3. (9 dc, 3 ch-3 corner sps)
Rnd 2: Sl st in the next 2 dc and into the ch-3 sp. (Ch 3, 2 dc, ch 3, 3 dc) in the same sp, ch 1. [(3 dc, ch 3, 3 dc) in the next ch-3 sp, ch 1] twice. Join. (18 dc; each side has 2 groups and 1 ch-1 sp)*
Rnd 3: Sl st to the corner sp. (Ch 3, 2 dc, ch 3, 3 dc) in the corner sp, ch 1, 3 dc in the next ch-1 sp, ch 1. [(3 dc, ch 3, 3 dc) in the next corner sp, ch 1, 3 dc in the next ch-1 sp, ch 1] twice. Join. (27 dc; each side has 3 groups and 2 ch-1 sps)*
Rnds 4–6: Repeat the method of Rnd 3. Work (3 dc, ch 3, 3 dc) in each corner sp and (ch 1, 3 dc) in each ch-1 sp along the sides, then ch 1 before the next corner. Each round adds one granny group to every side.
- Rnd 4: 36 dc (4 groups per side)
- Rnd 5: 45 dc (5 groups per side)
- Rnd 6: 54 dc (6 groups per side, 5 ch-1 sps per side)
Rnd 7 (conversion round): Ch 1. Work sc in each dc and 1 sc in each ch-1 sp, and 2 sc in each ch-3 corner sp. Join to the first sc.
Count: 54 dc + 15 ch-1 sps = 69 sc worked one per existing st or sp, plus 6 corner sc = 75 sc.
Each side has 25 sc: 1 corner sc, 18 sc over the dc, 5 sc in the ch-1 sps, and 1 corner sc. That gives 3 × 25 = 75, with no corner stitch counted twice.
Mark one corner pair with a stitch marker. This becomes the back corner.
Walls
Rnd 8 (fold round): Ch 1, sc in BLO of each st around. Join. (75 sc)
This round turns the edge upward. The unused front loops of Rnd 7 form a ridge around the base. Move your marker up to the 2 sts directly above the back corner.
Rnd 9: Ch 3 (counts as dc), 2 dc in the same st, sk 2, 3 dc in the next st, sk 2; repeat from * 23 more times. Join to the top of the ch-3. (25 granny groups, 75 dc)
Rnds 10–14: Sl st in the next 2 dc and into the sp between groups. Ch 3, 2 dc in the same sp, then 3 dc in each sp between groups around. Join. (25 groups, 75 dc per rnd)
Move the marker up each round so it stays above the back corner.
Rnd 15: Ch 1, sc in each dc around. Join. (75 sc)
Rnd 16: Ch 1, sc in each sc around. Join. (75 sc) Do not fasten off.
Strap
Fold the pouch flat so the marked back corner sits at one edge. Find the 8 sts of Rnd 16 centered on the marker. Sl st along the rim to the first of these 8 sts.
Row 1: Ch 1, sc in the same st and in the next 7 sts. (8 sc)
Rows 2–12: Ch 1, turn, sc in each st across. (8 sc)
- Pouches B and C (connector straps): Stop after Row 12. The strap measures 3 in (7.6 cm). Fasten off and leave a 24 in (61 cm) tail for sewing.
- Pouch A (hanger strap): Continue to Row 24. The strap measures 6 in (15.2 cm). Fasten off and leave a 24 in (61 cm) tail.
Make All Pieces
Make 3 pouches in coral:
- Pouch A (top): 1 pouch with a 24-row hanger strap
- Pouch B (middle): 1 pouch with a 12-row connector strap
- Pouch C (bottom): 1 pouch with a 12-row connector strap
Layout, top to bottom:
        [ wooden ring ]
              |
    [ A strap: 24 rows, folded ]
    [      Pouch A          ]
              |
    [ B strap: 12 rows ]  → sewn to back of A
    [      Pouch B          ]
              |
    [ C strap: 12 rows ]  → sewn to back of B
    [      Pouch C          ]
Joining
Use whipstitch with the strap tails. Sew through both layers with small, even stitches. Pull each stitch snug, but not so tight that the strap puckers.
Connector strap logic: Rows 1–8 of each connector strap stay free. They make a 2 in (5.1 cm) gap between pouches. Rows 9–12 lie flat against the outside back wall of the pouch above, and Row 9 starts at that pouch’s base fold.
C to B:
- Lay Pouch B face down. Center C’s strap over B’s back corner, with Row 9 at B’s fold ridge.
- Whipstitch across the strap where Rows 8 and 9 meet, joining it to 8 of the unused Rnd 7 front loops at B’s back corner, 1 strap st to 1 loop.
- Whipstitch the row ends of Rows 9–12 to the wall, 4 row ends on each side.
- Whipstitch the 8 sts of Row 12 to the wall, 1 stitch per strap st.
B to A: Repeat the same steps, sewing B’s strap to the back of Pouch A.
Hanger loop:
- Pass the tip of A’s strap through the wooden ring from front to back.
- Fold the strap down so Row 24 lies on the back of Row 12.
- Whipstitch the 8 sts of Row 24 to the 8 sts of Row 12, st to st.
- Whipstitch the row ends of Rows 21–24 to Rows 12–15 on each side. Leave the folded loop open around the ring.
Size checkpoint: Hang the column. From the base of C to the top of the ring loop, it should measure about 22 in (55.9 cm). Each strap gap should be 2 in (5.1 cm).
Border
Border gauge: One rev sc in each sc of Rnd 16 adds 0.25 in (0.6 cm) of depth. It keeps the rim length unchanged.
On each pouch, join the yarn in the first free rim st just to the left of the strap base, with the right side facing.
Border row: Ch 1, rev sc in each free st of Rnd 16 around the rim, ending at the other side of the strap base. Fasten off and weave in the end. (67 rev sc)
Why the math works: Rnd 16 has 75 sc. The strap uses 8 of them, and 75 − 8 = 67 free sts. Working exactly 1 rev sc per st keeps the rim at the same circumference as the walls, about 21.4 in (54.4 cm). That means the rim will not ruffle or pull in.
Repeat the border on all 3 pouches: 3 × 67 = 201 rev sc in total.
Final Blocking
- Weave in all ends along the sc rounds, where they hide best.
- Spray each pouch lightly until it is damp, not soaked.
- Push each triangle base flat. Check that every side measures 7 in (17.8 cm).
- Stuff each pouch with a toilet roll wrapped in a dry towel to shape the walls.
- Pin each strap flat at 2.3 in (5.8 cm) wide.
- Let it dry completely, at least 12 hours, before hanging.
Final Quality-Control Checklist
- Each base has 25 sc per side, 75 in total
- Each wall round has 25 granny groups
- Rnds 15–16 have 75 sc each
- Every strap is 8 sc wide
- Connector straps have 12 rows; the hanger strap has 24 rows
- Each border has 67 rev sc
- Every pouch is about 4.5 in (11.4 cm) tall after the border
- Strap gaps are equal at 2 in (5.1 cm)
- The column is about 22 in (55.9 cm) long, hanging
- All three straps line up at the back corners, so the column hangs straight
Troubleshooting
The triangle cups or ruffles: Your corners are too tight or too loose. Check that each corner is (3 dc, ch 3, 3 dc), and keep the ch-3 relaxed.
The wall round ends with a leftover stitch: Count Rnd 8 again; it must have exactly 75 sts. Rnd 9 uses 3 sts per group: 25 × 3 = 75.
The walls flare outward: Your dc tension is looser than your sc. Use a hook one size smaller for Rnds 9–14 only.
The roll won’t fit: Check the base side length. If it is under 6.5 in (16.5 cm) after Rnd 6, remake the pouch with a larger hook.
The column hangs crooked: One strap is off-center. Unpick it and re-center it over the marked back corner.
The straps stretch over time: Use cotton yarn. You can also sew a strip of grosgrain ribbon to the back of each strap.
Care
Hand wash in cool water with mild soap, press out the water in a towel, and dry flat. Reshape the pouches around a roll while they are damp.
Final Notes
The measurement chain is simple. A granny triangle base with 7 in (17.8 cm) sides supports 75-stitch walls. The walls rise to 4.25 in (10.8 cm), and the 0.25 in (0.6 cm) border brings each pouch to 4.5 in (11.4 cm). Three pouches with 2 in (5.1 cm) gaps between them, plus the hanger loop, give a holder about 22 in (55.9 cm) long. Check your first pouch carefully, and the other two will match.
Happy crocheting!