

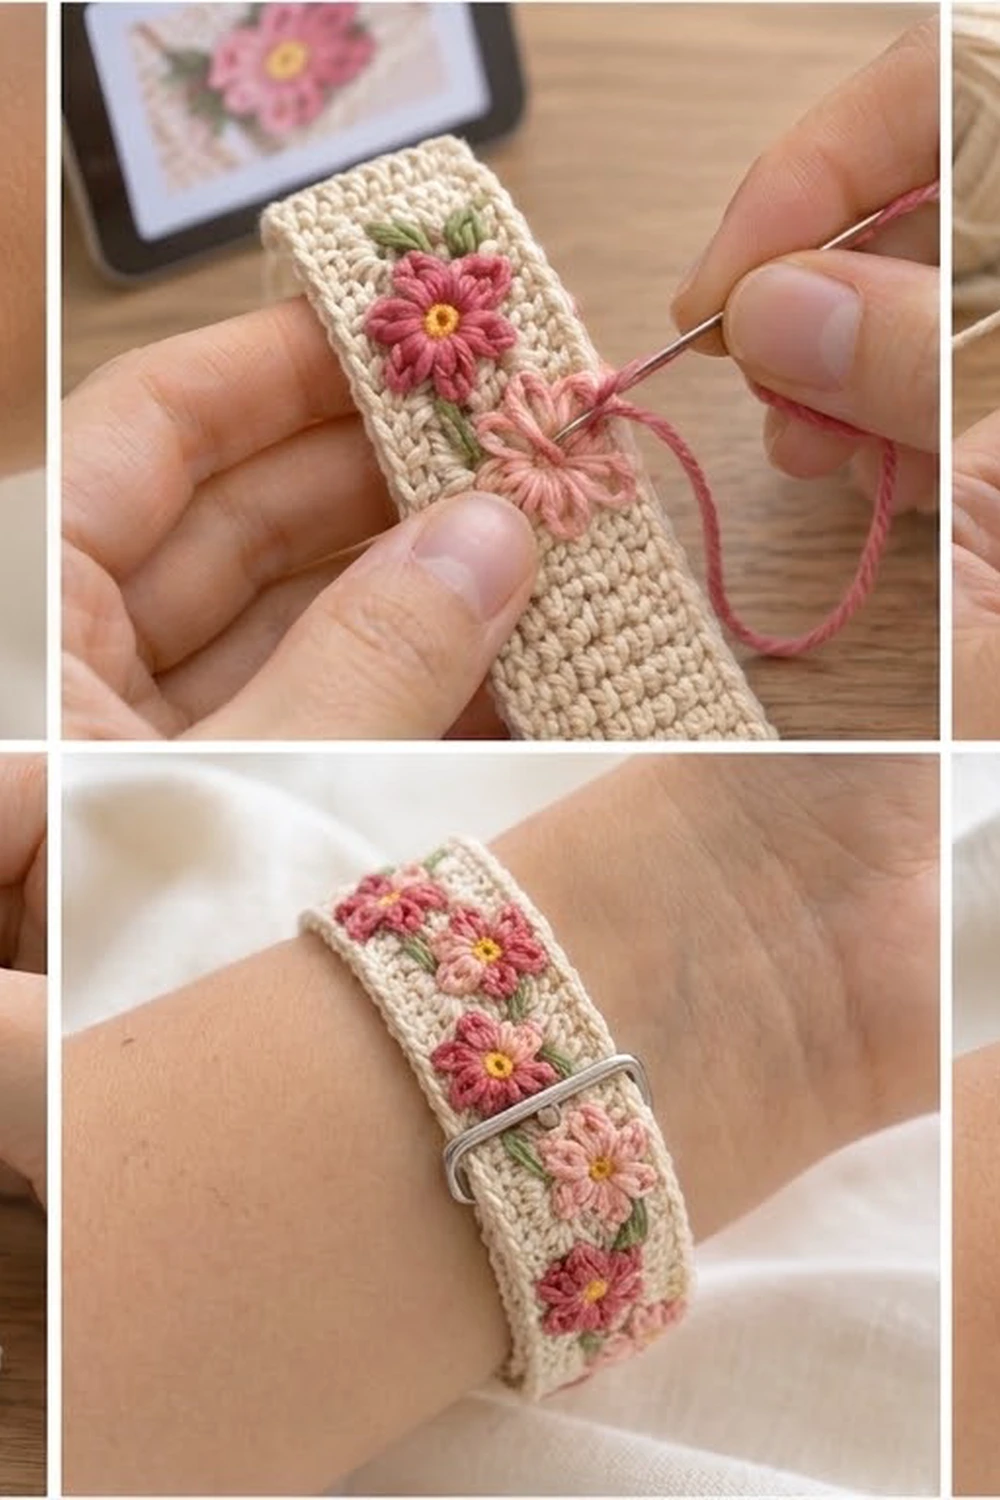
This slim band turns a smartwatch into a soft, handmade piece of jewelry. It is a strip of firm single crochet in warm cream with a neat outlined edge. A row of tiny embroidered flowers runs down the center.
The flowers alternate between deep rose and light pink, and each one has a sunny yellow French-knot center. Small green leaves sit between them, alternating sides, which gives the band a gentle zigzag rhythm. The look is cottage-garden and sweet, but tidy enough to wear every day.
The pattern uses US crochet terms. The finished band measures 7/8 in (2.2 cm) wide by 9 1/4 in (23.5 cm) long, which fits wrists from about 5 1/2 to 7 1/2 in (14.0 to 19.1 cm).
Construction is simple. You crochet one narrow strip in short rows, embroider the flowers, add a two-round border, then block the band. Last, you fold one end around a watch adapter and thread the other end through the second adapter and a sliding metal keeper.
Finished Size and Construction
- Finished size: 7/8 in × 9 1/4 in (2.2 cm × 23.5 cm)
- Skill level: Easy (basic embroidery)
- Terminology: US crochet terms
- Yarn weight: Fingering / Super Fine (#1) cotton
- Hook: 2.25 mm (US B-1)
- Number of pieces: 1 strip
- Layout: Single strip, worked in rows across the width
- Piece size before border: 5/8 in × 9 in (1.6 cm × 22.9 cm)
- Border depth: 1/8 in (0.3 cm) on every side
- Embellishment: 5 embroidered flowers and 8 embroidered leaves
Materials
Use a smooth, mercerized cotton in fingering weight. Cotton holds its shape against the watch hardware, doesn’t stretch out with daily wear, and shows the embroidery clearly. Avoid fuzzy or very stretchy yarns, because the band needs to stay firm.
Yarn:
- Cream (main color): 10 g, about 34 m
- Deep rose (flowers): 2 g, about 7 m
- Light pink (flowers): 2 g, about 7 m
- Yellow (flower centers): 1 g, about 3 m
- Sage green (leaves): 1 g, about 3 m
All quantities include a margin for your gauge swatch and for tails.
Tools and hardware:
- 2.25 mm (US B-1) crochet hook
- 2 smartwatch band adapters sized for your watch case, with a bar opening at least 7/8 in (2.2 cm) wide
- 1 metal sliding keeper (loop), inner width at least 7/8 in (2.2 cm)
- Blunt tapestry needle and a sharp embroidery needle
- Sewing needle and cream sewing thread
- 1 removable stitch marker
- Ruler or tape measure
- Scissors
- Blocking mat and rust-proof pins
Abbreviations (US Terms)
- ch – chain
- sc – single crochet
- sl st – slip stitch
- st(s) – stitch(es)
- RS – right side
Special stitches (embroidery):
- Lazy daisy (LD): Bring the needle up at the base point. Insert it back down in the same hole, then bring the tip up at the petal tip without pulling through. Wrap the yarn under the needle tip and pull through to form a loop. Anchor the loop with a tiny straight stitch over its tip.
- French knot (FK): Bring the needle up and wrap the yarn twice around the needle. Insert it back down right beside the exit point, then hold the wraps snug as you pull through.
Gauge and Checkpoints
Gauge: 8 sc and 8 rows = 1 in (2.5 cm) in single crochet, worked firmly.
This band is only one piece, so the strip is your gauge swatch. Work the first 8 rows, then stop and measure.
- After Row 8: 5/8 in (1.6 cm) wide, 1 in (2.5 cm) long
- After Row 24: 3 in (7.6 cm) long
- After Row 48: 6 in (15.2 cm) long
- After Row 72: 9 in (22.9 cm) long
- After border: 7/8 in × 9 1/4 in (2.2 cm × 23.5 cm)
If your strip is too wide or rows are too tall, go down 0.25 mm in hook size and start again. If it’s too narrow or rows are too short, go up 0.25 mm. Width matters most, because the band has to fit through the adapter bar and the keeper. Length can be adjusted by adding or removing rows in multiples of 2 (see Troubleshooting).

Part 1: The Band Strip
Work with cream yarn. Every row has 5 sc. Turning chains do not count as stitches.
Foundation: Ch 6.
Row 1 (RS): Sc in 2nd ch from hook and in each ch across. (5 sc)
Place a marker in Row 1 to mark the RS.
Row 2: Ch 1, turn. Sc in each st across. (5 sc)
Rows 3–72: Repeat Row 2. (5 sc in each row)
Checkpoint: The strip has 72 rows and measures 5/8 in × 9 in (1.6 cm × 22.9 cm). Don’t fasten off. Keep the working loop on a marker so you can begin the border later from the same yarn.
Keep your tension even and firm. A dense fabric gives the embroidery a solid base and stops the band from stretching on the wrist.
Row map for embroidery: Number the rows from Row 1, which is the adapter end. Rows 1–4 form the fold allowance, so leave them plain. Row 72 is the free end that passes through the keeper.
Part 2: Embroidered Flowers and Leaves
Embroider before you add the border. All flowers sit inside the 5-stitch body, so the border stays clean.
Each flower is centered over stitch 3 (the middle stitch) of its row and is about 1/2 in (1.3 cm) across, which is 4 stitches wide by 4 rows tall.
Flower placement (center rows):
| Flower | Center row | Color |
|---|---|---|
| 1 | Row 10 | Deep rose |
| 2 | Row 22 | Light pink |
| 3 | Row 34 | Deep rose |
| 4 | Row 46 | Light pink |
| 5 | Row 58 | Deep rose |
The flower centers are 12 rows apart, which is 1 1/2 in (3.8 cm). Flower 5 ends at Row 60. That leaves Rows 61–72 plain for the tail that sits under the keeper.
To make each flower:
- Thread the embroidery needle with a 16 in (40.6 cm) length of the flower color.
- Work 6 LD petals around the center point. Space them like clock hours at 12, 2, 4, 6, 8, and 10 o’clock. Each petal is 1/4 in (0.6 cm) long, which is 2 rows or 2 stitches.
- Keep the petals plump. Let each loop sit slightly open instead of pulling it flat.
- Weave the tails through the back of the petals.
- With yellow, work 1 FK in the exact center.
Leaves: Using green, work 2 small LD leaves halfway between each pair of flowers. That gives 4 gaps and 8 leaves in total. Make each leaf 3/16 in (0.5 cm) long and angle it outward toward a long edge. Alternate the sides so the leaves of each pair sit diagonally across the center line. This creates the soft zigzag of the vine.
Weave in all embroidery tails on the wrong side, under the stitches of the same color where possible.
Border
The border uses the same gauge, 8 sts = 1 in (2.5 cm). Round 1 adds 1 sc on each side, which is 1/8 in (0.3 cm). Round 2 is a slip-stitch outline that adds texture but no measurable width.
Pick up the working loop at Row 72.
Round 1 (sc): Ch 1. Do not turn.
- Short end (Row 72): 3 sc in the first st, sc in the next 3 sts, 3 sc in the last st.
- First long side: Work 1 sc in each row-end down the side. (72 sc)
- Short end (foundation): Working into the underside of the foundation ch, 3 sc in the first ch, sc in the next 3 ch, 3 sc in the last ch.
- Second long side: Work 1 sc in each row-end up the side. (72 sc)
- Sl st to the first sc to join.
Round 1 count: 162 sc.
Count per side, with each 3-sc corner group’s center st as the corner stitch and both corners included:
- Short ends: corner + 1 + 3 + 1 + corner = 7 sts each
- Long sides: corner + 1 + 72 + 1 + corner = 76 sts each
Check: (2 × 7) + (2 × 76) − 4 shared corners = 162.
Round 2 (outline): Ch 1. Sl st loosely in each st around, working 1 sl st in each corner center st. (162 sl st) Join with a sl st to the first sl st and fasten off.
Work Round 2 loosely, going up a hook size if needed. Tight slip stitches will pinch the band and make it curl.
Why the math works: The body is 5 sts wide. Round 1 places one stitch on each side, so 5 + 2 = 7 sts, and 7 ÷ 8 = 7/8 in (2.2 cm). The 7 sts counted on each short end include both corner stitches, so no stitch is added twice. Lengthwise, 72 rows plus 1 border row at each end gives 74 rows, and 74 ÷ 8 = 9 1/4 in (23.5 cm). Because each long side gets exactly 1 sc per row-end, the edges stay straight with no ruffling or cupping.
Final Blocking
- Weave in the cream tails along the edge stitches, and trim them close.
- Lightly mist the band with water until it’s damp but not wet.
- Lay it RS up on a blocking mat.
- Pin it to 7/8 in × 9 1/4 in (2.2 cm × 23.5 cm), with pins every 1 in (2.5 cm) along both long sides.
- Gently puff each petal with a fingertip so the flowers stay raised.
- Let it dry completely, which takes about 2–3 hours.
- Attach adapter A: Fold the foundation end over the adapter bar by 1/2 in (1.3 cm), which covers Rows 1–4. Sew the fold flat on the wrong side with cream thread. Use small backstitches across the full width, two lines in total.
- Add the keeper: Slide the metal keeper onto the free end from Row 72 and move it about 1 1/4 in (3.2 cm) along the band.
- Thread adapter B: Pass the free end through adapter B’s bar from the outside in, then fold it back along the inside of the band. Slide the keeper over both layers.
- Snap both adapters onto the watch, then adjust the fit and push the keeper toward adapter B.
Final Quality-Control Checklist
- Every row has exactly 5 sc
- The strip measures 5/8 in × 9 in (1.6 cm × 22.9 cm) before the border
- Border Round 1 has 162 sts: 7 on each short end and 76 on each long side
- The finished band measures 7/8 in × 9 1/4 in (2.2 cm × 23.5 cm)
- 5 flowers are centered at Rows 10, 22, 34, 46, and 58, alternating deep rose and light pink
- Each flower has 6 petals and a yellow French knot
- 8 leaves are placed in alternating pairs
- The fold at adapter A is sewn securely across the full width
- The keeper slides smoothly over the doubled band
- No tails show on the RS
Troubleshooting
The band is too wide for the adapter or keeper. Your gauge is loose. Remake the strip with a smaller hook, or work the border with Round 2 only.
The edges ruffle. You have too many sc on the long sides. Work exactly 1 sc per row-end, 72 per side.
The edges pull in. Round 2 is too tight. Rework it with a hook one size larger.
The band is too long or short for your wrist. Add or remove rows in multiples of 2 between Flower 5 and Row 72. Every 8 rows changes the length by 1 in (2.5 cm). The long-side count changes by the same number of rows.
The petals look flat. Leave a little slack in each loop before you anchor it.
The fabric shows through behind the French knots. Wrap the yarn three times instead of twice.
Care
Hand wash in cool water with mild soap, press out the water in a towel, and dry flat. Remove the band from the watch before washing.
Final Notes
The measurement chain is simple:
- 5 sc at 8 sts per inch gives a 5/8 in (1.6 cm) strip.
- 72 rows at 8 rows per inch gives 9 in (22.9 cm).
- One sc border round adds 1/8 in (0.3 cm) on every side, for a finished 7/8 in × 9 1/4 in (2.2 cm × 23.5 cm) band.
If you check your gauge at Row 8 and confirm the 162-stitch border count, the band will slide neatly into its hardware. Then the five little blossoms can do the rest.
Happy crocheting!