

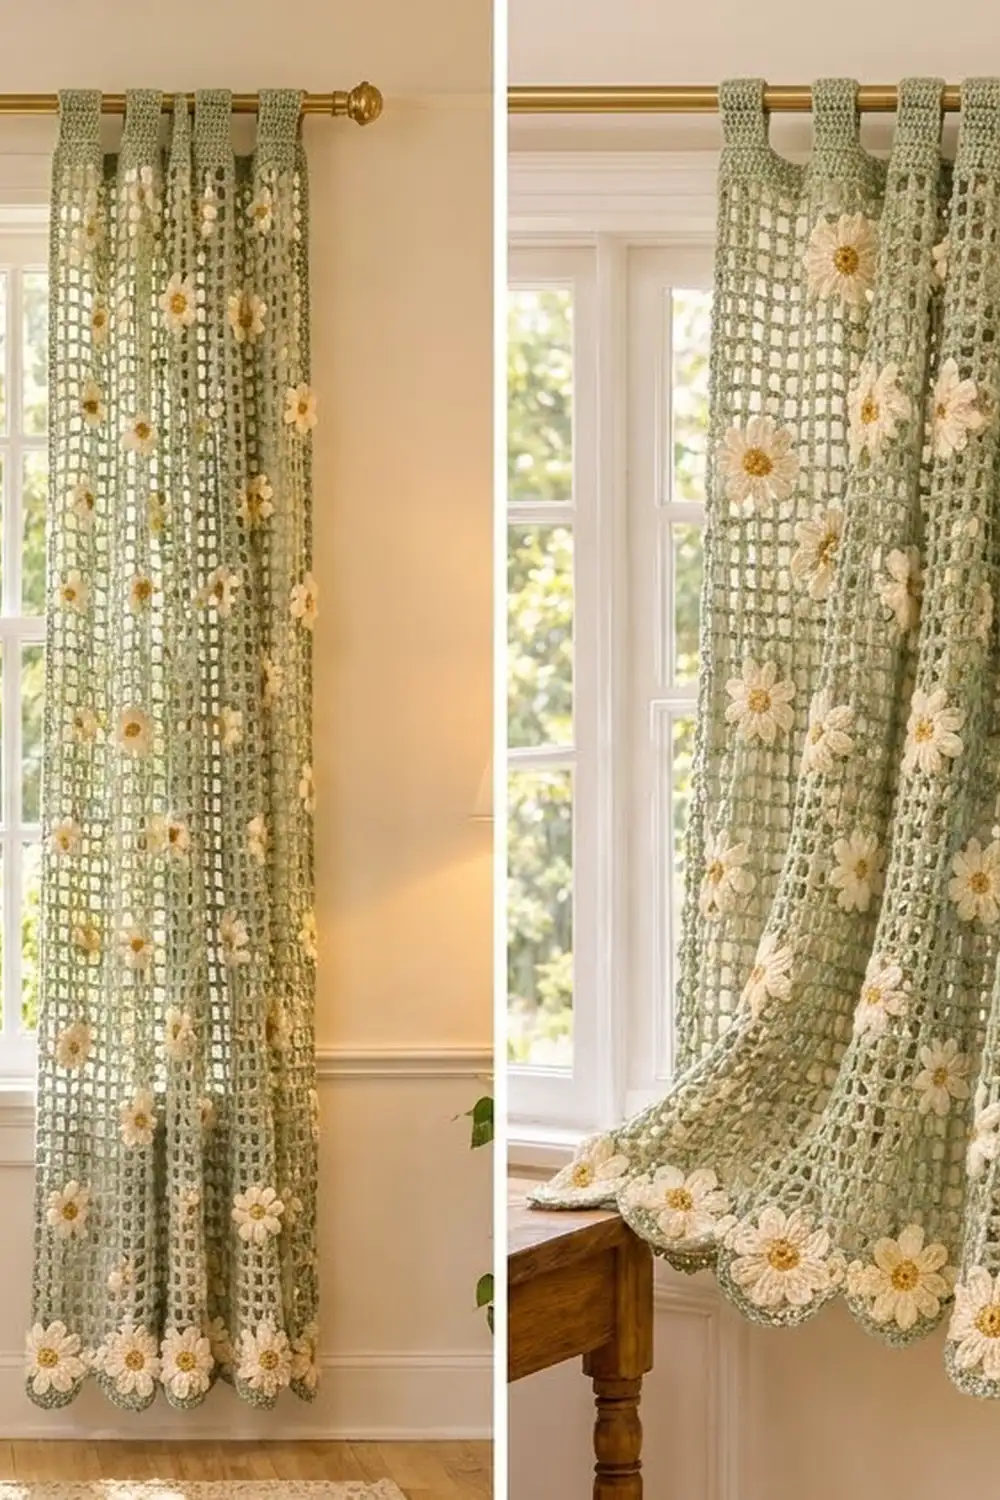
This curtain panel pairs an airy sage-green filet mesh with cream daisies that look as if they drifted in through an open window. Light comes through the open squares, and the daisies add texture and cottage charm without blocking the view.
The palette has three colors: sage green for the mesh, tabs and edging; cream for the petals; and mustard gold for the flower centers. The style is relaxed farmhouse: simple geometry and one cheerful repeated motif.
This pattern uses US crochet terms. One finished panel measures 32.5 in (82.6 cm) wide and 81 in (205.7 cm) long, from the top of the tab loops to the bottom of the scallops. Make two panels for a pair.
You work the mesh in one piece, row by row. Next comes one single-crochet border round, then two rows of scallops along the bottom and six tabs along the top. The daisies are small separate appliqués that you sew onto the mesh and into each scallop.
Finished Size and Construction
- Finished size: 32.5 in x 81 in (82.6 cm x 205.7 cm), tab loops included
- Skill level: Easy-Intermediate
- Terminology: US
- Yarn weight: Worsted (#4) cotton
- Hook: 5.0 mm (H-8)
- Number of pieces: 1 mesh panel, worked in one piece, plus 42 sewn-on daisy appliqués
- Layout: 40 meshes x 95 rows; 32 staggered body daisies plus 10 scallop daisies
- Daisy size: 3 in (7.6 cm) across
- Size before border: 32 in x 76 in (81.3 cm x 193.0 cm)
- Border depth: 0.25 in (0.6 cm) on the sides and top; 0.25 in (0.6 cm) plus 1.5 in (3.8 cm) of scallops on the bottom; the folded tabs reach 3 in (7.6 cm) above the top edge
Materials
Use a smooth worsted-weight cotton. It holds the square mesh shape, hangs straight and washes well. Fuzzy or very stretchy yarns will make the open blocks sag.
Amounts are for one panel, using yarn that comes as 100 g = 190 m (207.8 yd):
- Sage green: 450 g, 855 m (935.0 yd)
- Cream: 150 g, 285 m (311.7 yd)
- Mustard gold: 50 g, 95 m (103.9 yd)
These quantities include a margin of roughly 15–20 percent for gauge differences and swatching. Double them for a pair.
Tools: 5.0 mm (H-8) hook, tapestry needle, 10 or more locking stitch markers, measuring tape, rust-proof pins, a large blocking surface and a spray bottle.
Abbreviations (US Terms)
- ch – chain
- sl st – slip stitch
- sc – single crochet
- hdc – half double crochet
- dc – double crochet
- tr – treble crochet
- sk – skip
- st(s) – stitch(es)
- sp(s) – space(s)
- RS / WS – right side / wrong side
- rep – repeat
Special stitches:
– Mesh: one dc followed by ch 2. Each mesh sits on 3 stitches and makes one open square.
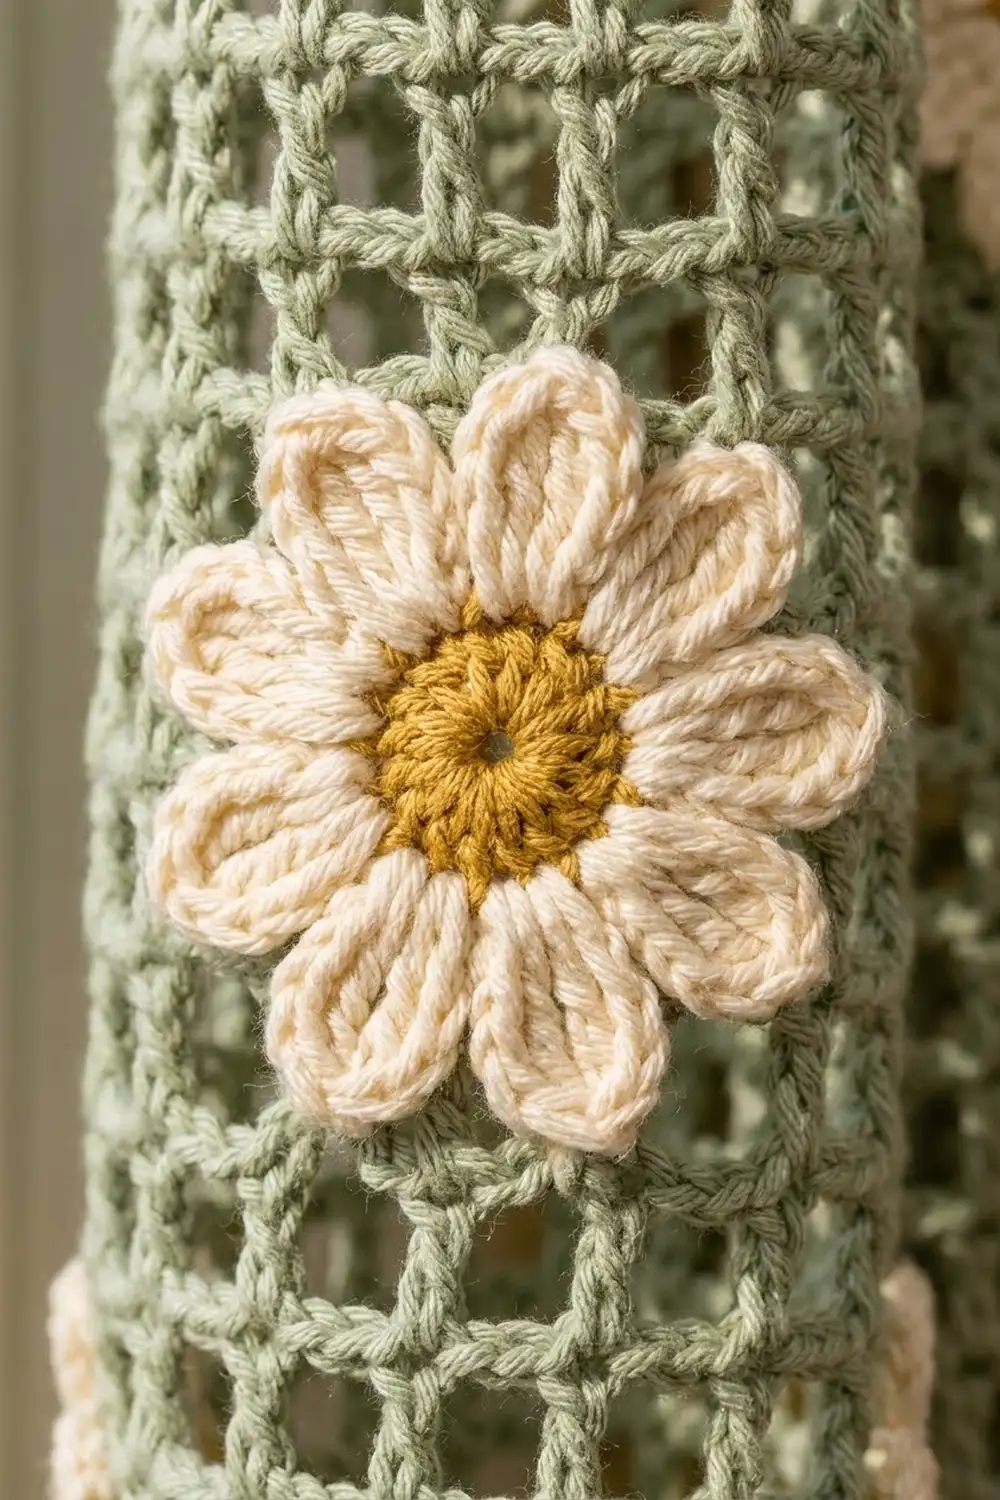
– Petal: (hdc, dc, 2 tr, dc, hdc) all worked into the same stitch.
– Fan: 11 tr worked into the same stitch.
Gauge and Checkpoints
Mesh gauge (blocked): 5 meshes and 5 rows = 4 in (10.2 cm). That makes each mesh 0.8 in (2.0 cm) wide and each row 0.8 in (2.0 cm) tall.
Single-crochet gauge: 15 sc and 16 rows = 4 in (10.2 cm).
Test first. Chain 35 and work the mesh pattern for 10 rows. Pin it out, mist it and let it dry. It should measure 8 in x 8 in (20.3 cm x 20.3 cm). Make one test daisy too. It should measure 3 in (7.6 cm) across.
Checkpoints on the panel:
– After Row 1: 32 in (81.3 cm) wide
– After Row 25: 20 in (50.8 cm) tall
– After Row 50: 40 in (101.6 cm) tall
– After Row 75: 60 in (152.4 cm) tall
– After Row 95: 76 in (193.0 cm) tall
Measure with the panel lightly stretched, because cotton mesh grows a little under its own weight.
If your piece is too big, go down 0.5 mm in hook size. If it is too small, go up 0.5 mm. Don’t change the number of rows, or the daisy grid won’t line up.
Part 1: The Mesh Panel
With sage green, ch 125.
Row 1 (RS): Dc in 8th ch from hook. The 7 skipped ch count as 2 skipped base ch, a dc and a ch-2. Ch 2, sk 2 ch, dc in next ch. Rep from * 38 more times. Row 1 has 41 dc (counting the skipped chains as 1 dc) and 40 ch-2 sps: that is 40 meshes, or 121 sts.
Row 2: Ch 5, turn (counts as dc and ch 2). Dc in next dc. Ch 2, dc in next dc. Rep from * 37 more times. Ch 2, sk 2 ch, then dc in the 5th of the 7 skipped foundation chains, counting from the first dc of Row 1. (41 dc, 40 ch-2 sps, 121 sts)
Rows 3–95: Ch 5, turn, dc in next dc. Ch 2, dc in next dc. Rep from * across. Work the last dc into the 3rd ch of the turning ch-5. (41 dc, 40 ch-2 sps, 121 sts)
Row 95 is a RS row. Don’t fasten off.
Check: 40 meshes x 0.8 in = 32 in (81.3 cm) wide, and 95 rows x 0.8 in = 76 in (193.0 cm) tall.
Part 2: The Daisies (Make 42)
Rnd 1: With mustard gold, make a magic ring. Ch 1 and work 8 sc into the ring. Join with a sl st to the first sc. (8 sc)
Rnd 2: Ch 1, then 2 sc in each sc. Join. (16 sc)
The center should measure 1 in (2.5 cm) across. Fasten off.
Rnd 3: Join cream with a sl st in any sc. Petal in next sc, sl st in next sc. Rep from * 7 more times; on the last repeat, work the sl st into the joining sl st. (56 sts: 8 petals of 6 sts, plus 8 sl sts)
Fasten off and leave a 12 in (30.5 cm) tail for sewing. The 2 tr make the fullest point of each rounded petal. The daisy should measure 3 in (7.6 cm) across.
Part 3: Sew On the Body Daisies
Lay the panel RS up, with Row 95 at the top. Number the meshes 1–40 from right to left. “Column 5” means the dc between meshes 5 and 6. Each daisy is centered on that dc, at the top of the row given.
- A rows (Rows 12, 32, 52, 72, 92): columns 5, 15, 25, 35
- B rows (Rows 22, 42, 62, 82): columns 10, 20, 30
Placement grid (each . = 5 meshes; X = daisy):
Row 92  A:  . X . . X . . X . . X .
Row 82  B:  . . X . . X . . X . .
Row 72  A:  . X . . X . . X . . X .
Row 62  B:  . . X . . X . . X . .
Row 52  A:  . X . . X . . X . . X .
Row 42  B:  . . X . . X . . X . .
Row 32  A:  . X . . X . . X . . X .
Row 22  B:  . . X . . X . . X . .
Row 12  A:  . X . . X . . X . . X .
Total: 5 A rows x 4 daisies + 4 B rows x 3 daisies = 32 body daisies.
The daisies sit 8 in (20.3 cm) apart along each row, and the daisy rows are 8 in (20.3 cm) apart. The lowest daisy center is 9.6 in (24.4 cm) above the bottom edge. The highest is 2.4 in (6.1 cm) below the top edge, which clears the 1.5 in (3.8 cm) petal radius.
Mark each center with a stitch marker before sewing. With the cream tail, sew a running stitch around the gold ring, then tack each petal tip to the nearest mesh bar. Keep the stitches snug but not tight, so the mesh stays square.
Border
Border gauge: 15 sc = 4 in (10.2 cm), which is 3 sc per 0.8 in (2.0 cm) mesh or row.
Rnd 1 (sage green): Ch 1. Work 3 sc into the top of the last dc of Row 95 for the top-left corner. Then:
- Left side: 3 sc around each row-end post, Row 95 down to Row 1. (285 sc)
- Bottom-left corner: 3 sc into the foundation ch at the base of the last dc.
- Bottom: 2 sc in next ch-2 sp, sc in base of next dc. Rep from * 38 more times, then 2 sc in the last sp. (119 sc)
- Bottom-right corner: 3 sc into the base of the turning section.
- Right side: 3 sc around each row-end post, Row 1 up to Row 95. (285 sc)
- Top-right corner: 3 sc into the 3rd ch of the Row 95 turning ch-5.
- Top: 2 sc in next ch-2 sp, sc in next dc. Rep from * 38 more times, then 2 sc in the last sp. (119 sc)
Join with a sl st to the first sc and fasten off.
Counts per side, each including its 2 corner groups: top 125, bottom 125, left 291, right 291. Each corner is shared by two sides. Round total: 119 + 119 + 285 + 285 + (4 x 3) = 820 sc.
Why the math works: Every mesh along the top and bottom gets 3 sc, and every row along the sides gets 3 sc. Both match the border gauge of 3 sc per 0.8 in (2.0 cm), so the edges neither ruffle nor pull in.
Bottom Scallops
Mark the middle sc of each bottom corner group. Counting both marked sts, the bottom edge has 1 + 119 + 1 = 121 sts.
Scallop Row 1: With RS facing, join sage with a sc in the bottom-left marked st. Sk 5 sts, fan in next st, sk 5 sts, sc in next st. Rep from * 9 more times, ending in the bottom-right marked st. That is 10 fans of 12 sts each, and 1 + (10 x 12) = 121 sts used. Row total: (10 x 11 tr) + 11 sc = 121 sts.
Scallop Row 2: Ch 1, turn, sc in first sc. [Sc in next tr, 2 sc in next tr] 5 times, sc in next tr, sc in next sc. Rep from * 9 more times. Each scallop has 11 sc worked 1 per tr, plus 5 increases, for 16 sc. Row total: (10 x 16) + 11 = 171 sc. Fasten off.
Each scallop is 3.2 in (8.1 cm) wide and 1.5 in (3.8 cm) deep.
Scallop daisies: Center one daisy in each scallop, with the lowest petal tip about 0.25 in (0.6 cm) inside the green edging. The upper petals will overlap the border. Sew it on as for the body daisies. (10 daisies)
Top Tabs
Mark the middle sc of each top corner group. Counting both marked sts, the top edge has 121 sts. Number them 1–121 from the top-right marked st.
Row 1: With RS facing, join sage in st 1. Ch 1, then sc in the same st and the next 10 sts. (11 sc)
Rows 2–24: Ch 1, turn, sc in each sc. (11 sc)
Fasten off and leave a 12 in (30.5 cm) tail. Make 5 more tabs, starting in sts 23, 45, 67, 89 and 111. Check: 6 tabs x 11 sts + 5 gaps x 11 sts = 121. Each tab and each gap is 2.9 in (7.4 cm) wide.
Each tab is 6 in (15.2 cm) long. Fold it to the WS and sew Row 24 to the back of the border. The loop stands 3 in (7.6 cm) tall and fits rods up to 1.5 in (3.8 cm) in diameter.
Final Blocking
- Weave in all ends along the mesh bars.
- Lay the panel RS up on towels.
- Pin it to 32.5 in (82.6 cm) wide and 76.5 in (194.3 cm) from the top border to the base of the scallops.
- Straighten the mesh columns against a long ruler.
- Pin each scallop into a smooth half-circle.
- Mist the panel evenly. Don’t press the daisies.
- Let it dry completely.
- Hang it and let it settle for a day before measuring the final length.
Final Quality-Control Checklist
- Width is 32.5 in (82.6 cm) at the top, middle and bottom.
- Overall length is 81 in (205.7 cm).
- Every row has 40 open meshes.
- All 32 body daisies are on their marked dc.
- There are 10 scallops, each holding a daisy.
- The 6 tabs are even, the same length and securely sewn.
- No ends show on the RS.
Troubleshooting
Blocks are tall and narrow: Loosen your chains or shorten your dc.
Panel narrows: You may be missing the last dc into the turning chain. Count 41 dc on each row.
Side borders ripple: Use 2 sc per row-end, but only if your rows are clearly shorter than 0.8 in (2.0 cm).
Scallops cup: Add one centered increase to Scallop Row 2.
Daisies curl: Block them before sewing.
Tabs are tight on the rod: Add 2–4 rows to each tab.
Care
Wash gently in cold water, in a mesh bag. Reshape while damp and dry flat, then rehang.
Final Notes
Everything starts from 1 mesh = 0.8 in (2.0 cm). Forty meshes give a width of 32 in (81.3 cm), and 95 rows give a length of 76 in (193.0 cm). The border adds 3 sc per mesh or per row, bringing the panel to 32.5 in x 76.5 in (82.6 cm x 194.3 cm). Along the bottom, the 121 sts make 10 scallops that add 1.5 in (3.8 cm). Along the top, the 121 sts make 6 tabs that add 3 in (7.6 cm). That brings the total to 81 in (205.7 cm).
Happy crocheting!