

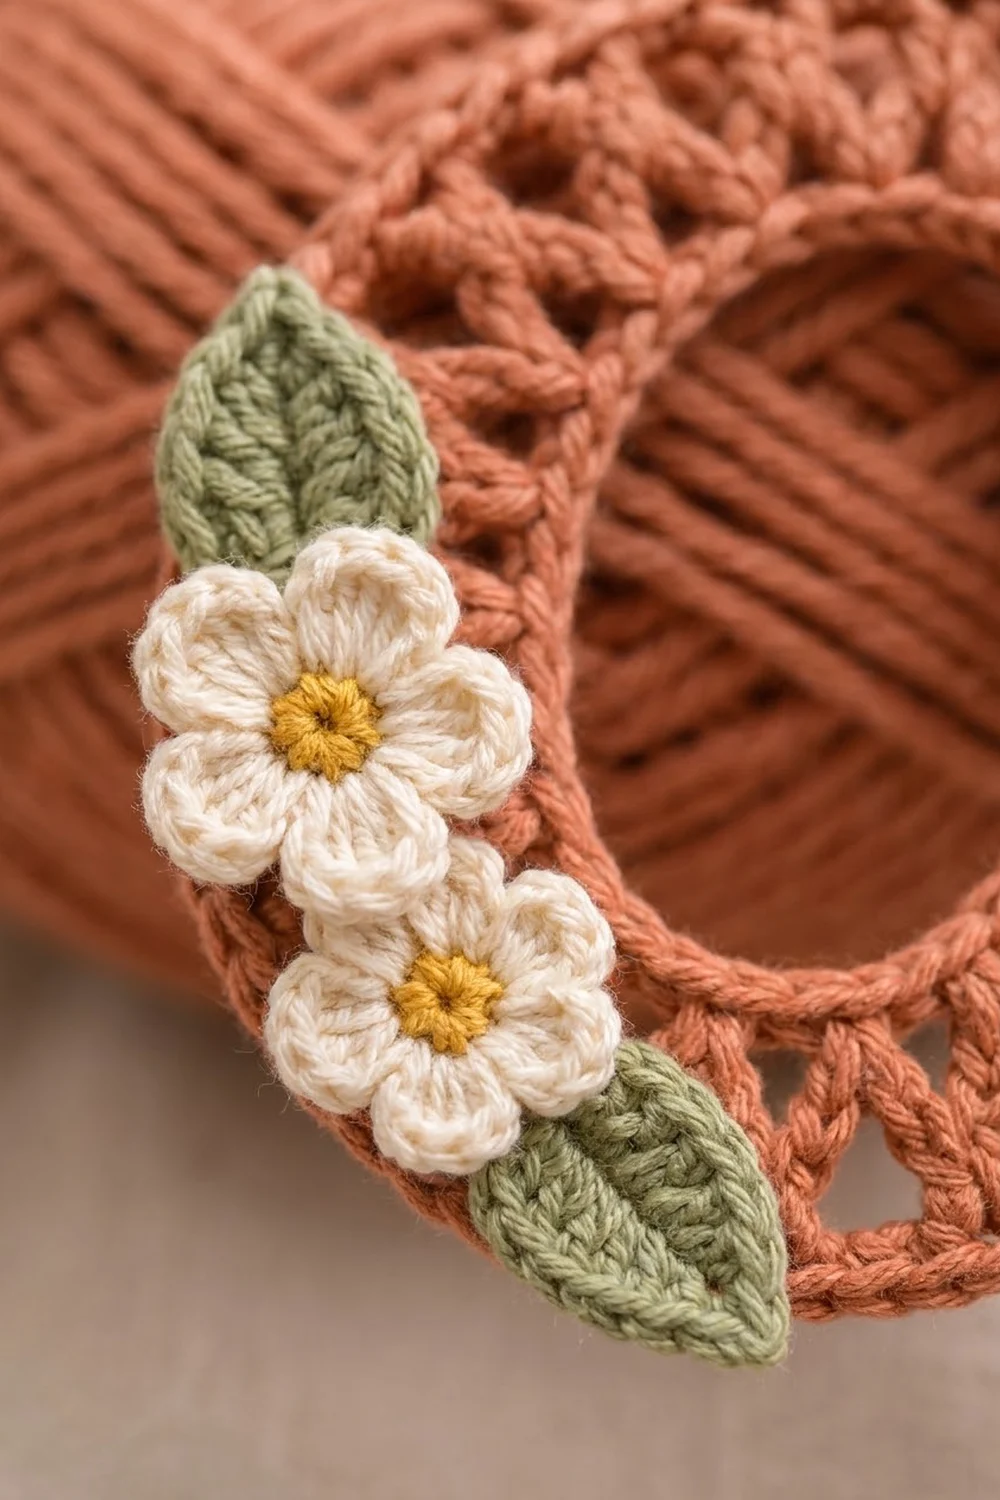
This little keychain is a crocheted letter O, an open oval frame with a lacy band of triangle-shaped windows. A small cluster of cream flowers and sage leaves sits on the lower-left curve. It hangs from a gold split ring, so it works on keys, a bag strap, or a car headrest.
The frame is worked in a warm terracotta cotton. The two five-petal flowers are cream with mustard-yellow centers, and the two leaves are soft sage green. The look is cottage-style, light, and gift-friendly.
This pattern uses US crochet terms. The finished keychain body measures 3.5 in (8.9 cm) tall by 2.5 in (6.4 cm) wide, not including the hardware. The center opening is about 2 in (5.1 cm) tall by 1 in (2.5 cm) wide.
Construction is simple. You start with a chain ring that becomes the inner edge, then work one round of V-stitches to create the lace, then finish with a single crochet edging. The flowers and leaves are made separately and sewn on. Finally, jump rings and a split ring are added at the top.
Finished Size and Construction
- Finished size: 3.5 in (8.9 cm) tall x 2.5 in (6.4 cm) wide
- Skill level: Easy
- Terminology: US crochet terms
- Yarn weight: Sport (#2 fine) cotton
- Hook: 2.75 mm (US C-2)
- Number of pieces: 1 oval frame, plus 4 small appliqués (2 flowers, 2 leaves) sewn on to make one finished item
- Layout: Single oval, hung vertically from the center of the top curve
- Piece size: 3.5 in (8.9 cm) x 2.5 in (6.4 cm)
- Size before border: about 3.2 in (8.1 cm) x 2.2 in (5.6 cm)
- Border depth: 1 round of sc, about 0.17 in (0.4 cm)
- Band width: about 0.75 in (1.9 cm) from inner edge to outer edge
Materials
Choose a smooth mercerized cotton or cotton blend in sport weight. Cotton holds the oval shape well and resists the stretching keychains get from daily use. Avoid fuzzy yarns, because they hide the triangle windows.
- Terracotta (frame): 5 g, about 14 m
- Cream (flower petals): 2 g, about 6 m
- Sage green (leaves): 1 g, about 3 m
- Mustard yellow (flower centers): 1 g, about 3 m
Tools:
- 2.75 mm (US C-2) crochet hook
- Tapestry needle
- 4 stitch markers
- Gold split ring, 1 in (2.5 cm) diameter
- 2 gold jump rings, 0.3 in (0.8 cm) diameter
- 2 pairs of flat-nose pliers
- Rustproof pins and a blocking mat
- Scissors and a spray bottle
All quantities include a margin of about 20 percent for swatching and weaving in.
Abbreviations (US Terms)
- ch – chain
- sl st – slip stitch
- sc – single crochet
- hdc – half double crochet
- dc – double crochet
- st(s) – stitch(es)
- sp – space
- MR – magic ring
- Rnd – round
- beg – beginning
Special stitch – V-stitch (V-st): (dc, ch 2, dc) in the same stitch. Each V-st has 2 dc and 1 ch-2 sp.
Gauge and Checkpoints
Gauge: 6 sc and 6 sc rows = 1 in (2.5 cm).
The whole frame is only three rounds, so the frame itself is your test piece. Make one frame, check it, and adjust before you make the appliqués.
Checkpoint 1 (after Rnd 1): 30 sc. Laid flat and gently shaped into an oval, the inner edge measures about 5 in (12.7 cm) around.
Checkpoint 2 (after Rnd 2): 16 V-sts. The piece measures about 3.2 in (8.1 cm) x 2.2 in (5.6 cm).
Checkpoint 3 (after Rnd 3): 60 sc. The frame measures 3.5 in (8.9 cm) x 2.5 in (6.4 cm) after blocking.
If your frame is too big: Go down to a 2.5 mm hook, or tighten your chain ring. A loose chain ring makes the opening too wide.
If your frame is too small: Go up to a 3 mm hook. If only the outer edge cups, see Troubleshooting.
Frame Pattern
Where you place the V-stitches is what shapes the oval. The two straight sides get widely spaced V-sts, so they barely grow. The two curved ends get closely packed V-sts, so they fan out around the curve.
To keep track, divide the 30 stitches of Rnd 1 into four sections:
- Side A: sts 1–6 (straight side)
- End B: sts 7–15 (curved end, bottom)
- Side C: sts 16–21 (straight side)
- End D: sts 22–30 (curved end, top, where the keychain hangs)
Rnd 1 (inner edge)
With terracotta, ch 30. Join with a sl st in the first ch to form a ring, taking care not to twist the chain.
Ch 1, sc in the same ch as the join and in each ch around. Join with a sl st in the first sc. (30 sc)
Place markers in st 1, st 7, st 16, and st 22 to mark the start of each section.
Rnd 2 (lace round)
Ch 5 (counts as dc + ch 2), dc in the same st as the join. This is the first V-st, worked in st 1.
Side A: Skip 2 sts, V-st in next st (st 4), skip 2 sts. (2 V-sts in Side A)
End B: [V-st in next st, V-st in next st, skip 1 st] 3 times. (6 V-sts in End B)
Side C: [V-st in next st, skip 2 sts] 2 times. (2 V-sts in Side C)
End D: [V-st in next st, V-st in next st, skip 1 st] 3 times. (6 V-sts in End D)
Join with a sl st in the 3rd ch of the beg ch-5. (16 V-sts: 32 dc and 16 ch-2 sps)
This round creates the open triangles. Each V opens into a triangle pointing outward, and the gaps between V-sts form triangles pointing inward. On the ends, the paired V-sts sit close together, so the triangles there are smaller and more frequent, which gives the curves their fanned look.
Do not fasten off. Go straight into the border round.
Border
Border gauge: 6 sc = 1 in (2.5 cm), the same as the main gauge.
The border is one round of sc. It closes the triangle windows and gives the frame its clean outer edge.
Rnd 3 (outer edge)
Ch 1, sc in the same st as the join (the top of the beg ch-5, which is the first dc of the first V-st).
Side A: First V-st: the sc you just made covers its first dc; work 1 sc in the ch-2 sp and sc in the second dc. Second V-st: sc in first dc, 1 sc in ch-2 sp, sc in second dc. (6 sc in Side A: 2 V-sts x 3 sc)
End B: For each of the 6 V-sts: sc in first dc, 2 sc in ch-2 sp, sc in second dc. (24 sc in End B: 6 V-sts x 4 sc)
Side C: For each of the 2 V-sts: sc in first dc, 1 sc in ch-2 sp, sc in second dc. (6 sc in Side C)
End D: For each of the 6 V-sts: sc in first dc, 2 sc in ch-2 sp, sc in second dc. (24 sc in End D)
Join with a sl st in the first sc. (60 sc total: 6 + 24 + 6 + 24)
Fasten off and weave in the ends along the inner sc edge.
Why the math works
Think of the finished oval as two straight sides, each 1 in (2.5 cm) long, joined by two half-circle ends.
- Inner edge: The opening is 2 in (5.1 cm) x 1 in (2.5 cm). Its perimeter is 2 x 1 in plus one full circle 1 in (2.5 cm) across: 2 + 3.14 = 5.14 in (13.1 cm). Rnd 1 has 30 sc, which is 5 in (12.7 cm) at gauge. The cotton stretches to cover the small difference during blocking.
- Outer edge: The frame is 2.5 in (6.4 cm) wide, so each end is a half-circle with a 1.25 in (3.2 cm) radius. The perimeter is 2 x 1 in plus 2 x 3.14 x 1.25 in, which is 2 + 7.85 = 9.85 in (25.0 cm). Rnd 3 has 60 sc, which is 10 in (25.4 cm) at gauge. That is within 0.15 in (0.4 cm), so the edge lies flat.
- Sides versus ends: Each straight side stays at 6 sts from Rnd 1 to Rnd 3, so it does not grow. Each end grows from 9 sts to 24 sts, which is the extra length a curve needs. This is what turns a round ring into an oval.
- Height check: 1 in (2.5 cm) of straight side + 2 x 1.25 in (3.2 cm) of end radius = 3.5 in (8.9 cm) tall.
Flowers (make 2)
Rnd 1 (center)
With mustard yellow, make a MR. Ch 1, work 5 sc in the ring. Pull the ring closed and join with a sl st in the first sc. (5 sc) Fasten off yellow.
Rnd 2 (petals)
Join cream in any sc. In the same st, work (ch 2, 2 dc, ch 2, sl st). In next sc, work (sl st, ch 2, 2 dc, ch 2, sl st). Repeat from * 3 more times. (5 petals)*
Fasten off, leaving a 10 in (25.4 cm) tail for sewing. Each flower measures about 0.75 in (1.9 cm) across.
Leaves (make 2)
With sage green, ch 7.
Side 1: Sc in 2nd ch from hook, hdc in next ch, dc in next 2 ch, hdc in next ch. (5 sts)
Tip: Work (sc, ch 2, sc) in the last ch.
Side 2: Working in the unused loops on the other side of the chain: hdc in next ch, dc in next 2 ch, hdc in next ch, sc in last ch. (5 sts)
Sl st in the first sc. (12 sts + 1 ch-2 tip) Fasten off, leaving a 10 in (25.4 cm) tail. Each leaf measures about 1 in (2.5 cm) long and 0.5 in (1.3 cm) wide.
Assembly
Hold the frame with End D at the top. The appliqués go on the lower-left curve, where the left side meets the bottom end.
- Leaf 1: Place it on the left side, just below the middle, with the tip pointing up and out. Sew around its edge with small stitches through the outer sc round.
- Flower 1: Place it so it overlaps the base of Leaf 1, on the band near the lower-left curve. Sew through the yellow center and the base of each petal.
- Flower 2: Place it below and to the right of Flower 1, overlapping it slightly, on the bottom curve.
- Leaf 2: Tuck its base under Flower 2, with the tip pointing right along the bottom curve. Sew it in place.
Keep your stitches small. Pull them snug but not tight, so the frame does not pucker.
Hardware: Find the center of End D on Rnd 3. Open one jump ring by twisting it sideways with the two pliers. Pass it through the frame between the two center sts of End D, catching both Rnd 3 and the tops of the Rnd 2 dc for strength. Close it. Link the second jump ring to the first, then attach the split ring.
Final Blocking
- Lightly mist the frame, with the appliqués attached, until it is damp but not soaked.
- Lay it right side up on a blocking mat with a grid.
- Shape it into an oval 3.5 in (8.9 cm) tall x 2.5 in (6.4 cm) wide.
- Pin the outer edge at the top, the bottom, both sides, and four diagonal points.
- Open each triangle window with your fingertip so they look even.
- Shape the inner opening to 2 in (5.1 cm) x 1 in (2.5 cm).
- Gently flatten the flower petals and leaf tips.
- Let it dry fully before you remove the pins.
Final Quality-Control Checklist
- Rnd 1 has 30 sc, Rnd 2 has 16 V-sts, and Rnd 3 has 60 sc.
- Each straight side has 6 sc on Rnd 3, and each curved end has 24 sc.
- The frame measures 3.5 in (8.9 cm) x 2.5 in (6.4 cm).
- The opening measures about 2 in (5.1 cm) x 1 in (2.5 cm).
- All triangle windows are open and evenly sized.
- Both flowers have 5 petals and a yellow center.
- The appliqués are sewn on securely, and no stitches show on the back.
- The jump rings are fully closed, with no gap the frame could slip out of.
- All ends are woven in and trimmed.
Troubleshooting
The frame is round, not oval. Check where you placed the V-sts. Each end needs 6 V-sts and each side only 2. Mixing them up removes the shaping.
The outer edge ruffles. Your sc may be looser than your dc. Work Rnd 3 with a 2.5 mm hook.
The outer edge cups. Your border is too tight. Work Rnd 3 with a 3 mm hook.
The chain ring twisted. Unravel it and chain again. A twisted ring cannot be fixed later.
The flower center has a hole. Pull the magic ring tighter before joining, and weave the tail across the back.
The keychain tilts when it hangs. The jump ring is off-center. Count again to find the middle of End D.
Care
Hand wash in cool water with mild soap, press the water out in a towel, and dry flat. Keep the metal hardware dry to protect the gold finish.

Final Notes
The measurement chain is short and easy to check. Thirty sc on the inner ring give an opening edge of 5 in (12.7 cm). Sixteen V-sts, 2 on each side and 6 on each end, turn that ring into an oval about 3.2 in (8.1 cm) x 2.2 in (5.6 cm). Sixty sc in the border, 6 per side and 24 per end, finish the frame at 3.5 in (8.9 cm) x 2.5 in (6.4 cm). Add two flowers, two leaves, and a gold ring, and your letter O keychain is ready to use or give.
Happy crocheting!