

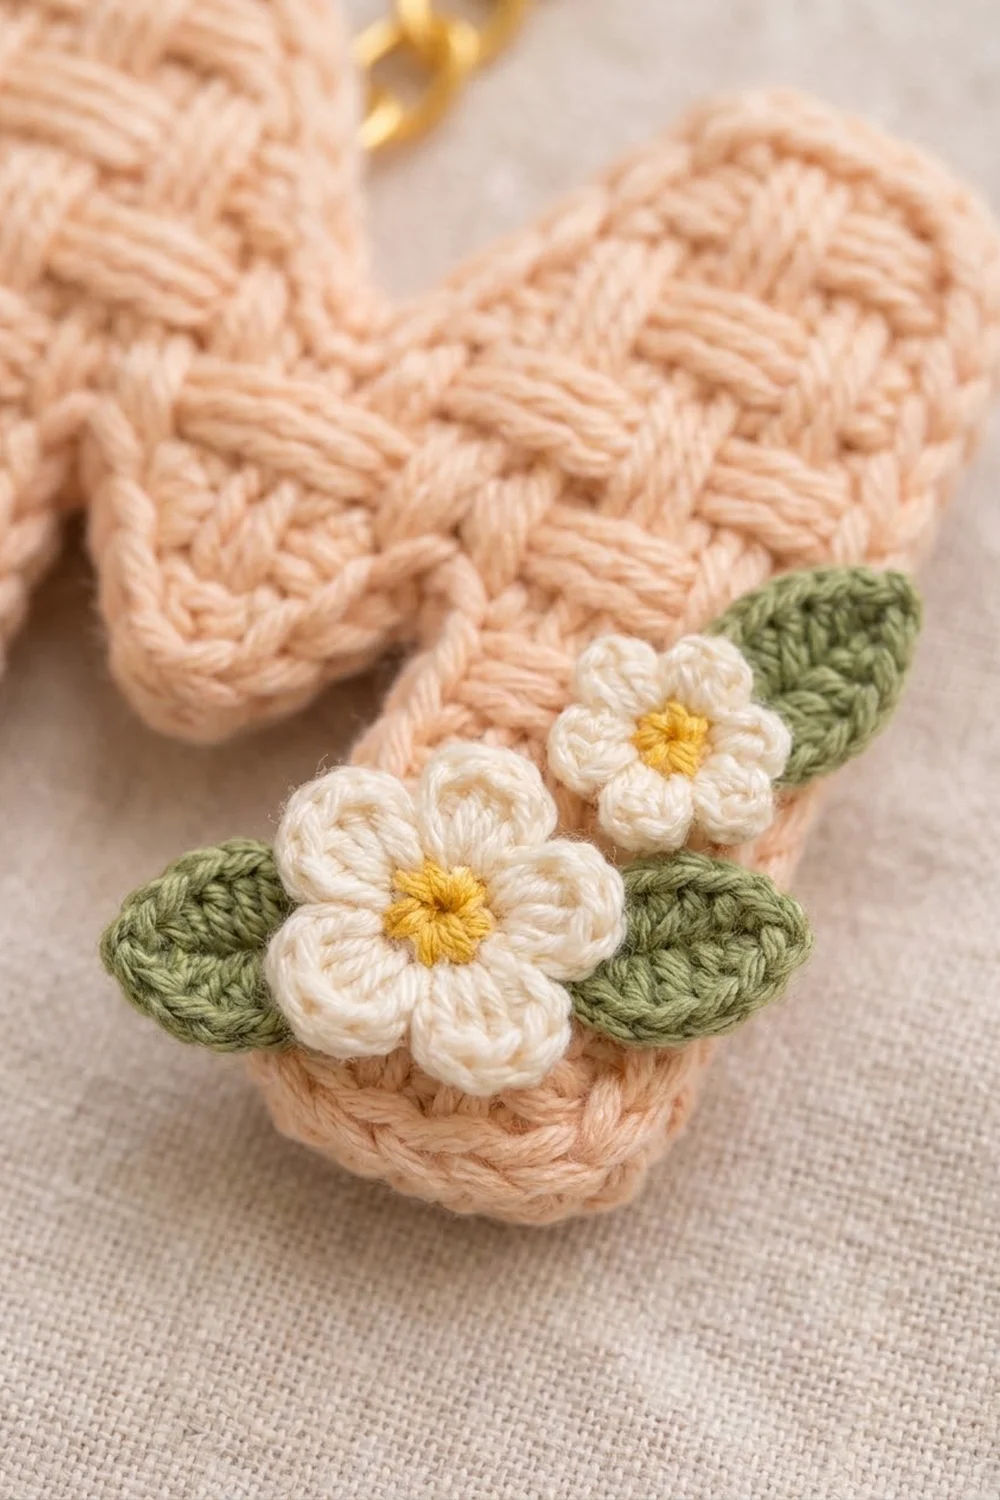
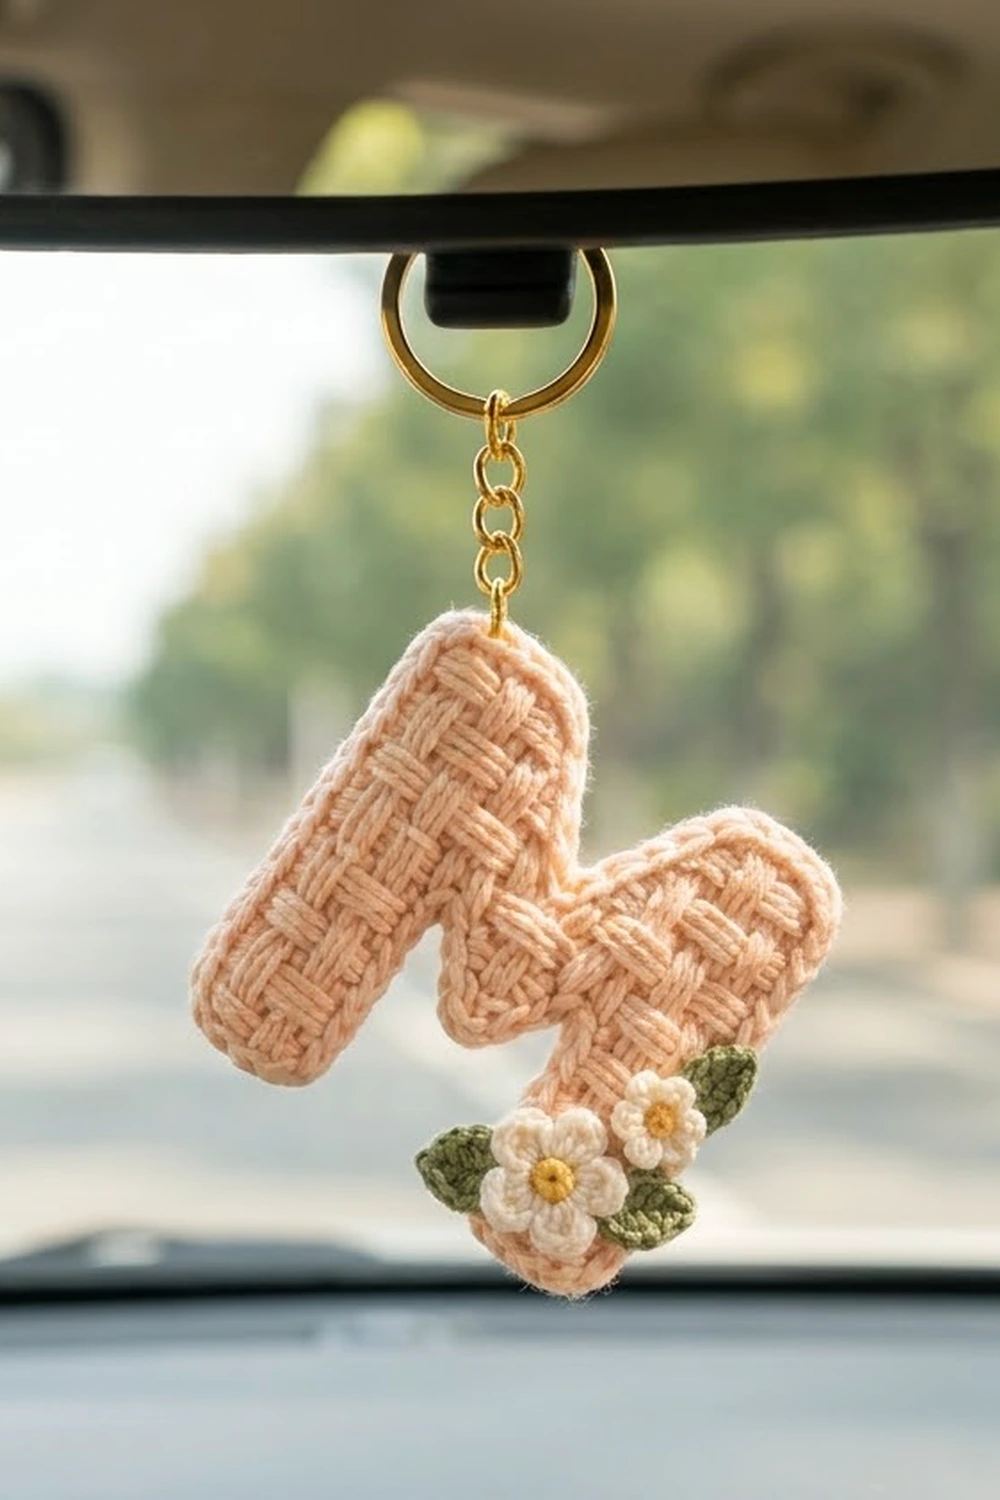
This keychain is a chunky capital letter M with a woven basketweave texture. The letter is soft peach cotton with a rolled, corded edge. In the lower right corner sit two cream flowers with sunny yellow centers and two small green leaves. A gold split ring on a short chain hangs from the top left corner.
The style is sweet and tidy. Raised and recessed blocks look like woven ribbon, the corners are rounded, and the little flower cluster spills over the edge. Use it as a bag charm, a key tag, or a car headrest charm.
This pattern uses US crochet terms. The finished letter is 3.5 in (8.9 cm) wide by 3.5 in (8.9 cm) tall, not counting the hardware.
You work the letter as one flat piece in rows, from the bottom up. First you make the two legs separately, then Row 5 joins them, which closes the inverted V between the legs. After two full rows, the work splits into the two top humps, which forms the notch. Two border rounds, single crochet and then reverse single crochet, give the corded edge. The flowers and leaves are small appliqués that you sew on at the end.
Finished Size and Construction
- Finished size: 3.5 in x 3.5 in (8.9 cm x 8.9 cm)
- Skill level: Intermediate (post stitches, simple shaping)
- Terminology: US
- Yarn weight: DK / light worsted (#3) cotton
- Hook: 3.5 mm (E-4)
- Number of pieces: 1 letter, plus 4 appliqués (2 flowers, 2 leaves)
- Layout: single letter, with the appliqués in the lower right corner
- Size before border: 3 in x 3 in (7.6 cm x 7.6 cm), which is 15 stitches wide by 9 rows tall
- Border depth: 1/4 in (0.6 cm) on every side
Materials
Smooth DK cotton is the best choice because it shows the post-stitch texture clearly and keeps the letter flat. Acrylic gives a softer, puffier result.
- Peach (letter and border): about 10 g / 24 m
- Cream (petals): about 2 g / 5 m
- Yellow (centers): about 1 g / 2 m
- Green (leaves): about 2 g / 5 m
These amounts include a small safety margin, so scraps are usually enough.
Tools:
– 3.5 mm (E-4) hook
– Tapestry needle
– Stitch markers
– Scissors and a ruler
– Gold split ring, 1 in (2.5 cm) across
– Gold chain, 1 in (2.5 cm) long, with one jump ring
– Small pliers
– Blocking mat and rust-proof pins
Abbreviations (US Terms)
- ch – chain
- sl st – slip stitch
- sc – single crochet
- hdc – half double crochet
- dc – double crochet
- FPdc / BPdc – front post / back post double crochet
- rev sc – reverse single crochet (crab stitch)
- MR – magic ring
- RS / WS – right side / wrong side
- st(s) – stitch(es)
Column labels: The letter is 15 columns wide. Columns are numbered 1 to 15 from left to right, as seen from the RS. They are grouped into five 3-column blocks:
– A = columns 1–3
– B = columns 4–6
– C = columns 7–9
– D = columns 10–12
– E = columns 13–15
Raised vs. recessed:
– A raised stitch is FPdc on RS rows and BPdc on WS rows.
– A recessed stitch is BPdc on RS rows and FPdc on WS rows.
The two block patterns:
– Pattern 1 (Rows 2, 3, 6, 7): A, C and E are raised; B and D are recessed.
– Pattern 2 (Rows 4, 5, 8, 9): B and D are raised; A, C and E are recessed.
Every row begins with ch 2, which does not count as a stitch. Work each post stitch around the stitch directly below it.
Post increase: Work two post stitches around the same stitch. Each of the two stitches is raised or recessed according to its own column.
Gauge and Checkpoints
Gauge: 20 sts and 12 rows = 4 in (10.2 cm) in the basketweave pattern. That works out to 5 sts and 3 rows per inch. Each block is 0.6 in (1.5 cm) wide and 2/3 in (1.7 cm) tall.
The letter is small enough to act as its own test piece, so make it before you make any appliqués. Check these measurements as you go:
- Row 4, each leg: 7 sts, 1.4 in (3.6 cm) wide, 1 1/3 in (3.4 cm) tall
- Row 5: 3 in (7.6 cm) wide
- Row 7: 3 in (7.6 cm) wide, 2 1/3 in (5.9 cm) tall
- Row 9: 3 in x 3 in (7.6 cm x 7.6 cm)
- After the border: 3.5 in x 3.5 in (8.9 cm x 8.9 cm)
If the letter is too big, go down 0.5 mm in hook size. If it is too small, go up 0.5 mm. Keep the post stitches tall and relaxed.
Letter M
Left Leg
Row 1 (RS): With peach, ch 6. Dc in 3rd ch from hook and in next 3 ch. Turn. (4 dc: columns 4 to 1)
Row 2 (WS, Pattern 1): Ch 2. BPdc around each of next 3 sts (A). FPdc around last st (column 4). FPdc around same st (column 5). Turn. (5 sts)
Row 3 (RS, Pattern 1): Ch 2. BPdc twice around first st (columns 6 and 5). BPdc around next st (column 4). FPdc around each of last 3 sts (A). Turn. (6 sts)
Row 4 (WS, Pattern 2): Ch 2. FPdc around each of next 3 sts (A). BPdc around each of next 3 sts (B). FPdc around same st as last BPdc (column 7). (7 sts)
Fasten off. Each row adds one stitch on the inner edge, which slants that side of the leg.
Right Leg
Row 1 (RS): With peach, ch 6. Dc in 3rd ch from hook and in next 3 ch. Turn. (4 dc: columns 15 to 12)
Row 2 (WS, Pattern 1): Ch 2. FPdc twice around first st (columns 11 and 12). BPdc around each of next 3 sts (E). Turn. (5 sts)
Row 3 (RS, Pattern 1): Ch 2. FPdc around each of next 3 sts (E). BPdc around each of next 2 sts (columns 12, 11). BPdc around same st as last BPdc (column 10). Turn. (6 sts)
Row 4 (WS, Pattern 2): Ch 2. FPdc around first st (column 9). BPdc around same st (column 10). BPdc around each of next 2 sts (columns 11, 12). FPdc around each of last 3 sts (E). Turn. Do not fasten off. (7 sts)
Gap check: Lay the two legs side by side. The open space between them should be 7 columns wide at Row 1, then 5, then 3, and just column 8 at Row 4. That gives a pointed gap 1 1/3 in (3.4 cm) tall.
Joining Row
Row 5 (RS, Pattern 2): Ch 2. BPdc around each of next 3 sts (E). FPdc around each of next 3 sts (D). BPdc around next st (column 9). Ch 1 (column 8). Now continue onto the left leg: BPdc around its column 7. FPdc around each of next 3 sts (B). BPdc around each of last 3 sts (A). Turn. (14 post sts + 1 ch-1 sp)
Keep the ch-1 snug so the tip of the gap stays sharp.
Body
Row 6 (WS, Pattern 1): Ch 2. BPdc around each of next 3 sts (A). FPdc around each of next 3 sts (B). BPdc around next st (column 7). Dc in ch-1 sp (column 8). BPdc around next st (column 9). FPdc around each of next 3 sts (D). BPdc around each of last 3 sts (E). Turn. (15 sts)
Row 7 (RS, Pattern 1): Ch 2. FPdc around each of next 3 sts (E). BPdc around each of next 3 sts (D). FPdc around each of next 3 sts (C). BPdc around each of next 3 sts (B). FPdc around each of last 3 sts (A). Turn. (15 sts)
Left Hump
Row 8 (WS, Pattern 2): Ch 2. FPdc around each of next 3 sts (A). BPdc around each of next 3 sts (B). FPdc around next st (column 7). Turn, leaving the remaining 8 sts unworked. (7 sts)
Row 9 (RS, Pattern 2): Ch 2, skip first st (column 7). FPdc around each of next 3 sts (B). BPdc around each of last 3 sts (A). Fasten off. (6 sts)
Right Hump
Row 8 (WS, Pattern 2): With WS facing, skip column 8 of Row 7. Join peach with a sl st in column 9. Ch 2. FPdc around same st (column 9). BPdc around each of next 3 sts (D). FPdc around each of last 3 sts (E). Turn. (7 sts)
Row 9 (RS, Pattern 2): Ch 2. BPdc around each of next 3 sts (E). FPdc around each of next 3 sts (D). Leave column 9 unworked. Fasten off. (6 sts)
The notch is 1 column wide at Row 8 and 3 columns wide at Row 9, which makes a V 2/3 in (1.7 cm) deep.
Checkpoint: 3 in x 3 in (7.6 cm x 7.6 cm). Weave in the ends on the WS.
Border
Border gauge: 6 sc = 1 in (2.5 cm). Work these stitches into each type of edge:
– 1 sc in each stitch top or foundation chain
– 2 sc around each dc row-end
– 3 sc in each of the 8 outer corner stitches: the outer and inner corner of each foot, and the outer and inner corner of each hump
Rnd 1 (RS): Join peach with a sl st in column 1 of Row 9 (the top left corner). Work clockwise:
- Left hump top (6 sts): 3 sc in first st, sc in next 4 sts, 3 sc in last st = 10
- Notch: 2 sc around each of 2 row-ends (4), sc in column 8 of Row 7 (1), 2 sc around each of 2 row-ends (4) = 9
- Right hump top (6 sts): 3 + 4 + 3 = 10
- Right side (9 row-ends): 2 sc each = 18
- Right foot (4 ch): 3 + 2 + 3 = 8
- Leg gap: 2 sc around each of 4 row-ends (8), sc in ch-1 sp (1), 2 sc around each of 4 row-ends (8) = 17
- Left foot (4 ch): 3 + 2 + 3 = 8
- Left side (9 row-ends): 2 sc each = 18
Join with a sl st to first sc. (98 sc)
Check the total: 10 + 9 + 10 + 18 + 8 + 17 + 8 + 18 = 98. The 2 extra sc for each corner are already included in the hump and foot totals, so don’t add them again.
Rnd 2: Ch 1. Working left to right, rev sc in each sc around. Join with a sl st and fasten off. (98 rev sc)
Why the math works:
– A dc row is 1/3 in (0.8 cm) tall. At 6 sc per inch, 2 sc also cover 1/3 in, so the sides lie flat.
– Stitch tops are worked 1:1, and the 3-sc corners turn the edge cleanly.
– Only 1 sc goes into each inward point (the notch and the gap tip), which keeps both points crisp.
– The two rounds add 1/4 in (0.6 cm) per side, so 3 in (7.6 cm) becomes 3.5 in (8.9 cm).
Flowers (Make 2)
Rnd 1 (both flowers): With yellow, MR. Ch 1, 5 sc in ring. Pull the ring closed and join. Fasten off. (5 sc)
Large flower, Rnd 2: Join cream in any sc. (Sl st, ch 2, 3 dc, ch 2, sl st) in each sc around. (5 petals, about 1 in / 2.5 cm across)
Small flower, Rnd 2: Join cream in any sc. (Sl st, ch 1, hdc, dc, hdc, ch 1, sl st) in each sc around. (5 petals, about 3/4 in / 1.9 cm across)
Leaves (Make 2)
With green, ch 7. Sl st in 2nd ch from hook, then work 1 st in each remaining ch: sc, hdc, dc, hdc, sc. Ch 1. Turn the piece and work along the other side of the chain: sc, hdc, dc, hdc, sc. Sl st in the tip. (12 sts, about 1 in / 2.5 cm long)
Assembly
- Sew the large flower on the right leg, 1/2 in (1.3 cm) above the bottom edge, with its petals overlapping the border.
- Sew the small flower above it and slightly to the right.
- Tuck one leaf behind the small flower, pointing up and out. Tuck the other behind the large flower, pointing down and out. Sew both through the back loops so no stitches show.
- Attach the jump ring through the border at the top left corner, then add the chain and split ring.
Final Blocking
- Mist the letter until it is damp.
- Pin it RS up to 3.5 in x 3.5 in (8.9 cm x 8.9 cm).
- Pin each foot square, then pin the gap tip and the notch point.
- Round the corners with your fingers.
- Let it dry fully before you sew on the appliqués.
Final Quality-Control Checklist
- The letter measures 3.5 in x 3.5 in (8.9 cm x 8.9 cm).
- Each leg has 7 sts at Row 4, and each hump has 6 sts at Row 9.
- Both border rounds have 98 sts.
- The blocks form a clean checkerboard.
- The notch and the leg gap are symmetrical.
- The appliqués are secure and the jump ring is fully closed.
Troubleshooting
- Blocks look mixed up: You probably swapped FPdc and BPdc on a WS row. Recheck the raised/recessed rule.
- Letter curls: Your post stitches are too tight. Go up 0.5 mm in hook size.
- Border ruffles: Work 3 sc per 2 row-ends instead of 2 sc per row-end.
- Hole at the gap tip: Close it with a few stitches using the yarn tail.
Care
Remove the metal hardware first. Then hand wash in cool water and lay flat to dry.
Final Notes
Here is how the measurements build up. At 5 sts and 3 rows per inch, 15 sts and 9 rows make a 3 in x 3 in (7.6 cm x 7.6 cm) letter. The 98-stitch border adds 1/4 in (0.6 cm) per side, for a finished size of 3.5 in x 3.5 in (8.9 cm x 8.9 cm).
Happy crocheting!