

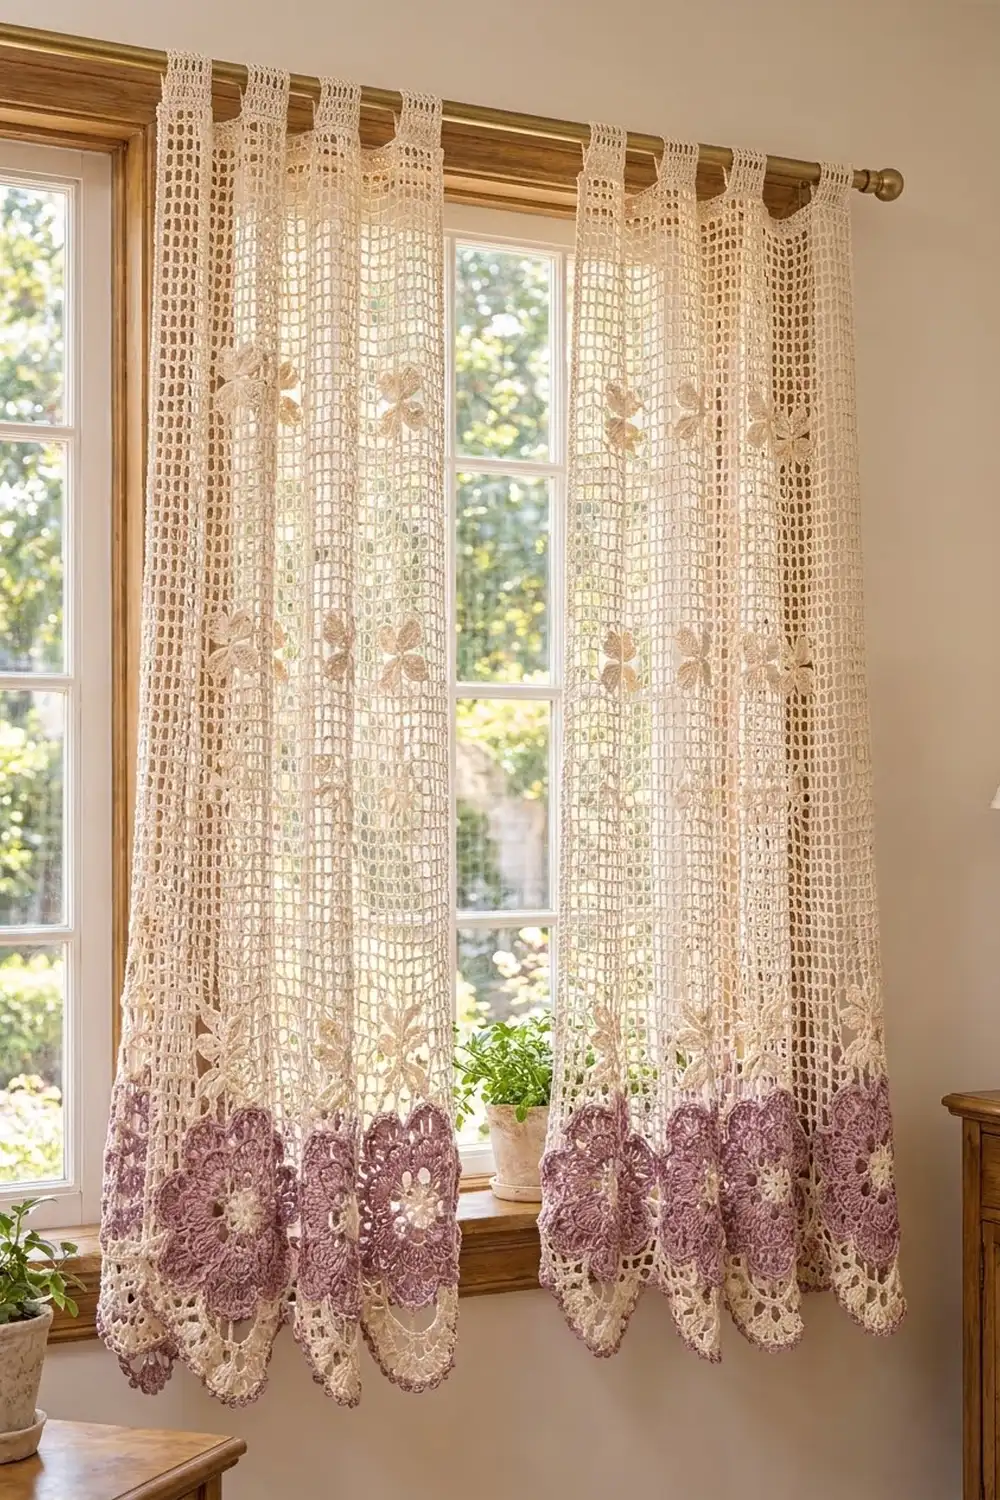
These lace curtains have a band of dusty mauve flowers along the hem with airy cream filet mesh above. When light comes through, the flowers show up clearly and the mesh stays soft and open.
Each flower has a cream center and two layers of mauve petals: a small front layer and a bigger back layer. A cream round of chain loops with pointed tips frames each flower and joins it to the next. Above the flowers, columns of small cream four-leaf clusters run up the mesh, one column over each flower.
The pattern uses US crochet terms. One finished panel measures 28.5″ (72.4 cm) wide and 58.3″ (148.1 cm) long without the tabs, or about 60.3″ (153.2 cm) to the top of the tabs. The pattern covers one panel. Make it twice for the pair.
For each panel, you make 4 flower motifs and join them as you go into a strip. Then you work a leveling row across the tops of the flowers, followed by 80 rows of filet mesh, a solid header and 7 tabs. Last, you work a shell hem along the bottom and a single crochet edging along both sides.
Finished Size and Construction
- Finished panel size: 28.5″ x 58.3″ (72.4 x 148.1 cm), plus tabs about 2″ (5.1 cm) tall
- Skill level: Intermediate
- Terminology: US
- Yarn weight: DK (#3) cotton
- Hook: 4.5 mm (US 7)
- Number of pieces: 4 motifs per panel, 8 for the pair (the body is worked directly onto the motifs)
- Layout: 4 motifs in 1 row along the hem
- Motif size: 7″ (17.8 cm) from tip to opposite tip, and 6.5″ (16.5 cm) tall when laid with flat sides
- Size before border: 28″ x 57.3″ (71.1 x 145.5 cm)
- Border depth: 0.25″ (0.6 cm) on the sides and 1″ (2.5 cm) at the hem
Materials
Use a smooth mercerized or combed cotton in DK weight, about 120 m per 50 g. Cotton holds the lace shape, washes well and doesn’t fuzz in sunlight.
For the pair of panels:
– Cream (A): 1,000 g / 2,400 m
– Dusty mauve (B): 150 g / 360 m
These amounts include a margin of about 10% for swatching and blocking.
Tools:
– 4.5 mm (US 7) crochet hook
– Tapestry needle
– Stitch markers
– Measuring tape
– Blocking mats or a large clean towel, and rust-proof pins
– Spray bottle
– Curtain rod, up to 1.5″ (3.8 cm) in diameter
Abbreviations (US Terms)
- ch: chain
- sl st: slip stitch
- sc: single crochet
- hdc: half double crochet
- dc: double crochet
- tr: treble crochet
- dtr: double treble crochet
- sp(s): space(s)
- st(s): stitch(es)
- RS / WS: right side / wrong side
Special stitch: 3-dc cluster (cl). Yarn over, insert the hook in the stated space, yarn over and pull up a loop, yarn over and pull through 2 loops. Repeat from * 2 more times in the same space (4 loops on the hook), then yarn over and pull through all 4 loops.
Gauge and Checkpoints
Motif: 7″ (17.8 cm) from tip to opposite tip after Round 7.
Mesh: 9 squares = 7″ (17.8 cm) wide, and 10 rows = 6″ (15.2 cm) tall. One square is about 0.78″ (2.0 cm) wide and 0.6″ (1.5 cm) tall.
Make one complete motif before anything else. Check its size at each stage:
- After Round 2: 2″ (5.1 cm)
- After Round 4: 3.5″ (8.9 cm)
- After Round 6: 6″ (15.2 cm)
- After Round 7: 7″ (17.8 cm)
If the motif comes out too big, go down half a hook size. If it’s too small, go up half a size. The mesh gauge depends on the motif gauge: 9 squares sit on top of each motif, so a motif that’s even 0.5″ (1.3 cm) off changes the panel width by 2″ (5.1 cm).
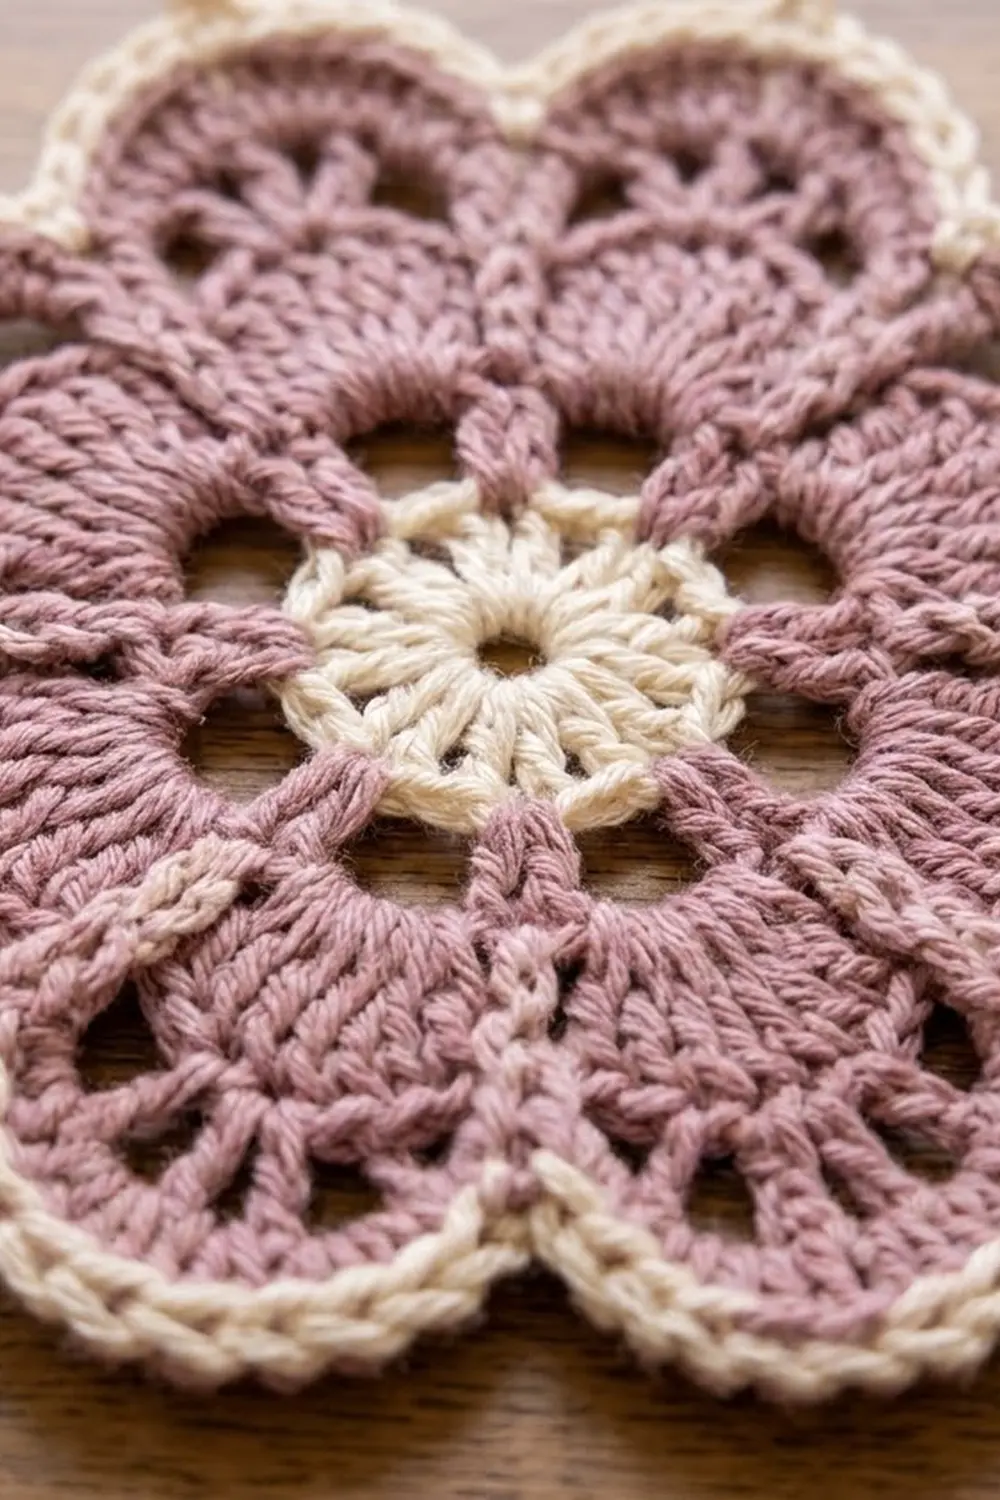
Flower Motif (Make 4 per Panel)
Round 1 (A): Make a magic ring. Ch 3 (counts as dc), work 15 dc in the ring, then sl st to the top of the ch-3. (16 dc)
Round 2 (A): Ch 4 (counts as dc + ch 1), dc in next st, ch 1. Repeat from * 14 more times, then sl st to the 3rd ch of the ch-4. Fasten off. (16 dc, 16 ch-1 sps)
Round 3 (B): Join B in any ch-1 sp. Ch 1, sc in this ch-1 sp, ch 3, skip next ch-1 sp. Repeat from * 7 more times, then sl st to the first sc. (8 sc, 8 ch-3 loops)
Round 4 (B), front petals: Sl st into the first ch-3 loop. In each ch-3 loop, work (sc, hdc, 3 dc, hdc, sc), then sl st to the first sc. (8 petals, 56 sts)
Round 5 (B): Fold the petals forward. Ch 5 behind the next petal, then sc around the back post of the next Round 3 sc. Repeat from * 7 more times. End with the last sc around the post of the Round 3 sc where you started. (8 ch-5 loops)
Round 6 (B), back petals: In each ch-5 loop, work (sc, hdc, 2 dc, 3 tr, 2 dc, hdc, sc), then sl st to the first sc. Fasten off. (8 petals of 11 sts, 88 sts)
The center tr of each petal is its 6th stitch. These back petals sit behind and between the front petals, which makes the two-layer flower.
Round 7 (A), the tip round: Join A with a sl st in the center tr of any petal. Ch 1, (sc, ch 5, sc) in the same st, ch 6, sc in the space between this petal and the next, ch 6. Then work (sc, ch 5, sc) in the center tr of the next petal, ch 6, sc between petals, ch 6. Repeat from * 6 more times and sl st to the first sc. Fasten off. (24 sc, 8 ch-5 tip loops, 16 ch-6 loops)
Between every two tips there are exactly 2 ch-6 loops.
Make All Pieces
- Per panel: 4 motifs. Each one uses about 7 g of A and 18 g of B.
- For the pair: 8 motifs.
Only motif 1 of each panel is worked in full on its own. Motifs 2–4 are joined during their Round 7.
Layout of one panel (motif 1 is on the right):
[ M4 ][ M3 ][ M2 ][ M1 ]
Joining (Join-As-You-Go)
Lay motif 1 flat and turn it so that 2 tips point up, 2 point down, 2 point right and 2 point left. This gives each motif 4 flat-ish sides with 2 tips each. Number the tips: P1 is the upper right, P2 and P3 are the top tips, P4 is the upper left, P5 is the lower right, P6 and P7 are the bottom tips, and P8 is the lower left.
Joined tip: Work (sc, ch 2) in the center tr. Then sl st into the matching ch-5 tip loop of the previous motif. Finish with (ch 2, sc) in the same center tr.
Work Round 7 of motif 2 as usual until you reach the 2 tips that face motif 1. Join motif 2’s P1 to motif 1’s P4, and motif 2’s P5 to motif 1’s P8, using a joined tip for each. The 2 ch-6 loops between those tips stay free on both motifs, which leaves a small lacy opening. Finish the round as usual. Join motif 3 to motif 2 and motif 4 to motif 3 in the same way.
Each sl st joins one tip loop to one tip loop. The join adds no stitches, so all later counts treat each joint as a single shared point.
Keep the 2-ch either side of the sl st relaxed. If they’re tight, the motifs will buckle.
Checkpoint: The strip measures 28″ (71.1 cm) from the outer right tip to the outer left tip, and 6.5″ (16.5 cm) tall.
Mesh Body
Turn the strip so the top edge is up and the RS faces you. Work from right to left.
Row 1 (A, leveling row, RS): Join A in the P1 tip loop of motif 1 and ch 5 (counts as dtr). Then, for each motif, work:
ch 2, tr in loop a, ch 2, dc in loop b, ch 2, sc in P2, ch 2, hdc in loop c, ch 2, hdc in loop d, ch 2, sc in P3, ch 2, dc in loop e, ch 2, tr in loop f, ch 2, dtr in P4.
Loops a–f are the 6 ch-6 loops across the top of the motif, in order. On motifs 1–3, the P4 dtr goes into the sl st joint, and that same dtr is the start of the next motif. On motif 4, it goes into the free P4 tip loop.
Count: 1 + (4 x 9) = 37 sts and 36 ch-2 sps. The taller stitches fill the dips, so the top of the row is straight. Checkpoint: 7.5″ (19.1 cm) from the bottom tips to the top of Row 1.
Row 2 (WS): Ch 5 (counts as dc + ch 2) and turn. Dc in next st, ch 2. Repeat from * across, ending with dc in the 3rd ch of the ch-5. (37 dc, 36 squares)
Rows 3–81: Work as Row 2, adding leaf clusters on the rows given below. The count stays at 37 dc and 36 squares on every row. Put the turning dc in the 3rd ch of the turning ch-5.
Leaf squares. Squares 5, 14, 23 and 32 sit over the center of each motif. Count them from either end, because the positions are symmetrical.
- Row A (rows 5, 13, 21, 29, 37, 45, 53, 61, 69, 77): In each leaf square, work ch 1, (cl, ch 1, cl) in the ch-2 sp below, ch 1, then dc in the next dc.
- Row B (rows 6, 14, 22, 30, 38, 46, 54, 62, 70, 78): In the leaf square directly above, work ch 1, (cl, ch 1, cl) in the ch-1 sp between the 2 Row A clusters, ch 1, then dc in the next dc.
- Row after B: Over each leaf, work ch 2 and dc in the next dc, skipping all the leaf stitches.
The 2 clusters from Row A and the 2 from Row B fan out from one point and form the four-leaf flower. Each column has 10 flowers. Checkpoint: The width stays at 28″ (71.1 cm). After Row 81, the mesh (rows 2–81) measures 48″ (121.9 cm).
Header and Tabs
Row 82 (conversion row): Ch 3 (counts as dc) and turn. Work dc in each dc and 2 dc in each ch-2 sp. Count: 37 + (36 x 2) = 109 dc.
Rows 83–84: Ch 3 (counts as dc) and turn. Work dc in each st across. (109 dc)
Checkpoint: The header is 1.8″ (4.6 cm) tall, and the body before the border is 57.3″ (145.5 cm).
Tabs: Each tab is 7 sts wide with 10 skipped sts between tabs, which uses all 109 sts: (7 x 7) + (6 x 10) = 109. The tabs sit on sts 1–7, 18–24, 35–41, 52–58, 69–75, 86–92 and 103–109.
For each tab, join A and work 7 sc. Then work 23 more rows of 7 sc, for 24 rows and 6″ (15.2 cm) in total. Fasten off and leave a 12″ (30.5 cm) tail. Fold each tab to the back and sew its last row to the back of Row 82. This makes a loop about 2″ (5.1 cm) tall.
Border
Border gauge: At the hem, 5 dc fill each ch-6 loop. On the sides, work 2 sc per mesh row, which is 2 sc per 0.6″ (1.5 cm).
Hem edging (A, RS): Join A with an sc in the free P5 tip loop of motif 1. Then, for each motif, work:
5 dc in loop g, 5 dc in loop h, (3 dc, ch 3, 3 dc) in P6, 5 dc in loop i, 5 dc in loop j, (3 dc, ch 3, 3 dc) in P7, 5 dc in loop k, 5 dc in loop l, sc in P8.
On motifs 1–3, the P8 sc goes into the sl st joint. On motif 4, it goes into the free P8 tip loop. Fasten off.
Count per motif: (6 loops x 5) + (2 tips x 6) = 42 dc and 2 ch-3 points. Total: 168 dc, 8 ch-3 points and 5 sc. The sc at each joint pulls the hem into a valley between flowers, and the ch-3 points sharpen the scallops.
Side edging (A, RS, each side): Join A in the end sc of the hem and work upward:
- 5 sc in each of the 2 free outer side ch-6 loops (10 sc)
- 3 sc around the Row 1 edge stitch
- 2 sc around each edge post of Rows 2–81 (160 sc)
- 2 sc around each header row (6 sc)
Total: 179 sc per side. Fasten off.
Why the math works: Each mesh row is about 0.6″ (1.5 cm) tall, and 2 sc cover that height without stretching or rippling the edge. Five dc per loop matches the length of a ch-6 loop, so the hem lies flat. The edging adds 0.25″ (0.6 cm) on each side, which brings 28″ (71.1 cm) to 28.5″ (72.4 cm). The hem adds 1″ (2.5 cm), which brings 57.3″ (145.5 cm) to 58.3″ (148.1 cm).
Final Blocking
- Weave in all ends along the dc posts, never across open mesh.
- Soak the panel in cool water for 15 minutes, then press out the water in a towel without wringing.
- Lay it flat to 28.5″ x 58.3″ (72.4 x 148.1 cm).
- Pin each motif tip and each hem point so the scallops are even.
- Line up the mesh squares and leaf columns with a long ruler.
- Leave it to dry completely. Block the second panel to the same measurements.
Final Quality-Control Checklist
- Every motif has 8 front petals, 8 back petals and 8 tips.
- Each joint between motifs uses 2 tips, and the side loops are free.
- Every mesh row has 37 dc and 36 squares.
- There are 10 leaf flowers in each of the 4 columns.
- The header has 109 dc and 7 evenly spaced tabs.
- The hem has 8 sharp points, and each side edge has 179 sc.
- Both panels are the same size.
Troubleshooting
- Motifs cup: The Round 5 chains are too short or tight. Loosen them, or work ch 6 instead.
- Motifs ruffle: The tr stitches in Round 6 are too loose. Go down half a hook size for Round 6 only.
- Row 1 is wavy: Check that you used the full tr/dc/hdc/sc height sequence.
- Mesh leans: Work the dc into the dc itself, not into the space next to it.
- The edge waves: You have too many sc. Keep to 2 per row.
- Tabs twist: Count 7 sc on every row before you sew the tab down.
Care
Hand wash or machine wash on a cool delicate cycle in a mesh bag. Reshape and dry flat, and avoid strong direct sun for long periods so the mauve doesn’t fade.
Final Notes
Each measurement depends on the one before it:
- Motif: 7″ (17.8 cm)
- Strip of 4 motifs: 28″ (71.1 cm)
- Mesh: 37 dc and 36 squares across that same 28″ (71.1 cm)
- Body before border: 28″ x 57.3″ (71.1 x 145.5 cm), adding 48″ (121.9 cm) of mesh and a 1.8″ (4.6 cm) header
- Finished panel: 28.5″ x 58.3″ (72.4 x 148.1 cm)
If your first motif matches, everything else will too. Make the second panel the same way to finish the pair.
Happy crocheting!