

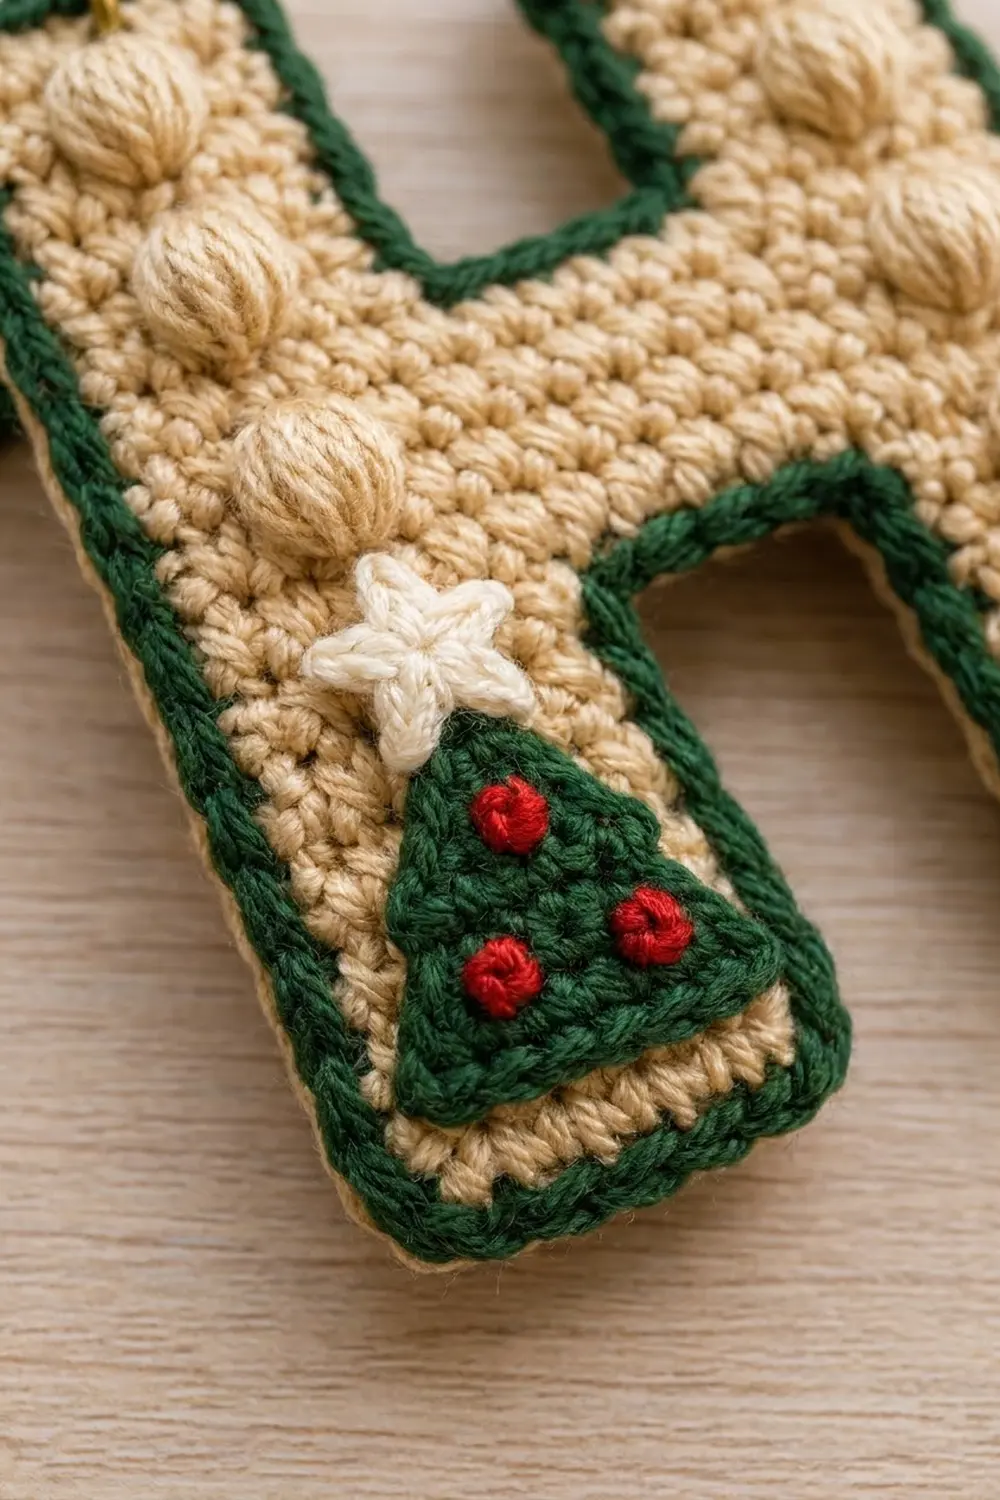
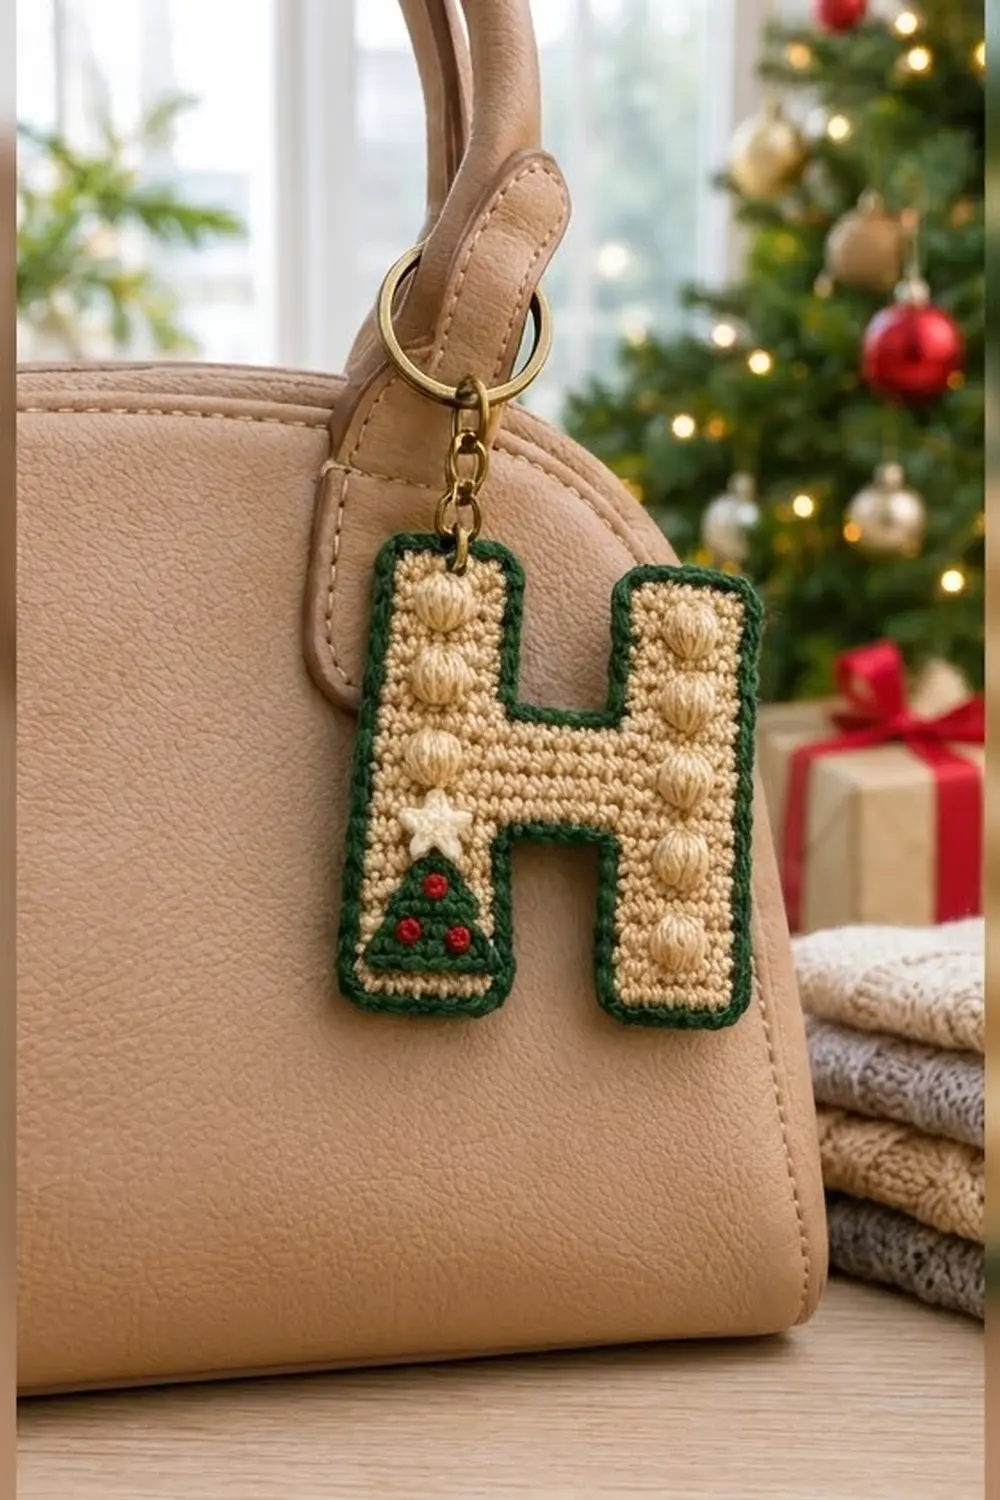
This little letter H is a cozy holiday monogram you can clip to a bag, a set of keys, or a gift as part of the present. The letter is worked in a warm sand-beige single crochet with a column of round puff stitches running up each leg, so it looks like a soft, quilted gingerbread cookie.
A forest-green border with a twisted rope edge frames the letter. A tiny green Christmas tree with red ornaments and a cream star sits on the lower left leg. The style is classic and festive without being loud.
The pattern uses US crochet terms. The finished keychain measures 3.75 in wide x 4.25 in tall (9.5 x 10.8 cm).
The H is worked flat in rows as one piece. You make two short lower legs, join them with a chained crossbar, and then split again for the two upper legs. A beige edging round smooths the outline, and two green rounds finish the border. The tree and star are small separate appliqués sewn on at the end.
Finished Size and Construction
- Finished size: 3.75 x 4.25 in (9.5 x 10.8 cm)
- Skill level: Easy-intermediate
- Terminology: US crochet terms
- Yarn weight: Sport weight (category 2) cotton
- Hook: 2.75 mm (US C-2)
- Number of pieces: 1 letter body, plus 2 small appliqués (tree and star)
- Layout: Single letter H; crossbar centered at mid-height
- Body size after Row 21: 3.0 x 3.5 in (7.6 x 8.9 cm)
- Size before border (after beige edging): 3.25 x 3.75 in (8.3 x 9.5 cm)
- Border depth: 1/4 in (0.6 cm) per side, in 2 green rounds
Materials
Choose a smooth mercerized cotton or cotton blend. Cotton keeps the puffs round and the edges crisp, and it holds up well to daily handling on a keyring. Avoid fuzzy yarns, because they blur the stitch definition.
- Sand/beige (main color): 8 g, about 25 m
- Forest green (border and tree): 4 g, about 12 m
- Cream (star): 1 g, about 3 m
- Red (ornaments): under 1 g, about 1 m (sport yarn or 3 strands of embroidery floss)
Tools:
– 2.75 mm (US C-2) crochet hook
– Tapestry needle
– 1 in (2.5 cm) split keyring with a short chain and jump ring
– Small pliers
– Rust-proof pins and a blocking board
– Scissors
All quantities include a margin for a gauge swatch and sewing tails.
Abbreviations (US Terms)
- ch – chain
- sc – single crochet
- sl st – slip stitch
- sc2tog – single crochet 2 together
- sc3tog – single crochet 3 together
- rev sc – reverse single crochet (crab stitch); sc worked from left to right
- st(s) – stitch(es)
- yo – yarn over
- RS / WS – right side / wrong side
Special stitch – puff: Yo, insert hook in next st, yo and pull up a loop to about 1/4 in (0.6 cm) tall. Repeat from * to * 3 more times in the same st (9 loops on hook). Yo, pull through all 9 loops, then ch 1 to close.
The closing ch 1 is not counted. The puff counts as 1 st. On the next WS row, work your sc into the top of the puff and skip the closing ch, then push the puff toward the RS.
Gauge and Checkpoints
Gauge: 6 sc and 6 rows = 1 in (2.5 cm) in sc worked firmly.
Test before you commit by working the first lower leg (Rows 1–8). It works as your swatch.
Checkpoints:
1. Each lower leg after Row 8: 1.2 in wide x 1.3 in tall (3.0 x 3.3 cm).
2. After Row 13: 3.0 in (7.6 cm) wide and about 2.2 in (5.6 cm) tall. The lower gap measures about 0.7 in (1.8 cm) wide.
3. After Row 21: 3.0 x 3.5 in (7.6 x 8.9 cm). The crossbar is about 0.8 in (2.0 cm) tall.
4. After the beige edging: 3.25 x 3.75 in (8.3 x 9.5 cm).
5. After the border: 3.75 x 4.25 in (9.5 x 10.8 cm).
If your leg is too big, go down to a 2.5 mm hook. If it’s too small, go up to a 3.0 mm hook. Keep the same stitch counts either way. A loose fabric lets the puffs sink, so err on the firm side.
Lower Legs
Left Lower Leg
This leg has no puffs in Rows 3 and 7 because the tree appliqué will cover this area. A flat base lets the tree lie smoothly.
With beige, ch 8.
Row 1 (RS): Sc in 2nd ch from hook and in each ch across, turn. (7 sts)
Rows 2–8: Ch 1 (does not count as a st), sc in each st across, turn. (7 sts)
Fasten off. The leg should measure 1.2 x 1.3 in (3.0 x 3.3 cm).
Right Lower Leg
With beige, ch 8.
Row 1 (RS): Sc in 2nd ch from hook and in each ch across, turn. (7 sts)
Row 2 (WS): Ch 1, sc in each st across, turn. (7 sts)
Row 3 (RS): Ch 1, sc 3, puff in next st, sc 3, turn. (7 sts)
Rows 4–6: Ch 1, sc in each st across, turn. (7 sts)
Row 7: Repeat Row 3. (7 sts)
Row 8 (WS): Ch 1, sc in each st across. (7 sts)
Do not fasten off. Your yarn now sits at the outer (right) edge of the right leg when you view it from the RS.
Crossbar
Row 9 (RS – joining row): Ch 1 and turn. Sc 7 across the right leg, then ch 4. Lay the left leg beside it with the RS facing you and the legs about 0.7 in (1.8 cm) apart. Sc in the first st of the left leg’s Row 8 (its inner edge), then sc in the next 6 sts. Turn.
Count: 7 sc + 4 ch + 7 sc = 18 sts.
Row 10 (WS): Ch 1, sc in each sc and in each ch across, turn. (18 sts)
Row 11 (RS): Ch 1, sc 3, puff, sc 3, sc 4, sc 3, puff, sc 3, turn. (18 sts)
Rows 12–13: Ch 1, sc in each st across, turn. (18 sts)
Row 13 ends at the outer edge of the left leg. Checkpoint: the piece is 3.0 in (7.6 cm) wide.
Upper Legs
Left Upper Leg
Row 14 (WS): Ch 1, sc in the first 7 sts, turn. Leave the remaining 11 sts unworked. (7 sts)
Row 15 (RS): Ch 1, sc 3, puff, sc 3, turn. (7 sts)
Rows 16–18: Ch 1, sc 7, turn. (7 sts)
Row 19: Repeat Row 15. (7 sts)
Rows 20–21: Ch 1, sc 7, turn. (7 sts)
Fasten off.
Right Upper Leg
Row 14 (WS): With the WS facing, skip the 4 unworked center sts of Row 13 after the left leg. Join beige in the 12th st. Ch 1, sc in the same st and in the next 6 sts, turn. (7 sts)
Rows 15–21: Work as for the left upper leg Rows 15–21. (7 sts)
Fasten off.
The left leg now has 3 puffs (Rows 11, 15, 19) and the right leg has 5 (Rows 3, 7, 11, 15, 19). Checkpoint: 3.0 x 3.5 in (7.6 x 8.9 cm).
Beige Edging Round
This round frames the letter in beige before the green border goes on. It also evens out the row ends. Work 1 sc per row end. At outer corners, work 3 sc in the corner st. Do not add or remove stitches at the 4 inner corners.
Rnd 1 (RS): Join beige in the first st of Row 21 on the right upper leg (top outer corner). Ch 1 and work around as follows:
- Top of right leg: 3 sc in the same st, sc 5, 3 sc in the last st. (11)
- Upper gap: 8 sc down the inner edge of the right upper leg, sc in each of the 4 unworked sts of Row 13, then 8 sc up the inner edge of the left upper leg. (20)
- Top of left leg: 3 sc in the first st, sc 5, 3 sc in the last st. (11)
- Outer left side: 21 sc, 1 in each row end. (21)
- Bottom of left leg (working into the foundation ch): 3 sc in the first ch, sc 5, 3 sc in the last ch. (11)
- Lower gap: 8 sc up the left inner edge, 4 sc into the underside of the Row 9 chains, then 8 sc down the right inner edge. (20)
- Bottom of right leg: 3 sc in the first ch, sc 5, 3 sc in the last ch. (11)
- Outer right side: 21 sc. (21)
Sl st to the first sc. Fasten off.
Total: 126 sts (11 + 20 + 11 + 21 + 11 + 20 + 11 + 21).
Checkpoint: 3.25 x 3.75 in (8.3 x 9.5 cm).
Christmas Tree Appliqué
With green, ch 8.
Row 1 (RS): Sc in 2nd ch from hook and in each ch across, turn. (7 sts)
Row 2: Ch 1, sc 7, turn. (7 sts)
Row 3: Ch 1, sc2tog, sc 3, sc2tog, turn. (5 sts)
Row 4: Ch 1, sc 5, turn. (5 sts)
Row 5: Ch 1, sc2tog, sc 1, sc2tog, turn. (3 sts)
Row 6: Ch 1, sc3tog. (1 st)
Fasten off and leave a 12 in (30.5 cm) tail. The tree measures about 1.2 in wide x 1.0 in tall (3.0 x 2.5 cm).
Star Appliqué
With cream, make a magic ring.
Rnd 1: Ch 1, 5 sc in the ring, then sl st to the first sc. (5 sts)
Rnd 2: Ch 3, sl st in 2nd ch from hook, sc in the next ch, sl st in the next sc of Rnd 1. Repeat from * to * 4 more times. (5 points)
Fasten off and leave an 8 in (20.3 cm) tail. The star measures about 0.5 in (1.3 cm) across.
Border
Border gauge: Each green round adds about 1/8 in (0.3 cm) per side. The two rounds together add 1/4 in (0.6 cm) per side.
Rnd 2 (green): Join green in the center sc of the top-right corner group. Ch 1 and work 3 sc in the same st. Then sc in each st around, working 3 sc in the center sc of each of the 8 outer corner groups. Sl st to the first sc.
Total: 142 sts (126 + 16). Counts per edge:
– Each leg top and leg bottom: 15 (4 edges = 60)
– Each outer side: 21 (2 sides = 42)
– Each gap: 20 (2 gaps = 40)
Rnd 3 (green): Ch 1. Working from left to right, rev sc in each st around. (142 sts) Sl st to the first st and fasten off.
Why the math works: Each outer corner needs 2 extra stitches per round to turn without cupping, so 8 corners x 2 = 16. The straight edges stay 1:1. The inner corners get no extra stitches, because extras there would ruffle into the gaps. Rnd 3 is a 1:1 trim round, so the count stays at 142.
Checkpoint: 3.75 x 4.25 in (9.5 x 10.8 cm).
Final Blocking
- Weave in all ends on the body, but keep the appliqué tails.
- Pin the H RS up to 3.75 x 4.25 in (9.5 x 10.8 cm). Place pins at all 8 outer corners and at the 4 inner corners.
- Check that the gaps are square and the crossbar is level.
- Mist lightly with water. Don’t press the puffs flat.
- Let it dry completely.
- Sew the tree to the left lower leg, centered on the leg, with its base about 2 rows above the leg bottom (covering roughly Rows 2–7). Whipstitch around the edges with the green tail.
- With red, make 3 French knots on the tree: one near the center of Row 4 and one near each end of Row 2.
- Sew the star over the tip of the tree so it overlaps the leg fabric above it.
- Open the jump ring with pliers and thread it through the center of the left leg’s top edge, catching the green and beige rounds. Close it securely and add the keyring and chain.
Final Quality-Control Checklist
- Final size is 3.75 x 4.25 in (9.5 x 10.8 cm).
- The legs are 1.2 in (3.0 cm) wide and the gaps are 0.7 in (1.8 cm) wide.
- The crossbar sits at exact mid-height.
- The left leg has 3 visible puffs and the right leg has 5, all popping to the RS.
- Rnd 1 has 126 sts; Rnds 2 and 3 have 142 sts each.
- The corners lie flat, with no ruffling at the inner corners.
- The appliqués are sewn down on all edges.
- The jump ring is fully closed.
Troubleshooting
- Puffs sink to the back: Push each puff forward before working the WS row, and work that row’s stitch into the puff top firmly.
- Puffs look flat: Pull the loops up a little taller.
- Side edges wave: Your row ends are loose. Work the edging with a 2.5 mm hook.
- Inner corners pucker: Replace the 2 stitches at the corner with an sc2tog on Rnd 2 only. The count drops by 1 per corner.
- Corners curl: Make sure the 3-sc groups are in the center stitch.
- Crossbar is crooked: Check that both legs had the RS facing in Row 9.
- Tree is bulky: Whipstitch through the back loops only.
Care
Spot clean with mild soap and cool water, then reshape and air dry flat. Don’t machine wash, because the hardware can scratch the fabric.
Final Notes
The measurement chain is simple:
– 7-stitch legs at 1.2 in (3.0 cm)
– Body at 3.0 x 3.5 in (7.6 x 8.9 cm)
– Edging at 3.25 x 3.75 in (8.3 x 9.5 cm)
– Finished keychain at 3.75 x 4.25 in (9.5 x 10.8 cm)
Check each stage and the finished letter will match. Happy crocheting!