

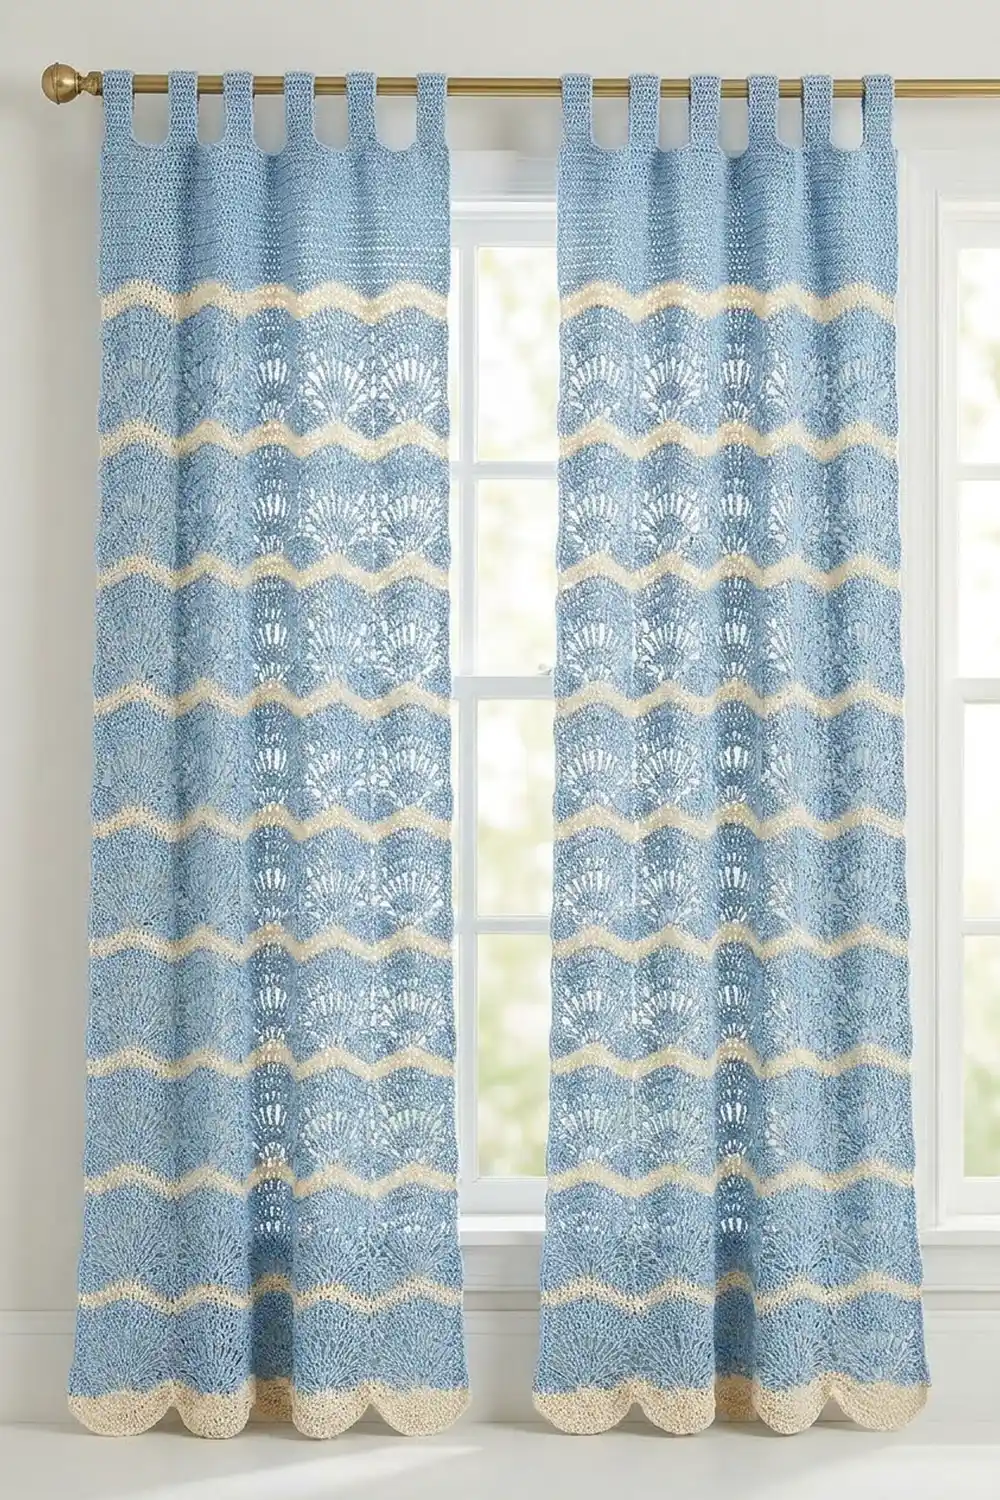
The Seaside Fan Curtain Panel brings a calm coastal look to a window. Columns of open blue fans rise across the panel. Above each row of fans sits a narrow cream band that curves over the fans like small waves. A cream scalloped hem finishes the bottom edge, and blue tabs at the top slide straight onto a curtain rod.
The panel uses two colors: a soft light blue and a warm cream. The fans make the fabric airy, so daylight comes through, while the cream bands add structure and a gentle rhythm. The look suits beach houses, bedrooms, and sunrooms.
The pattern uses US crochet terms. One finished panel measures 36.3 in (92.2 cm) wide and 77 in (195.6 cm) long from hem to top edge. The tabs add 3 in (7.6 cm), so the total hanging height is 80 in (203.2 cm). For a pair, make two panels.
Construction overview. You work the panel in one piece from the bottom up, in a 4-row band that repeats 30 times. Each band has a blue fan row, two cream single crochet rows, and a blue fill row that levels the fabric again. Both colors are carried up one edge, so you don’t cut yarn at every stripe. After the body, you add the cream hem into the foundation chain, a two-row blue border on each long side, a top edge row, and eight tabs.
Finished Size and Construction
- Finished size (one panel): 36.3 × 77 in (92.2 × 195.6 cm), plus 3 in (7.6 cm) tabs
- Skill level: Intermediate
- Terminology: US
- Yarn weight: #4 worsted, cotton or cotton blend
- Hook: 6.0 mm (US J-10)
- Number of pieces: 1 panel. Make a second identical panel for a pair; the panels are never joined.
- Layout: 7 fan columns across, 30 fan bands up
- Piece size before border: 35.3 × 76.75 in (89.7 × 194.9 cm), including the hem
- Side border depth: 0.5 in (1.3 cm) on each long side
- Fan repeat: 16 sts = 5 in (12.7 cm) wide; one band = 2.5 in (6.4 cm) tall
Materials
Yarn. Choose a smooth worsted cotton or cotton blend at about 170 m (186 yd) per 100 g. Cotton drapes well and shows the fan spokes clearly. Avoid fuzzy yarns, which blur the openwork. Buy all skeins of each color from the same dye lot.
For one panel:
– Light blue (main color): 1,000 g, about 1,700 m (1,860 yd)
– Cream (contrast color): 350 g, about 595 m (650 yd)
For a pair, double these amounts. The quantities include a margin of roughly 10% for your swatch and small gauge differences.
Tools:
– 6.0 mm (US J-10) crochet hook
– Tapestry needle
– Locking stitch markers
– Measuring tape
– Scissors
– Blocking mats or a large clean floor area, plus rustproof pins
– Spray bottle or steamer
Abbreviations (US Terms)
- ch: chain
- sc: single crochet
- hdc: half double crochet
- dc: double crochet
- tr: treble crochet
- dtr: double treble crochet
- st(s): stitch(es)
- sp: space
- RS / WS: right side / wrong side
- rep: repeat
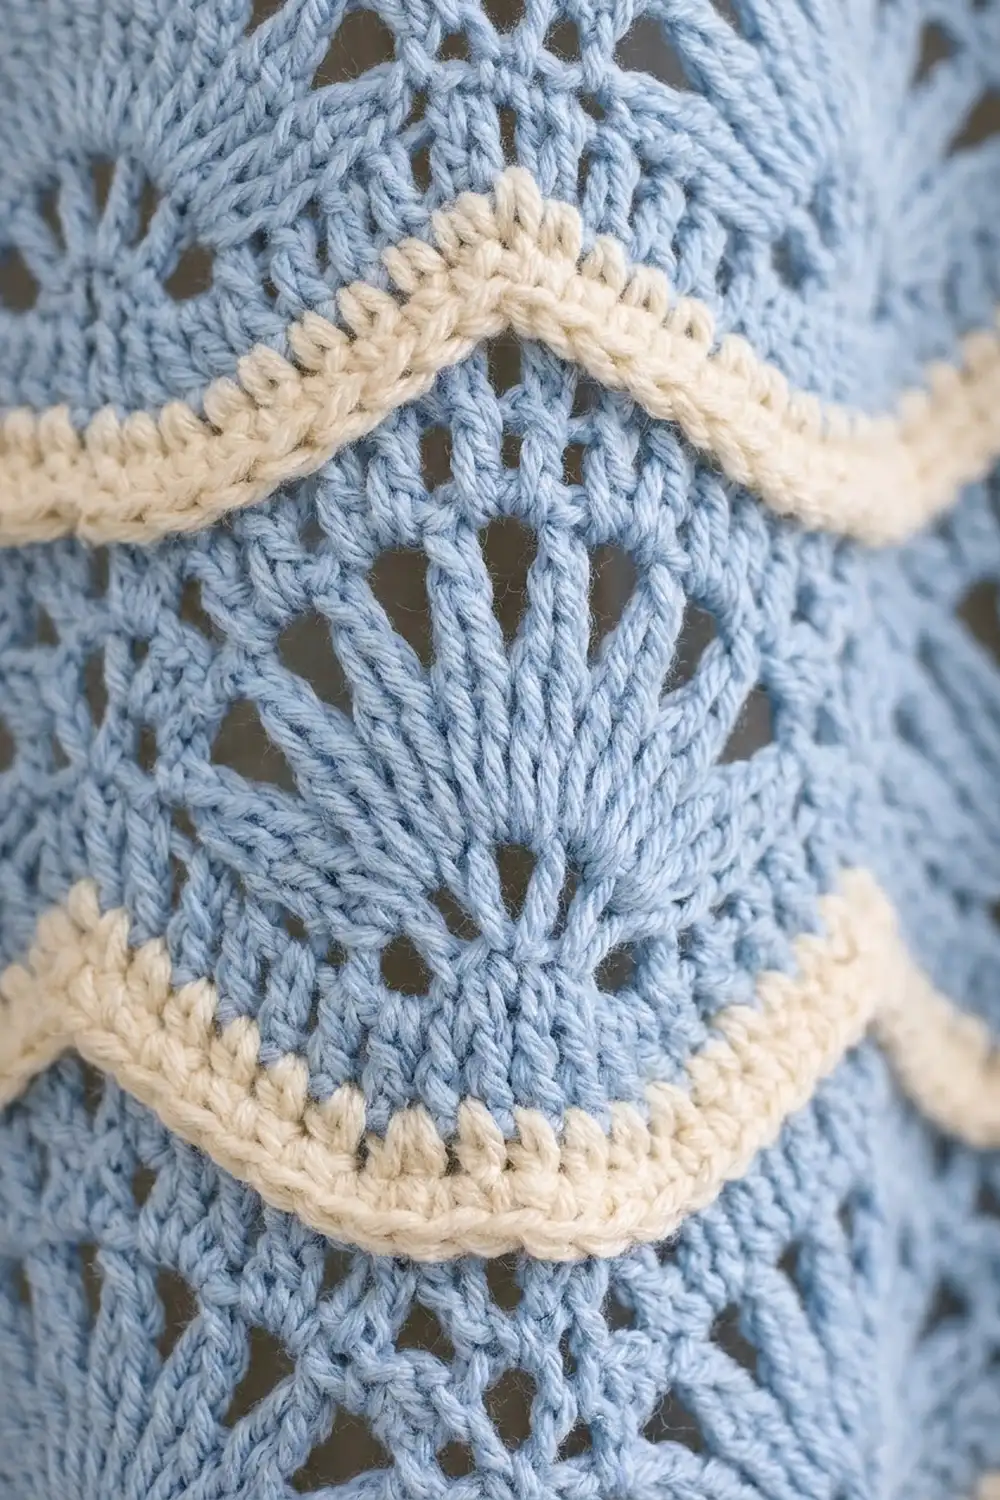
Special stitch: Fan. Work (tr, ch 1) 7 times in the same stitch, then 1 more tr in that stitch. A fan has 8 tr and 7 ch-1 sps, so it counts as 15 sts. In this pattern, every ch-1 sp counts as a stitch.
Gauge and Checkpoints
Gauge: 16 sc = 5 in (12.7 cm) and 4 sc rows = 1 in (2.5 cm), worked with the 6.0 mm hook. In pattern, one 4-row band = 2.5 in (6.4 cm) tall.
Test swatch. Before starting the full panel, make a two-repeat swatch. Ch 34 and work Rows 1–9 as written below; your swatch has 33 sts per row (16 × 2 + 1). Lightly block it. It should measure 10.3 in (26.2 cm) wide and 5.25 in (13.3 cm) tall.
- Swatch too large: go down to a 5.5 mm (US I-9) hook.
- Swatch too small: go up to a 6.5 mm (US K-10.5) hook.
- Width correct but bands too short: pull up your tr and dtr loops a little taller. Don’t change hooks for this.
Checkpoints for the full panel (measure flat, without stretching):
– After Row 1: 35.3 in (89.7 cm) wide
– After Row 41 (band 10): 25.25 in (64.1 cm) long
– After Row 81 (band 20): 50.25 in (127.6 cm) long
– After Row 123: 75.75 in (192.4 cm) long
– After the hem: 76.75 in (194.9 cm) long
Panel Body
Color carrying. Every color change happens at the same edge: the left edge with the RS facing. Drop the color you’re not using and carry it loosely up that edge. The side border will enclose the carried strands later.
Foundation: With light blue, ch 114.
Row 1 (WS): Sc in the 2nd ch from the hook and in each ch across. Turn. (113 sts)
The 4-Row Band (rep 30 times)
Row 2 (RS, fan row, light blue): Ch 1, sc in the first st. Skip 7 sts, work a Fan in the next st, skip 7 sts, sc in the next st. Rep from * 6 more times. Drop blue; do not turn yet. (7 Fans + 8 sc = 7 × 15 + 8 = 113 sts)*
Each Fan grows upward from a single base stitch, so the top edge of this row rises over each fan and dips at each sc.
Row 3 (WS, cream): Turn. Join cream with a sc in the first sc. Sc in each tr and each ch-1 sp of the next Fan (15 sc), then sc in the next sc. Rep from * across. Turn. (113 sts)*
Work at a relaxed tension. This row should follow the curved top of the fans, not flatten it.
Row 4 (RS, cream): Ch 1, sc in each st across. Drop cream. (113 sts)
The cream band now rises over each fan and dips between fans.
Row 5 (WS, fill row, light blue): Turn. Pick up blue from the edge and bring it up loosely. Ch 5 (counts as the first dtr). Tr in the next st, dc in the next 2 sts, hdc in the next 2 sts, sc in the next 5 sts, hdc in the next 2 sts, dc in the next 2 sts, tr in the next st, dtr in the next st. Rep from * 6 more times. Turn. (1 + 7 × 16 = 113 sts)*
Each dtr sits directly above a fan-row sc (a low point), and each group of 5 sc sits over a fan’s crown (a high point). This makes the top edge level again. The center sc of each group of 5 is the 8th st of the repeat. The next Fan goes into that stitch, which keeps the fans lined up in columns.
Rows 6–121: Work Rows 2–5 another 29 times, for 30 bands in all. On each new Row 2, the first sc goes into the turning-ch dtr, and each Fan goes into the center sc of a group of 5. Each row has 113 sts.
Top rows:
– Row 122 (RS): With blue, ch 1, sc in each st across. Turn. (113 sts)
– Row 123 (WS): Ch 1, sc in each st across. Fasten off blue. Cut cream, leaving a 6 in (15.2 cm) tail.
Check: The body should measure 35.3 × 75.75 in (89.7 × 192.4 cm).
Scalloped Hem
Turn the panel upside down with the RS facing. You’ll work into the 113 free loops on the other side of the foundation chain. The center of each scallop falls directly below a fan column.
Hem Row 1 (cream): Join cream with a sc in the first free loop. Skip 2 loops. Hdc in the next loop, dc in the next 4 loops, 5 dc in the next loop, dc in the next 4 loops, hdc in the next loop. Skip 2 loops, sc in the next loop. Rep from * 6 more times. Turn. (1 + 7 × 16 = 113 sts)*
Hem Row 2: Ch 1, sc in the first sc. Sc in the next 7 sts. Work 3 sc in the next st, which is the center dc of the 5-dc group. Sc in the next 7 sts, then sc in the next sc. Rep from * 6 more times. Fasten off. (1 + 7 × 18 = 127 sts)*
The added stitches round out each scallop, and the sc at each skipped section pulls a dip between scallops.
Check: The panel should now be 76.75 in (194.9 cm) long.
Border
The bottom edge needs no extra border because the hem finishes it. The two long sides get two rows of blue sc. The top gets a single edge row, and the tabs are worked from that row.
Border gauge: Same as the main gauge, 16 sc = 5 in (12.7 cm), which is 3.2 sc per inch.
Side stitch placement, per band:
– 1 sc in each cream sc row end (2 sc)
– 3 sc evenly along the fan-row edge
– 3 sc evenly along the dtr at the fill-row edge
That’s 8 sc per band.
Side Border Row 1 (RS, each long side): With the RS facing, join blue at the top corner. Work along the edge in this order:
– 1 sc in each of Rows 123 and 122 (2 sc)
– 8 sc per band for 30 bands (240 sc)
– 1 sc in Row 1 (1 sc)
– 2 sc along Hem Row 1 and 1 sc along Hem Row 2 (3 sc)
Turn. (246 sc)
Work the cream and blue strands you carried up the edge inside these stitches.
Side Border Row 2 (WS): Ch 1, sc in each st across. Fasten off. (246 sc)
Repeat both rows on the other long side.
Why the math works: The edge is 76.75 in (194.9 cm) long. At 3.2 sc per inch it needs about 246 sts, and 246 sc covers 76.9 in (195.3 cm). The difference is under ⅛ in, which blocking takes up, so the sides hang flat without ruffling or pulling in. The two border rows add 0.5 in (1.3 cm) per side, so the width becomes 35.3 + 1.0 = 36.3 in (92.2 cm).
Top Edge Row (RS): With the RS facing, join blue at the top right corner. Work across the top:
– 1 sc in each of the 2 border row ends
– 1 sc in each of the 113 sts of Row 123
– 1 sc in each of the 2 border row ends on the other side
Turn. (2 + 113 + 2 = 117 sts)
This row brings the panel to 77 in (195.6 cm).
Tabs (make 8)
Number the Top Edge Row stitches 1–117. Each tab is worked over 5 sts, with 11 sts between tabs:
– Tab 1: sts 1–5
– Tab 2: sts 17–21
– Tab 3: sts 33–37
– Tab 4: sts 49–53
– Tab 5: sts 65–69
– Tab 6: sts 81–85
– Tab 7: sts 97–101
– Tab 8: sts 113–117
Check the spacing: 8 tabs × 5 sts = 40, plus 7 gaps × 11 sts = 77, for a total of 117. Each tab is 1.6 in (4.1 cm) wide, and each gap is 3.4 in (8.6 cm).
Tab Row 1: Join blue in the first st of the tab, ch 1, sc in the same st and the next 4 sts. Turn. (5 sc)
Tab Rows 2–24: Ch 1, sc in each st across. Turn. (5 sc)
The strip is now 6 in (15.2 cm) long. Fasten off, leaving a 12 in (30.5 cm) tail. Fold the strip to the WS and whipstitch the last row to the back of Row 122. This forms a 3 in (7.6 cm) loop.
Final Blocking
- Weave in all ends inside the side borders or the cream sc rows.
- Lay the panel RS up on mats or a clean floor.
- Pin the long sides straight to 77 in (195.6 cm). Pin the width to 36.3 in (92.2 cm) every 10 in (25.4 cm) along the length.
- Pin each hem scallop at its lowest point, with the scallops 5 in (12.7 cm) apart.
- Open each fan gently with your fingers so the spokes spread evenly.
- Mist the panel until it’s damp, or steam it lightly with the iron held above the fabric, never touching it.
- Leave it until fully dry, usually 24 hours.
- Unpin and hang the panel for another 24 hours before trimming any ends or making final adjustments, since cotton relaxes slightly under its own weight.
Final Quality-Control Checklist
- Every body row has 113 sts.
- There are 30 complete bands and 7 fan columns, and the columns line up straight.
- Each cream band rises over the fans and dips between them.
- The hem has 7 scallops, each centered under a fan column.
- Each side border row has 246 sc.
- The Top Edge Row has 117 sts, and all 8 tabs are evenly spaced.
- Each tab is folded to a 3 in (7.6 cm) loop and sewn securely.
- The panel measures 36.3 × 77 in (92.2 × 195.6 cm), plus the tabs.
- No carried strands show on the RS.
- For a pair, both panels match in length within ½ in (1.3 cm).
Troubleshooting
Fans ruffle or cup. Your tr stitches are too short or too loose at the base. Pull each tr loop to full height and keep the ch-1 sps snug.
The fabric slants or the fan columns drift. Count the 7 skipped sts on each side of every Fan. One miscount shifts the column.
Cream bands look flat instead of wavy. Row 3 was worked too tightly. Relax your tension or try a hook one size larger for the cream rows only.
The top of the fill row isn’t level. Make sure the dtr lands on each fan-row sc and the 5 sc land over each fan crown.
Side edges wave or pucker. Recount the border stitches at 8 sc per band. Wavy edges usually mean too many stitches, and puckered edges mean too few.
The panel grows after hanging. This is common with cotton. Block it again and dry it flat, or work 1 fewer band on your second panel to match the first.
Tabs stretch. Work them a little tighter, or sew the fold with a double strand of yarn.
Care
Hand wash in cool water with mild detergent. Gently press out the water and dry the panel flat. Never hang a wet panel, because its weight will stretch it.
Final Notes
The measurement chain is simple: 16 sts = 5 in (12.7 cm) per fan column, and 4 rows = 2.5 in (6.4 cm) per band. Seven columns plus 1 st give 113 sts, or 35.3 in (89.7 cm). Thirty bands plus the edge rows and hem give 76.75 in (194.9 cm). Two border rows on each side bring the width to 36.3 in (92.2 cm), the Top Edge Row brings the length to 77 in (195.6 cm), and the tabs add 3 in (7.6 cm). If your swatch matches, every later checkpoint will follow. Make a second panel the same way for a matching pair.
Happy crocheting!