

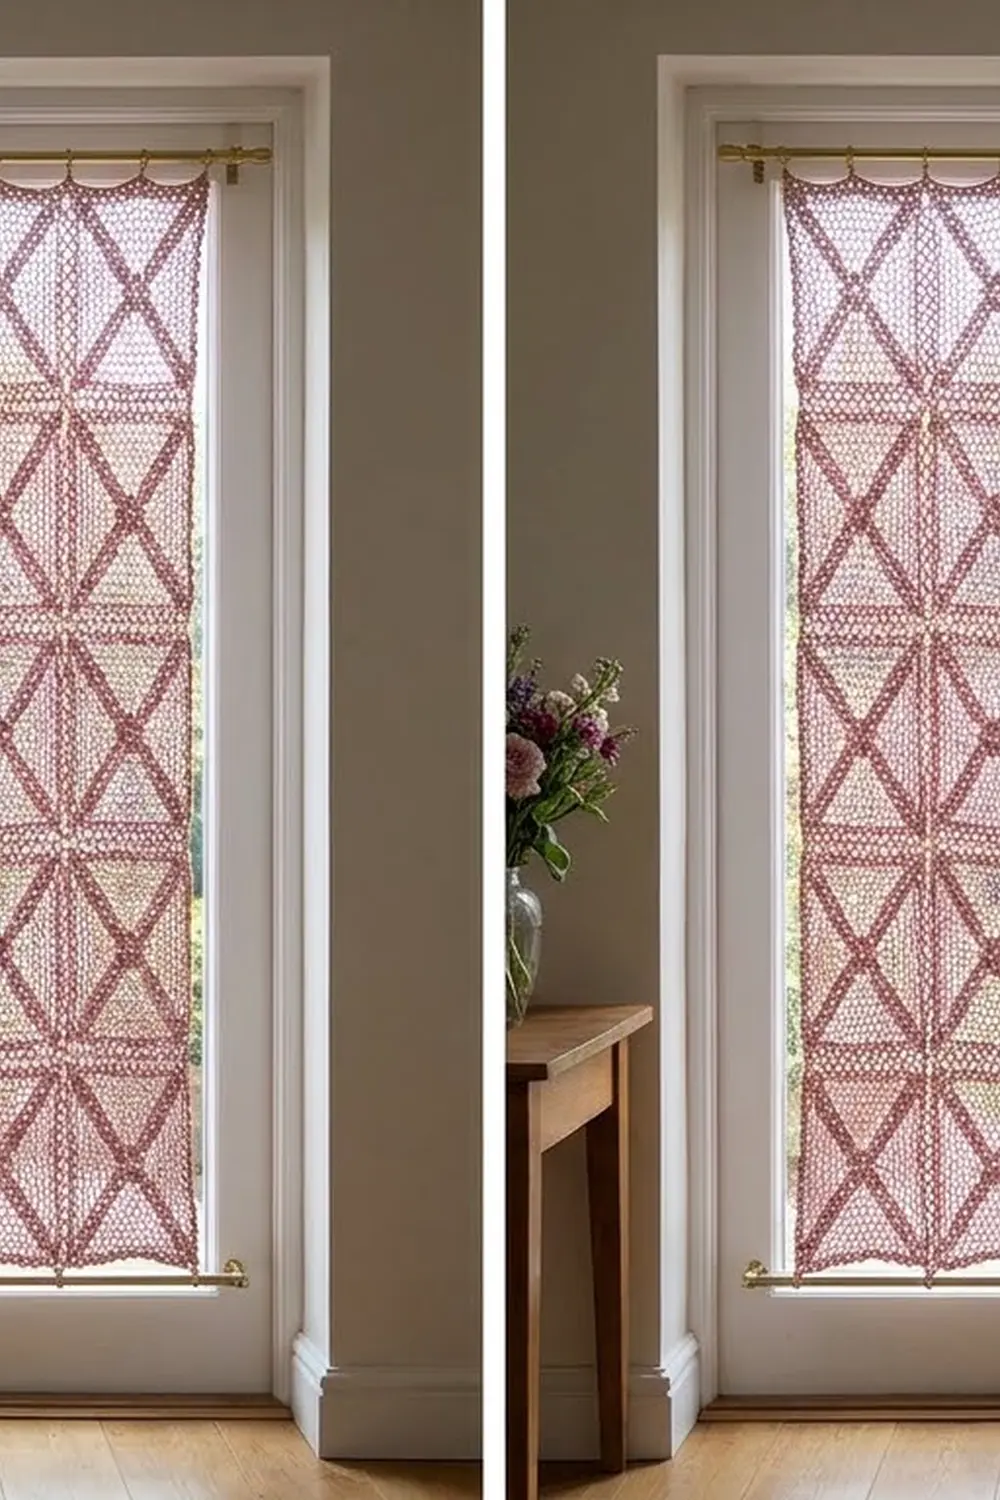
The Rosewood Bowtie Door Panel is a lace curtain for a glass door or a tall, narrow window. It is made from ten rectangular motifs. Each one has a bowtie of two fans that meet at a small center ring, with an open filet mesh frame around it.
The sample is worked in one dusty rose cotton. Light comes through the mesh and between the fan rays, while the solid fan bars give a little privacy. Rods at the top and bottom hold the panel flat against the glass, so it stays still when the door moves.
This pattern uses US crochet terms. The finished panel measures 15.5 x 47.25 in (39.4 x 120.0 cm), not counting the tabs. For French doors like the ones in the photo, make two panels.
The construction is simple. You work each motif in the round from the center out. Then you join the motifs with a flat slip stitch seam in 2 columns of 5 and add a two-round single crochet border. Last, you work five folded tabs on the top edge and five on the bottom edge.
Finished Size and Construction
- Finished size: 15.5 x 47.25 in (39.4 x 120.0 cm), excluding tabs
- Skill level: Intermediate
- Terminology: US
- Yarn weight: Worsted (#4) cotton or cotton blend
- Hook: 5.0 mm (H-8)
- Number of pieces: 10 motifs per panel, plus 10 tabs worked onto the border
- Layout: 2 motifs wide x 5 motifs tall
- Motif size: 7.25 x 9.25 in (18.4 x 23.5 cm)
- Size before border: 14.5 x 46.25 in (36.8 x 117.5 cm)
- Border depth: 0.5 in (1.3 cm) on each side
Materials
Yarn: Use a smooth worsted cotton, either mercerized or matte. Cotton holds lace shapes well, stands up to sunlight and washing, and won’t stretch out on a rod. Avoid fuzzy yarns, because they blur the fan rays.
- Dusty rose: 300 g, about 510 m (558 yd), for one panel. For a pair, double this to 600 g, about 1,020 m (1,115 yd).
These amounts include a margin of about 20%. One motif uses about 20 g (34 m / 37 yd). The joins, border, and tabs use about 50 g together.
Tools:
- 5.0 mm (H-8) crochet hook
- Tapestry needle
- Locking stitch markers
- Rust-proof pins and a blocking surface
- Spray bottle
- Two slim sash rods, 5/8 in (1.6 cm) in diameter or narrower
Abbreviations (US Terms)
- ch – chain
- sl st – slip stitch
- sc – single crochet
- hdc – half double crochet
- dc – double crochet
- tr – treble crochet
- sp(s) – space(s)
- st(s) – stitch(es)
- RS / WS – right side / wrong side
- BLO – back loop only
Special technique: hdc corner join. At the end of a round, don’t chain 3 and join. Instead, ch 1 and hdc in the top of the beginning chain. This closes the round and makes a space the size of a ch-3 corner space. Your hook is left sitting in the corner, ready to start the next round.
Gauge and Checkpoints
Base gauge: 16 sc and 16 rows = 4 in (10.2 cm) in sc, which is 4 sc and 4 rows per 1 in (2.5 cm).
Lace gauge only means something on a finished motif. Make one full motif first, block it lightly, and measure it before you make the rest.
Motif checkpoints:
- After Rnd 1: about 1.5 in (3.8 cm) across.
- After Rnd 3: about 3.5 in (8.9 cm) from the top fan edge to the bottom fan edge.
- After Rnd 5: about 6.25 x 8 in (15.9 x 20.3 cm).
- After Rnd 7: 7.25 x 9.25 in (18.4 x 23.5 cm).
If your motif is too big, use a 4.5 mm (7) hook. If it is too small, use a 5.5 mm (I-9) hook. Being off by 0.25 in (0.6 cm) per motif adds up to 1.25 in (3.2 cm) over a column of five motifs.
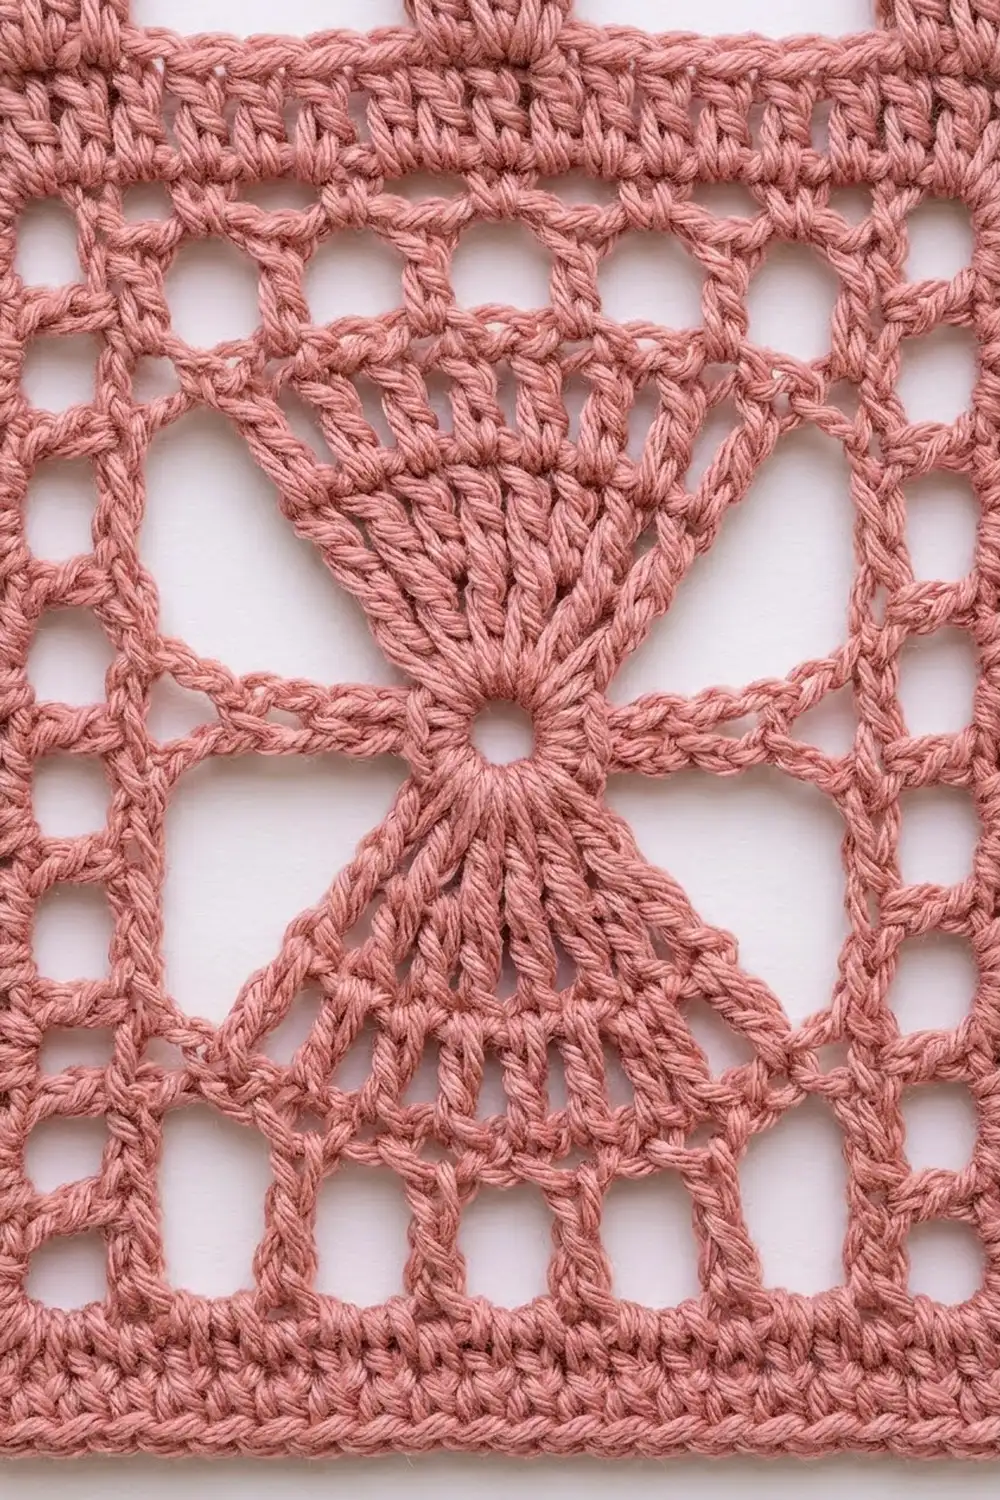
Motif (Make 10)
Every round starts at the first stitch of the top fan. The two fans become the short edges (top and bottom), and the net-filled waist becomes the long edges (sides).
Rnd 1: Ch 6 and sl st in the first ch to form a ring. Ch 3 (counts as dc), 6 dc in ring (top fan), ch 5, 7 dc in ring (bottom fan), ch 5, sl st to top of beg ch-3.
(14 dc, 2 ch-5 sps.)
Rnd 2 (rays): Ch 4 (counts as dc + ch 1), [dc in next dc, ch 1] 5 times, dc in next dc, ch 5, sc in next ch-5 sp, ch 5, [dc in next dc, ch 1] 6 times, dc in next dc, ch 5, sc in next ch-5 sp, ch 5, sl st to 3rd ch of beg ch-4.
(Each fan: 7 dc and 6 ch-1 sps. Each side: 1 sc and 2 ch-5 sps. Total: 14 dc, 12 ch-1 sps, 2 sc, 4 ch-5 sps.)
Rnd 3 (solid bar): Ch 3 (counts as dc), [dc in next ch-1 sp, dc in next dc] 6 times, ch 4, sc in next ch-5 sp, ch 4, sc in next ch-5 sp, ch 4, dc in next dc, [dc in next ch-1 sp, dc in next dc] 6 times, ch 4, sc in next ch-5 sp, ch 4, sc in next ch-5 sp, ch 4, sl st to top of beg ch-3.
(Each fan: 13 dc. Each side: 2 sc and 3 ch-4 sps. Total: 26 dc, 4 sc, 6 ch-4 sps.)
Rnd 4 (rays): Ch 4 (counts as dc + ch 1), [dc in next dc, ch 1] 11 times, dc in next dc, ch 4, [sc in next ch-4 sp, ch 4] 3 times, [dc in next dc, ch 1] 12 times, dc in next dc, ch 4, [sc in next ch-4 sp, ch 4] 3 times, sl st to 3rd ch of beg ch-4.
(Each fan: 13 dc and 12 ch-1 sps. Each side: 3 sc and 4 ch-4 sps. Total: 26 dc, 24 ch-1 sps, 6 sc, 8 ch-4 sps.)
Rnd 5 (squaring):
- Top edge: Ch 3 (counts as dc), [dc in next ch-1 sp, dc in next dc] 12 times. This gives 25 dc across the top. Ch 3 for the corner.
- First long side: In each of the next 4 ch-4 sps, work [(tr, ch 1) 3 times, tr]. Ch 1 between sps, and skip all the sc. Ch 3 for the corner.
- Bottom edge: Dc in each dc and each ch-1 sp across the bottom fan (25 dc). Ch 3 for the corner.
- Second long side: Work it the same as the first long side. Finish with the hdc corner join.
(Each short side: 25 dc. Each long side: 16 tr and 15 ch-1 sps. Total: 50 dc, 32 tr, 30 ch-1 sps, 4 corner sps.)
Rnd 6 (mesh frame): Ch 3 (counts as dc) in the corner sp, ch 1, skip first dc, [dc in next dc, ch 1, skip next dc] 12 times, (dc, ch 3, dc) in corner sp, ch 1, [dc in next tr, ch 1] 16 times (skip the ch-1 sps), (dc, ch 3, dc) in corner sp. Repeat the short side and the long side once more. Then dc in the beginning corner sp and finish with the hdc corner join.
(Each short side: 14 dc, including both corner dc, and 13 ch-1 sps. Each long side: 18 dc, including both corner dc, and 17 ch-1 sps. Total: 64 dc, 60 ch-1 sps, 4 corner sps.)
Rnd 7 (sc frame): Ch 1, sc in corner sp, sc in each dc and each ch-1 sp to next corner, (sc, ch 2, sc) in corner sp; repeat from * around, ending with sc in the beginning corner sp, ch 2, sl st to first sc. Fasten off.
(Each short side: 29 sc. Each long side: 37 sc. Each count includes that side’s 2 corner sc. Total: 132 sc, 4 ch-2 corner sps.)*
Count check: Short side: 1 + 14 + 13 + 1 = 29. Long side: 1 + 18 + 17 + 1 = 37. At 4 sc per inch, 29 sc = 7.25 in (18.4 cm) and 37 sc = 9.25 in (23.5 cm).
Make All Pieces
Make 10 motifs in dusty rose for one panel (about 200 g), or 20 for a pair. Block each motif to 7.25 x 9.25 in (18.4 x 23.5 cm). Turn every motif so its long edges are vertical.
[ M ][ M ]   row 1 (top)
[ M ][ M ]   row 2
[ M ][ M ]   row 3
[ M ][ M ]   row 4
[ M ][ M ]   row 5 (bottom)
Joining
Method: Use a flat slip stitch seam, worked in the BLO from the RS. It lies flat and makes the thin ridge you can see between the motifs.
Columns: Place two motifs RS up with their short edges touching. Sl st through both corner ch-2 sps. Then sl st through the BLO of each matching pair of sc, 29 to 29. Finish through the next pair of corner ch-2 sps. Join five motifs this way to make a column (4 seams), then make a second column.
Center seam: Join the two columns along their long edges, working 37 to 37 for each motif, or 185 sts in total. Where the seams cross, sl st through all the corner ch-2 sps that meet there.
Tension: Keep the slip stitches as loose as the sc underneath. If yours come out tight, go up one hook size for joining. Tight seams pucker the lace and make the panel shorter.
Checkpoint: The joined panel should measure 14.5 x 46.25 in (36.8 x 117.5 cm). The BLO seams add no stitches.
Border
Border gauge: 4 sc and 4 rows per 1 in (2.5 cm).
Rnd 1: With RS facing, join yarn in the first sc of the top edge. Sc in each sc around. At each of the 4 outer corners, sc in the last st, ch 2, then sc in the first st of the next side. Do not work into the seam corner ch-2 sps; they aren’t counted. Sl st to first sc.
(Top and bottom: 2 x 29 = 58 sc each. Sides: 5 x 37 = 185 sc each. Total: 486 sc, 4 corner sps.)
Rnd 2: Ch 1, sc in each sc around, working (sc, ch 2, sc) in each corner sp. Sl st to first sc and fasten off.
(Top and bottom: 60 sc each. Sides: 187 sc each. Each count includes that side’s 2 new corner sc. Total: 494 sc.)
Why the math works: At 4 sc per inch, 58 sts is exactly 14.5 in (36.8 cm) and 185 sts is exactly 46.25 in (117.5 cm). That matches the joined panel, so Rnd 1 won’t flare or pull in. In Rnd 2, the only added stitches are at the corners, where they help the border turn. Each border round is 0.25 in (0.6 cm) deep, so the two rounds add 0.5 in (1.3 cm) per edge. The finished panel is 15.5 x 47.25 in (39.4 x 120.0 cm).
Tabs (5 on Top, 5 on Bottom)
Number the 60 top-edge sts of Rnd 2 from 1 to 60, so the corner sc are sts 1 and 60. Work a tab over each of these groups: sts 2–7, 15–20, 28–33, 41–46 and 54–59. Check: 1 + (5 x 6) + (4 x 7) + 1 = 60.
Row 1: With RS facing, join yarn in the first st of the tab and sc in 6 sts. Turn.
Rows 2–12: Ch 1, sc in each st across, turn. (6 sc)
Each tab measures 1.5 x 3 in (3.8 x 7.6 cm). Fasten off, leaving a 10 in (25.4 cm) tail. Fold the tab to the WS and sew Row 12 to the back of Border Rnd 1. The loop fits a rod up to 5/8 in (1.6 cm) in diameter. Repeat the tabs on the bottom edge.
Final Blocking
- Weave in the ends through solid sc or along seams, not across the mesh.
- Pin the panel to 15.5 x 47.25 in (39.4 x 120.0 cm). Pin the corners first, then the middle of each side.
- Pin each point where seams cross so the motifs stay square.
- Ease each fan open by hand so the rays spread evenly.
- Mist the panel until it’s damp, not dripping.
- Let it dry completely, which takes about 24 hours.
- Unpin it, flatten the tabs, and measure again.
Final Quality-Control Checklist
- Every motif has 29 sc on its short sides and 37 sc on its long sides.
- All bowties point the same way.
- Each column measures 46.25 in (117.5 cm) before the border.
- The border has 58 and 185 sts per side in Rnd 1, and 60 and 187 in Rnd 2.
- The top and bottom tabs line up with each other.
- No seam puckers.
- All ends are hidden and secure.
Troubleshooting
- The fans cup or ruffle: Go down half a hook size for Rnds 3 and 5.
- The motif comes out square: Check that Rnd 5 has 4 tr in each ch-4 sp and Rnd 6 has 16 mesh units on each long side.
- The center seam waves: Count 37 sts per motif and redo any section that’s off.
- The border flares: You worked into the seam ch-2 sps. Pull out the border and skip them.
- The tabs twist: Sew each fold straight, not at an angle.
- The panel sags: Move the rods slightly farther apart.
Care
Hand wash, or machine wash cold on a gentle cycle in a mesh bag. Reshape the panel and dry it flat or on its rods.
Final Notes
Each stage of this panel builds on the one before. A gauge of 4 sc per inch gives a 7.25 x 9.25 in (18.4 x 23.5 cm) motif. Ten motifs in a 2 x 5 layout make a 14.5 x 46.25 in (36.8 x 117.5 cm) panel. The border starts with exactly 58 and 185 sts, adds 0.5 in (1.3 cm) per edge, and finishes at 15.5 x 47.25 in (39.4 x 120.0 cm). Space the rods about 48.75 in (123.8 cm) apart, center to center. Test the spacing against your door before you drill.
Happy crocheting!