

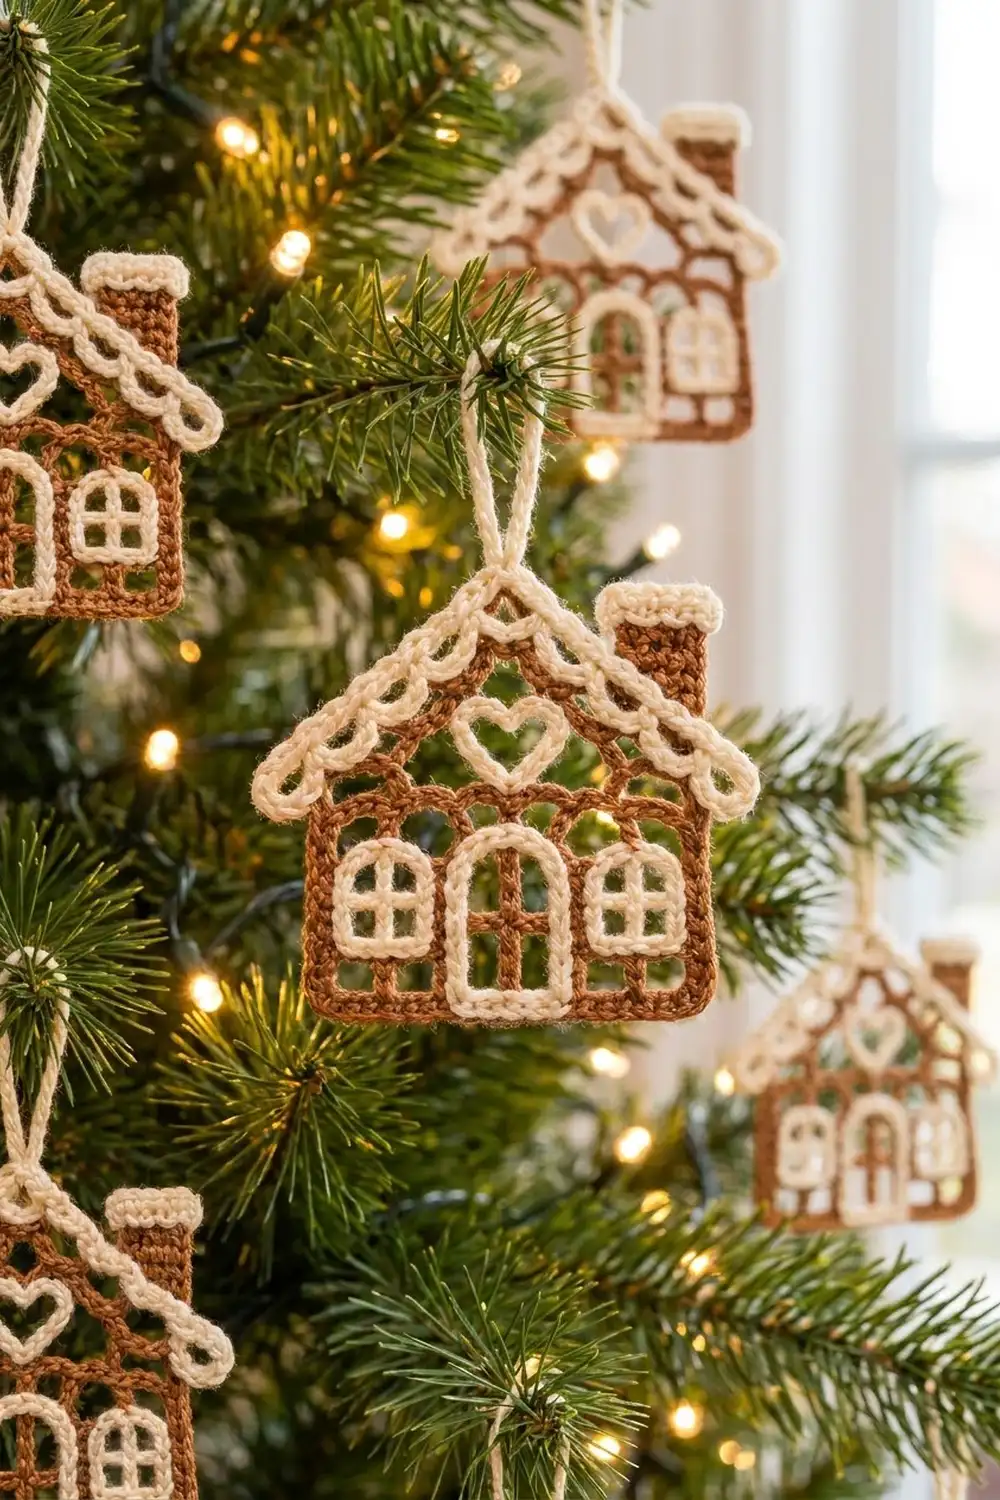
This little gingerbread house looks like it was piped with royal icing. The walls and gable are an airy cinnamon-brown filet lattice. Crisp cream outlines mark the windows, the arched door, and a small heart under the roof peak. A row of plump cream scallops runs along the roofline, and a tiny chimney with a snowy cap peeks up on the right.
The palette is just two colors: warm cinnamon brown and soft cream. The style is lacy but neat. When it hangs on the tree, the open mesh lets the lights glow through, so it looks delicate without being fussy.
The finished ornament measures about 5 in (12.7 cm) wide and 4¼ in (10.8 cm) tall, not counting the 1½ in (3.8 cm) hanging loop. This pattern uses US crochet terms throughout.
Here’s the construction. You crochet the house as one flat filet-mesh piece from the bottom up, decreasing for the gable. Next comes a brown single crochet edging round. Then you add the cream roof trim and surface-crocheted window and door outlines directly onto the piece. A small chimney and a heart outline are made separately and sewn on.
Finished Size and Construction
- Finished size: about 5 in × 4¼ in (12.7 × 10.8 cm), plus a 1½ in (3.8 cm) loop
- Skill level: Intermediate (basic filet mesh, surface slip stitch)
- Terminology: US
- Yarn weight: Sport (#2) cotton
- Hook: 3.25 mm (US D-3)
- Number of pieces: 1 main house, plus 2 small appliqués (chimney, heart)
- Layout: single ornament, no joining
- Mesh piece size: 10 squares wide × 9 rows tall
- Size before border: 4.0 in × 3.6 in (10.2 × 9.1 cm)
- Border depth: brown edging ⅛ in (0.3 cm) per side; the cream roof scallops stick out about ⅜ in (1.0 cm)
Materials
Use a smooth mercerized cotton. It gives crisp stitch definition and blocks flat. Pick a warm, medium cinnamon or ginger brown, and an off-white or ivory instead of stark white so the “icing” looks soft.
- Cinnamon brown: 10 g, about 30 m (33 yd)
- Cream: 6 g, about 18 m (20 yd)
These quantities include a margin of roughly 25% for swatching and weaving in ends.
Tools:
– 3.25 mm (US D-3) crochet hook
– Tapestry needle
– Scissors
– Rust-proof pins and a blocking board
– Optional: fabric stiffener or spray starch
Abbreviations (US Terms)
- ch – chain
- sl st – slip stitch
- sc – single crochet
- dc – double crochet
- sk – skip
- sp – space
- st(s) – stitch(es)
- RS – right side
- WS – wrong side
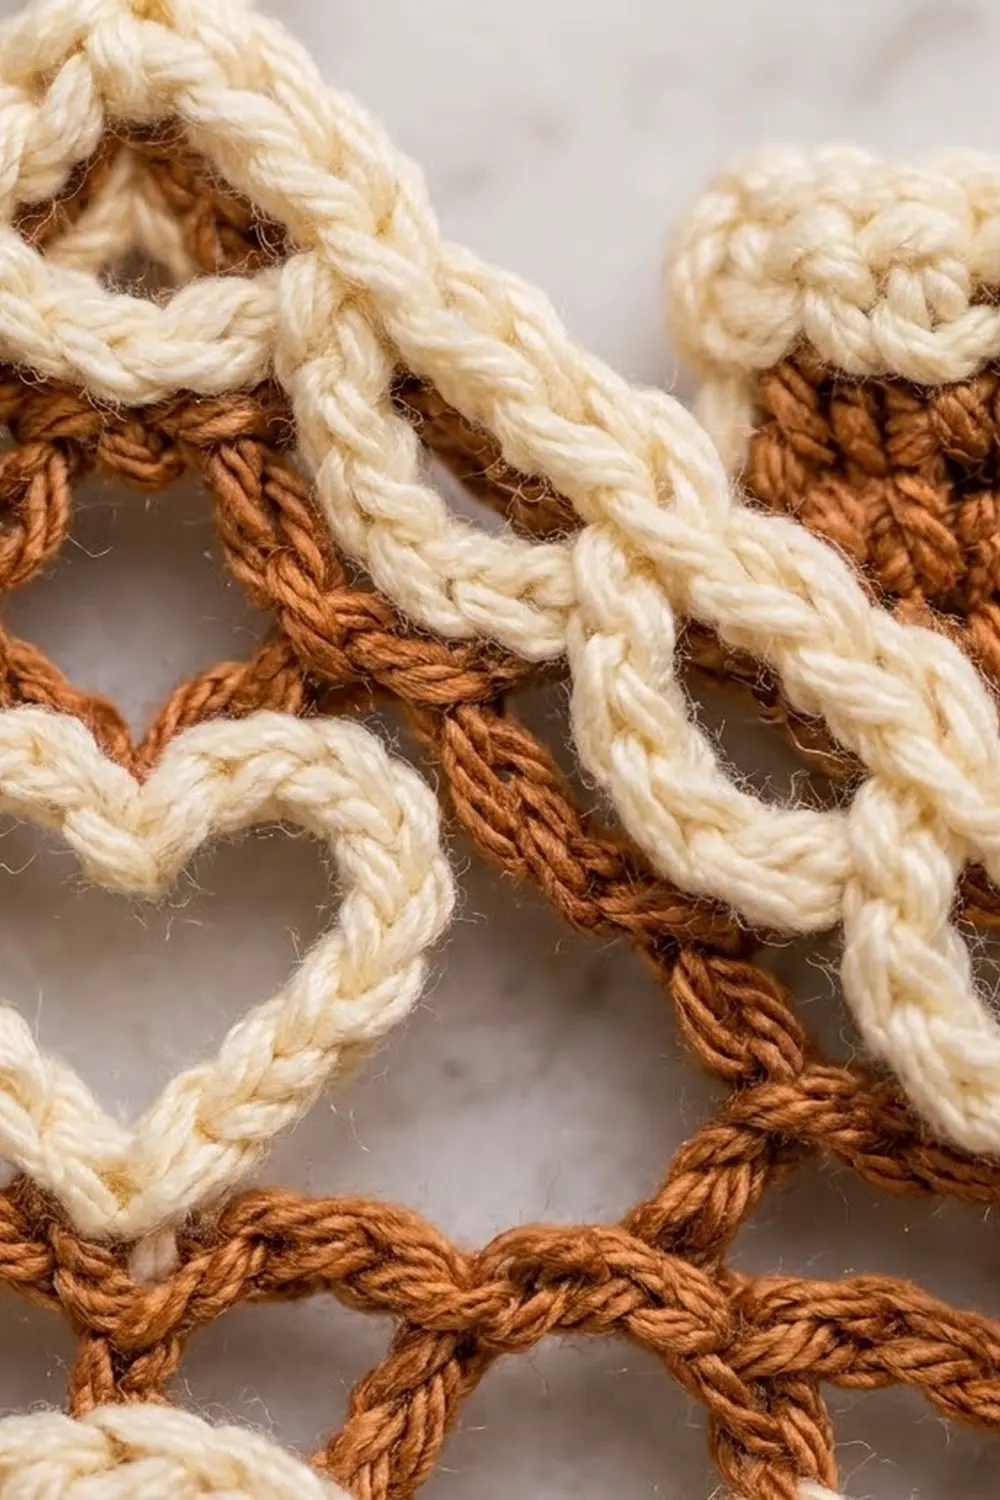
Special stitch: surface slip stitch. Hold the yarn at the back of the work. Insert the hook from front to back through the work, yarn over at the back, and pull a loop through to the front and through the loop on your hook. On this ornament you work 2 surface sl sts along each 0.4 in (1.0 cm) edge of a mesh square, running right along the brown bar.
Mesh square: one dc post plus one ch-1 bar, closed off by the next dc.
Gauge and Checkpoints
- Filet mesh: 5 squares × 5 rows = 2 in (5.1 cm). One square is 0.4 in (1.0 cm) each way.
- Single crochet: 5 sc × 5 rows = 1 in (2.5 cm).
Work Rows 1–3 of the house first and measure before you go any further.
Checkpoints:
– After Row 1: 4.0 in (10.2 cm) wide
– After Row 5: 2.0 in (5.1 cm) tall
– After Row 9: 3.6 in (9.1 cm) tall at the peak
– After the edging: 4.25 in × 3.85 in (10.8 × 9.8 cm)
If your piece is too big, go down to a 3.0 mm hook. If it’s too small, go up to a 3.5 mm hook. If only the height is off, adjust how tall you make your dc. Pull the first loop up to the height of the ch-4 turning chain.
Main House (Cinnamon Brown)
Foundation: Ch 24.
Row 1 (RS): Dc in 6th ch from hook. The 5 skipped chs count as dc, ch 1, and a skipped ch. Ch 1, sk next ch, dc in next ch 9 times. Turn.
(10 squares: 11 dc + 10 ch-1 sps = 21 sts)
Rows 2–5: Ch 4 (counts as dc + ch 1), dc in next dc, ch 1, dc in next dc 8 times, ch 1, dc in 3rd ch of turning ch. Turn.
(10 squares, 21 sts per row)
These 5 rows form the walls, which measure 4.0 in × 2.0 in (10.2 × 5.1 cm). Number the squares 1–10 from left to right with the RS facing. You’ll need these numbers for the windows and door.
Gable
Each gable row moves in by one square at the start and leaves one square unworked at the end.
Row 6: Sl st in first dc, sl st in ch-1 sp, sl st in next dc. Ch 4 (counts as dc + ch 1), dc in next dc, ch 1, dc in next dc 7 times. Leave the last square unworked. Turn.
(8 squares: 9 dc + 8 ch-1 sps = 17 sts)
Row 7: Sl st in first dc, ch-1 sp, and next dc. Ch 4, dc in next dc, ch 1, dc in next dc 5 times. Turn.
(6 squares: 7 dc + 6 ch-1 sps = 13 sts)
Row 8: Sl st in first dc, ch-1 sp, and next dc. Ch 4, dc in next dc, ch 1, dc in next dc 3 times. Turn.
(4 squares: 5 dc + 4 ch-1 sps = 9 sts)
Row 9: Sl st in first dc, ch-1 sp, and next dc. Ch 4, dc in next dc, ch 1, dc in next dc. Do not fasten off.
(2 squares: 3 dc + 2 ch-1 sps = 5 sts)
Checkpoint: 4.0 in wide × 3.6 in tall (10.2 × 9.1 cm). Each roof slope now has 4 even “steps.”
Chimney (Cinnamon Brown + Cream)
Foundation: With brown, ch 5.
Row 1: Sc in 2nd ch from hook and in each ch across. Turn. (4 sc)
Rows 2–9: Ch 1, sc in each st across. Turn. (4 sc)
Fasten off brown and join cream.
Row 10: Ch 1, sc in each st across. Turn. (4 sc)
Row 11 (snow cap): Ch 1, 2 sc in first st, sc in next 2 sts, 2 sc in last st.
(4 worked 1-per-st + 2 extra = 6 sc)
Fasten off and leave a 6 in (15.2 cm) tail. The chimney measures 0.8 in × 2.2 in (2.0 × 5.6 cm). The cap flares out slightly past the brown.
Heart (Cream)
Ch 16 and join with a sl st to form a ring.
Rnd 1: Ch 1, work 20 sc into the ring, join with a sl st to the first sc. (20 sc)
Fasten off and leave an 8 in (20.3 cm) tail. Pinch the ring into a heart. Fold one point down for the top dip, and pull the opposite side into the bottom point. It should be about 1 in (2.5 cm) wide.
Border
Border Gauge
The edging works out to about 5 sc per 1 in (2.5 cm) along straight edges. Each part of the edge gets its own stitch count:
– Bottom: 1 sc per foundation ch (21 chs over 4.0 in)
– Sides: 2 sc around each dc row-end. A dc row is 0.4 in (1.0 cm), which equals 2 sc.
– Slope steps: 3 sc for each diagonal step. A step is about 0.57 in (1.4 cm) long, and 3 sc covers that.
Round 1: Brown Edging
Continue with the brown loop from Row 9, or rejoin brown at the bottom-left corner. With the RS facing, work all the way around:
- Bottom: 3 sc in first foundation ch (corner), sc in each of the next 19 chs, 3 sc in last foundation ch (corner). (21 worked 1-per-ch + 4 extra = 25 sc)
- Right side: 2 sc around each of the 5 row-end posts. (10 sc)
- Right slope: 3 sc for each of the 4 steps, worked around the post and over the ledge. (12 sc)
- Peak: 2 sc in first ch-1 sp, 3 sc in center dc, 2 sc in next ch-1 sp. (7 sc)
- Left slope: 3 sc for each of the 4 steps. (12 sc)
- Left side: 2 sc around each of the 5 row-end posts. (10 sc)
Join with a sl st to the first sc.
Total: 25 + 10 + 12 + 7 + 12 + 10 = 76 sc
Fasten off. The piece now measures 4.25 in × 3.85 in (10.8 × 9.8 cm).
Why the math works: The bottom has 1 sc per chain, and the 2 corner groups give you the 90° turns. The sides use 2 sc per dc row because a dc row is as tall as 2 sc. The slopes use 3 sc per step to cover the longer diagonal without ruffling. The 3 sc in the center dc forms a soft point at the peak. Each count is listed only once, so no corner stitches are counted twice.
Roof Trim (Cream)
The trim covers 31 sts: 12 on the right slope, 7 across the peak, and 12 on the left slope.
Row A (RS): Join cream in the first sc of the right slope at the eave. Sc in each of the 12 right-slope sc, 7 peak sc, and 12 left-slope sc. Turn. (31 sc)
Row B (WS): Ch 1, sc in first sc, ch 5, sk 2 sts, sc in next st 10 times. Turn.
(11 sc + 10 ch-5 loops)
31 = 1 + (3 × 10), so the row comes out even. The 6th sc lands on stitch 16, which is the exact center of the peak. That gives you 5 scallops on each slope.
Row C (RS): Ch 1, sl st in next sc, 7 sc in next ch-5 loop 10 times, sl st in last sc.
(70 sc + 11 sl sts)
Fasten off. The thick loops stay open in the middle and stand out about ⅜ in (1.0 cm) past the brown edge.
Hanging Loop (Cream)
Join cream with a sl st in the center sc of Row B (the 6th sc, at the peak). Ch 20, then sl st in the same st to form a loop. Work 24 sc into the loop and sl st to the base. Fasten off. The loop stands about 1½ in (3.8 cm) tall.
Windows and Door (Cream, Surface Slip Stitch)
Work 2 surface sl sts along each square edge.
Windows (make 2): The left window covers squares 2–3 and the right window covers squares 8–9, both in Rows 2–3.
1. Surface sl st around the outer edge of the 2 × 2 block. (8 edges × 2 = 16 sl sts)
2. Work up the center post. (4 sl sts)
3. Work across the center bar. (4 sl sts)
That’s 24 sl sts per window. Ease the top corners slightly so they look rounded, then fasten off.
Door: The door covers squares 5–6 in Rows 1–3.
1. Starting at the bottom of the left post, surface sl st up the post. (6 sl sts)
2. Ch 7 loosely for the arch and sl st at the top of the right post.
3. Surface sl st down the right post. (6 sl sts)
4. Fasten off. Join again at the bottom of the center post and surface sl st up it. (6 sl sts)
5. Work across the bar at the top of Row 2. (4 sl sts)
Tack the center of the arch to the Row 4 mesh just above it so it holds a rounded curve.
Sewing On the Appliqués
- Heart: Center it in the gable over squares 5–6, Rows 6–7. Whipstitch it at the top dip, the point, and both sides.
- Chimney: Place it behind the right slope with its right edge about ½ in (1.3 cm) in from the eave. About 1.0 in (2.5 cm) should show above the roof, including the cap. Sew it to the back of the edging and the mesh.
Final Blocking
- Weave in all ends along brown bars on the WS so they don’t show through the mesh.
- Wet the ornament with cool water and press out the excess in a towel.
- Pin it to 4.25 in × 3.85 in (10.8 × 9.8 cm) at the brown edging, with a pin at each corner and one at the peak.
- Pin the mesh squares straight. Use a ruler to check that each square is 0.4 in (1.0 cm).
- Fan out the cream scallops evenly and pin each one through its center.
- Shape the hanging loop and the door arch.
- Optional: mist with starch or brush on diluted stiffener.
- Let it dry completely before you unpin it.
Final Quality-Control Checklist
- Walls are 10 squares wide and 5 rows tall; gable rows have 8, 6, 4, and 2 squares
- Edging has 76 sc and lies flat with no ruffles
- Roof trim has 5 scallops per side, and they’re symmetrical at the peak
- Both windows show a cream outline and cross bars
- Door is centered, with an arch and a center bar
- Heart is centered and its outline is clearly visible
- Chimney stands upright and its cap rises above the roofline
- Loop is centered at the peak and strong enough to hang
- All ends are woven in invisibly
Troubleshooting
- Mesh is slanting: Your turning ch-4 is too loose. Tighten it, or use a ch 3 + ch 1 rhythm with even tension.
- Slopes are uneven: Check that you did 1 square of sl sts at the start of every gable row and left 1 square unworked at the end.
- Edging ruffles: Use 2 sc per slope step instead of 3, or go down a hook size for the edging only.
- Edging cups: Check that each corner has 3 sc.
- Row B doesn’t land on the center: Recount Row A. It must have exactly 31 sc.
- Surface sl sts pucker: Work looser, or go up one hook size for the cream details.
- Heart looks round: Pinch the dip more firmly and add a tacking stitch there.
Care
Hand wash in cool water and lay flat to dry, re-pinning to shape if needed. Store flat or hang it so the scallops don’t get crushed.
Final Notes
The measurements build on each other. Each 0.4 in (1.0 cm) mesh square adds up to walls of 4.0 in × 2.0 in (10.2 × 5.1 cm). The gable brings the piece to 3.6 in (9.1 cm) tall. The 76-st edging brings it to 4.25 in × 3.85 in (10.8 × 9.8 cm). The cream scallops then take the finished ornament to about 5 in × 4¼ in (12.7 × 10.8 cm). If you check your gauge at the first square, everything after it falls into place.
Happy crocheting!