

The Blue Harbor Chevron Curtain Panel is a lacy ripple curtain with clean zigzag stripes in dusty blue and soft cream. Solid double crochet rows give each stripe a firm outline. Open mesh rows between them let daylight through in rows of small windows. The bottom edge keeps its natural pointed zigzag. At the top, a solid blue band with tabs lets the panel slide straight onto a curtain rod.
The style sits between relaxed farmhouse and coastal cottage. This pattern uses US crochet terms throughout.
The finished panel measures 41 in (104.1 cm) wide and 77.5 in (196.9 cm) tall, from the lowest bottom point to the top of the band. The tab loops add 2 in (5.1 cm) above that. For a pair, make a second identical panel.
You work the panel as one piece from the bottom up, in rows of ripple stitch, changing color every few rows. A straightening row then levels the top edge, followed by a solid blue band and nine tabs. A plain single crochet edging runs down each side to finish.
Finished Size and Construction
- Finished size: 41 in (104.1 cm) wide × 77.5 in (196.9 cm) tall, plus 2 in (5.1 cm) tab loops
- Skill level: Easy-intermediate
- Terminology: US crochet terms
- Yarn weight: Worsted (#4), cotton or cotton blend
- Hook: 5.0 mm (US H-8)
- Number of pieces: 1 (single panel, no joining)
- Layout: 9 chevron repeats across × 15 stripe repeats tall
- Repeat size: 1 chevron repeat is 4.5 in (11.4 cm) wide; 1 stripe repeat (8 rows) is 5 in (12.7 cm) tall
- Size before border: 40.5 in (102.9 cm) wide × 75 in (190.5 cm) tall (ripple body only)
- Border depth: top band is 2.5 in (6.4 cm); side edging adds about 0.25 in (0.6 cm) per side
Materials
Choose a smooth worsted-weight cotton or cotton blend. Cotton hangs straight, shows the stitch pattern clearly, and stretches less over time than acrylic. Look for roughly 180 m per 100 g (197 yd per 100 g).
- Cream (Color A): 500 g, about 900 m (984 yd)
- Dusty blue (Color B): 350 g, about 630 m (689 yd)
Both quantities include a margin of about 10% for your gauge swatch and weaving in ends.
Tools:
- 5.0 mm (US H-8) crochet hook
- Tapestry needle
- Locking stitch markers
- Measuring tape
- Scissors
- Blocking pins and a large flat surface
Abbreviations (US Terms)
- ch – chain
- sk – skip
- st(s) – stitch(es)
- sl st – slip stitch
- sc – single crochet
- hdc – half double crochet
- dc – double crochet
- tr – treble crochet
- sp – space
- yo – yarn over
- dc2tog – (yo, insert hook in next st, pull up a loop, yo, pull through 2 loops) twice, yo, pull through all 3 loops
- dc3tog – work as dc2tog but over 3 sts, then yo and pull through all 4 loops
Special note: In mesh rows, each ch-1 counts as 1 stitch. On the next row, you work 1 dc into each dc and 1 dc into each ch-1 sp, so the stitch count never changes.
Gauge and Checkpoints
Gauge:
– 1 chevron repeat (14 sts) = 4.5 in (11.4 cm), measured peak to peak.
– 8 rows (1 stripe repeat) = 5 in (12.7 cm), measured straight up one column.
– Each dc row is about 0.625 in (1.6 cm) tall.
Test a swatch first. With Color A, ch 31. Work Rows 1–8 over 2 chevron repeats (29 sts). Block the swatch lightly and let it dry. It should measure 9 in (22.9 cm) wide and 5 in (12.7 cm) tall.
- Too big: go down to a 4.5 mm hook.
- Too small: go up to a 5.5 mm hook.
Width matters most, because the panel has to fit your window. Height is easy to adjust by adding or removing stripe repeats.
Checkpoints:
- After Row 8: 40.5 in (102.9 cm) wide and 5 in (12.7 cm) tall
- After Row 40: 25 in (63.5 cm) tall
- After Row 80: 50 in (127.0 cm) tall
- After Row 120: 75 in (190.5 cm) tall
- After the top band: 77.5 in (196.9 cm) tall
Always measure flat, without stretching.
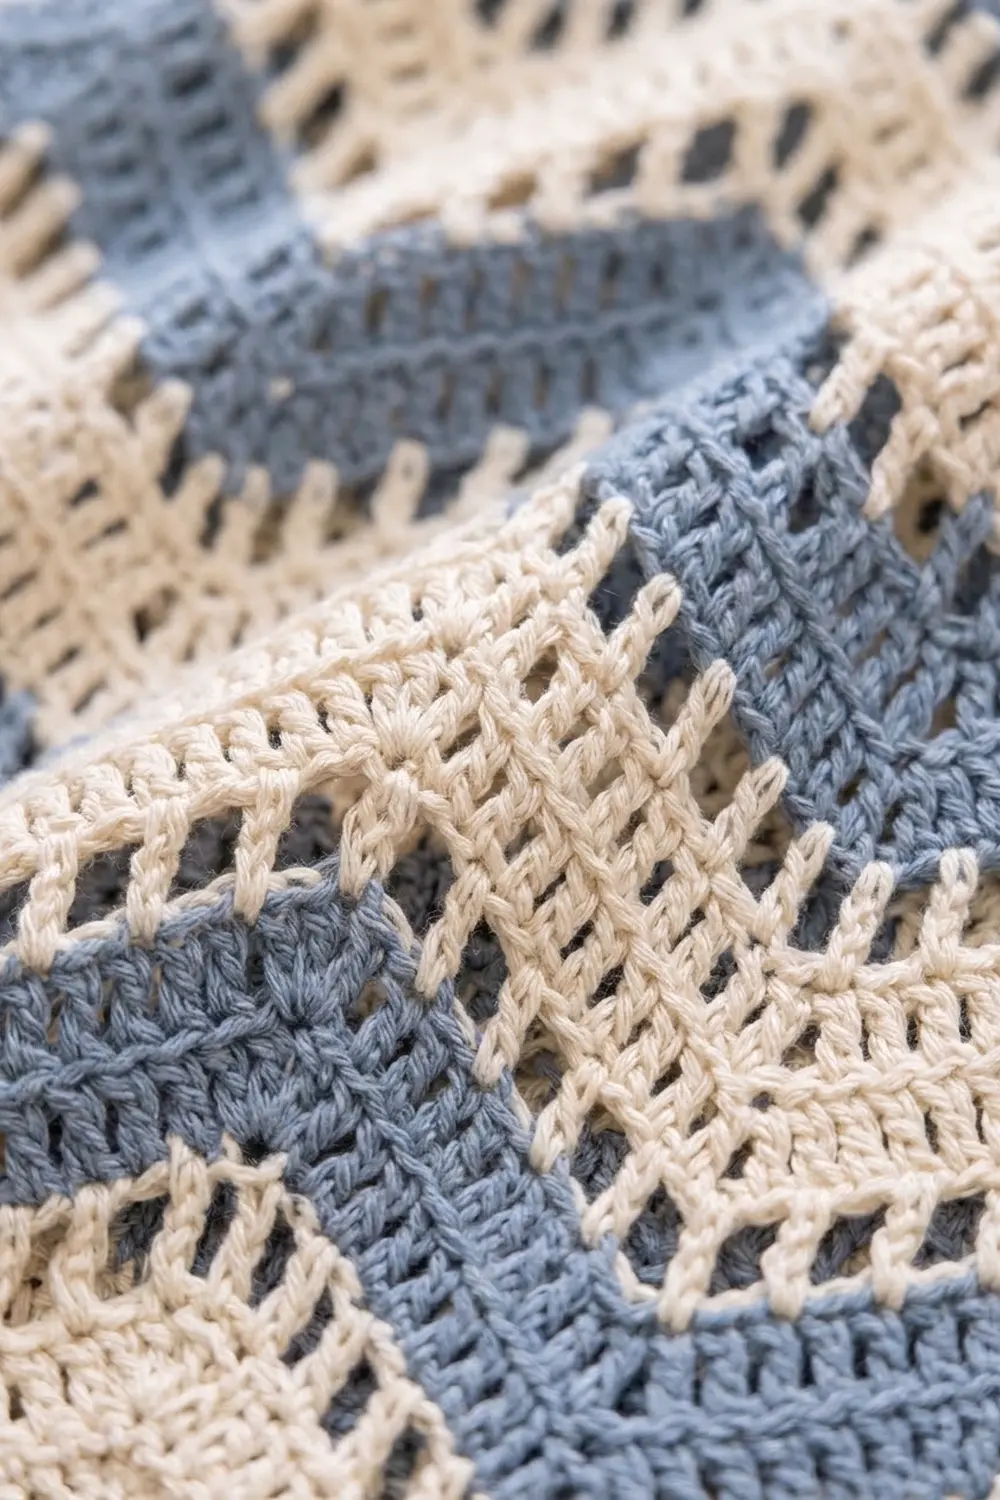
Ripple Body
Stitch count: Every ripple row has 127 sts (14 × 9 + 1). The turning ch-2 never counts as a stitch.
Each chevron has 5 rising sts, a 3-st peak, 5 falling sts, and a dc3tog valley. Each side edge is a half valley worked as dc2tog, so the side edges sit at low points of the zigzag.
Row Types
Row A (solid row): Ch 2, dc2tog over first 2 sts, dc in next 5 sts, 3 dc in next st (peak), dc in next 5 sts, dc3tog over next 3 sts (valley); repeat from * 7 more times, dc in next 5 sts, 3 dc in next st, dc in next 5 sts, dc2tog over last 2 sts, turn. (127 sts)*
When Row A follows a mesh row, work into the dc sts and ch-1 sps one for one. The 3 peak dc go into the peak ch-1 sp.
Row B (mesh row): Ch 2, dc2tog over first 2 sts, dc in next st, ch 1, sk next st, dc in next st, ch 1, sk next st, dc in next st, (dc, ch 1, dc) in next st (peak), dc in next st, ch 1, sk next st, dc in next st, ch 1, sk next st, dc in next st, dc3tog over next 3 sts; repeat from * 7 more times, dc in next st, ch 1, sk next st, dc in next st, ch 1, sk next st, dc in next st, (dc, ch 1, dc) in next st, dc in next st, ch 1, sk next st, dc in next st, ch 1, sk next st, dc in next st, dc2tog over last 2 sts, turn. (127 sts, counting each ch-1)*
Count check:
– Each chevron makes 5 + 3 + 5 + 1 (valley) = 14 sts from 5 + 1 + 5 + 3 = 14 sts used.
– Each edge dc2tog uses 2 sts and makes 1. The two edges together balance the last chevron, which has no valley.
– So every row stays at 127 sts.
Foundation
With Color A, ch 129.
Row 1 (Color A): Sk first 2 ch (these do not count), dc2tog over next 2 ch, dc in next 5 ch, 3 dc in next ch, dc in next 5 ch, dc3tog over next 3 ch; repeat from * 7 more times, dc in next 5 ch, 3 dc in next ch, dc in next 5 ch, dc2tog over last 2 ch, turn. (127 sts)*
That is 127 chains worked plus 2 chains skipped, for 129 in total.
Stripe Sequence
One stripe repeat is 8 rows:
- Row 1: Color A, Row A (on the first repeat, this is the foundation row above)
- Row 2: Color A, Row B
- Row 3: Color A, Row A
- Row 4: Color A, Row B
- Row 5: Color A, Row A; change to Color B on the last yo
- Row 6: Color B, Row A
- Row 7: Color B, Row B
- Row 8: Color B, Row A; change to Color A on the last yo
Rows 9–120: Repeat Rows 1–8 fourteen more times, for 15 stripe repeats in total. Work each Row 1 as Row A. Row 120 is a blue Row A. Don’t change color at the end of it; keep Color B attached for the band.
This sequence gives you wide, airy cream bands with 2 mesh rows each, and narrower blue bands with 1 mesh row in the center.
At each color change, cut the old color and leave a 6 in (15.2 cm) tail. Weave the tails into the side edges, where the edging will hide them.
Border
The border has three parts:
– a top band in Color B
– tabs in Color B
– side edging in Color A
Border gauge:
– In the band, 127 sts span 40.5 in (102.9 cm), about 3.1 sts per inch (1.2 sts per cm).
– On the side edging, 2 sc per dc row end gives about 3.2 sc per inch (1.3 sc per cm). That matches the fabric, so the edges lie flat.
Top Band
Row 1 (straightening row): Ch 4 (counts as tr) in the edge st, dc in next 2 sts, hdc in next 2 sts, sc in next 5 sts, hdc in next 2 sts, dc in next 2 sts, tr in next st; repeat from * 8 more times, turn. (127 sts: 1 + 14 × 9)*
This is a conversion row: 127 sts worked 1 per existing st + 0 added = 127. The tall tr sts fill each valley and both half-valley edges. The 5 sc sit over the 3-st peak plus 1 st on each side of it. Together they give a level top edge.
Rows 2–4: Ch 3 (counts as dc), dc in each st across, turn. (127 sts each row)
The band now measures 2.5 in (6.4 cm) tall and 40.5 in (102.9 cm) wide. Don’t fasten off yet.
Tabs
There are 9 tabs, each 7 sts wide, with 8 gaps of 8 sts between them. The math: 9 × 7 + 8 × 8 = 63 + 64 = 127 sts, which is the full band. Each tab is about 2.2 in (5.6 cm) wide, and each gap is about 2.5 in (6.4 cm).
Tab 1: Ch 1, sc in first 7 sts, turn. (7 sc) Work 15 more rows of ch 1, sc in each st across, turn, for 16 rows in total. Fasten off and leave a 12 in (30.5 cm) tail. The strip should measure 4 in (10.2 cm).
Tabs 2–9: Skip 8 sts after the previous tab. Join Color B with a sl st in the next st and work as for Tab 1.
The tabs start on sts 1, 16, 31, 46, 61, 76, 91, 106, and 121. Tab 9 covers sts 121–127 and ends on the last st of the band.
Forming loops: Fold each tab to the back so its last row lines up with Row 2 of the band. Whipstitch it in place with the tail, catching only the back loops so nothing shows on the front. Each tab becomes a 2 in (5.1 cm) loop.
Side Edging
First side: Join Color A at the top corner of the band and work down the row ends:
– 2 sc in each of the 3 dc row ends of band Rows 4–2 (6 sc)
– 3 sc in the straightening-row end (3 sc)
– 2 sc in each of the 120 ripple row ends (240 sc)
Fasten off. (249 sc)
Second side: Join Color A at the bottom corner and work up the other edge in reverse order: 240 + 3 + 6 = 249 sc. Fasten off.
Both sides have identical row structures, so the counts match: 2 sc per dc-height row and 3 sc for the taller tr row. The edging adds about 0.25 in (0.6 cm) per side, for a total width of 41 in (104.1 cm).
The bottom edge needs no border, because the foundation row already forms clean points.
Final Blocking
- Weave in all remaining ends, including the tab tails.
- Soak the panel in cool water with a little mild detergent for 15 minutes. Press out the water; don’t wring it.
- Roll the panel in towels to remove excess moisture.
- Lay it flat and ease it to 40.5 in (102.9 cm) across the ripple body, or 41 in (104.1 cm) including the edging.
- Pin each bottom point so it lines up with the ripple columns above it.
- Check the height: 77.5 in (196.9 cm) from the lowest point to the top of the band.
- Pin the band straight and check that the tabs are evenly spaced.
- Let it dry completely. Cotton usually takes 24–48 hours.
Final Quality-Control Checklist
- Every ripple row has 127 sts.
- All 9 peaks line up vertically, and so do all the valleys.
- The stripe order is 5 cream rows, then 3 blue rows, through all 15 repeats.
- The mesh windows are neat and even.
- The straightening row gives a level top edge.
- There are 9 tabs, each 7 sts wide, evenly spaced and securely sewn.
- Each side edging has 249 sc and lies flat.
- The panel measures 41 in (104.1 cm) × 77.5 in (196.9 cm), plus 2 in (5.1 cm) tabs.
- All ends are invisible.
Troubleshooting
Peaks drift sideways: You’ve missed or added a stitch. Recount to 127. The 3-dc peak always goes into the center st of the peak below, or into the peak ch-1 sp after a mesh row.
Edges slant: Every row must start and end with dc2tog. Don’t count the ch-2.
Panel too narrow: The foundation chain is probably tight. Chain with a hook one size larger.
Uneven mesh holes: Keep each ch-1 the same size as the loop on your hook.
Top band ripples: Recount the straightening row to 127 and check the tr/dc/hdc/sc sequence.
Wavy side edging: You have too many sc. Work exactly 2 sc per dc row end.
Edging pulls in: Your tension is too tight. Go up one hook size for the edging only.
Tabs twist: Pin each tab straight before sewing.
Care
Hand wash, or machine wash on a gentle cool cycle in a mesh bag. Lay flat to dry and re-pin the points. Don’t tumble dry, because heat can shrink cotton and distort the chevrons.
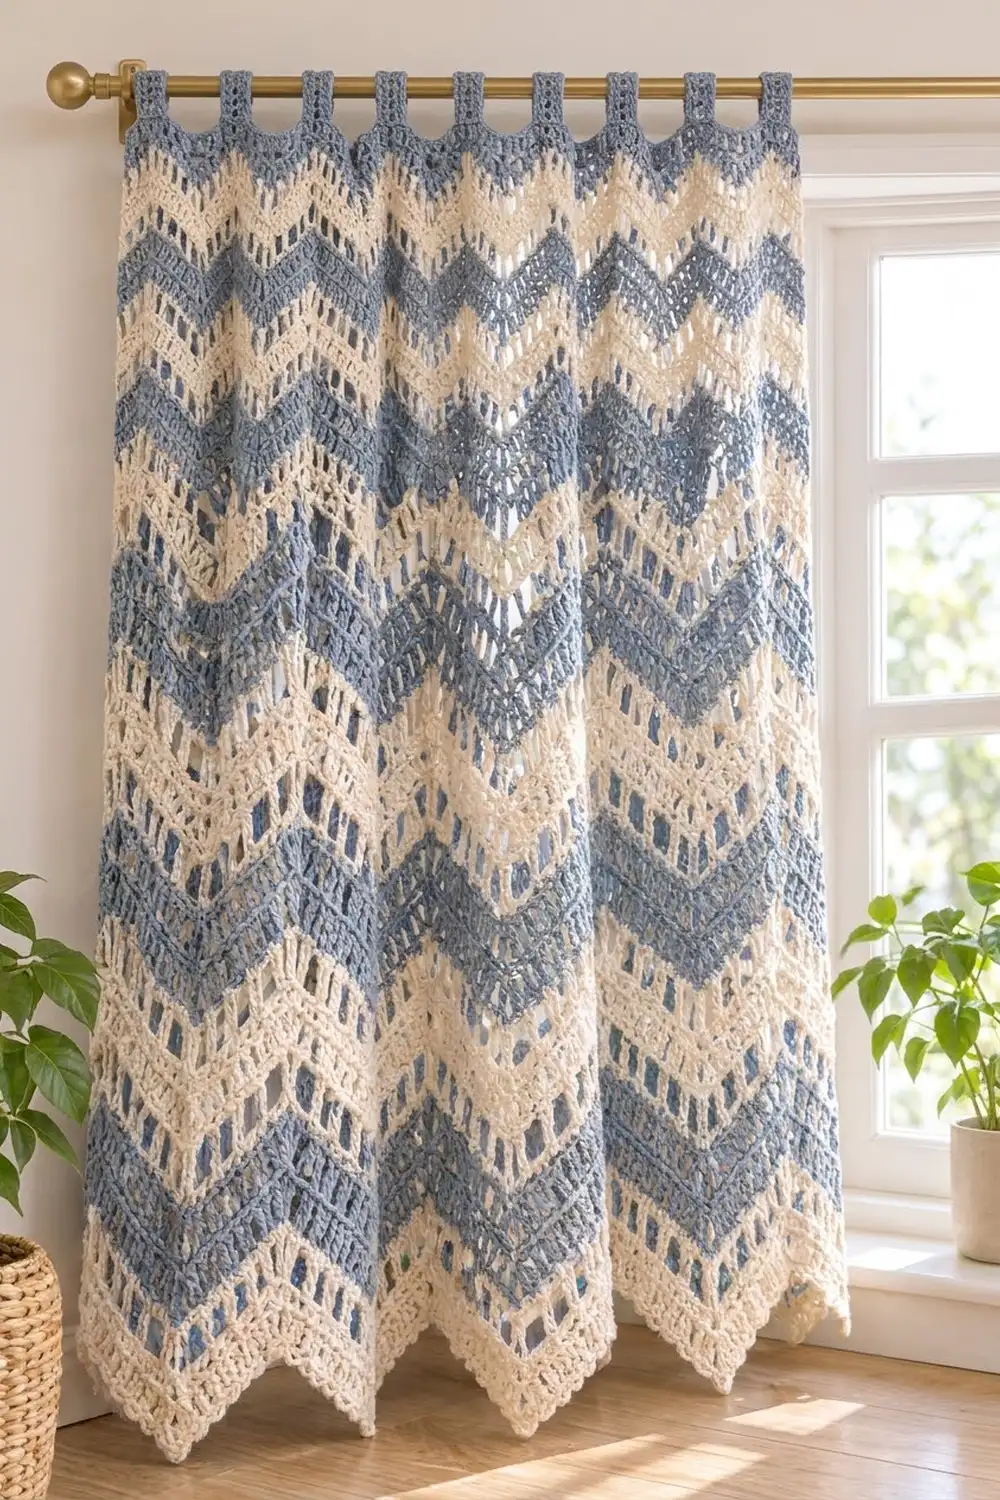
Final Notes
Every measurement builds on the one before:
– 14 sts make one 4.5 in (11.4 cm) chevron, so 9 chevrons give 127 sts and 40.5 in (102.9 cm).
– 8 rows make one 5 in (12.7 cm) stripe repeat, so 15 repeats give 75 in (190.5 cm).
– The straightening row keeps 127 sts and starts a 2.5 in (6.4 cm) band.
– The 9 tabs and 8 gaps use exactly those 127 sts.
– 249 sc per side brings the width to 41 in (104.1 cm).
The panel finishes at 77.5 in (196.9 cm) tall plus 2 in (5.1 cm) tab loops. Match the gauge on your swatch, and count often during the first stripe repeat.
Happy crocheting!