

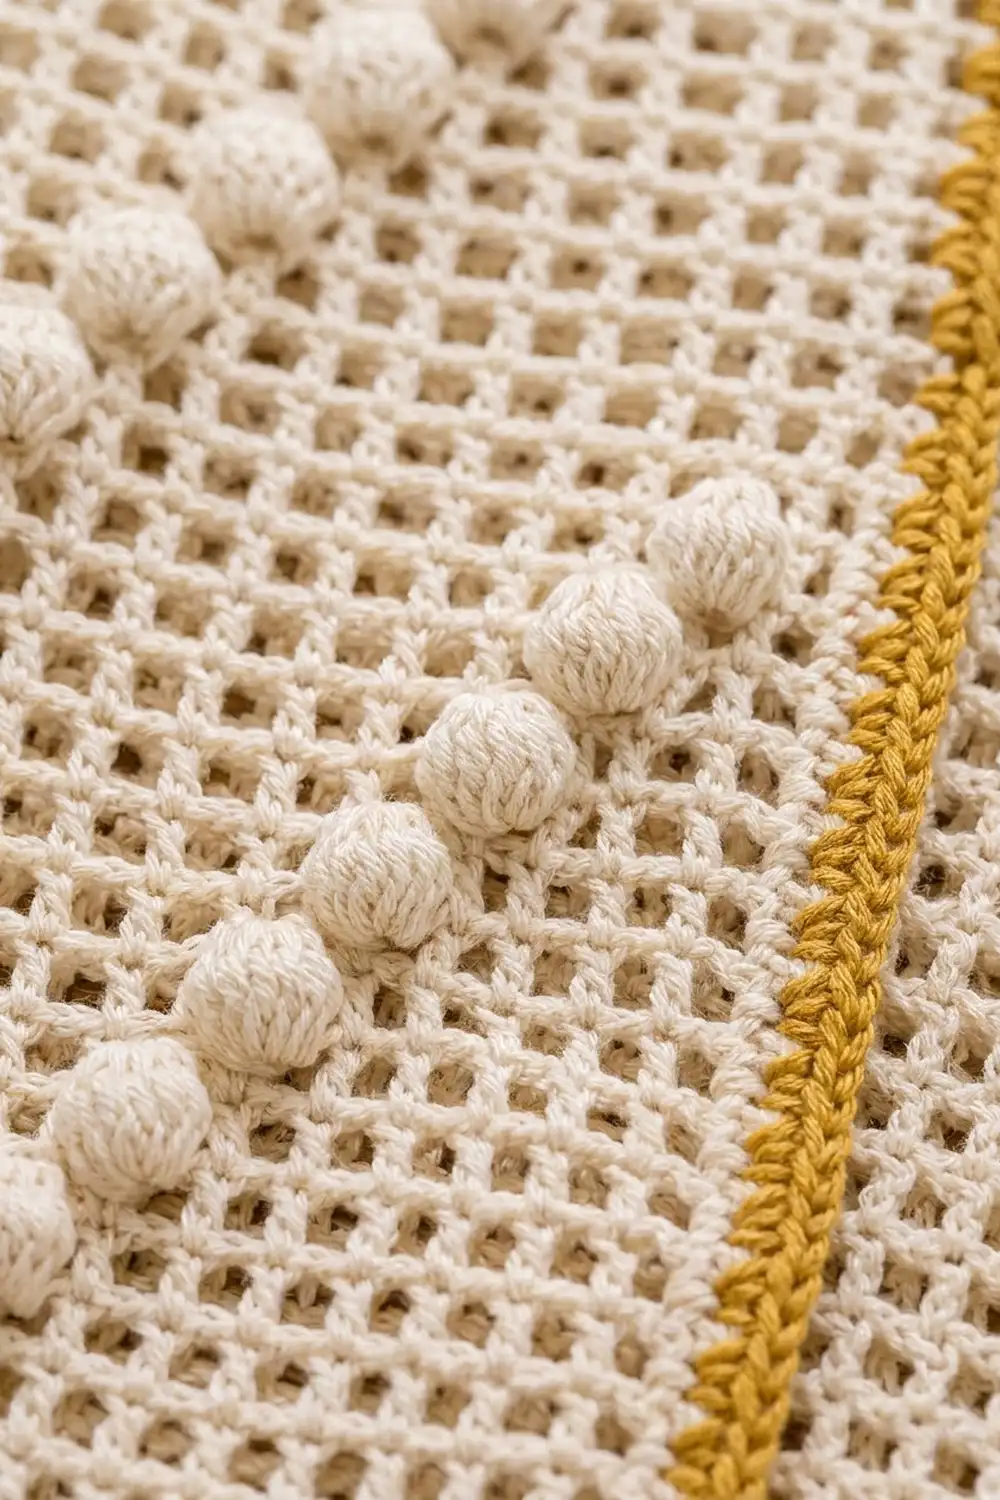
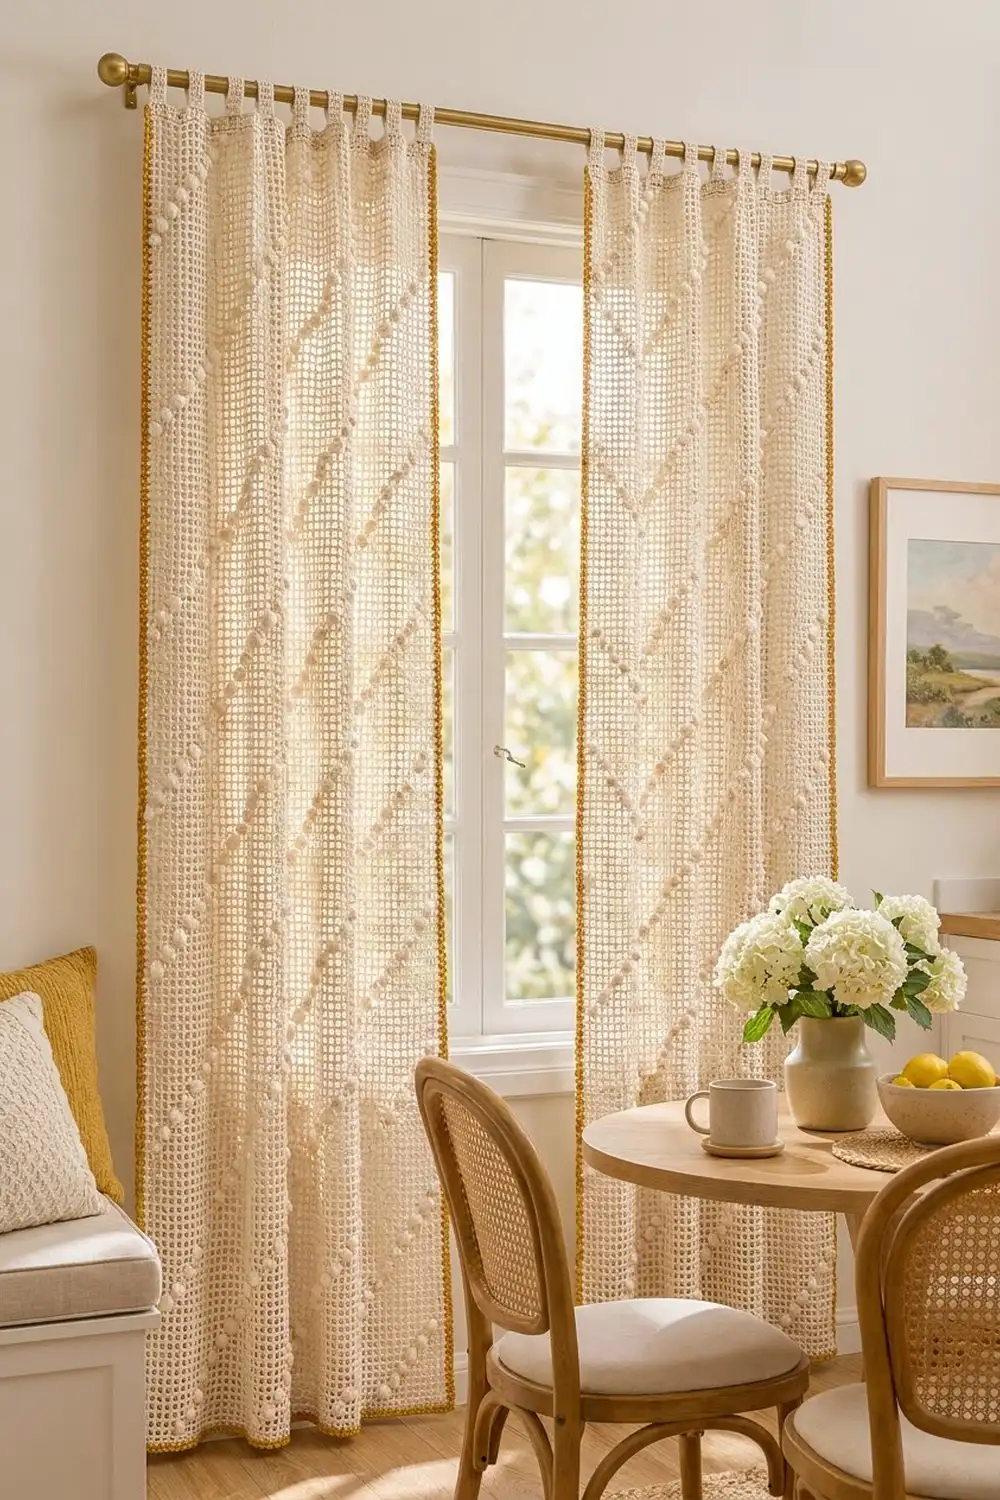
The Honey Lattice Curtain is a light, airy window panel worked in classic filet mesh. Raised bobbles climb across the open grid in long, parallel zigzag lines. Sunlight comes through the mesh, and the bobbles add soft texture you can see from across the room.
The panel is cream, with a mustard-gold crab-stitch edge down both long sides and across the hem. Cream tab tops slide straight onto a curtain rod, so you don’t need rings or clips. The style is warm, simple, and slightly vintage, and it works well in kitchens, breakfast nooks, and bedrooms.
This pattern uses US crochet terms. The finished panel measures 29 in (73.7 cm) wide and 52.5 in (133.4 cm) long from the top edge to the hem. The tabs add 3.5 in (8.9 cm), for an overall drop of 56 in (142.2 cm).
You work the whole panel flat in one piece, in rows, from the hem up. Bobbles go on wrong-side rows so they pop to the right side. After that you add a two-row mustard border, crochet seven tabs onto the top edge, and block the panel.
Finished Size and Construction
- Finished size: 29 in x 52.5 in (73.7 cm x 133.4 cm), plus 3.5 in (8.9 cm) tabs
- Skill level: Intermediate
- Terminology: US
- Yarn weight: Worsted (#4) cotton
- Hook: 5 mm (H-8)
- Number of pieces: 1 panel (the tabs are worked directly onto it)
- Layout: Single panel, no joining
- Panel size before border: 28 in x 52 in (71.1 cm x 132.1 cm)
- Border depth: 0.5 in (1.3 cm) on each long side and the hem; no border on the top edge
Materials
Use a smooth worsted-weight cotton or cotton blend. Cotton holds an open mesh crisply and stretches less when it hangs. Avoid fuzzy yarns, because they blur the bobbles and fill in the grid. The amounts below assume about 154 m per 100 g (168 yd per 100 g).
- Color A, cream: 800 g, about 1,232 m (1,347 yd)
- Color B, mustard gold: 100 g, about 154 m (168 yd)
These quantities include a margin of about 15–20% for your swatch and for tension differences. For a pair of curtains, double them.
Tools:
– 5 mm (H-8) crochet hook
– 7 locking stitch markers
– Tapestry needle
– Scissors
– Tape measure
– Rust-proof pins and blocking mats or towels
– Spray bottle
Abbreviations (US Terms)
- ch – chain
- sc – single crochet
- dc – double crochet
- sk – skip
- sp – space
- st(s) – stitch(es)
- RS / WS – right side / wrong side
- rev sc – reverse single crochet (crab stitch): work from left to right (if you’re right-handed). Insert the hook in the next st to the right, yo, pull up a loop, yo, pull through both loops.
Special stitch – Bobble: [Yo, insert hook in the indicated sp, yo, pull up a loop, yo, pull through 2 loops] 5 times, yo, pull through all 6 loops on the hook. A bobble counts as 1 st.
Plain mesh: Ch 1, sk next st or ch-1 sp, dc in next dc.
Bobble mesh: Bobble in next ch-1 sp, dc in next dc.
Every mesh is 2 sts wide: 1 filler (a ch or a bobble) plus 1 dc.
Gauge and Checkpoints
Gauge: 10 meshes and 9 rows = 4 in (10.2 cm) in plain filet mesh, lightly relaxed.
Work a test swatch before you start the panel. Ch 27. Dc in the 3rd ch from the hook and in each ch across (25 sts). Next row: ch 4 (counts as dc + ch 1), sk next st, dc in next st, ch 1, sk next st, dc in next st across (12 meshes, 25 sts). Work 10 more mesh rows, adding a bobble in the center mesh on every other row. Measure 10 meshes across the middle and 9 rows up the middle.
- Too big (fewer than 10 meshes per 4 in / 10.2 cm): use a 4.5 mm hook.
- Too small (more than 10 meshes per 4 in / 10.2 cm): use a 5.5 mm hook.
Row gauge sets the length of the panel. If your rows are taller or shorter than the gauge, change the number of plain rows at the top (Rows 114–116). Don’t change the bobble rows.
Panel checkpoints (the width stays 28 in / 71.1 cm throughout):
– After Row 9: 4 in (10.2 cm) tall
– After Row 45: 20 in (50.8 cm) tall
– After Row 81: 36 in (91.4 cm) tall
– After Row 117: 52 in (132.1 cm) tall
Measure the panel flat, not while it’s hanging.
Panel
With Color A, ch 143.
Row 1 (RS): Dc in the 3rd ch from the hook and in each ch across, turn. (141 dc; the skipped ch-2 does not count.)
Row 2 (WS): Ch 4 (counts as dc + ch 1), sk next st, dc in next st, ch 1, sk next st, dc in next st; repeat from * across, turn. (70 meshes: 71 dc + 70 ch-1 sps = 141 sts)
Rows 3–5: Ch 4 (counts as dc + ch 1), sk ch-1 sp, dc in next dc, ch 1, dc in next dc; repeat from * across, working the last dc in the 3rd ch of the turning ch-4, turn. (70 meshes, 141 sts)
From here on, a “plain row” means a row worked like Rows 3–5.
Bobble Zigzag Section (Rows 6–113)
Across the row, the mesh is divided into 5 edge meshes, then 6 zigzag repeats of 10 meshes each, then 5 more edge meshes (5 + 60 + 5 = 70 meshes).
Each bobble row puts exactly 1 bobble in each 10-mesh repeat. The bobble’s position (P) moves one mesh along on each bobble row, then turns back. This creates 6 parallel zigzag lines.
Bobble row (even rows, WS): Ch 4 (counts as dc + ch 1), sk ch-1 sp, dc in next dc (first edge mesh). Work 4 plain meshes. Work (P – 1) plain meshes, 1 bobble mesh, then (10 – P) plain meshes; repeat from * 5 more times. Work 4 plain meshes, ch 1, dc in the 3rd ch of the turning ch, turn. (70 meshes: 71 dc + 64 ch-1 sps + 6 bobbles = 141 sts)
Plain row (odd rows, RS): Work as for Rows 3–5, with ch 1 over each bobble and a dc in each dc. (70 meshes, 141 sts)
P values for each vertical repeat:
Bobble row:  1  2  3  4  5  6  7  8  9 10 11 12 13 14 15 16 17 18
P value:     1  2  3  4  5  6  7  8  9 10  9  8  7  6  5  4  3  2
- Rows 6–41: Repeat 1. Bobble rows are Rows 6, 8, 10 … 40, using bobble rows 1–18 of the table in order. The odd rows are plain rows.
- Rows 42–77: Repeat 2, using the same sequence (Row 42 uses P = 1).
- Rows 78–113: Repeat 3, using the same sequence (Row 78 uses P = 1). Row 113 is a plain row.
Each vertical repeat is 36 rows, or 16 in (40.6 cm). Each diagonal travels 9 meshes, about 3.6 in (9.1 cm), across 8 in (20.3 cm) of height.
Tip: Mark the first bobble of Row 6. Each new bobble should sit exactly one mesh away from the bobble two rows below it.
Top of Panel
Rows 114–116: Work 3 plain rows. (70 meshes, 141 sts)
Row 117 (RS): Ch 2 (does not count as a st), dc in first dc, dc in ch-1 sp, dc in next dc; repeat from * across, working the last dc in the 3rd ch of the turning ch. (141 dc)
Fasten off. The panel should now measure 28 in x 52 in (71.1 cm x 132.1 cm).
Border
Border gauge: Along the sides, work 2 sc per dc row-end, which gives 18 sc per 4 in (10.2 cm). Across the hem, work 1 sc per foundation ch, about 5 sc per 1 in (2.5 cm).
Row 1 (RS): With the RS facing, join Color B with a sc in the side of Row 117 at the top left corner. Work 1 more sc in the same row-end. Then work 2 sc in each row-end down the side (Side 1: 117 x 2 = 234 sc).
At the bottom, work 3 sc in the first foundation ch (corner), 1 sc in each of the next 139 chs, and 3 sc in the last ch (corner). This gives the hem 141 sts worked into + 4 extra corner sts = 145 sc.
Work 2 sc in each row-end up the second side (Side 2: 234 sc). Don’t turn. (234 + 145 + 234 = 613 sc)
Row 2 (RS): Ch 1, rev sc in each sc back to the starting corner. (613 rev sc) Fasten off.
Why the math works: Each dc row is 4/9 in tall, so 2 sc per row-end gives 4.5 sc per inch. That is slightly firmer than the natural 5 sc per inch, which keeps the hanging sides from rippling or growing. On the hem, 1 sc per ch matches the panel exactly. The 2 extra sts at each corner let the border turn without cupping. The rev sc row works 1 st into each sc, so the count doesn’t change. Together, the two rows add 0.5 in (1.3 cm) to each side and to the hem, for a finished size of 29 in x 52.5 in (73.7 cm x 133.4 cm).
Tabs
There are 7 tabs, each 9 sts wide (about 1.8 in / 4.6 cm), with 13-st gaps (about 2.6 in / 6.6 cm) between them. Check: 7 x 9 + 6 x 13 = 63 + 78 = 141 sts.
With the RS facing, mark the first st of each tab on Row 117, counting from the right edge: sts 1, 23, 45, 67, 89, 111, and 133.
Each tab: With the RS facing, join Color A at a marked st.
Row 1: Ch 2 (does not count as a st), dc in the same st and in the next 8 sts, turn. (9 dc)
Rows 2–16: Ch 2, dc in each dc across, turn. (9 dc)
Fasten off, leaving a 12 in (30.5 cm) tail. Each tab should measure about 7 in (17.8 cm). Fold it to the WS and whipstitch the last row to the back of Row 116, directly behind the tab’s base. This makes a 3.5 in (8.9 cm) loop that fits rods up to 1.25 in (3.2 cm) in diameter.
Repeat for all 7 tabs. Weave in the ends along the dc posts so they stay hidden.
Final Blocking
- Soak the panel in cool water for 15 minutes, then gently press the water out. Don’t wring it.
- Roll the panel in towels to remove excess water.
- Lay it flat, RS up.
- Pin the hem straight to 29 in (73.7 cm), with a pin every 4 in (10.2 cm).
- Pin both sides straight to 52.5 in (133.4 cm).
- Run your fingers along the mesh lines to square any crooked meshes.
- Lift each bobble so it sits round. Don’t pin through the bobbles.
- Let the panel dry completely, then hang it for a day so the mesh settles.
Final Quality-Control Checklist
- Every mesh row has 70 meshes and 141 sts.
- Each bobble row has exactly 6 bobbles, all on the RS.
- The 6 zigzag lines are parallel and turn at the same height.
- The panel measures 28 in x 52 in (71.1 cm x 132.1 cm) before the border.
- Border Row 1 has 613 sc.
- The sides hang straight without waving.
- All 7 tabs are evenly spaced and sewn at the same height.
- The finished panel measures 29 in x 52.5 in (73.7 cm x 133.4 cm).
Troubleshooting
Bobbles show on the wrong side: You worked them on RS rows. Bobbles belong on even (WS) rows only.
A zigzag line jogs: One row used the wrong P value. Check that row against the table and rip back to it.
The panel narrows: You are probably missing the last dc into the turning ch. Count the dc posts (71) often.
The border waves: Your sc are too loose. Redo Row 1 with a 4.5 mm hook.
The border puckers: Your sc are too tight. Redo it with a 5.5 mm hook.
Tabs twist on the rod: The tab was sewn at an angle. Unpick it and sew it straight down, directly behind its base.
Bobbles look flat: After each bobble row, push the bobbles through to the RS with a fingertip.
Care
Hand wash in cool water with mild soap, or machine wash cold in a mesh bag on a gentle cycle. Dry flat and re-block lightly if needed.
Final Notes
Here is how the measurements build on each other:
- At a gauge of 10 meshes and 9 rows per 4 in (10.2 cm), 70 meshes (141 sts) give a 28 in (71.1 cm) width.
- 117 rows give a 52 in (132.1 cm) length, including three bobble repeats of 16 in (40.6 cm) each.
- The 0.5 in (1.3 cm) border brings the panel to 29 in x 52.5 in (73.7 cm x 133.4 cm).
- The 3.5 in (8.9 cm) tabs complete the 56 in (142.2 cm) drop.
Check each measurement as you reach it, and your panel will hang straight and even.
Happy crocheting!