

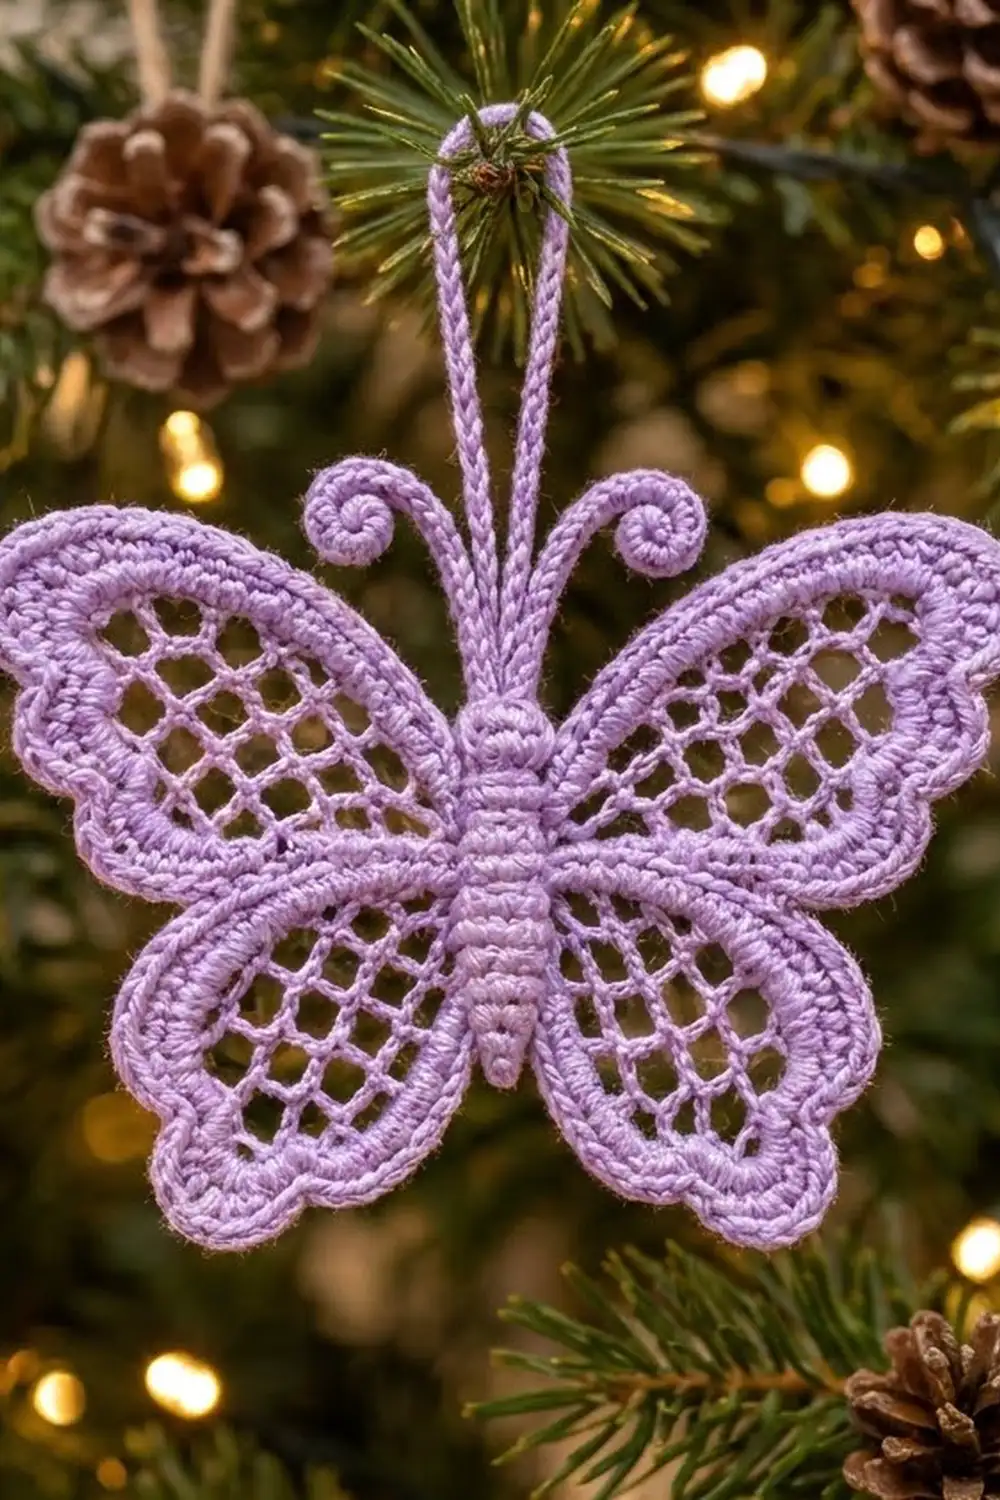
This lavender lace butterfly is a small, delicate ornament worked in crochet thread. It has four corded wing frames filled with an airy net, a thick rope-textured outer edge, and a raised, segmented body topped with curled antennae. It looks lovely on a Christmas tree, tied to a gift, or hanging in a window all year.
The design uses one color, a soft lavender, so the texture does the work. The raised frames, the net, and the ridged body catch the light and give the piece an heirloom, Irish-lace look without complicated techniques.
This pattern uses US crochet terms. The finished butterfly measures 3.5 in (8.9 cm) wide by 2.75 in (7.0 cm) tall at the wings. With the antennae, it is about 3.5 in (8.9 cm) tall.
Construction is simple. You make four wing frames, single crochet worked over a padding cord, and fill each one with net rounds. Next you sew the frames together at the center and work a two-round border around the outer silhouette. Last, you make the body with its antennae and hanging loop and sew it over the center.
Finished Size and Construction
- Finished size: 3.5 in (8.9 cm) wide x 2.75 in (7.0 cm) tall at the wings; 3.5 in (8.9 cm) tall including antennae
- Skill level: Intermediate
- Terminology: US crochet terms
- Yarn weight: Size 10 crochet thread (Lace, 0)
- Hook: 1.75 mm (US steel 6)
- Number of pieces: 1 finished ornament (4 wing frames sewn together, plus 1 body sewn on top)
- Layout: 2 upper wings above 2 lower wings, body down the center
- Upper wing (before border): 1.5 in (3.8 cm) wide x 1.25 in (3.2 cm) tall
- Lower wing (before border): 1.25 in (3.2 cm) wide x 1 in (2.5 cm) tall
- Size before border: 3 in (7.6 cm) wide x 2.25 in (5.7 cm) tall
- Border depth: 0.25 in (0.6 cm) on every outer edge
Materials
Yarn: Use a mercerized cotton size 10 crochet thread. Mercerized cotton holds crisp stitch definition, takes starch well, and doesn’t fuzz on the tree. A soft lavender or lilac shows the texture best. Very dark shades hide the net detail.
- Lavender: 8 g / 42 m (46 yd)
That amount covers the stitches plus the padding cord that runs inside every frame and border stitch. All quantities include a margin of about 20 percent.
Tools:
- 1.75 mm (US steel 6) crochet hook
- Fine tapestry needle that fits through size 10 thread stitches
- Small sharp scissors
- 4 locking stitch markers
- Rustproof pins and a foam blocking board
- Fabric stiffener or spray starch (optional, recommended for ornaments)
- A small pinch of thread scraps or fiberfill for the body
Abbreviations (US Terms)
- ch – chain
- sl st – slip stitch
- sc – single crochet
- sc2tog – single crochet 2 together
- BLO – back loop only
- MR – magic ring
- sp(s) – space(s)
- st(s) – stitch(es)
- rsc – reverse single crochet (crab stitch)
Special stitch – sc over cord: Cut a padding cord of thread, fold it in half, and hold it along the top of the stitches you’re working into. Make each sc as normal, catching the doubled cord inside it. This raises and rounds the frame.
Reverse single crochet (rsc): Work from left to right (right to left if you crochet left-handed). Insert the hook into the next st to the right, yarn over, pull up a loop, yarn over, draw through both loops.
Gauge and Checkpoints
Gauge: 9 sc worked over the padding cord = 1 in (2.5 cm).
Make one upper wing frame first, through Round 1 only, and use it as your gauge swatch. Relaxed and laid flat, the 42-st ring should be about 1.5 in (3.8 cm) across.
Checkpoints:
- Upper frame ring, Round 1: about 1.5 in (3.8 cm) across
- Lower frame ring, Round 1: about 1.2 in (3.0 cm) across
- Shaped upper wing with net: 1.5 in (3.8 cm) wide x 1.25 in (3.2 cm) tall
- Shaped lower wing with net: 1.25 in (3.2 cm) wide x 1 in (2.5 cm) tall
- Assembled wings before border: 3 in (7.6 cm) x 2.25 in (5.7 cm)
- After border: 3.5 in (8.9 cm) x 2.75 in (7.0 cm)
- Body: 1.75 in (4.4 cm) long x 0.4 in (1.0 cm) wide
If your ring is too big, go down to a 1.5 mm hook or pull the padding cord a little snugger. If it’s too small, go up to a 2.0 mm hook. Don’t change the stitch counts. The net and border math depend on them.

Upper Wing (make 2)
Cut a padding cord about 12 in (30.5 cm) long and fold it in half.
Foundation: Ch 42, sl st in first ch to form a ring, taking care not to twist.
Round 1 (frame): Ch 1. Working over the doubled padding cord, sc in each ch around, sl st in first sc to join. (42 sc)
Gently pull both cord ends so the ring lies flat with no ruffle. Trim the cord ends to 0.5 in (1.3 cm) and tuck them inside the next few stitches.
Mark the frame. Pm in sc 1 (the joining st), sc 6, sc 9 and sc 10. These are your landmarks:
- Sc 1–6: body edge (hidden under the body)
- Sc 7–9: lower-wing join
- Sc 10–42: outer edge (33 sts), which carries the border
Before you start the net, pinch the ring into a rounded wing shape. Sc 1–6 go at the narrow inner point. Sc 10–42 form a wide curve with the highest point at about sc 24 and the outermost tip at about sc 32.
Round 2 (net): Working in the BLO of the frame, along its inner edge, sl st in sc 1. Ch 1, sc in same st, ch 4, sk 2 sts, sc in BLO of next st; repeat from * 12 more times, ch 4, sk last 2 sts, sl st in first sc. (14 sc, 14 ch-4 sps)
Check: 14 sc + (14 x 2 skipped) = 42 frame sts.
Round 3: Sl st in each of first 2 ch, ch 1, sc in same ch-4 sp, ch 3, sc in next ch-4 sp; repeat from * around, ch 3, sl st in first sc. (14 ch-3 sps)
Round 4: Sl st in next ch, ch 1, sc in same ch-3 sp, ch 2, sc in next ch-3 sp; repeat from * around, ch 2, sl st in first sc. (14 ch-2 sps)
Each round anchors in the middle of the previous loops, so the stacked loops form the diamond-shaped openings of the net.
Round 5 (center): Sl st in next ch, ch 1, sc in each ch-2 sp around, sl st in first sc. (14 sc)
Fasten off, leaving a 6 in (15.2 cm) tail. Thread the tail through the front loops of Round 5 and draw it up to leave a small opening about 0.125 in (0.3 cm) across. Don’t cinch it closed, or the wing will cup. Weave in the end.
Checkpoint: Shaped and pinned, the upper wing measures 1.5 in (3.8 cm) x 1.25 in (3.2 cm).
Lower Wing (make 2)
Cut a padding cord about 10 in (25.4 cm) long and fold it in half.
Foundation: Ch 33, sl st in first ch to form a ring.
Round 1 (frame): Ch 1. Working over the padding cord, sc in each ch around, sl st in first sc. (33 sc)
Mark the frame:
- Sc 1–6: body edge
- Sc 7–9: upper-wing join
- Sc 10–33: outer edge (24 sts)
Pinch the ring into a lobed teardrop. The narrow point is at sc 1–6, the outer lobe is at about sc 18, and the lower rounded lobe is at about sc 27.
Round 2: Working in BLO along the inner edge, sl st in sc 1, ch 1, sc in same st, ch 4, sk 2, sc in BLO of next st; repeat from * 9 more times, ch 4, sk last 2, sl st in first sc. (11 sc, 11 ch-4 sps)
Check: 11 + (11 x 2) = 33 frame sts.
Round 3: Sl st in first 2 ch, ch 1, sc in same sp, ch 3, sc in next sp; repeat around, ch 3, join. (11 ch-3 sps)
Round 4: Sl st in next ch, ch 1, sc in same sp, ch 2, sc in next sp; repeat around, ch 2, join. (11 ch-2 sps)
Round 5: Sl st in next ch, ch 1, sc in each sp around, join. (11 sc)
Fasten off and finish the center as for the upper wing.
Checkpoint: Shaped and pinned, the lower wing measures 1.25 in (3.2 cm) x 1 in (2.5 cm).
Assemble the Wings
Lay the four wings right side up in butterfly position: upper wings on top, lower wings below, all narrow points meeting at the center.
- On each side, place upper sc 7–9 against lower sc 7–9. Whipstitch them together through the front loops on the wrong side, 3 stitches to 3 stitches.
- Bring the four body edges (sc 1–6 on each wing) together at the center. Tack sc 1–3 of the left upper wing to sc 1–3 of the right upper wing, and do the same for the two lower wings. Keep the stitches small. The body will cover this area.
- Keep your tension loose enough that the seams lie flat and don’t pucker the frames.
Checkpoint: The assembled wings measure 3 in (7.6 cm) wide x 2.25 in (5.7 cm) tall. Pin them to that size before you start the border.
Border
Border gauge: 9 sts = 1 in (2.5 cm), the same as the frames. Work Round 1 over a fresh doubled padding cord about 30 in (76.2 cm) long. That gives the border the same raised, corded look as the frames.
The border runs only along the outer edges: 33 sts on each upper wing and 24 sts on each lower wing. It bridges the center behind the head and the tail.
Round 1 (trim round): Join the thread in the front loop of left upper wing sc 10, next to the top center. Ch 1. Working in the front loops of the frame sts, over the padding cord:
- Left upper wing: sc in each of the 33 outer sts, working 2 sc in the st at the top curve (about sc 24), at the outer tip (about sc 32) and at the lower scallop (about sc 40). (33 + 3 = 36 sc)
- Left lower wing: sc in each of the 24 outer sts, working 2 sc at the outer lobe (about sc 18) and at the lower lobe (about sc 27). (24 + 2 = 26 sc)
- Bottom center: ch 2 to bridge to the right lower wing.
- Right lower wing: work as the left. (24 + 2 = 26 sc)
- Right upper wing: work as the left. (33 + 3 = 36 sc)
- Top center: ch 2, sl st in first sc.
Round 1 total: (114 sts worked 1 per frame st) + (10 increases) = 124 sc, plus 2 ch-2 bridges.
Round 2 (rope edge): Ch 1. Working left to right, rsc in each sc around, and work 1 sl st in each bridge ch. Sl st in first rsc. (124 rsc + 4 sl st)
Fasten off and weave in the ends.
Why the math works: Each side has 33 + 24 = 57 outer frame sts. The 5 increases per side sit exactly on the convex points of the wings, where the outer edge is longer than the frame beneath it, so the border lies flat instead of cupping. That gives 62 border sts per side and 124 in all. At 9 sts per inch, the two rounds add about 0.25 in (0.6 cm) on every outer edge. That takes the wings from 3 in x 2.25 in (7.6 cm x 5.7 cm) to 3.5 in x 2.75 in (8.9 cm x 7.0 cm).
Body
Work in continuous rounds. Don’t join. Pm in the first st of each round.
Head
Rnd 1: 6 sc in MR. (6)
Rnd 2: 2 sc in each st around. (12)
Rnds 3–4: Sc in each st around. (12)
Rnd 5: Sc2tog 6 times. (6)
Thorax
Rnd 6: 2 sc in each st around. (12)
Rnds 7–8: Sc in each st around. (12)
Rnd 9: Sc2tog, sc in next 2 sts; repeat 3 times. (9)
Lightly stuff the head and thorax with thread scraps.
Segmented abdomen
Rnd 10: Sc in BLO of each st around. (9) The unused front loops form the first segment ridge.
Rnd 11: Sc in each st around. (9)
Rnds 12–17: Repeat Rnds 10–11 three more times. (9 each)
That gives 4 ridges.
Rnd 18: Sc2tog, sc in next st; repeat 3 times. (6)
Finish stuffing the abdomen.
Rnd 19: Sc2tog 3 times. (3)
Fasten off with an 8 in (20.3 cm) tail and close the tip.
Checkpoint: The body measures 1.75 in (4.4 cm) long and 0.4 in (1.0 cm) wide.
Antennae (make 2, worked directly on the head)
Join the thread at the top of the head, 1 st to the left of center.
Ch 14. Starting in the 2nd ch from the hook, work 3 sc in each of the next 4 ch, then sl st in each of the remaining 9 ch. (12 sc + 9 sl st = 13 ch used)
The 3-sc groups force the tip into a tight spiral curl. Sl st into the head, then repeat for the second antenna, 1 st to the right of center. Each antenna stands about 0.75 in (1.9 cm) tall.
Hanging loop: Join the thread at the center top of the head, between the antennae. Ch 45 and sl st in the same head st. Work a sl st in the back bump of each ch to firm up the cord, then fasten off. The loop hangs about 2 in (5.1 cm).
Attach the body: Center the body over the wing seams, with the head level with the top of the upper wings. Using the long tail, sew through the body’s underside and the frame sts 1–6 of all four wings.
Final Blocking
- Soak the ornament in cool water for 10 minutes. Press out the water in a towel without wringing.
- Pin it right side up on the blocking board to 3.5 in (8.9 cm) x 2.75 in (7.0 cm).
- Pin at every border increase point so the scallops stay rounded.
- Open the net with a pin tip so each diamond is even.
- Shape the antenna curls with your fingers.
- If you’re using stiffener, brush it on now or spray it with starch. Keep stiffener off the body so it stays rounded.
- Let it dry completely, at least 12 hours, before you unpin.
Final Quality-Control Checklist
- Upper frames have 42 sc and lower frames have 33 sc
- Upper wing nets have 14 loops per round and lower wing nets have 11
- Net centers are open, not puckered
- Border Round 1 has 36 / 26 / 26 / 36 sc
- The rope edge is even, with no twisted stitches
- Body has 4 visible ridges and sits centered
- Antennae curl in mirror image
- Final size is 3.5 in x 2.75 in (8.9 cm x 7.0 cm)
- All ends are woven in and invisible from the front
Troubleshooting
Wing cups or domes: The net center was cinched too tight. Loosen the Round 5 tail, or rework Round 4 with ch 3.
Net sags: Your loops are too long. Work the chains more snugly, or use a smaller hook for the net rounds only.
Border ruffles: You added extra increases. Recount against 36 / 26 per side.
Border pulls in at the tips: You missed an increase point. Add the 2-sc stitch at that tip.
Antennae won’t curl: Work the 3-sc groups tighter, or dampen and roll the tips around a toothpick to dry.
Body leans: Add a few stitches at the head and tail to anchor it to the frames.
Care
Hand wash in cool water with mild soap, and reshape and pin flat to dry. Re-starch if needed, and store flat or hanging, away from crushing.
Final Notes
The measurement chain is simple to follow. Each frame ring comes out at 1.5 in (3.8 cm) for the upper wings and 1.2 in (3.0 cm) for the lower wings. Shaped, the wings measure 1.5 in x 1.25 in (3.8 cm x 3.2 cm) and 1.25 in x 1 in (3.2 cm x 2.5 cm). Assembled, they measure 3 in x 2.25 in (7.6 cm x 5.7 cm). The border adds 0.25 in (0.6 cm) on every outer edge for a finished size of 3.5 in x 2.75 in (8.9 cm x 7.0 cm). Check each stage and your butterfly will come out crisp and true to size.
Happy crocheting!