

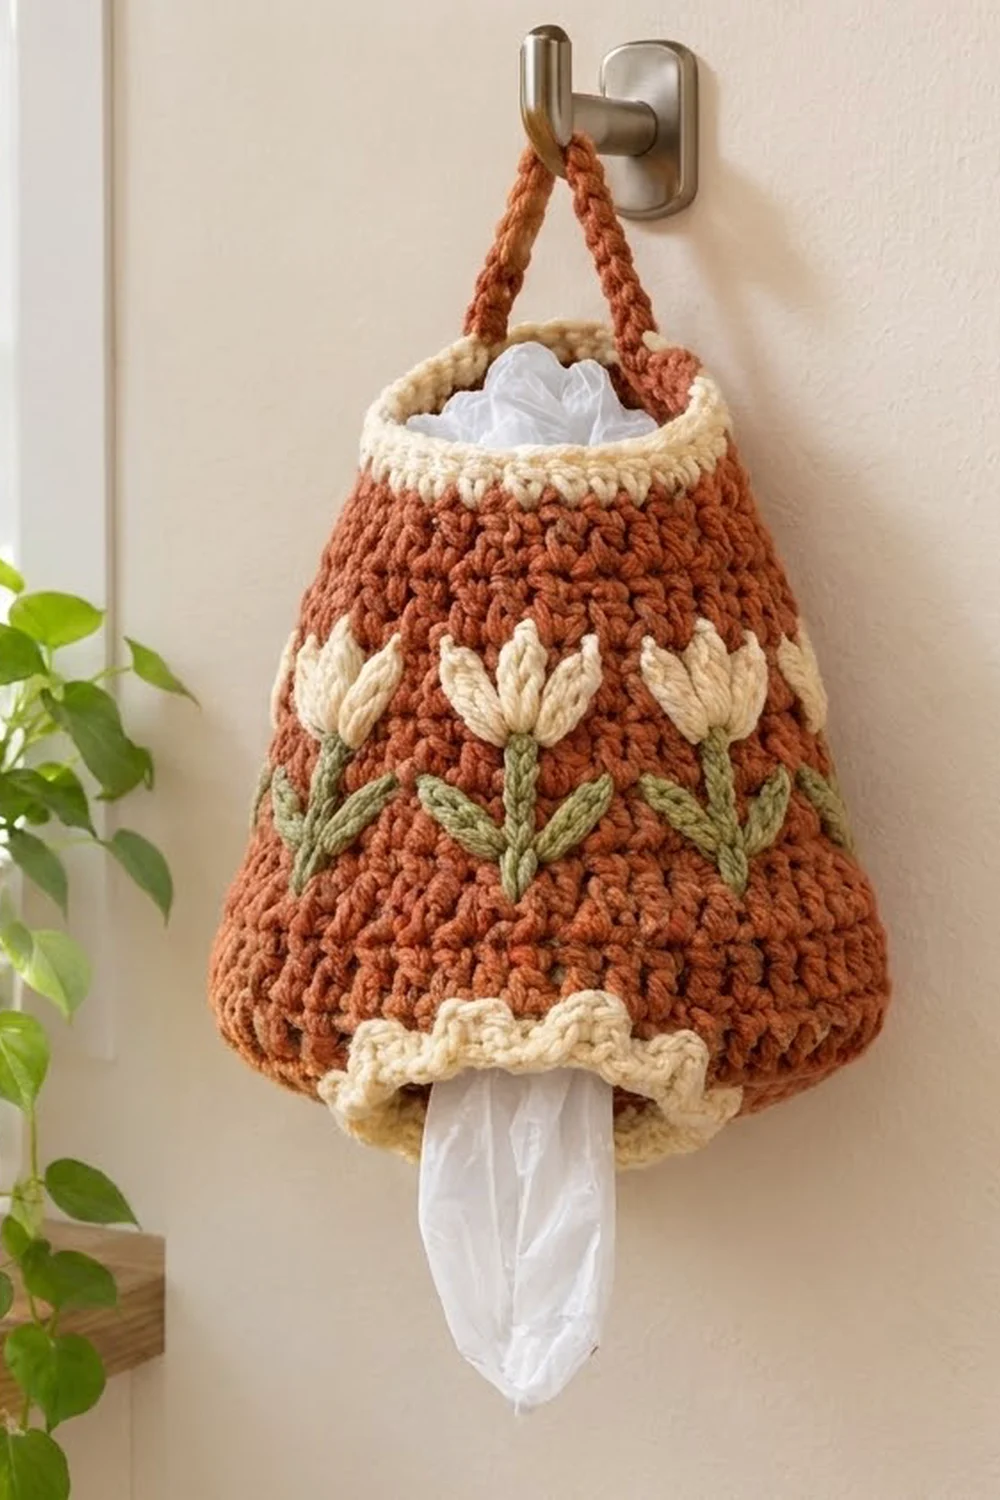
The Tulip Meadow Bag Holder is a cone-shaped hanging holder for plastic grocery bags. You stuff used bags in through the top opening and pull them out one at a time through the round opening at the bottom. It hangs from a wall hook by a slim strap and looks more like home decor than storage.
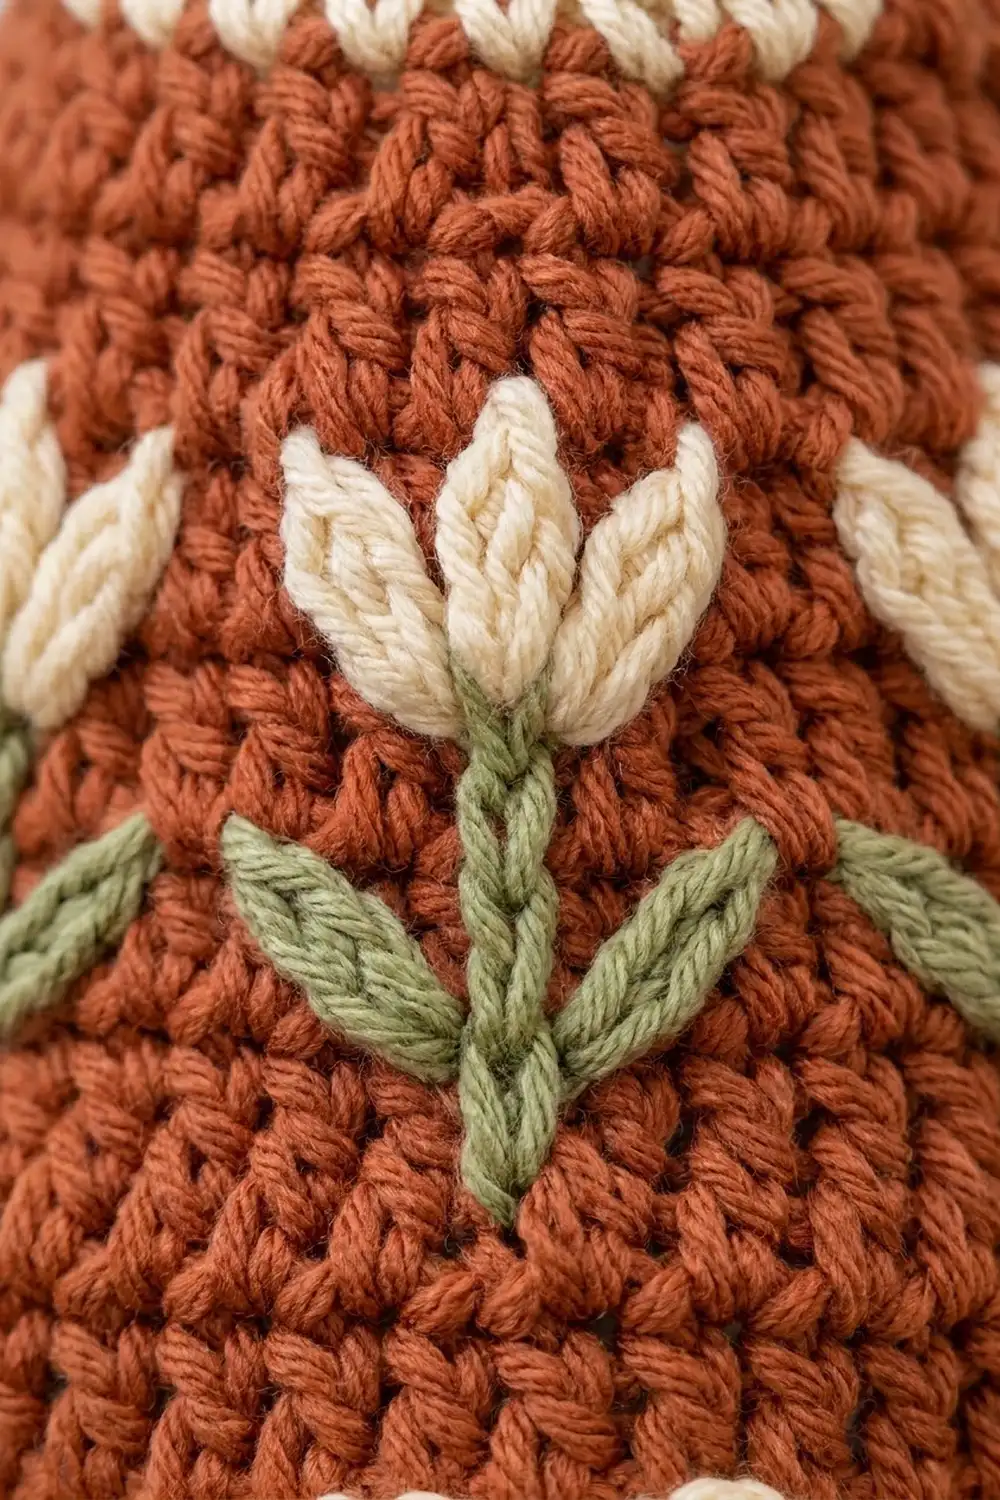
The body is a warm rust or terracotta shade. A cream rim finishes the top, and a cream scalloped frill circles the bottom opening. Around the middle runs a band of eight cream tulips with sage green stems and paired leaves. The tulips are embroidered onto the finished fabric, so you only ever crochet with one color at a time.
This pattern uses US crochet terms. The finished holder measures about 8 in (20.3 cm) across the bottom and 4.4 in (11.2 cm) across the top opening. It is about 9 in (22.9 cm) tall measured along the sloped side, not counting the 0.75 in (1.9 cm) scallop frill or the strap.
Construction is simple. You start at the bottom opening with a chain ring and work a flat ring-shaped base outward. One back-loop round turns the edge up, and the walls are worked in single crochet, decreasing gently toward the top. Then you add the cream top rim, the strap, the bottom scallops and the tulip embroidery.
Finished Size and Construction
- Finished size: 8 in (20.3 cm) bottom diameter, 4.4 in (11.2 cm) top diameter, about 9 in (22.9 cm) tall along the side
- Skill level: Easy to intermediate (basic embroidery)
- Terminology: US crochet terms
- Yarn weight: Worsted weight (#4) cotton or cotton blend
- Hook: 4.5 mm (US 7)
- Number of pieces: 1. The strap and edgings are worked directly onto the body.
- Layout: One seamless cone worked in the round, with a strap across the top
- Base size: 8 in (20.3 cm) outer diameter with a 3.8 in (9.7 cm) center opening
- Size before edgings: about 8.5 in (21.6 cm) wall height along the side
- Edging depth: top rim 0.5 in (1.3 cm); bottom scallops 0.75 in (1.9 cm)
Materials
Choose a smooth worsted weight cotton or cotton blend. Cotton holds the cone shape well, doesn’t stretch out when the holder is full, and shows the embroidery clearly. Acrylic also works, but the walls will be softer.
- Color A, Rust/Terracotta: about 70 g / 120 m (131 yd)
- Color B, Cream: about 15 g / 25 m (27 yd)
- Color C, Sage Green: about 10 g / 15 m (16 yd)
All quantities include a margin of about 20% for your gauge swatch and small differences in tension.
Tools:
- 4.5 mm (US 7) crochet hook
- Blunt tapestry needle
- 4 to 8 locking stitch markers
- Scissors
- Measuring tape
- Spray bottle and a cylinder or bowl for blocking
Abbreviations (US Terms)
- ch – chain
- sl st – slip stitch
- sc – single crochet
- dc – double crochet
- sc2tog – single crochet 2 together
- inc – 2 sc in the same stitch
- BLO – back loop only
- st(s) – stitch(es)
- rnd(s) – round(s)
Special stitches:
- Surface slip stitch: Hold the yarn behind the fabric. Insert the hook from front to back between stitches, pull up a loop, then pull it through the loop on your hook. This makes a raised chain line on the surface.
- Lazy daisy: Bring the needle up at the base point. Insert it back into the same hole and bring it out at the tip point, keeping the yarn loop under the needle tip. Pull through to make a teardrop loop, then go down just past the tip to anchor it.
Gauge and Checkpoints
Gauge: 14 sc and 15 rnds = 4 in (10.2 cm) in sc worked in the round.
That works out to 3.5 sts and 3.75 rnds per inch. Every measurement in this pattern comes from these two numbers, so check your gauge first. The test piece is the base itself. Work Rnds 1–8, then measure before you go further.
Checkpoint 1, after Rnd 1: The center opening is about 3.8 in (9.7 cm) across, or 12 in (30.5 cm) around (42 sts ÷ 3.5).
Checkpoint 2, after Rnd 8: The base lies flat and measures about 8 in (20.3 cm) across, about 24 in (61.0 cm) around (84 sts ÷ 3.5). The ring of fabric is about 2.1 in (5.3 cm) wide.
Checkpoint 3, after Rnd 24: The wall is about 4.3 in (10.9 cm) tall from the fold.
Checkpoint 4, after Rnd 40: The wall is about 8.5 in (21.6 cm) tall along the side, and the top opening is about 4.4 in (11.2 cm) across.
If your base is too big, go down half a hook size (4 mm). If it is too small, go up half a size (5 mm). If the base ruffles, your tension is tight in the increase rounds, so loosen up or go up a hook size. If it cups upward, go down a size.
Pattern
Work in continuous rnds without joining, unless stated. Place a marker in the first st of each rnd and move it up as you go.
Base (Color A)
Ch 42 and sl st to the first ch to form a ring. Be careful not to twist the chain.
Rnd 1: Ch 1, sc in each ch around. (42 sts)
Rnd 2: [Sc 6, inc] 6 times. (48 sts)
Rnd 3: [Sc 7, inc] 6 times. (54 sts)
Rnd 4: [Sc 8, inc] 6 times. (60 sts)
Rnd 5: [Sc 9, inc] 6 times. (66 sts)
Rnd 6: [Sc 10, inc] 6 times. (72 sts)
Rnd 7: [Sc 11, inc] 6 times. (78 sts)
Rnd 8: [Sc 12, inc] 6 times. (84 sts)
Each rnd adds exactly 6 sts. This is the right growth for a flat ring at this gauge. Check Checkpoint 2 now.
Walls (Color A)
Rnd 9 (turning round): Sc in BLO of each st around. (84 sts)
The unused front loops leave a neat ridge on the outside, and the work starts to rise into the walls.
Rnds 10–14: Sc in each st around. (84 sts)
Rnd 15: [Sc 12, sc2tog] 6 times. (78 sts)
Rnds 16–19: Sc in each st around. (78 sts)
Rnd 20: [Sc 11, sc2tog] 6 times. (72 sts)
Rnds 21–24: Sc in each st around. (72 sts)
Check Checkpoint 3.
Rnd 25: [Sc 10, sc2tog] 6 times. (66 sts)
Rnds 26–29: Sc in each st around. (66 sts)
Rnd 30: [Sc 9, sc2tog] 6 times. (60 sts)
Rnds 31–33: Sc in each st around. (60 sts)
Rnd 34: [Sc 8, sc2tog] 6 times. (54 sts)
Rnds 35–37: Sc in each st around. (54 sts)
Rnd 38: [Sc 7, sc2tog] 6 times. (48 sts)
Rnds 39–40: Sc in each st around. (48 sts)
Sl st in the next st and fasten off. The wall is Rnds 9–40, which makes 32 rnds, or about 8.5 in (21.6 cm) at 3.75 rnds per inch. Check Checkpoint 4.
The decreases get closer together toward the top, so the side curves gently into a bell shape instead of a straight cone.
Edgings
Edging Gauge
The edgings use the same hook and gauge as the body. Two sc rnds add about 0.5 in (1.3 cm) of height. Each scallop covers 3 sts, or about 0.86 in (2.2 cm) of edge, and hangs about 0.75 in (1.9 cm) deep.
Top Rim (Color B)
Rnd 41: Join Color B in any st of Rnd 40. Ch 1, sc in each st around. (48 sts) Join with a sl st to the first sc.
Rnd 42: Ch 1, sc in each st around. (48 sts) Join with a sl st to the first sc and fasten off.
The rim keeps the same 48 sts, so the top opening stays at about 13.7 in (34.8 cm) around and won’t flare. Number the rim sts from 1 to 48, starting at the join, and mark st 1 and st 25. These two sts are exactly opposite each other, with 23 sts between them on each side.
Strap (Color A)
Row 1: Join Color A with a sl st in marked st 1 of Rnd 42. Ch 40. Carry the chain across the opening without twisting it, and sl st in marked st 25.
Row 2: Ch 1, turn. Sc in each ch across. (40 sts) Sl st in st 1 of the rim.
Row 3: Ch 1, turn. Sc in each sc across. (40 sts) Sl st in st 25 of the rim and fasten off.
The strap is 40 sts long, so it measures 40 ÷ 3.5 = about 11.4 in (29.0 cm). It spans a 4.4 in (11.2 cm) opening, so the peak of the loop rises about 5 in (12.7 cm) above the rim. The strap is about 0.5 in (1.3 cm) wide.
Bottom Scallops (Color B)
Turn the holder upside down. The free loops of the starting chain show around the center opening.
Rnd 1: Join Color B in any free loop of the starting chain. Ch 1, sc in each free loop around. (42 sts) Join with a sl st to the first sc.
Rnd 2: *Sl st in next st, 5 dc in next st, skip next st; repeat from * 13 more times. (14 scallops: 14 sl sts + 70 dc = 84 sts) Join with a sl st to the first sl st and fasten off.
Why the math works: Each scallop repeat uses exactly 3 sts of Rnd 1. 42 ÷ 3 = 14, so the last repeat ends right at the join with no partial scallop. Five dc fanned into one st make the frill flare outward. That’s the ruffled look around the opening.
Tulip Embroidery
The tulip band sits on Rnds 18–28: green stems on Rnds 18–24 and cream flowers on Rnds 24–28. Each tulip is about 2.9 in (7.4 cm) tall.
Placement: On Rnd 21 (72 sts), place a marker in every 9th st, for 8 markers in total. The tulips are spaced about 2.6 in (6.6 cm) apart. Place one marker directly below a strap join so the tulips line up with the strap.
Stem (Color C): With the hook, work a surface slip stitch line straight up from Rnd 18 to Rnd 24 above each marker, with one sl st per rnd. (7 sl sts) Fasten off on the inside.
Leaves (Color C): Use a doubled strand on the needle. Work 2 pairs of lazy daisy leaves on each stem. For each pair, start at the stem on Rnd 19, and make one leaf angling up and out to the left and one to the right, each ending on Rnd 21, 2 sts from the stem. Work the second pair from Rnd 22, ending on Rnd 24. The paired leaves form a V on each side.
Petals (Color B): Use a doubled strand on the needle. Starting from the top of the stem on Rnd 24, make 3 lazy daisy petals:
- One straight up to Rnd 28, about 1.1 in (2.8 cm) long
- One angling up and left to Rnd 27, 2 sts to the side
- One angling up and right to Rnd 27, 2 sts to the side
Pull each loop snug enough to sit plump but not pucker the fabric. Weave in all ends on the inside.
Final Blocking
- Weave in any remaining ends on the inside of the holder.
- Lightly mist the whole piece with water until it is damp, not soaked.
- Slip the holder over a cylinder or an upturned bowl about 8 in (20.3 cm) across at the bottom, or stuff it firmly with towels.
- Smooth the walls so the decrease lines run straight and the tulips sit level.
- Press the BLO ridge of Rnd 9 into a crisp fold.
- Pinch each scallop into an even fan and let them all point downward.
- Lay the strap flat and straight.
- Let it dry completely, about 24 hours, before hanging.
Final Quality-Control Checklist
- Bottom diameter is about 8 in (20.3 cm), top is about 4.4 in (11.2 cm)
- Height is about 9 in (22.9 cm) along the side, within 0.5 in (1.3 cm)
- Final wall rnd has 48 sts and the rim also has 48 sts
- 14 even scallops with no partial repeat at the join
- Strap is attached at two opposite points and has no twist
- 8 tulips, evenly spaced, all at the same height
- No embroidery puckers, and all ends are secured on the inside
- Bags pull out of the bottom opening one at a time
Troubleshooting
Base ruffles or cups: Check the 6-per-rnd increases and your tension. Ruffles mean go up a hook size; cupping means go down a size.
Walls flare instead of tapering: Count the sts after each decrease rnd. A missed sc2tog leaves extra sts.
Ridge at Rnd 9 is not visible: Make sure you worked into the back loops only, not both loops.
Scallops don’t fit evenly: Rnd 1 of the edging must have exactly 42 sts. Recount, and add or remove sc to fix it.
Strap tilts: The joins must be exactly 24 sts apart (st 1 and st 25).
Tulips lean: Re-mark the 9-st spacing on Rnd 21 and stitch each stem straight up a single column.
Bags fall out too easily: Work the bottom edging Rnd 1 with sc2tog at even intervals to tighten the opening. Then adjust the scallop repeat to match your new count, which must be a multiple of 3.
Care
Hand wash in cool water with mild soap, gently squeeze out the water, and dry flat over a bowl to keep the shape. Don’t tumble dry, or the embroidery may felt and the cone may lose its shape.
Final Notes
The whole design follows one measurement chain. With 14 sts and 15 rnds per 4 in (10.2 cm), the 42-st ring gives a 3.8 in (9.7 cm) opening. Eight base rnds grow it to 84 sts and 8 in (20.3 cm) across. The 32 wall rnds taper to 48 sts and rise about 8.5 in (21.6 cm). Two cream rim rnds bring the height to about 9 in (22.9 cm). The 40-st strap, 14 scallops and 8 tulips all divide evenly into those counts. If your checkpoints match, the finished holder will match too.
Happy crocheting!