

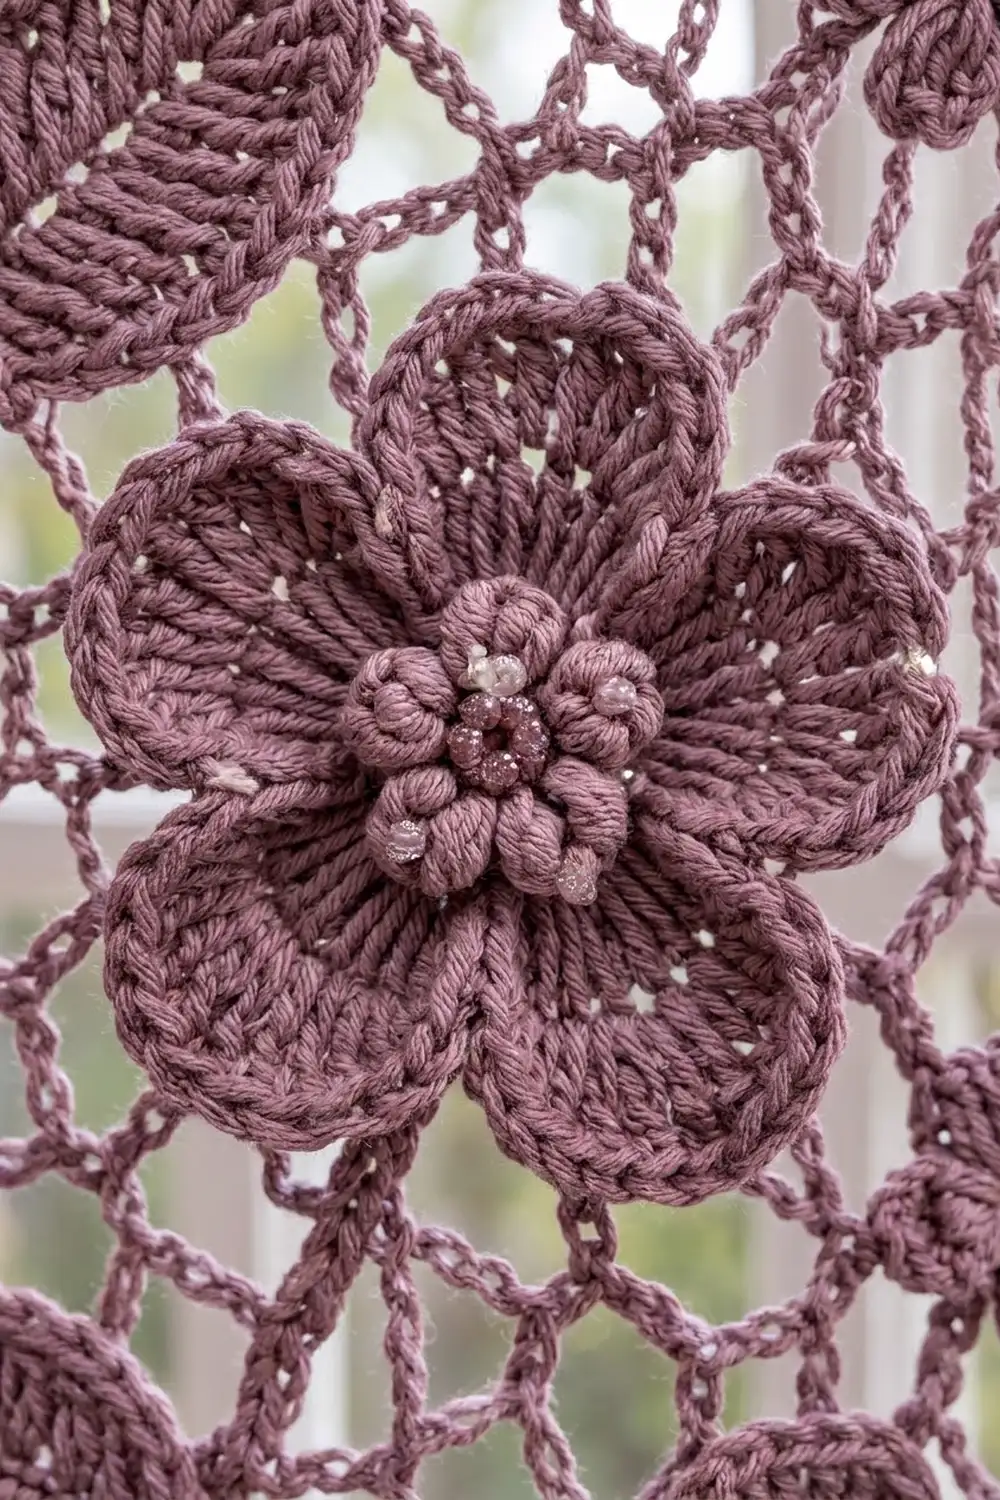
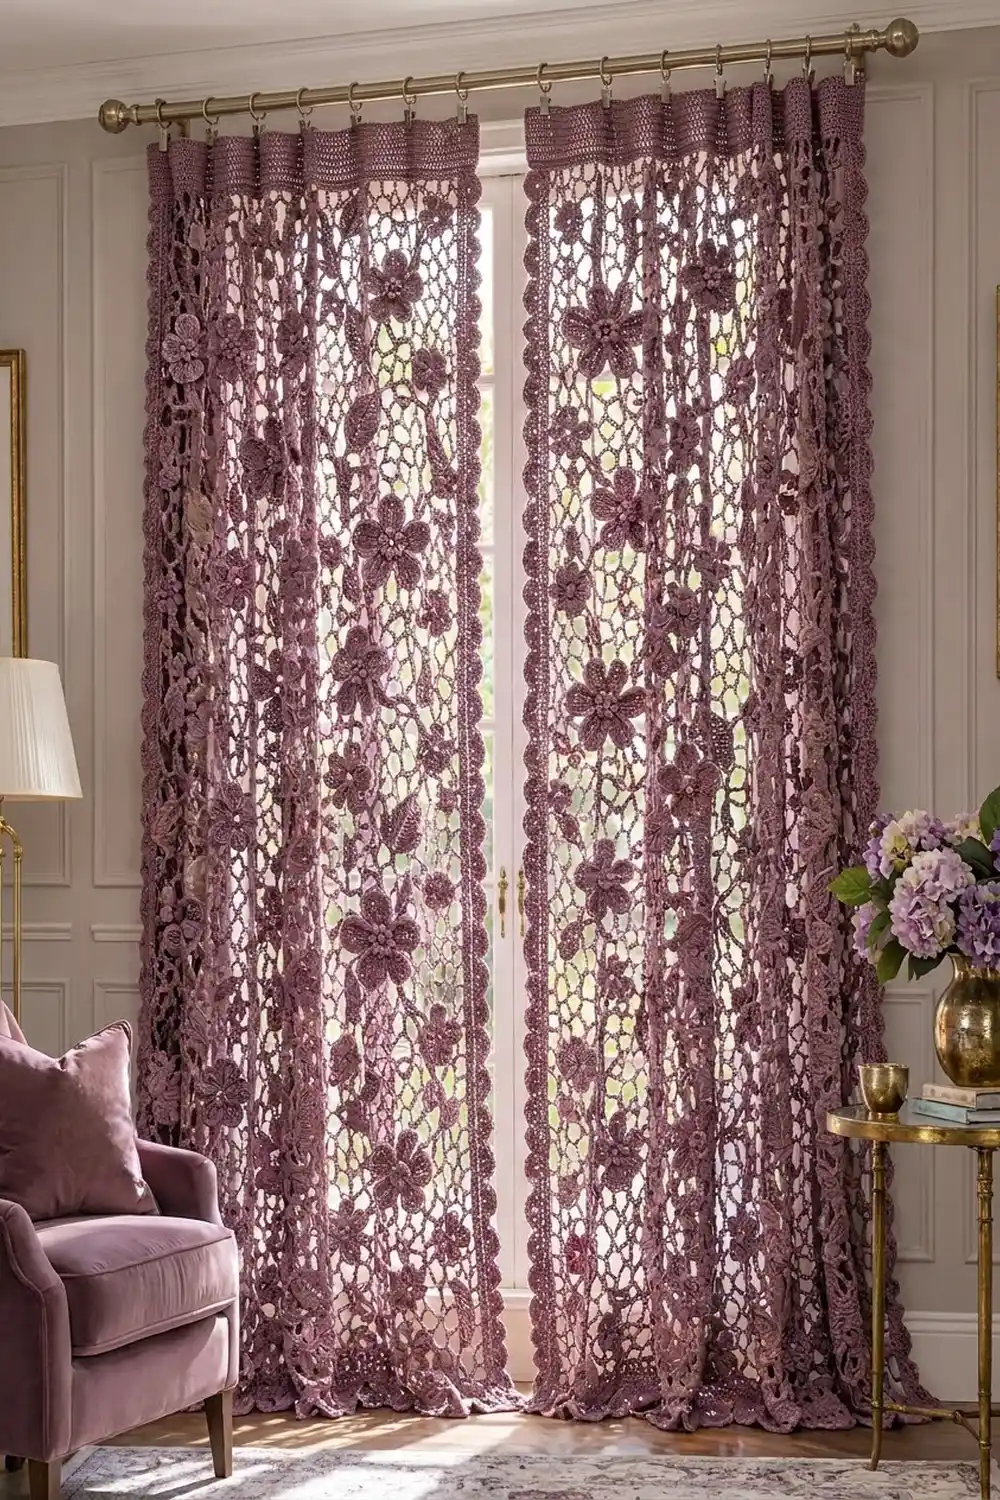
The Mauve Arbor Lace Curtain Panel is a full-length curtain made of light chain-mesh net. Raised flowers and veined leaves sit on top of the mesh. A scalloped edge runs down both sides and across the bottom, and a solid band at the top holds the curtain clips. It looks like Irish lace but is simpler to make.
The panel uses one color, a soft dusty mauve. With a single shade, the texture stands out: bobble flower centers, ridged petal outlines and leaf veins catch the light against the open net. Make two panels for a pair.
This pattern uses US crochet terms. One finished panel measures 40¼ in (102.2 cm) wide by 84 in (213.4 cm) long, including the scalloped border.
How it’s made:
1. Crochet a solid header band.
2. Work the mesh in rows straight down from the header.
3. Make the flowers and leaves separately and sew them on following a layout grid.
4. Work a two-round scalloped border down both sides and across the bottom.
Finished Size and Construction
- Finished size (one panel): 40¼ x 84 in (102.2 x 213.4 cm)
- Skill level: Intermediate
- Terminology: US
- Yarn weight: DK (#3) cotton
- Hook: 4.0 mm (G-6)
- Pieces per panel: 55 in total: 1 header-and-mesh body, 12 large flowers, 18 small flowers and 24 leaves
- Layout: appliqués in 6 tiers down the mesh and 4 columns across
- Piece sizes:
- Large flower: 3 in (7.6 cm) across
- Small flower: 1½ in (3.8 cm) across
- Leaf: 3½ x 1½ in (8.9 x 3.8 cm)
- Size before border: 38¼ x 83 in (97.2 x 210.8 cm)
- Border depth: 1 in (2.5 cm) on the sides and bottom. The top edge has no border.
Materials
Use a smooth mercerized or combed DK cotton. Cotton keeps the scallops crisp and stretches very little while hanging. Avoid fuzzy yarns, because they blur the mesh.
- Dusty Mauve: 400 g / 920 m per panel, or 800 g / 1,840 m for a pair. That is eight 50 g balls (about 115 m each) per panel.
These amounts include about a 20% margin for swatching, sewing tails and differences in gauge.
Tools
- 4.0 mm (G-6) crochet hook
- Blunt tapestry needle
- Rust-proof pins and stitch markers
- Measuring tape
- Spray bottle, plus blocking mats or a clean carpeted floor
- 8–10 ring curtain clips per panel
Abbreviations (US Terms)
- ch – chain
- sl st – slip stitch
- sc – single crochet
- hdc – half double crochet
- dc – double crochet
- tr – treble crochet
- BLO – back loop only
- sk – skip
- sp(s) – space(s)
- st(s) – stitch(es)
- MR – magic ring
- RS / WS – right side / wrong side
Special stitch – Bobble (BO): *Yo, insert hook in st, yo, pull up a loop, yo, draw through 2 loops; repeat from * 2 more times in the same st (4 loops on hook), yo, draw through all 4 loops.
Gauge and Checkpoints
- Solid sc: 16 sc and 18 rows = 4 in (10.2 cm)
- Mesh: 4 ch-5 loops by 4 rows = 4 in (10.2 cm) wide and 3 in (7.6 cm) tall, so each mesh row is ¾ in (1.9 cm) tall.
Before you start the panel, make a test piece:
1. Work 17 sc for 9 rows.
2. Work 8 rows of mesh above it, with 4 loops per row.
3. Make one large flower and one leaf.
Pin the test piece out lightly and measure it.
Checkpoints:
– Large flower: 3 in (7.6 cm) across
– Leaf: 3½ in (8.9 cm) long
– Header after Row 9: 38¼ x 2 in (97.2 x 5.1 cm)
– After Mesh Row 12: 11 in (27.9 cm) long, including the header
– After Mesh Row 108: 83 in (210.8 cm) long
If your gauge is too big, go down one hook size. If it’s too small, go up one size. If only the mesh is off, change hooks for the mesh rows only.
Header Band
Ch 154.
Row 1 (RS): Sc in 2nd ch from hook and in each ch across. (153 sc)
Rows 2–9: Ch 1, turn, sc in each sc across. (153 sc)
The header should measure 38¼ x 2 in (97.2 x 5.1 cm). Don’t fasten off.
Mesh Body
The mesh is worked down from the header.
– Odd rows have 38 full loops.
– Even rows have 37 full loops plus a half loop at each edge. The half loops keep the side edges straight.
Mesh Row 1: Ch 1, turn, sc in first sc, *ch 5, sk 3 sc, sc in next sc; repeat from * 37 more times. (39 sc and 38 ch-5 loops; this uses 1 + 38 x 4 = 153 header sts)
Mesh Row 2: Turn, ch 5 (counts as dc + ch 2), sc in first ch-5 loop, *ch 5, sc in next ch-5 loop; repeat from * 37 times, ch 2, dc in last sc. (38 sc, 37 full loops and 2 half loops)
Mesh Row 3: Ch 1, turn, sc in first dc, *ch 5, sc in next ch-5 loop; repeat from * 37 times, ch 5, sc in 3rd ch of turning ch-5. (39 sc and 38 full loops)
Mesh Rows 4–108: Repeat Mesh Rows 2 and 3, ending with a Row 2 repeat. Row 108 has 38 sc, 37 full loops and 2 half loops.
The mesh measures 108 x ¾ in = 81 in (205.7 cm). With the header, the panel is now 83 in (210.8 cm) long. Fasten off.
Large Flower (make 12 per panel)
Rnd 1 (RS): MR, ch 1, 10 sc in ring, sl st to first sc. (10 sc)
Rnd 2 (WS): Turn, ch 1, *sc in next st, BO in next st; repeat from * 4 more times, sl st to first sc. (10 sts: 5 sc and 5 BO) You work this round on the WS so the bobbles pop out on the RS and form the beaded center.
Rnd 3 (RS): Turn, ch 1, *sc in next sc, ch 5, sk next BO; repeat from * 4 more times, sl st to first sc. (5 sc and 5 ch-5 sps)
Rnd 4: *In next ch-5 sp work (sc, hdc, 7 dc, hdc, sc), sl st in next sc; repeat from * 4 more times. (5 petals of 11 sts each = 55 sts, plus 5 sl sts)
Rnd 5: Ch 1. Working in BLO and skipping the sl sts, *sc in next 5 sts, 2 sc in next st (the center dc), sc in next 5 sts; repeat from * 4 more times, sl st to first sc. (55 sts worked 1 per st + 5 extra = 60 sc, or 12 per petal) Working in the back loop leaves a raised ridge around each petal.
Fasten off, leaving a 12 in (30.5 cm) tail for sewing. The flower should be 3 in (7.6 cm) across.
Small Flower (make 18 per panel)
Rnd 1: MR, ch 1, 10 sc in ring, sl st to first sc. (10 sc)
Rnd 2: *(Sc, hdc, dc, hdc, sc) in next sc, sl st in next sc; repeat from * 4 more times. (5 petals of 5 sts each = 25 sts, plus 5 sl sts)
Pull the ring tight to make a small knot in the center. Fasten off, leaving a 10 in (25.4 cm) tail. The flower should be 1½ in (3.8 cm) across.
Leaf (make 24 per panel)
Ch 13.
Rnd 1: Work along the first side of the chain: sc in 2nd ch from hook, hdc in next ch, dc in next 2 ch, tr in next 4 ch, dc in next 2 ch, hdc in next ch. Work 3 sc in the last ch to form the tip. Then work along the other side of the foundation ch: hdc in next ch, dc in next 2 ch, tr in next 4 ch, dc in next 2 ch, hdc in next ch, sc in last ch. Sl st to first sc. (11 + 3 + 11 = 25 sts)
Rnd 2: Ch 1. Working in BLO, sc in each st up to the middle sc of the tip, (sc, ch 2, sc) in that middle sc, sc in each remaining st, sl st to first sc. (25 sts worked 1 per st + 1 extra = 26 sc, plus 1 ch-2 tip)
Vein: With the RS facing, surface sl st along the foundation chain from the base to the tip.
Fasten off, leaving a 12 in (30.5 cm) tail. The leaf should measure 3½ x 1½ in (8.9 x 3.8 cm).
Make All Pieces
Per panel:
– 1 header-and-mesh body
– 12 large flowers
– 18 small flowers
– 24 leaves
Make everything in Dusty Mauve. For a pair, make two of everything.
Layout grid: Divide the mesh into 6 tiers and 4 columns:
– Tiers: 18 mesh rows each, or 13½ in (34.3 cm) tall. Center the motifs on the 9th row of each tier.
– Columns: about 9½ in (24.1 cm) wide each. Counting from the right edge, center them on loops 5, 15, 24 and 34.
          Col 1        Col 2        Col 3        Col 4
Tier 1    F + 2 L      f            F + 2 L      f + f
Tier 2    f + f        F + 2 L      f            F + 2 L
Tier 3    F + 2 L      f            F + 2 L      f + f
Tier 4    f + f        F + 2 L      f            F + 2 L
Tier 5    F + 2 L      f            F + 2 L      f + f
Tier 6    f + f        F + 2 L      f            F + 2 L
Key: F = large flower, f = small flower, L = leaf. Each tier has 2 F, 3 f and 4 L, so the panel has 12 F, 18 f and 24 L in total.
Joining
Lay the mesh flat with the RS up and pin it to 38¼ in (97.2 cm) wide. Pin every motif in a tier before you sew any of them.
Large flowers:
1. Tack the base of the flower (Rnd 3) to the mesh with one stitch at the base of each petal (5 tacks). Catch a mesh sc or chain each time.
2. Tack each petal tip to the nearest mesh chain (5 tacks).
The petals stay free between tacks, so they stand up from the mesh.
Leaves:
1. Tuck the leaf base ½ in (1.3 cm) under a petal, angled outward.
2. Tack every ½ in (1.3 cm) along the vein.
3. Tack once at the ch-2 tip.
Small flowers: Tack the center in 4 places and each petal tip once.
Tension: Each tack should hold the motif without pulling the mesh. If a loop next to a motif closes up or puckers, remove that tack and redo it more loosely. Weave the tails through the back of their own motif so they don’t show through the open mesh.
Size checkpoint: After each tier, measure its width. It should still be 38¼ in (97.2 cm).
Border
The border goes around three sides: down the right side, across the bottom and up the left side. Leave the top of the header plain for the clips.
Border gauge: Rnd 1 has 4 sc per inch (2.5 cm). Each scallop uses 4 sts and measures 1 in (2.5 cm) wide and ¾ in (1.9 cm) tall.
Rnd 1 (RS): Join yarn at the top right corner of the header.
– Right side: 1 sc in each of the 9 header row ends, then 3 sc around each of the 108 mesh row ends. (9 + 324 = 333 sc)
– Corner: Ch 2.
– Bottom: 2 sc in each half loop, 1 sc in each of the 38 sc, and 3 sc in each of the 37 full loops. (4 + 38 + 111 = 153 sc)
– Corner: Ch 2.
– Left side: Work as for the right side. (333 sc)
Fasten off.
Rnd 1 counts: 333 sc on each side and 153 sc across the bottom, for 819 sc in total. These counts don’t include the two ch-2 corner spaces.
Rnd 2 (RS): Rejoin yarn in the first sc of Rnd 1 at the top right.
– Right side: Sc in first sc, sk 1, 5 dc in next sc, sk 1, sc in next sc; repeat from * 83 times. (1 + 83 x 4 = 333 sts used; 83 scallops)
– Corner: 7 dc in the ch-2 sp.
– Bottom: Sc in first sc, sk 1, 5 dc in next sc, sk 1, sc in next sc; repeat from * 38 times. (1 + 38 x 4 = 153 sts used; 38 scallops)
– Corner: 7 dc in the ch-2 sp.
– Left side: Work as for the right side. (83 scallops)
Fasten off. You have 204 scallops plus 2 corner fans.
Why the math works: Each scallop uses 4 sts, and each edge needs one extra sc so it starts and ends with a sc.
– Sides: 333 = 4 x 83 + 1
– Bottom: 153 = 4 x 38 + 1
That way, every edge ends exactly at a corner. The bottom count also matches the header’s 153 sts, so the panel stays the same width from top to bottom.
The border adds 1 in (2.5 cm) to each side and to the bottom:
– Width: 38¼ + 2 = 40¼ in (102.2 cm)
– Length: 83 + 1 = 84 in (213.4 cm)
Final Blocking
- Weave in all remaining ends through solid stitches, never across the open mesh.
- Soak the panel in cool water for 15 minutes. Gently press out the water without wringing, then roll the panel in towels.
- Lay the panel flat and pin the header to 40¼ in (102.2 cm) wide, including the border.
- Pin the sides straight to 84 in (213.4 cm) long, with a pin every 6 in (15.2 cm).
- Ease the mesh open into even diamonds and pin the point of every bottom scallop.
- Shape the petals and leaf tips with your fingers so they curve up slightly.
- Let it dry completely before you unpin.
If you’re short on space, block the panel in three sections of about 28 in (71.1 cm) each.
Final Quality-Control Checklist
- Header has 153 sc and is 2 in (5.1 cm) deep.
- Mesh has 108 rows, and the side edges are straight.
- 12 large flowers, 18 small flowers and 24 leaves are placed according to the grid.
- No puckers around the tacked motifs.
- Border has 83 scallops on each side, 38 across the bottom and 2 corner fans.
- Panel measures 40¼ x 84 in (102.2 x 213.4 cm).
- No tails show on the RS.
Troubleshooting
- Mesh edges wander: A half loop is missing. Every even row should start with ch 5 and end with ch 2, dc.
- Panel narrows toward the bottom: Your ch-5 loops are too tight. Go up one hook size for the mesh.
- Bobbles sink to the back: Work Rnd 2 of the large flower with the WS facing.
- Petals cup: Rnd 5 is too tight. Work it more loosely.
- Scallops ruffle or pull in: Recount Rnd 1. You should have 3 sc per mesh row end.
- Panel grows longer after hanging: Cotton mesh relaxes over time. Re-block the panel and pin it slightly shorter.
Care
Hand wash in cool water with a mild detergent. Dry flat and reshape the scallops and petals. Don’t tumble dry, and don’t hang the panel while it’s wet.
Final Notes
Each measurement builds on the one before it:
1. The swatch sets the gauge: 16 sc to 4 in (10.2 cm) and mesh rows ¾ in (1.9 cm) tall.
2. The 153-st header sets the width at 38¼ in (97.2 cm).
3. The 108 mesh rows add 81 in (205.7 cm).
4. Sewing on the appliqués doesn’t change the width.
5. The border’s 333-st sides and 153-st bottom divide evenly into scallops, for a finished size of 40¼ x 84 in (102.2 x 213.4 cm).
If you match each checkpoint, the panel will hang straight and even.
Happy crocheting!