

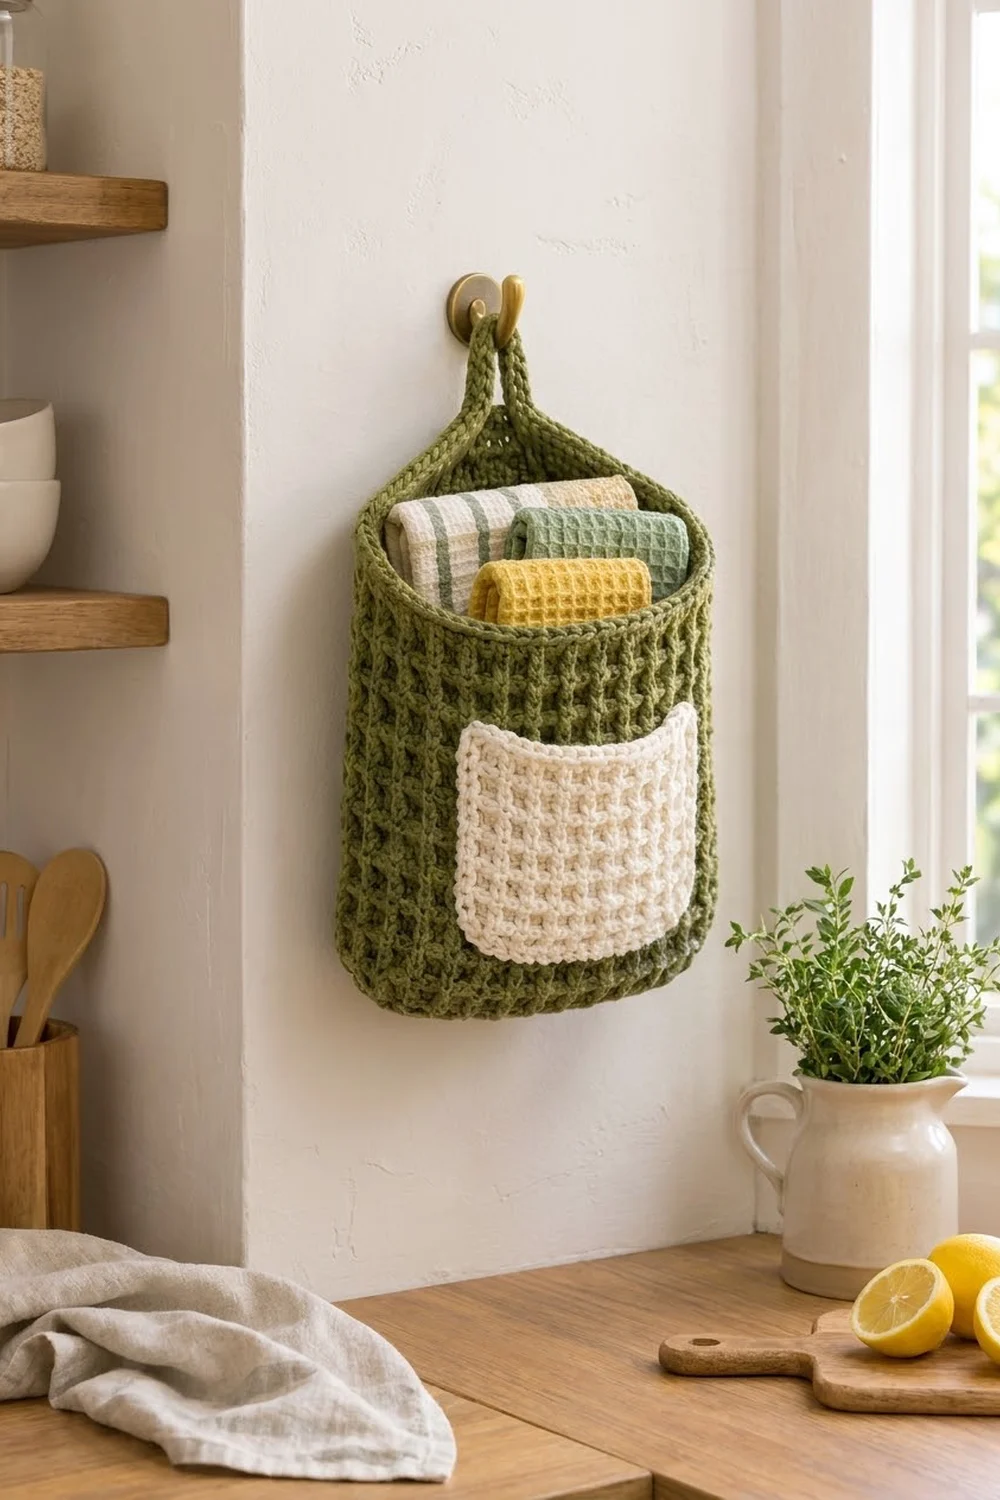
This hanging wall basket gives dishcloths, mail or small kitchen items a place off the counter. The olive green body is worked in deep waffle stitch, so it holds its shape. A cream waffle-stitch pocket on the front adds a second storage spot and a bit of contrast.
The style is simple farmhouse: two colors, one strong texture and a clean crab-stitch rim. The back rises above the front and tapers into a strap that folds into a loop, so the basket hangs neatly on a single hook.
This pattern uses US crochet terms. The finished basket is 8 in (20.3 cm) wide flattened and 9 in (22.9 cm) tall at the front rim. The back peak is 10.75 in (27.3 cm) tall, and the overall height with the loop is about 12.75 in (32.4 cm).
You start with an oval base, then work the body in joined waffle-stitch rounds. Next you shape the back in rows, add the strap and edge the opening. The pocket is a separate flat piece that you sew onto the front.
Finished Size and Construction
- Finished size: 8 in (20.3 cm) wide flattened; 9 in (22.9 cm) front height; 12.75 in (32.4 cm) overall with loop
- Base: 6.5 in × 2.5 in (16.5 cm × 6.4 cm) oval
- Skill level: Intermediate (post stitches, working in rounds and rows)
- Terminology: US
- Yarn weight: Worsted (#4), cotton or cotton blend
- Hook: 5.0 mm (H-8)
- Number of pieces: 2 (basket body and pocket)
- Layout: Pocket centered on the front, 1.5 in (3.8 cm) above the base edge
- Pocket size: 5.2 in × 5 in (13.2 cm × 12.7 cm)
- Body height before border: 8.5 in (21.6 cm) at the front
- Border depth: 0.5 in (1.3 cm)
Materials
Use a smooth worsted-weight cotton. It shows the waffle grid clearly and gives a firm fabric that will not sag under a load. Acrylic also works, but the basket will be softer.
- Olive green (main color, MC): about 190 g / 320 m (350 yd)
- Cream (contrast color, CC): about 40 g / 70 m (77 yd)
Both amounts include a margin of roughly 15 percent. Waffle stitch uses a lot of yarn, so it is better to have extra than to run short on the last rounds.
Tools:
– 5.0 mm (H-8) crochet hook
– Stitch markers (at least 3)
– Tapestry needle
– Scissors
– Measuring tape
– Rust-proof pins and a blocking surface
– Spray bottle
Abbreviations (US Terms)
- ch – chain
- sl st – slip stitch
- sc – single crochet
- dc – double crochet
- BLO – back loop only
- FPdc – front post double crochet: yarn over, insert the hook from front to back to front around the post of the stitch, then complete a dc
- BPdc – back post double crochet: as FPdc, but insert the hook from back to front to back
- sc2tog – single crochet 2 together
- dc3tog – double crochet 3 together
- rev sc – reverse single crochet (crab stitch): sc worked from left to right
- st(s) – stitch(es)
- RS / WS – right side / wrong side
Waffle stitch in the round (multiple of 3 sts):
– Waffle Round A: FPdc around next st, dc in next 2 sts around.
– Waffle Round B: dc in next st, FPdc around each of next 2 sts around.
The dc in Round B always sits above the FPdc from Round A. That offset is what builds the raised grid.
Gauge and Checkpoints
Gauge: 12 sts and 8 rounds in waffle stitch = 4 in (10.2 cm).
Make the pocket first and use it as your gauge swatch. Its 14-stitch waffle section should measure 4.7 in (11.9 cm) wide, and its 8 dc rows should be 4 in (10.2 cm) tall.
Checkpoints:
– After base Rnd 2: oval is 6.5 in × 2.5 in (16.5 cm × 6.4 cm), lying flat.
– After Rnd 11: body is 4.5 in (11.4 cm) tall from the base edge.
– After Rnd 19: body is 8.5 in (21.6 cm) tall and 8 in (20.3 cm) wide when flattened.
– After back Row 5: peak is 10.75 in (27.3 cm) from the base edge.
If your pieces are too big, go down a hook size, to 4.5 mm. If they are too small, go up to 5.5 mm. Post stitches tighten with practice, so measure again after the first 4 body rounds.
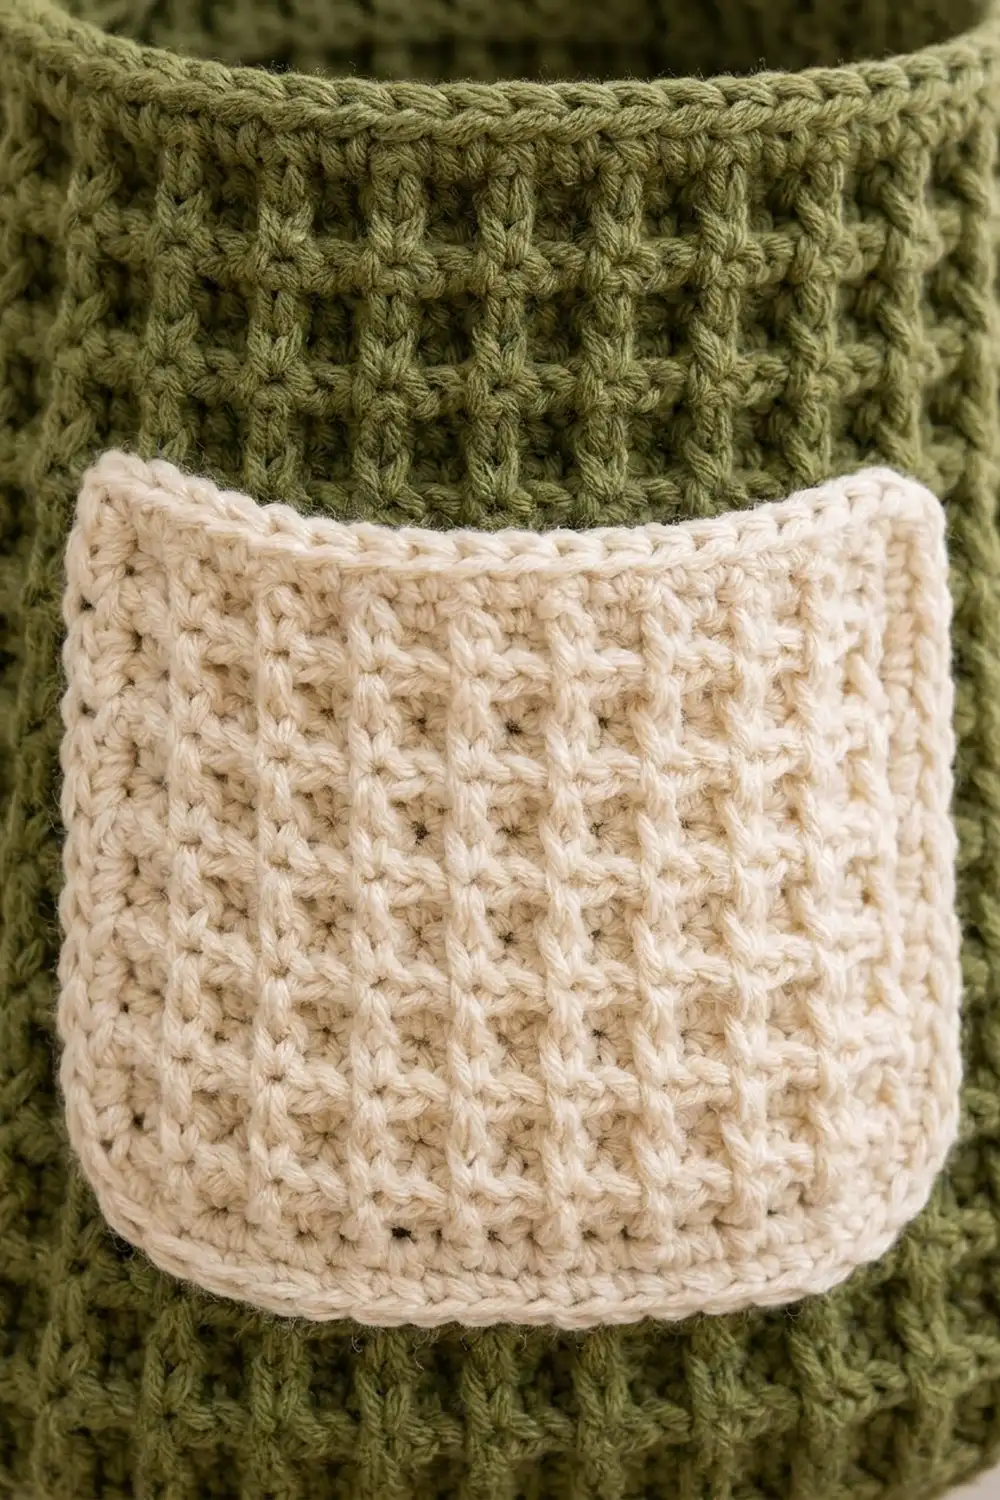
Pocket (Make 1)
With CC, ch 16.
Row 1 (WS): Dc in 3rd ch from hook and in each ch across. (14 dc). The skipped chs do not count.
Row 2 (RS): Ch 2 (does not count), turn. Dc in first st, FPdc around next st, dc in next 2 sts 4 times, dc in last st. (14 sts)
Row 3 (WS): Ch 2, turn. Dc in first st, BPdc around each of next 2 sts, dc in next st 4 times, dc in last st. (14 sts)
On the WS, the BPdc stitches go around the dc stitches from Row 2 and pop forward on the RS. The plain dc stitches sit on top of the Row 2 FPdc.
Rows 4–8: Repeat Rows 2–3 twice, then Row 2 once more. (14 sts per row; 8 dc rows in total)
Checkpoint: the piece is 4.7 in (11.9 cm) wide and 4 in (10.2 cm) tall.
Row 9 (WS): Ch 1, turn. Sc in each st across. (14 sc)
Row 10 (RS): Ch 1, turn. Sc in each st across. (14 sc)
These two rows make the firm band across the pocket opening. Fasten off.
Pocket Edging
With the RS facing, join CC in the first st of Row 10.
Edging Rnd (RS):
– Top: 3 sc in first st, sc in next 12 sts, 3 sc in last st. That is 14 sts worked 1 per stitch plus 4 extra at the corners, for 18 sc.
– Side: Working down the row ends, 1 sc in each of the 2 sc row ends and 2 sc in each of the 8 dc row ends, for 18 sc.
– Bottom: Working into the foundation chain, 2 sc in first ch, sc in next 12 ch, 2 sc in last ch. That is 14 chains worked 1 per stitch plus 2 extra, for 16 sc.
– Second side: 2 sc in each of the 8 dc row ends and 1 sc in each of the 2 sc row ends, for 18 sc.
Sl st to the first sc. (70 sc total: 18 + 18 + 16 + 18)
The bottom corners get only 2 sc each instead of 3. This keeps them from forming points, so they curve gently into the sides. Fasten off and leave a 24 in (61.0 cm) tail for sewing.
Pocket checkpoint: 5.2 in × 5 in (13.2 cm × 12.7 cm).
Basket Base
With MC, ch 16.
Rnd 1: 3 dc in 3rd ch from hook, dc in next 12 ch, 6 dc in last ch. Rotate and work along the underside of the chain: dc in next 12 ch, then 3 dc in the same ch as the first 3 dc. Sl st to the first dc. (36 dc)
The skipped chs do not count. Each end now has 6 dc fanned around it.
Rnd 2: Ch 2 (does not count throughout). 2 dc in each of the first 3 sts, dc in next 12 sts, 2 dc in each of next 6 sts, dc in next 12 sts, 2 dc in each of last 3 sts. Sl st to the first dc. (48 dc)
The breakdown is 6 + 12 + 12 + 12 + 6 = 48. The straight sides stay at 12 sts, and each curved end grows from 6 to 12 sts. This is the same rate as a flat dc circle, so the base lies flat.
Checkpoint: 6.5 in × 2.5 in (16.5 cm × 6.4 cm).
Basket Body
Rnd 3: Ch 2. Dc in the BLO of each st around. Sl st to the first dc. (48 dc)
Working in the BLO turns the work upward and leaves a neat ridge at the base edge.
Rnd 4: Ch 2. Work Waffle Round A: FPdc around next st, dc in next 2 sts 16 times. Sl st to the first st. (48 sts)
Rnd 5: Ch 2. Work Waffle Round B: dc in next st, FPdc around each of next 2 sts 16 times. Sl st to the first st. (48 sts)
Rnds 6–19: Repeat Rnds 4–5 seven more times. (48 sts per round) Rnd 19 is a B round. Fasten off.
There are 16 waffle rounds in total. With Rnd 3, the body has 17 rounds at 0.5 in (1.3 cm) each, for 8.5 in (21.6 cm).
Checkpoint: 8.5 in (21.6 cm) tall and 8 in (20.3 cm) wide when flattened. The circumference is 48 sts ÷ 3 sts per in = 16 in (40.6 cm), and half of that is 8 in.
Flatten the body with the round joins at one side fold. Mark sts 1–24 as the front and sts 25–48 as the back.
Back Shaping and Strap
The back is worked in rows over sts 25–48 only.
Row 1 (RS): Join MC in st 25. Ch 2 (does not count), dc3tog over sts 25–27, dc in next 18 sts, dc3tog over sts 46–48. (20 sts)
Row 2: Ch 2, turn. Dc3tog, dc in next 14 sts, dc3tog. (16 sts)
Row 3: Ch 2, turn. Dc3tog, dc in next 10 sts, dc3tog. (12 sts)
Row 4: Ch 2, turn. Dc3tog, dc in next 6 sts, dc3tog. (8 sts)
Row 5: Ch 1, turn. Sc2tog 4 times. (4 sc)
Checkpoint: the peak is 10.75 in (27.3 cm) above the base edge. Each row loses 4 sts, which makes the even, symmetrical slopes that rise to the strap.
Rows 6–21: Ch 1, turn. Sc in each st across. (4 sc per row)
This gives 16 rows, about 4 in (10.2 cm) long and 1 in (2.5 cm) wide. Fasten off and leave a 12 in (30.5 cm) tail.
Form the loop: Fold the strap toward the inside of the basket. Bring the end of Row 21 down to the WS of Row 5 and sew it securely across all 4 sts. This makes a loop about 2 in (5.1 cm) tall.
Border
Border gauge: Work 1 sc per body stitch across the front, which is 3 per in to match the waffle fabric. Work 2 sc per dc row end along the slopes, which is 4 per in to match the height of the dc rows.
Border Row 1 (RS facing): Join MC at the right edge of the strap base, at the end of Row 5.
– First slope: 1 sc in the Row 5 row end, then 2 sc in each of the 4 dc row ends, for 9 sc.
– Front: Sc in each of the 24 front sts, for 24 sc.
– Second slope: 2 sc in each of the 4 dc row ends, then 1 sc in the Row 5 row end, for 9 sc.
(42 sc: 24 worked 1 per stitch + 18 row-end sts)
Border Row 2: Ch 1, do not turn. Rev sc in each st back across. (42 sts) Fasten off.
Why the math works: Across the front, the 24 sc sit 1 per stitch on 24 waffle sts. The rim stays exactly 8 in (20.3 cm) wide, so it neither flares nor pulls in. On the slopes, 2 sc per dc row end matches each 0.5 in (1.3 cm) row, so the edges lie straight. The two border rows add 0.5 in (1.3 cm), bringing the front to 9 in (22.9 cm).
Attach the Pocket
- Flatten the basket with the front facing you.
- Center the pocket so its bottom edge sits 1.5 in (3.8 cm) above the base ridge. That leaves about 1.4 in (3.6 cm) of body showing on each side.
- Pin the pocket in place. Its top will sit at 6.5 in (16.5 cm), leaving 2.5 in (6.4 cm) of body below the rim.
- Using the CC tail, whipstitch through the outer loops of the pocket edging and the body behind it. Sew both sides and the bottom, and leave the top open.
- Keep your hand inside the basket while you sew so you only stitch through the front layer.
Final Blocking
- Lightly spray the whole basket until it is damp, not soaked.
- Stuff the body with a rolled towel to give it its rounded shape.
- Pat the base into a 6.5 in × 2.5 in (16.5 cm × 6.4 cm) oval.
- Shape the pocket’s bottom corners into smooth curves with your fingers.
- Pin the front rim straight at 8 in (20.3 cm) wide.
- Let it dry completely, then remove the towel.
Final Quality-Control Checklist
- Base lies flat, with 48 sts in Rnd 2
- Every body round from Rnd 3 to Rnd 19 has 48 sts
- The waffle grid lines up vertically
- Back rows decrease 20, 16, 12, 8, then 4
- Strap is 4 sc wide and the loop is sewn firmly on the inside
- Border Row 1 has exactly 42 sc
- Pocket edging has 70 sc
- Pocket is centered and sewn on 3 sides, with the top open
- All yarn tails are woven in securely
Troubleshooting
The waffle grid slants: Do not count the ch-2 at the start of a round as a stitch, and always start the round in the joining stitch.
The base cups or ruffles: Check that Rnd 1 has 6 dc at each end and that Rnd 2 has exactly 48 sts.
The body is too wide: Your post stitches may be loose. Go down a hook size, or pull up shorter loops.
The slopes look stepped: The ch-2 at the start of each row lets the edge bump out. Work the dc3tog firmly.
The rim flares: Work exactly 1 sc per front stitch in the border. Do not add extra stitches.
The pocket puckers: Sew with even, loose tension and match the pocket’s stitches to the body’s stitches one for one.
Care
Hand wash or machine wash on a cool, gentle cycle. Reshape the basket while it is damp and dry it flat or stuffed.
Final Notes
Every stage builds on the one before it:
– The 12-sts-per-4-in gauge gives a 48-stitch round.
– The 48 sts make a 16 in (40.6 cm) circumference, so the basket is 8 in (20.3 cm) wide flattened.
– 17 body rounds bring the front to 8.5 in (21.6 cm), and the border adds 0.5 in (1.3 cm) for 9 in (22.9 cm).
– 5 shaping rows bring the back peak to 10.75 in (27.3 cm).
– The folded strap adds about 2 in (5.1 cm), for 12.75 in (32.4 cm) overall.
Check each of these numbers as you go, and the basket will hang straight and hold its shape.
Happy crocheting!