

This curtain is made of nine hanging strands of paisley motifs. Each motif is a deep plum teardrop with a small open center, spoke-like stitches fanning out from the center, and a curled tail at the top. A soft blush-pink picot-loop edging goes all the way around every paisley, and small pink rings link the motifs into strands.
The strands hang from a plum header band with an open fan scallop along its lower edge. A full plum tassel with a pink wrapped neck finishes each strand. The two colors, plum and blush pink, give it a warm boho look that suits a window, a doorway, or a wall niche.
The pattern uses US crochet terms. The finished curtain measures about 31.75 in (80.6 cm) wide and 35.5 in (90.2 cm) long, including the tassels.
You will make the header band first, then 54 paisley motifs. Next, you build each strand with join-as-you-go rings, which connect the header, the paisleys, and the tassel. Every measurement is tied to one 16-stitch header repeat per strand, so the strands always line up.
Finished Size and Construction
- Finished size: 31.75 in (80.6 cm) wide x 35.5 in (90.2 cm) long
- Skill level: Intermediate
- Terminology: US terms
- Yarn weight: DK (3) mercerized cotton
- Hook: 3.5 mm (E-4)
- Number of pieces: 1 header band, 54 paisleys, 63 connector rings, 9 tassels
- Layout: 9 strands, each with 6 paisleys and 7 rings
- Paisley size: 3.75 in (9.5 cm) tall x 2.75 in (7.0 cm) wide
- Paisley size before edging: 3.25 in (8.3 cm) tall x 2.25 in (5.7 cm) wide
- Edging depth: 0.25 in (0.6 cm) on every side
- Header depth: 2.75 in (7.0 cm)
Materials
Use a smooth mercerized cotton in DK weight. It shows the spokes clearly, holds the curl of the tail, and does not stretch much while hanging. The quantities below assume about 120 m per 50 g.
- Plum (Color A): 250 g / 600 m, for the paisley bodies, the header, and the tassels
- Blush pink (Color B): 150 g / 360 m, for the edgings, the rings, and the tassel wraps
These quantities include a margin of about 20 percent for swatching and tassel trimming.
Tools:
- 3.5 mm (E-4) crochet hook
- Tapestry needle
- Scissors
- Stitch markers
- A 7 in (17.8 cm) piece of stiff card for the tassels
- Rustproof pins and a blocking mat
- 10 clip-on curtain rings and a curtain rod
Abbreviations (US Terms)
- ch – chain
- sl st – slip stitch
- sc – single crochet
- hdc – half double crochet
- dc – double crochet
- tr – treble crochet
- sk – skip
- sp – space
- st(s) – stitch(es)
Special stitch – join chain: Ch 2, sl st into the named loop on the neighboring piece, ch 2. Count the join chain as a connector, not as stitches.
Gauge and Checkpoints
Make one complete paisley and one ring before anything else, and measure them. Each strand repeats the same unit, so a small error grows six times down every strand.
Paisley checkpoints:
- After Round 1: 0.75 in (1.9 cm) across
- After Round 2: 1.5 in (3.8 cm) across
- After Round 3: 2.25 in (5.7 cm) across at the widest point
- After the tail: 3.25 in (8.3 cm) tall
- After the edging: 3.75 in (9.5 cm) x 2.75 in (7.0 cm)
Ring checkpoint: 0.75 in (1.9 cm) across after Round 2.
Header gauge: 16 dc = 3.5 in (8.9 cm). Rows 1–3 = 1.25 in (3.2 cm) deep.
If your paisley comes out too big, go down to a 3.25 mm hook. If it is too small, go up to a 3.75 mm hook. Check the header gauge separately, because it decides how far apart the strands hang.
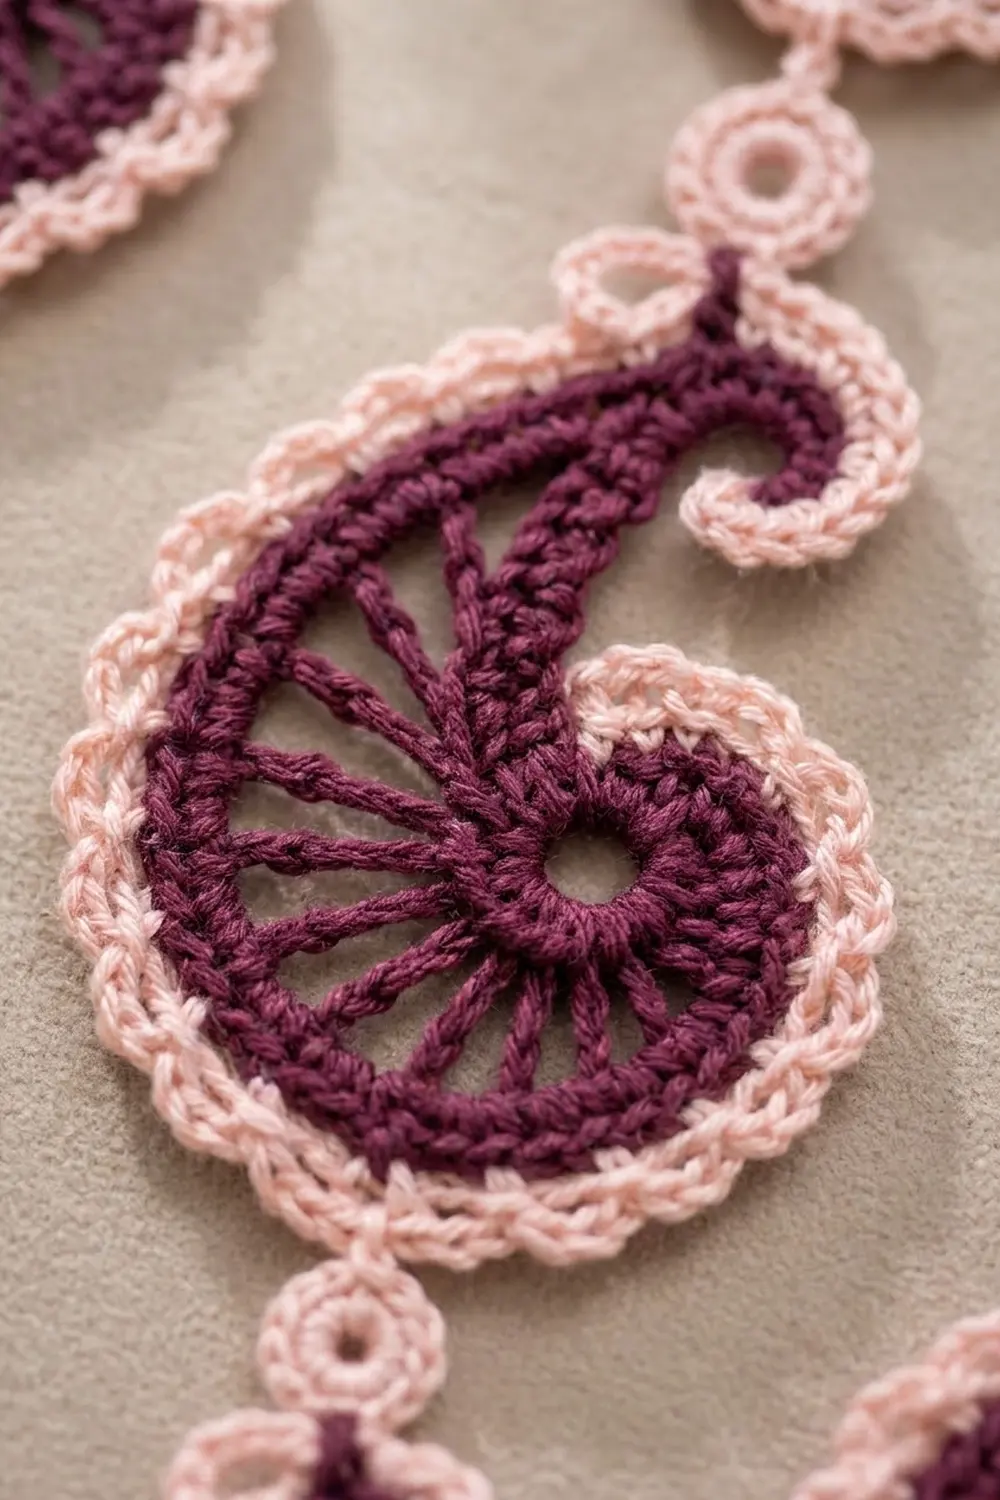
Paisley Motif (make 54)
Body (Color A):
Ch 6 and sl st to the first ch to form a ring. This ring becomes the open center.
Round 1: Ch 1, 16 sc in the ring, sl st to the first sc. (16 sc)
Round 2: Ch 4 (counts as dc + ch 1), dc in the next sc, ch 1; repeat from * 14 more times, then sl st to the 3rd ch of the beginning ch-4. (16 dc spokes, 16 ch-1 sps)
Round 3 (shaping): Sl st into the first ch-1 sp. Ch 1, then work 2 sts into every ch-1 sp as follows:
- Sps 1–2: 2 sc in each (4 sts)
- Sps 3–5: 2 hdc in each (6 sts)
- Sps 6–11: 2 dc in each (12 sts)
- Sps 12–14: 2 hdc in each (6 sts)
- Sps 15–16: 2 sc in each (4 sts)
Sl st to the first sc. (32 sts: 4 + 6 + 12 + 6 + 4)
The dc section pushes out to form the round belly of the teardrop. The short sts at each end pull in toward the top, where the tail grows. This also leaves the center hole off-center, toward the top of the motif.
Tail: Do not fasten off. Ch 14.
Working back along the chain: sc in the 2nd ch from the hook and in the next 3 ch (4 sc), hdc in each of the next 4 ch (4 hdc), then 2 dc in each of the last 5 ch (10 dc). Sl st into the joining st of Round 3. (18 sts over 13 ch; the skipped ch is the tail tip)
The 10 dc packed into the last 5 chains crowd the base of the tail, so the strip bends and curls back over the body. Shape the curl with your fingers. Fasten off.
Edging (Color B):
Join Color B with a sc in the first st of Round 3, right beside the base of the tail. The edging is worked into 64 base sts in this order:
- 32 Round 3 sts around the body
- 13 free loops along the underside of the tail chain
- 1 skipped tip ch
- 18 sts along the top of the tail
Edging round: Sc in the next st, ch 3, sk the next st; repeat from * around (the joining sc is the first sc). Sl st to the first sc. (32 sc, 32 ch-3 loops)
Loops 1–16 sit on the body, loops 17–23 run up the underside of the tail and around the tip, and loops 24–32 come back down the top of the tail.
Mark the two loops you will join to:
- Loop 1 is the hanging loop, at the top beside the tail.
- Loop 9 is the bottom loop, at the lowest point of the belly.
Fasten off and weave in the ends.
Connector Ring (make 63, while joining)
Ch 4 (Color B), sl st to form a ring.
Round 1: Ch 1, 8 sc in the ring, sl st to the first sc. (8 sc)
Round 2: Work this round as you join (see Joining). Ch 1, 2 sc in sc 1, join chain A, 2 sc in each of sc 2–5, join chain B, 2 sc in each of sc 6–8, sl st to the first sc. (16 sc + 2 join chains)
Join chains A and B sit directly opposite each other, so the ring hangs straight.
Header Band (the Border)
Border gauge: 16 dc = 3.5 in (8.9 cm). Each strand gets exactly one 16-st repeat. Nine repeats give 144 sts, plus 1 closing st, for 145 sts.
Work the header in Color A, starting at the top edge and working downward.
Foundation: Ch 146.
Row 1: Sc in the 2nd ch from the hook and in each ch across, turn. (145 sc)
Row 2: Ch 3 (counts as dc), dc in each st across, turn. (145 dc)
Row 3: Repeat Row 2. (145 dc) Check that the header is 31.75 in (80.6 cm) wide and 1.25 in (3.2 cm) deep.
Row 4 (fans): Ch 1, sc in the first dc, sk 7 dc, in the next dc work (tr, ch 2) 6 times, then tr; sk 7 dc, sc in the next dc; repeat from * 8 more times, turn. (10 sc, 9 fans; each fan has 7 tr and 6 ch-2 sps)
The sc sts land on sts 1, 17, 33 and so on up to st 145, and the fans land on sts 9, 25 and so on up to st 137. Each 16-st repeat holds exactly one fan.
Row 5 (scallop edge): Ch 1, sc in the first sc. Sc in the next tr, (2 sc in the next ch-2 sp, sc in the next tr) 6 times, sc in the next sc; repeat from * 8 more times. (1 + 9 x 20 = 181 sc)
Fasten off.
Each repeat has 19 sc across the fan, and the 10th of those sits on the center tr, at the lowest point of the scallop. Counting from the start of Row 5, these low points fall on sc 11, 31, 51, 71, 91, 111, 131, 151, and 171. Mark all nine.
Why the math works: 145 = 9 x 16 + 1. Each strand hangs from the center of its own 3.5 in (8.9 cm) repeat. The paisleys are 2.75 in (7.0 cm) wide, so this leaves a 0.75 in (1.9 cm) gap between neighboring strands. Row 5 has more sts than Row 3 because it follows the curve of each fan. The straight width of the header stays at 145 sts.
Make All Pieces
- Color A: 54 paisley bodies with tails, 1 header, and 9 tassels
- Color B: 54 paisley edgings, 63 rings, and 9 tassel wraps
Layout (H = header low point, R = ring, P = paisley, T = tassel):
H   H   H   H   H   H   H   H   H
R   R   R   R   R   R   R   R   R
P   P   P   P   P   P   P   P   P
R   R   R   R   R   R   R   R   R
P   P   P   P   P   P   P   P   P
R   R   R   R   R   R   R   R   R
P   P   P   P   P   P   P   P   P
R   R   R   R   R   R   R   R   R
P   P   P   P   P   P   P   P   P
R   R   R   R   R   R   R   R   R
P   P   P   P   P   P   P   P   P
R   R   R   R   R   R   R   R   R
P   P   P   P   P   P   P   P   P
R   R   R   R   R   R   R   R   R
T   T   T   T   T   T   T   T   T
Each column has 6 paisleys, 7 rings, and 1 tassel. That makes 54 paisleys, 63 rings, and 9 tassels in total.
Joining
The rings are worked join-as-you-go. Each join chain links one point to one point, so no sts are added to or taken away from any piece.
- Top ring: Join chain A goes into a marked header low point. Join chain B goes into loop 1 of the first paisley.
- Middle rings (5 per strand): Join chain A goes into loop 9 of the paisley above. Join chain B goes into loop 1 of the paisley below.
- Bottom ring: Join chain A goes into loop 9 of the 6th paisley. Leave out join chain B, so Round 2 is 16 sc with a single join chain.
Before each join, check that every paisley has its tail curling to the same side. Pull every sl st snug but not tight. Tight joins pucker the edging, and loose joins let the motifs twist.
Checkpoint: Each paisley plus the ring below it adds 4.75 in (12.1 cm). A finished strand of 7 rings and 6 paisleys is 29.5 in (74.9 cm) long (7 x 1 in + 6 x 3.75 in). Together with the header, that gives 32.25 in (81.9 cm) before the tassels.
Tassels (make 9): Wrap Color A 30 times around the 7 in (17.8 cm) card. Slide a 12 in (30.5 cm) tie of Color A through the top of the wraps, then cut the bottom loops. Thread the tie through the center of a bottom ring and knot it securely. Wrap Color B 8 times around the neck of the tassel, 0.5 in (1.3 cm) below the top, and knot it. Trim the tassel to 3.25 in (8.3 cm).
Final Blocking
- Lay the header flat on a blocking mat and pin it to 31.75 in (80.6 cm) x 2.75 in (7.0 cm). Pin out each fan point.
- Lightly mist the header and let it dry completely.
- Pin each paisley to 3.75 in (9.5 cm) x 2.75 in (7.0 cm). Open every ch-3 loop and press the tail into its curl.
- Mist the paisleys and let them dry flat.
- Steam the tassels, hold them straight, and comb the strands.
- Hang the curtain for 24 hours so the strands settle, then trim the tassels again if needed.
Final Quality-Control Checklist
- All 54 paisleys have 32 sc and 32 ch-3 loops in the edging.
- Every tail curls the same way.
- Each ring has 16 sc.
- The header has 145 sts across Rows 1–3 and 181 sc in Row 5.
- The strands hang from the nine scallop low points.
- The strands are 3.5 in (8.9 cm) apart, center to center.
- The total length is 35.5 in (90.2 cm).
- All ends are woven in securely.
Troubleshooting
- The tail lies flat: Check that you worked 2 dc in each of the last 5 ch. For a tighter curl, work 3 dc in the final ch.
- The paisley is round, not teardrop-shaped: Your Round 3 heights are off. The dc must go only in sps 6–11.
- The edging ruffles: Use a 3.25 mm hook for the edging only.
- The edging pulls in: Change the ch-3 loops to ch-4.
- The strands twist: Make sure join chains A and B sit opposite each other on every ring.
- The header is too wide: Remake Rows 1–3 with a smaller hook, or adjust your tension to 16 dc = 3.5 in (8.9 cm).
Care
Hand wash in cool water, roll the curtain in a towel, and dry it flat. Lightly re-block the paisleys before you hang it again.
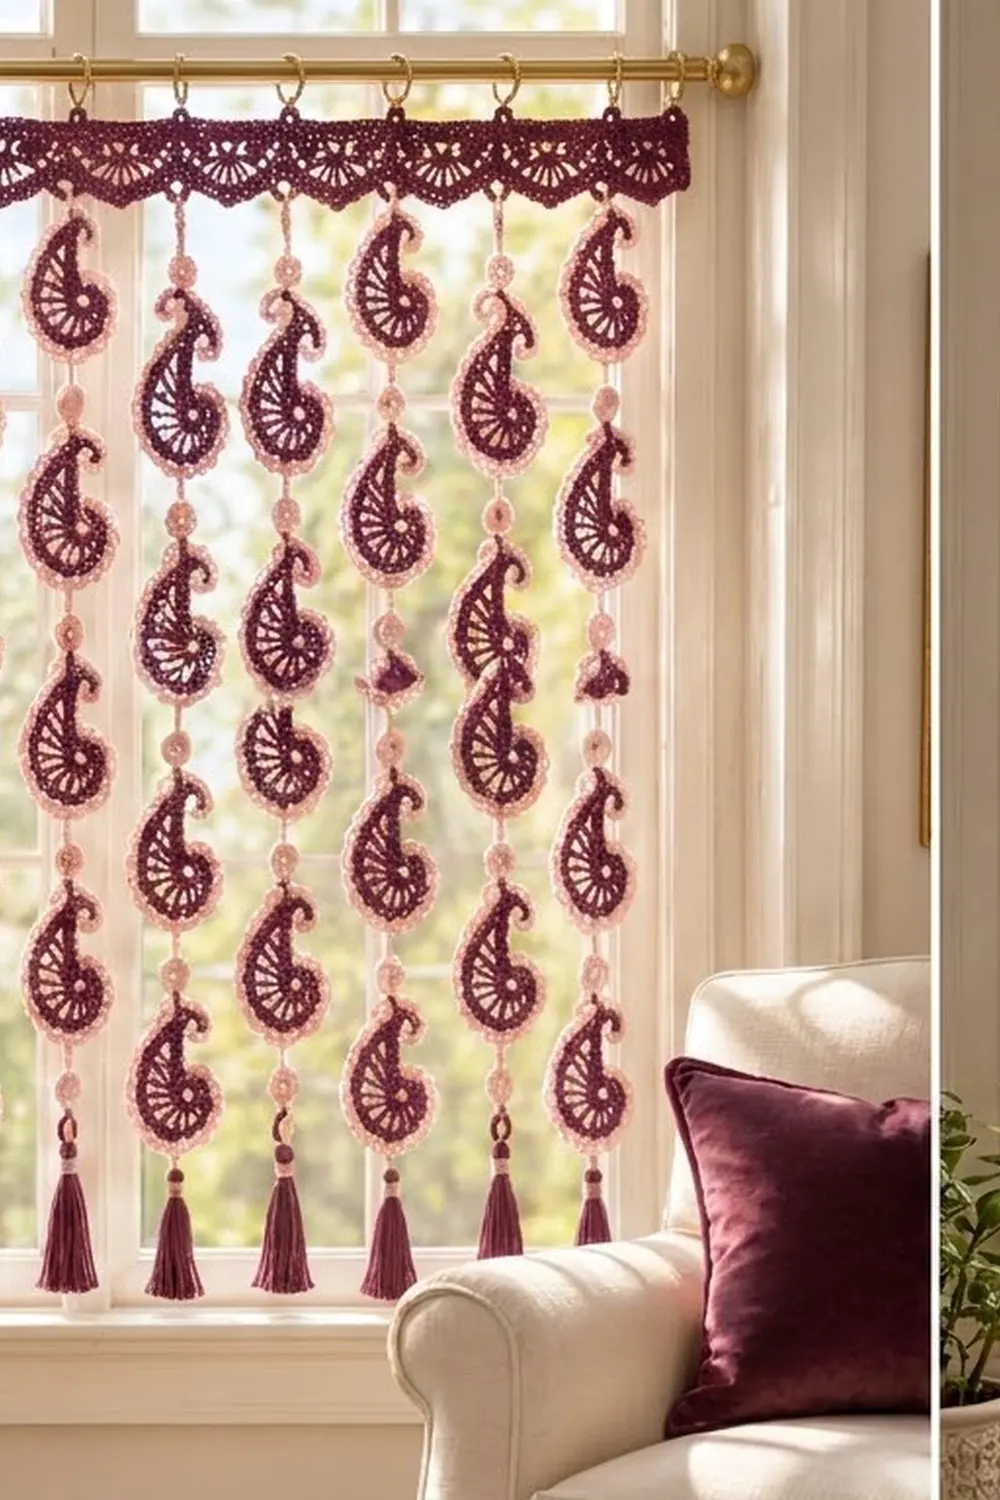
Final Notes
The whole curtain relies on a short measurement chain. Each paisley is 3.75 in (9.5 cm) x 2.75 in (7.0 cm), and each paisley plus its ring adds 4.75 in (12.1 cm). Every strand is 29.5 in (74.9 cm) long. Each 16-st header repeat measures 3.5 in (8.9 cm), and nine repeats plus 1 st give a header of 31.75 in (80.6 cm). With the header and the 3.25 in (8.3 cm) tassels, the curtain is 35.5 in (90.2 cm) long. Measure at every checkpoint, and the strands will hang evenly.
Happy crocheting!