

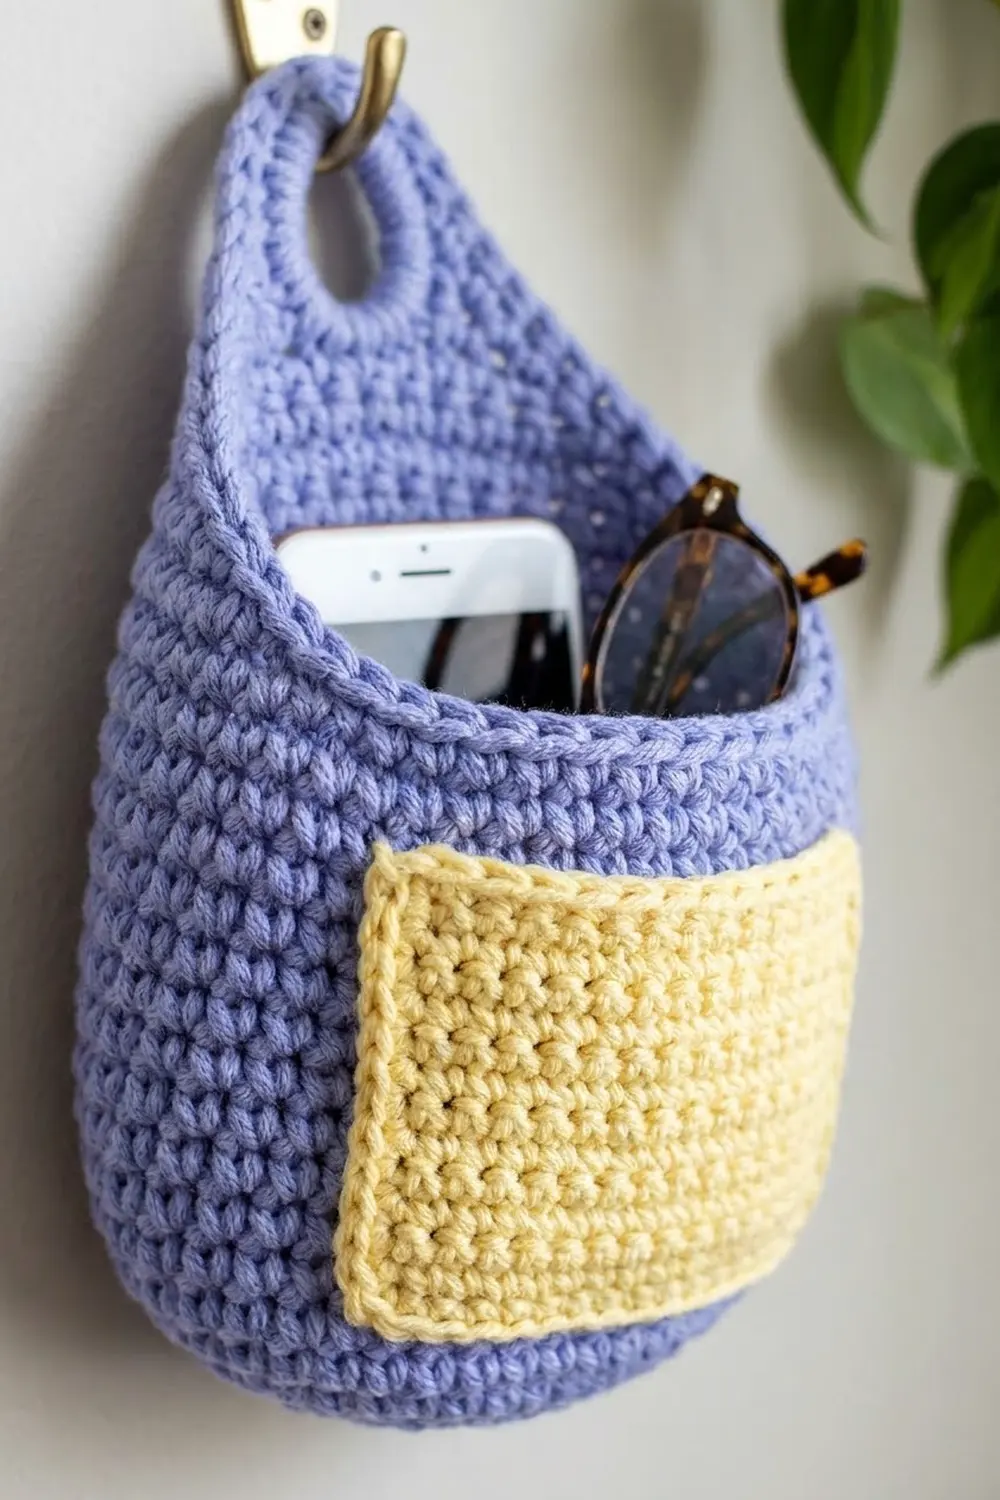
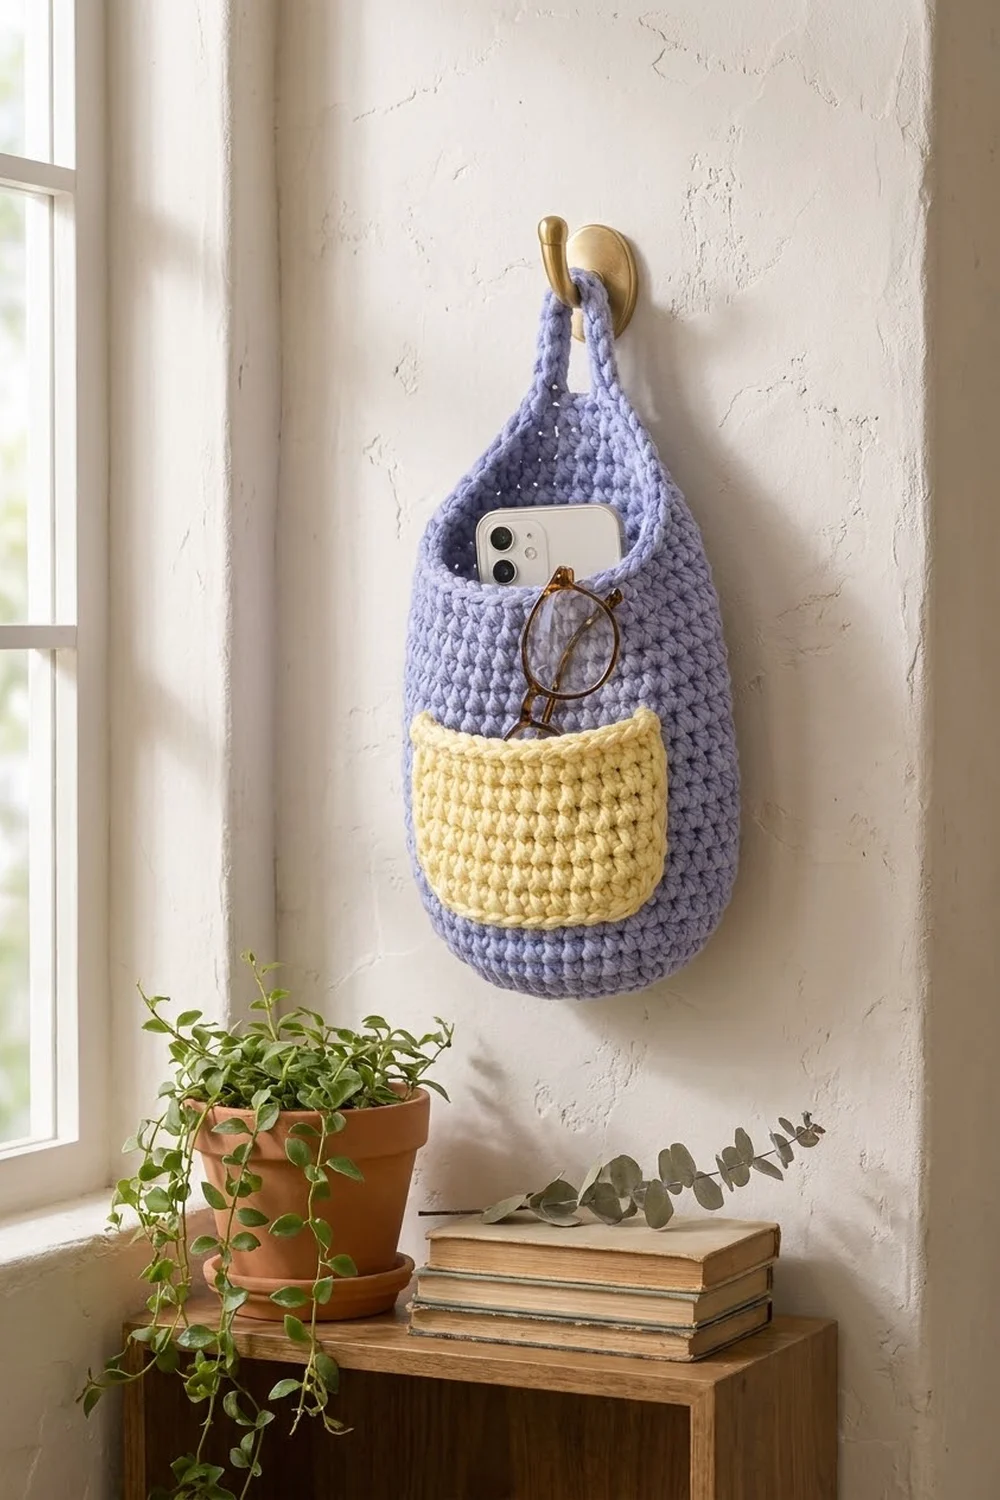
The Lavender Nook is a chunky hanging wall pocket that keeps your phone, glasses, keys or charger off the counter but within easy reach. It hangs from one hook by a sturdy strap, and a sunny yellow front pocket gives small items their own spot.
The body is periwinkle lavender and the pocket is butter yellow. The whole piece is dense single crochet in bulky cotton, so it keeps its shape without stiffening and looks clean and modern on a wall.
This pattern uses US crochet terms. Hung and pressed flat, the wall pocket measures about 8 in (20.3 cm) wide and 12.25 in (31.1 cm) tall to the top of the back peak. The loop adds about 2.5 in (6.4 cm), for a total hanging length of about 14.75 in (37.5 cm).
Construction is simple. You crochet an oval base and work the walls straight up in joined rounds. Then you work back and forth on the back half only, decreasing to shape a peak that turns into the strap. One edging round goes around the rim and strap. Last, you crochet a separate pocket and sew it to the front.
Finished Size and Construction
- Finished size (flat): 8 in (20.3 cm) wide × 12.25 in (31.1 cm) tall, plus a 2.5 in (6.4 cm) loop
- Skill level: Easy
- Terminology: US
- Yarn weight: Bulky (#5) cotton or cotton blend
- Hook: 6.0 mm (US J-10)
- Number of pieces: 2 (body with strap, pocket)
- Layout: Pocket centered on the front, sewn on three sides
- Body circumference: 44 sts = 16 in (40.6 cm)
- Pocket size: 4.7 in (11.9 cm) wide × 4 in (10.2 cm) tall
- Body size before edging: front rim about 8.6 in (21.8 cm) above the bottom fold
- Edging depth: 1 round of sc, about 0.3 in (0.8 cm)
Materials
Choose a smooth bulky cotton or cotton-acrylic blend with about 110 m per 100 g. Cotton gives the firm, matte stitches you see here and holds a phone without sagging. Avoid very fuzzy yarns, which hide the stitches and stretch over time.
- Color A, periwinkle lavender: 180 g (about 198 m / 217 yd)
- Color B, butter yellow: 25 g (about 28 m / 31 yd)
These amounts include a safety margin of about 15%.
Tools:
- 6.0 mm (US J-10) crochet hook
- Locking stitch markers (at least 4)
- Tapestry needle
- Scissors
- Measuring tape
- Rust-proof pins and a blocking mat or towel
Abbreviations (US Terms)
- ch – chain
- sc – single crochet
- sc2tog – single crochet 2 together: insert hook in next st, yo, pull up a loop; insert hook in following st, yo, pull up a loop; yo and pull through all 3 loops (1 st decreased)
- sl st – slip stitch
- st(s) – stitch(es)
- rnd(s) – round(s)
- yo – yarn over
- [ ] × n – repeat the steps in brackets n times
Joined rounds: At the end of each round, sl st to the first sc. Start the next round with ch 1 (this does not count as a stitch) and work the first sc into the same st as the join.
Gauge and Checkpoints
Gauge: 11 sc and 12 rnds/rows = 4 in (10.2 cm) in sc with a 6.0 mm hook. That is 2.75 sts and 3 rnds per inch.
The base doubles as your gauge swatch. Make Rnds 1–4 and measure before you go on.
Checkpoints:
- After Rnd 4 (base): 44 sts, about 5.5 in (14.0 cm) long × 3.25 in (8.3 cm) wide. The base cups slightly, which creates the rounded bottom.
- After Rnd 25 (walls): walls measure 7 in (17.8 cm) from the edge of the base. Pressed flat, the tube is 8 in (20.3 cm) wide.
- After Row 10 (peak): the peak rises about 3.3 in (8.4 cm) above the front rim.
- After Row 28 (strap): the strap measures 6 in (15.2 cm) from the top of the peak.
- Pocket before edging: 4 in (10.2 cm) wide × 3.3 in (8.4 cm) tall.
If your base is too big, go down to a 5.5 mm (US I-9) hook. If it is too small, go up to 6.5 mm (US K-10.5). Change hooks and remake the base. Don’t add or remove stitches, because every later count depends on the 44-stitch round.
Body
The body is worked in Color A.
Oval Base
Ch 9.
Rnd 1: 2 sc in 2nd ch from hook, sc in next 6 ch, 4 sc in last ch. Working along the other side of the chain, sc in next 6 ch, 2 sc in same ch as first 2 sc. Join. (20 sts)
Place a marker in the first stitch and move it up each round. Each round starts at the center of one narrow end (End A).
Rnd 2: Ch 1, [2 sc in next st] × 2, sc in next 6, [2 sc in next st] × 4, sc in next 6, [2 sc in next st] × 2. Join. (28 sts)
Rnd 3: Ch 1, [sc in next st, 2 sc in next st] × 2, sc in next 6, [sc in next st, 2 sc in next st] × 4, sc in next 6, [sc in next st, 2 sc in next st] × 2. Join. (36 sts)
Rnd 4: Ch 1, [sc in next 2 sts, 2 sc in next st] × 2, sc in next 6, [sc in next 2 sts, 2 sc in next st] × 4, sc in next 6, [sc in next 2 sts, 2 sc in next st] × 2. Join. (44 sts)
How the 44 stitches are laid out after Rnd 4: 8 (half of End A) + 6 (long side 1) + 16 (End B) + 6 (long side 2) + 8 (half of End A) = 44. Stitches 1–22 become the front and stitches 23–44 become the back.
Walls
Rnds 5–25: Ch 1, sc in each st around. Join. (44 sts each round, 21 rounds)
Don’t increase. The walls rise straight up from the cupped base, which gives the soft, bulging oval shape. Check against Checkpoint 2.
Do not fasten off.
Back Peak
From here you work in rows over the back half only (sts 23–44). The front half (sts 1–22) stays unworked and becomes the front rim.
Row 1: Ch 1, turn. Sc in next 22 sts, working back across sts 44 to 23. (22 sts) Leave the other 22 sts unworked.
Row 2: Ch 1, turn, sc2tog, sc in next 18 sts, sc2tog. (20 sts)
Rows 3–9: Ch 1, turn, sc2tog, sc in each st to last 2 sts, sc2tog. Each row loses 2 sts.
Row 3: 18 sts · Row 4: 16 · Row 5: 14 · Row 6: 12 · Row 7: 10 · Row 8: 8 · Row 9: 6.
Row 10: Ch 1, turn, sc2tog, sc in next 2 sts, sc2tog. (4 sts)
You decrease on every row, so the back narrows from 8 in (20.3 cm) to about 1.5 in (3.8 cm) over 3.3 in (8.4 cm) of height. That makes the teardrop peak.
Strap
Rows 11–28: Ch 1, turn, sc in each st across. (4 sts each row, 18 rows)
The strap should measure 6 in (15.2 cm). Fasten off and weave in the end.
The pocket is worked in Color B.
Ch 12.
Row 1: Sc in 2nd ch from hook and in each ch across. (11 sts)
Rows 2–10: Ch 1, turn, sc in each st across. (11 sts each row)
Don’t fasten off. The pocket now measures 4 in (10.2 cm) × 3.3 in (8.4 cm).
Edging Rnd: Ch 1, do not turn. Work around the pocket in four sections:
– Top edge: 2 sc in first st, sc in next 9 sts, 2 sc in last st (13 sts)
– First side: sc in the end of each of Rows 9–1 (9 sts)
– Bottom (foundation chain): 2 sc in first ch, sc in next 9 ch, 2 sc in last ch (13 sts)
– Second side: sc in the end of each of Rows 2–10 (9 sts)
Join to first sc. (44 sts)
Total: 13 + 9 + 13 + 9 = 44. Putting only 2 sc in each corner, instead of the usual 3, gives the softly rounded corners. Fasten off and leave a 30 in (76.2 cm) tail for sewing.
Pocket finished size: 4.7 in (11.9 cm) wide × 4 in (10.2 cm) tall.
Make All Pieces
- Color A: 1 body with peak and strap
- Color B: 1 pocket
Front layout (body pressed flat, front facing you):
        ( loop )
          |  |
         /    \        <- back peak (Rows 1-10)
   _____/______\_____  <- front rim (Rnd 25 + edging)
  |                  |   ~2.25 in (5.7 cm) gap
  |   +----------+   |
  |   |  POCKET  |   |   pocket covers Rnds 8-19
  |   |  (B)     |   |   ~4-5 sts margin each side
  |   +----------+   |
  |                  |   ~2.5 in (6.4 cm) to bottom fold
   \________________/
Joining
This section covers sewing on the pocket. Finish the body edging (next section) before you start.
- Press the body flat with the front (sts 1–22) facing you.
- Center the pocket on the front. Its bottom edge sits along Rnd 8, about 2.5 in (6.4 cm) above the bottom fold. Its top edge lines up with Rnd 19, about 2.25 in (5.7 cm) below the front rim.
- The pocket is 13 sts wide and the front is 22 sts wide, so leave 4–5 body stitches showing on each side. Pin all four corners.
- With the yellow tail, whipstitch through the outer loops of the pocket’s 44-stitch edging and into the matching body stitches. On each side, sew 9 pocket stitches to 12 body rounds. Along the bottom, sew 13 pocket stitches to about 13 body stitches. Leave the 13 top stitches open.
- Keep your tension firm but don’t let the pocket pucker. After each side, check that the body still lies flat at 8 in (20.3 cm) wide.
Keep one hand inside the body while you sew so you only catch the front layer.
Edging (Border)
Border gauge: same as the body, 2.75 sc per inch. Work 1 sc in each stitch across tops and 1 sc in each row-end along sides.
With Color A, join with a sl st in st 1 of Rnd 25 (the first front stitch, next to the peak).
Edging Rnd: Ch 1, then work these sections in order:
– Front rim: sc in each of the 22 front sts (22)
– Peak, first side: sc in each row-end of Rows 1–10 (10)
– Strap, first side: sc in each row-end of Rows 11–28 (18)
– Strap end: 2 sc in first st, sc in next 2, 2 sc in last st (6)
– Strap, second side: sc in each row-end of Rows 28–11 (18)
– Peak, second side: sc in each row-end of Rows 10–1 (10)
Join to first sc. (84 sts) Fasten off.
Total: 22 + 10 + 18 + 6 + 18 + 10 = 84.
Why the math works: each sc row is 0.33 in tall and each sc is 0.36 in wide. Putting 1 sc in each row-end pulls the edge in very slightly, which keeps the rim firm so it doesn’t flare. The front rim keeps its 22 stitches, so the opening matches the walls exactly.
Form the loop: Fold the strap toward the back (the side against the wall). Lay the last 1 in (2.5 cm) of the strap over the wrong side of Rows 8–10 of the peak and sew it down securely with Color A. The loop should stand about 2.5 in (6.4 cm) tall.
Final Blocking
- Weave in all remaining ends, running each one through at least 2 in (5.1 cm) of stitches.
- Mist the whole piece with water until it is damp but not soaked.
- Stuff the body with a small towel to round out the base and walls.
- Smooth the pocket flat against the body with your palm, and pin the corners if they curl.
- Pin the peak and strap flat so their edges are straight.
- Let it dry completely, which takes 12–24 hours.
- Measure it: 8 in (20.3 cm) wide and 12.25 in (31.1 cm) to the top of the peak.
Final Quality-Control Checklist
- Base has 44 sts and cups evenly at both ends
- Walls have 21 rounds, and the join seam runs straight up one end
- Peak rows decrease evenly from 22 to 4 sts
- Strap has 18 rows and measures 6 in (15.2 cm)
- Edging has 84 sts and the rim doesn’t flare
- Pocket is centered, sewn on three sides and open at the top
- Loop is sewn firmly and hangs straight
- All ends are secure and hidden inside
Troubleshooting
Base ruffles too much: Your tension is loose. Go down a hook size.
Base doesn’t cup: Your tension is tight. Go up a hook size, or keep going, since the walls will pull it into shape.
Join seam spirals: Make sure the first sc of each round goes into the same stitch as the join.
Peak leans to one side: A decrease was missed. Count the stitches in every row from Row 2 to Row 10.
Front rim gapes: Work the edging a little more tightly across the 22 front stitches.
Pocket puckers: The whipstitches are too tight. Undo that side and sew it again more loosely.
Basket tips forward on the hook: Shorten the loop by sewing the strap end farther down the back.
Care
Hand wash in cool water with mild soap and gently press out the water. Dry it flat over a rolled towel to hold its shape, and do not tumble dry.
Final Notes
All the sizes come from one chain of measurements. At 11 sts = 4 in (10.2 cm), the 44-stitch base gives a 16 in (40.6 cm) circumference and an 8 in (20.3 cm) flat width. The 21 wall rounds add 7 in (17.8 cm), and the 10 peak rows add 3.3 in (8.4 cm). The 4-stitch strap folds into a 2.5 in (6.4 cm) loop, and the pocket’s 13 × 9 edging fits neatly inside the 22-stitch front. If your base matches Checkpoint 1, everything else will line up.
Happy crocheting!