

The Teal Tide curtain panel is a floor-length broomstick lace curtain in one deep teal. Rows of tall, open fans let daylight through. Narrow single crochet bands between the fan rows keep the fabric stable, so it hangs straight.
Each fan is a group of ten long loops gathered into a knot at its base. You work the panel from the top down, so when it hangs, every fan opens upward like a sunburst. A solid heading gives the curtain clips something firm to grip, and a scalloped border frames all four sides.
This pattern uses US crochet terms. One finished panel measures 36 in (91.4 cm) wide by 84 in (213.4 cm) long after blocking. For a pair like the one in the photo, make two identical panels. They are not joined.
Here is how it’s built. You start with a solid heading, then repeat one unit 26 times: a broomstick fan row followed by 3 rows of single crochet. A 3-round border finishes the panel. It’s one continuous piece with no seams.
Finished Size and Construction
- Finished size: 36 in x 84 in (91.4 cm x 213.4 cm)
- Skill level: Intermediate (basic broomstick lace)
- Terminology: US crochet terms
- Yarn weight: Worsted (#4), cotton or cotton blend
- Hook: 5.5 mm (US I-9)
- Broomstick needle: 25 mm (1 in) wooden dowel or jumbo needle
- Number of pieces: 1 panel (make 2 for a pair)
- Layout: Single vertical rectangle, worked top to bottom
- Fan width: 3 in (7.6 cm), 11 fans across
- Size before border: 33 in x 81 in (83.8 cm x 205.7 cm)
- Border depth: 1.5 in (3.8 cm) on every side
Materials
Yarn: Use a smooth worsted-weight cotton or cotton-blend yarn. Cotton holds the long loops open and doesn’t sag much when hung. Avoid fuzzy yarns, because they blur the fans. Choose a deep, saturated color so the lace still reads clearly against a bright window.
- Deep teal: 1,200 g, about 2,160 m (12 skeins of 100 g / 180 m) per panel
These amounts include roughly a 10% margin for the gauge swatch and small differences in tension. Double them for a pair.
Tools:
– 5.5 mm (US I-9) crochet hook
– 25 mm (1 in) smooth wooden dowel, at least 40 in (101.6 cm) long, with sanded ends, or a long jumbo needle of the same diameter
– Tapestry needle
– Stitch markers
– Tape measure
– Blocking pins and a large padded surface
– 9 curtain ring clips for hanging
Abbreviations (US Terms)
- ch – chain
- sc – single crochet
- dc – double crochet
- sl st – slip stitch
- st(s) – stitch(es)
- sp – space
- sk – skip
- rep – repeat
Special stitches:
- Loop pass (broomstick pick-up): Don’t turn. Slip the loop on your hook onto the dowel. Insert the hook in the next st, yarn over, pull up a loop and slip it onto the dowel. Rep from * across.
- Fan group: Insert the hook through the next 10 loops on the dowel and slide them off together. Yarn over and pull through all 10 loops, then work 10 sc into the center of the group.
- Shell: 7 dc in the same st or sp.
Gauge and Checkpoints
Gauge: 10 sc and 4 rows = 3 in wide x 1 in tall (7.6 cm x 2.5 cm). One fan row, including its work-off sc, measures 2.25 in (5.7 cm) tall.
Test swatch: Make a small test piece before you start the panel. Ch 31 and work 4 rows of sc (30 sc). Work 1 fan row with 3 fan groups, then 3 rows of sc. The swatch should measure 9 in x 4 in (22.9 cm x 10.2 cm). Block it lightly and measure it hanging, not lying flat.
Checkpoints:
– After the heading: 33 in x 3 in (83.8 cm x 7.6 cm)
– After Repeat 1: 6 in (15.2 cm) long
– After Repeat 10: 33 in (83.8 cm) long
– After Repeat 13: 42 in (106.7 cm) long
– After Repeat 26: 81 in (205.7 cm) long
If your swatch is too wide, go down half a hook size. If it’s too narrow, go up half a hook size. If the fans are too short, use a fatter dowel. If they’re too tall, use a thinner one, or pull each loop snug against the dowel. Width is set by the stitch count. Fan height is set by the dowel. Fix each one separately.
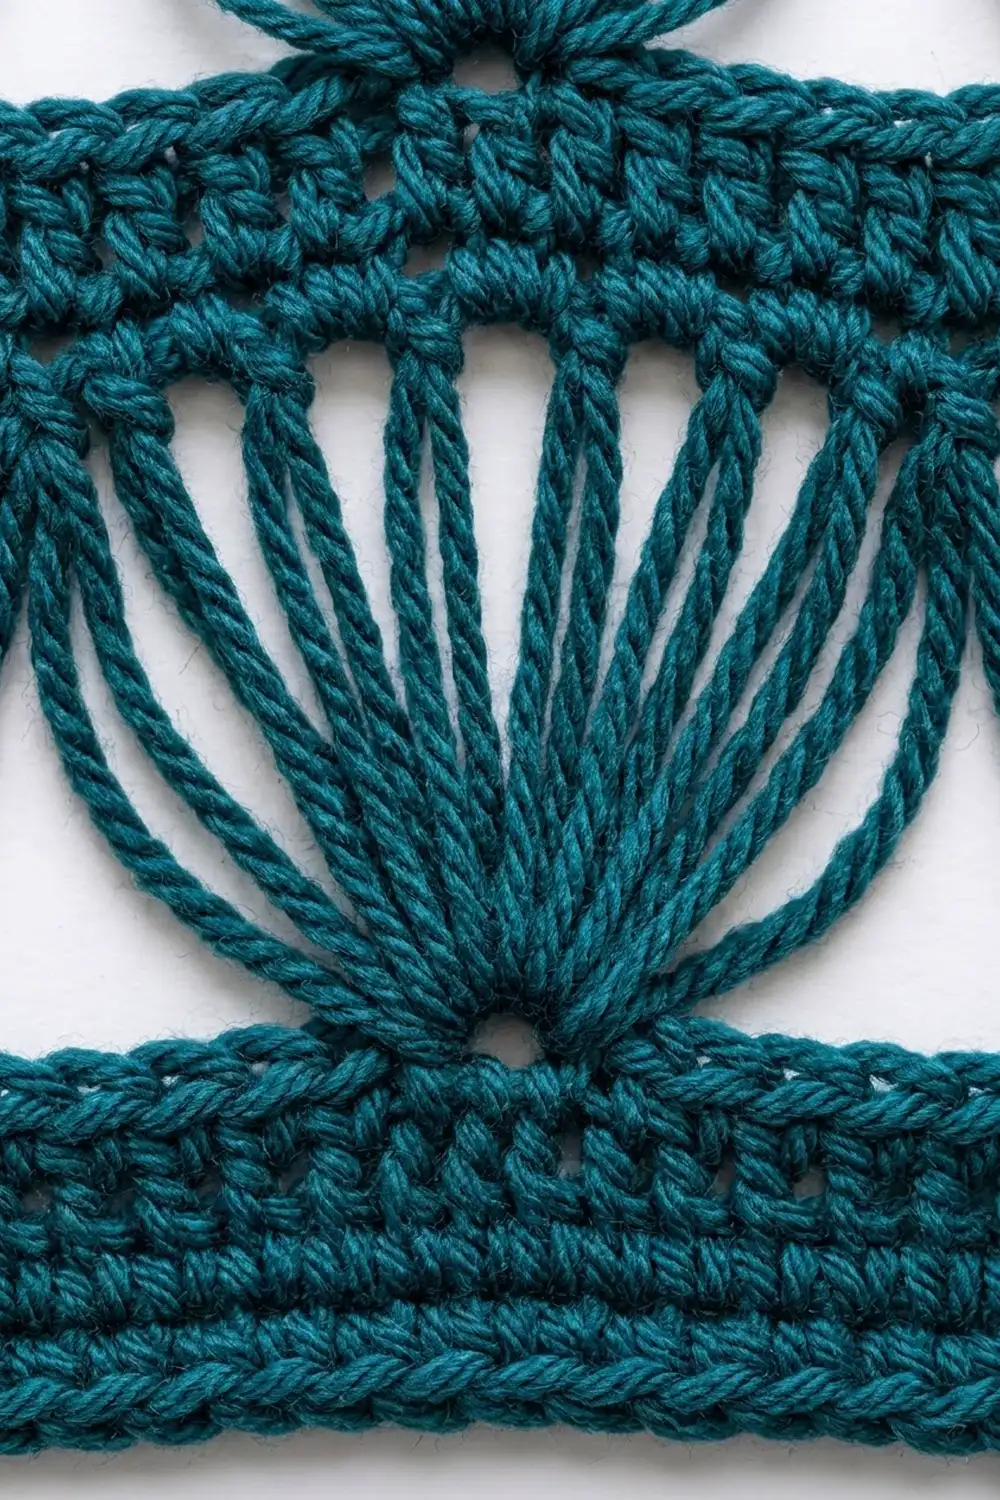
Heading
The heading is the solid band at the top edge that the clips grip.
Foundation: Ch 111.
Row 1: Sc in the 2nd ch from the hook and in each ch across. Turn. (110 sc)
Rows 2–12: Ch 1, sc in each st across. Turn. (110 sc)
At the end of Row 12, don’t turn. The heading should measure 33 in x 3 in (83.8 cm x 7.6 cm).
Body Repeat (Fan Row + Band)
Work one fan row, then 3 band rows, to make 1 repeat. Each repeat adds 3 in (7.6 cm).
Fan row, loop pass: Work a loop pass across all 110 sts. You’ll have 110 loops on the dowel. Keep every loop pulled snug against the dowel so all the fans come out the same height.
Fan row, work-off pass: Start at the end where the working yarn is attached. Work a fan group over the first 10 loops, then ch 1 to lock it. Work a fan group over each following set of 10 loops, 10 more times. Don’t ch 1 between groups. (11 groups, 110 sc)
The 10 sc pack tightly into the center of each group. That’s what makes the knotted base of each fan. Because the work moves downward, those knots sit at the bottom of each fan when the panel hangs, and the loops spread upward.
Band Row 1: Turn. Ch 1, sc in each sc across. Turn. (110 sc)
Band Rows 2–3: Ch 1, sc in each st across. Turn at the end of Row 2. Don’t turn at the end of Row 3. (110 sc)
Work the body repeat 26 times in total. Count fan rows with a marker every 5 repeats. Don’t fasten off after the last Band Row 3, because the border starts from this corner.
Size check: Before the border, the panel should measure 33 in x 81 in (83.8 cm x 205.7 cm). Measure it hanging from its heading. Broomstick lace grows when it hangs, so this is the measurement that matters.
Border
Border gauge: Along the long sides, work 10 sc for every 3 in (7.6 cm). That’s 8 sc along the edge of each fan row and 2 sc along each 3-row band. Work 10 sc along the heading’s row ends.
Round 1 (trim round): Ch 1. Work 1 sc in the corner st, then:
– Bottom edge: 110 sc, 1 in each st, plus 1 extra sc made by working 2 sc in the 55th st. That’s 110 + 1 = 111 sc, including the corner sc you just made.
– Corner: ch 2.
– Side edge: 270 sc at border gauge (26 repeats x 10 = 260, plus 10 along the heading), plus 3 extra sc: one where the heading meets the first fan row, one after the 13th repeat, and one where the last fan row meets its band. That’s 270 + 3 = 273 sc.
– Corner: ch 2.
– Top edge: working into the foundation chain, 110 + 1 = 111 sc, made the same way as the bottom edge.
– Corner: ch 2.
– Second side: 273 sc, made the same way as the first side.
– Corner: ch 2. Join with a sl st to the first sc.
Round 1 total: 111 + 273 + 111 + 273 = 768 sc and 4 ch-2 corner sps. Side counts don’t include the corner chains.
Round 2: Sl st into the next st. Ch 3 (counts as the first dc). Dc in each sc around. In each corner ch-2 sp, work (dc, ch 2, dc). Join to the top of the ch 3.
Each side picks up 1 dc from each of its corners, so the sides measure as follows:
– Top and bottom: 111 + 2 = 113 dc each
– Long sides: 273 + 2 = 275 dc each
Round 2 total: 776 dc and 4 ch-2 corner sps.
Round 3 (scallops): Sl st to the first corner ch-2 sp. Work a shell in the sp. Then along each side:
– Sk 2 sts, sc in the next st, sk 2 sts, shell in the next st. Rep from * along the side.
– Finish the side with sk 2 sts, sc in the next st, sk 2 sts.
– Work a shell in the next corner sp.
Continue the same way around and join with a sl st to the top of the first shell. Fasten off.
- Top and bottom: 18 shells and 19 sc between the corner shells
- Long sides: 45 shells and 46 sc between the corner shells
Round 3 total: 130 shells (36 + 90 + 4 corners) and 130 sc.
Why the math works: The scallop pattern needs a side count of 6k + 5, where k is the number of shells along that side. Round 2 gives you 113 = 6 x 18 + 5 and 275 = 6 x 45 + 5, so every scallop lands centered on each side. The 1 + 3 extra sc in Round 1 exist only to hit those multiples. On the long sides, 3 extra sc add about 0.9 in (2.3 cm) of ease over 81 in (205.7 cm). That’s just enough to stop the edge from pulling in, and blocking evens it out.
The border adds 0.25 in (0.6 cm) for Round 1, 0.5 in (1.3 cm) for Round 2, and 0.75 in (1.9 cm) for Round 3. That’s 1.5 in (3.8 cm) per side, which takes the panel to 36 in x 84 in (91.4 cm x 213.4 cm).
Final Blocking
- Weave in all ends along the solid sc bands, where they won’t show against the light.
- Soak the panel in cool water with a little wool wash for 15 minutes.
- Press the water out gently. Roll the panel in towels. Don’t wring it, because that twists the loops.
- Lay it flat on a padded surface. Pin the width to 36 in (91.4 cm) and the length to 84 in (213.4 cm).
- Line up each fan row with a straight edge, and spread the loops of each fan evenly.
- Pin out every scallop point along the edges.
- Let it dry completely. Then hang it for 24 hours and measure again before you trim the length of the rod or clips.
Final Quality-Control Checklist
- [ ] The heading has 110 sts and measures 33 in (83.8 cm) before the border
- [ ] There are 26 fan rows, each with 11 groups of 10 loops
- [ ] Every fan knot sits at the bottom when the panel hangs
- [ ] All the sc bands are 3 rows deep
- [ ] Border Round 2 counts are 113 / 275 / 113 / 275
- [ ] There are 130 shells in total, with one centered on each corner
- [ ] The panel measures 36 in x 84 in (91.4 cm x 213.4 cm) hanging
- [ ] All ends are hidden inside the solid bands
Troubleshooting
The fans are different heights. You pulled some loops loose. Keep every loop snug against the dowel during the loop pass.
The panel is narrower at the fan rows. The 10 sc are too tight. Relax your tension in the work-off pass, or go up a hook size for that pass only.
You came up short a loop or two. You probably skipped a stitch at an edge. Count to 110 loops before you start working off groups.
The side edges wave. You worked too many border sc. Go back to 8 sc per fan row and 2 sc per band.
The side edges pull in. You worked too few border sc. Check that each side has 273.
The scallops don’t fit at a corner. Recount Round 2. Each side must be 6k + 5.
The panel sags too long. Cotton relaxes when it hangs. Hang it for 24 hours before measuring, and re-block if needed.
Care
Hand wash cool or machine wash on a gentle cycle in a mesh laundry bag, then reshape and dry flat. Don’t tumble dry, because heat and agitation can felt the knots and distort the loops.

Final Notes
Each stage of this panel fixes one measurement. The 110-stitch heading sets the width at 33 in (83.8 cm). Each repeat adds 3 in (7.6 cm), so 26 repeats plus the heading bring the length to 81 in (205.7 cm). The border’s 113 and 275 stitch counts line up the scallops, and its 1.5 in (3.8 cm) depth gives the finished 36 in x 84 in (91.4 cm x 213.4 cm). Check each measurement as you go, and the panel will hang straight. Make a second panel the same way for a matched pair.
Happy crocheting!