

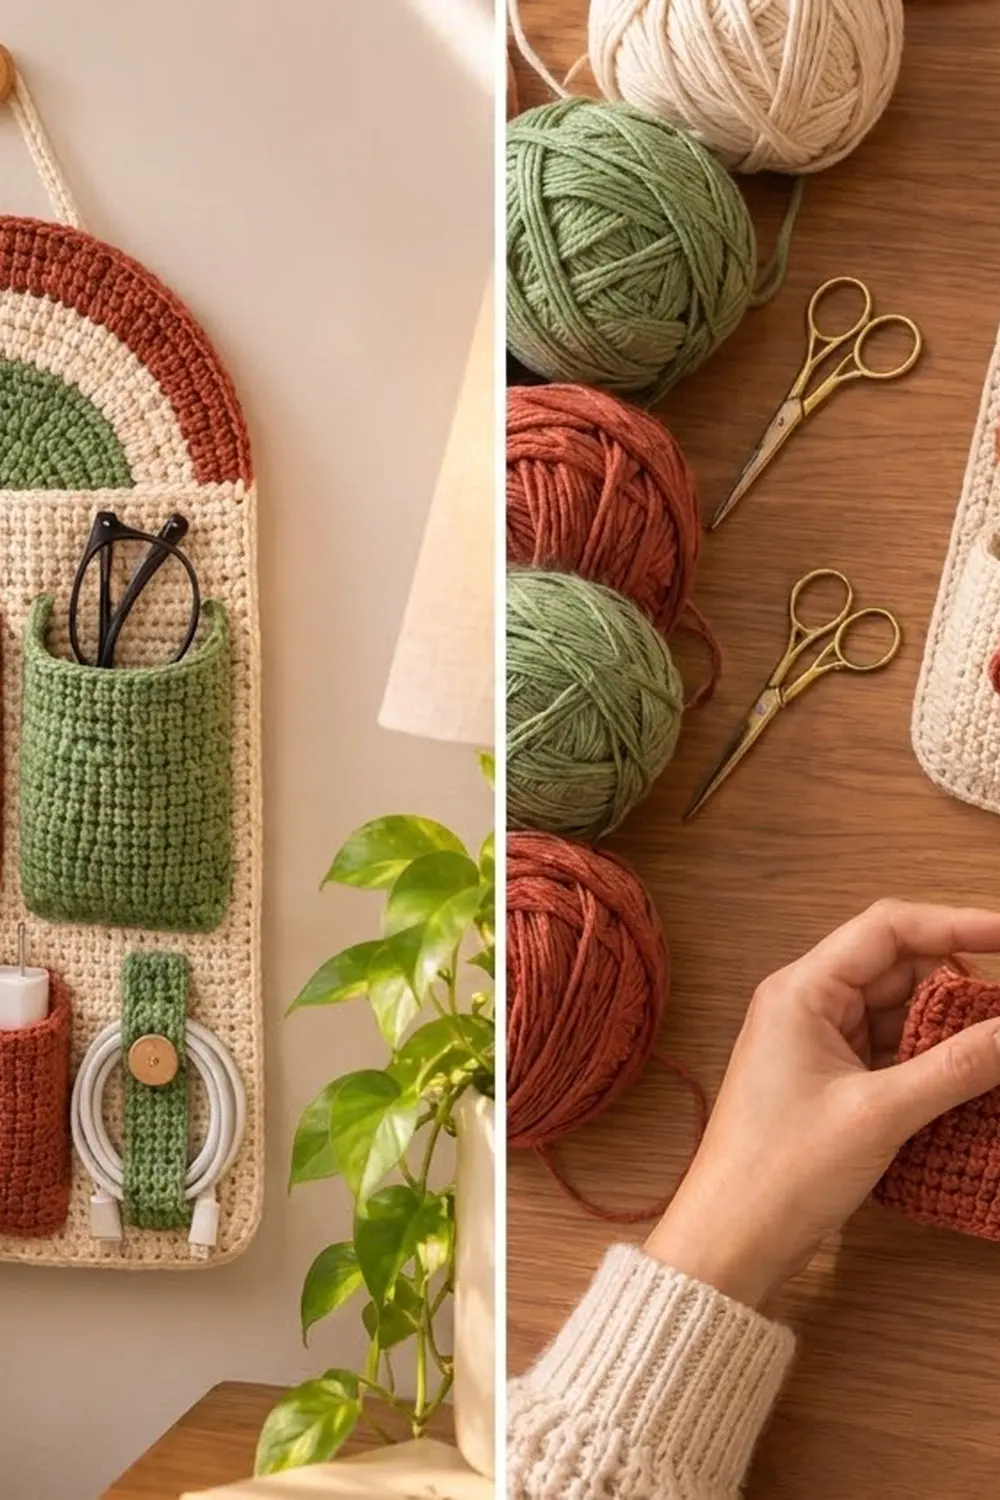
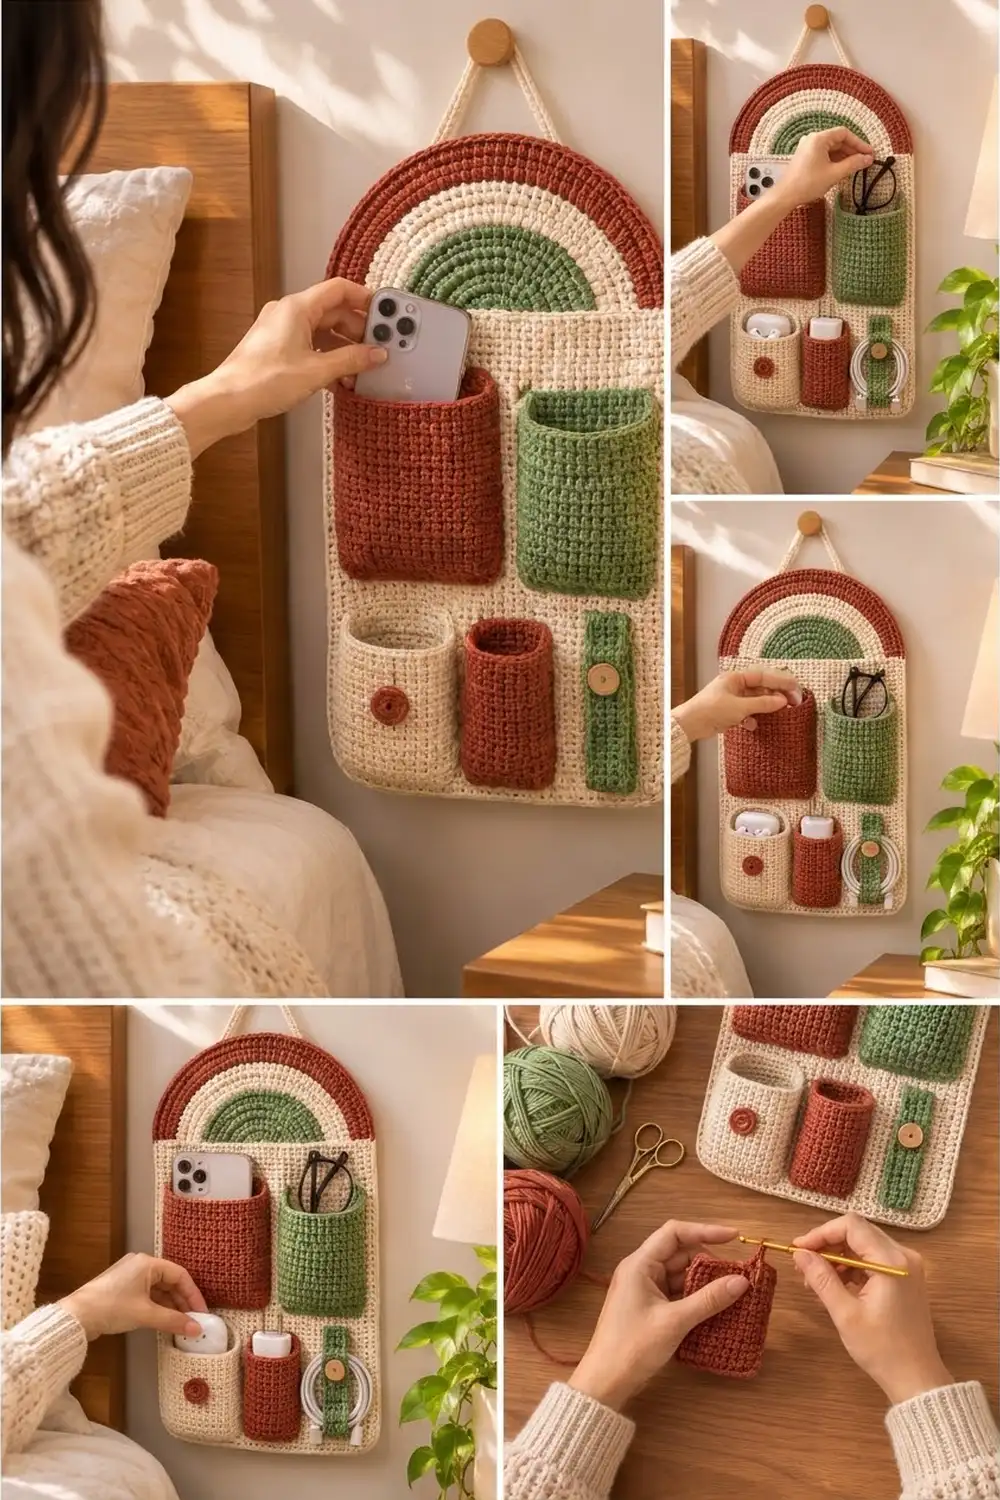
This bedside organizer keeps your phone, glasses, earbuds, charger, and cable in one spot on the wall next to your bed. A cream back panel ends in a rounded arch topped with a rainbow: a sage green half-circle in the center, a ridged cream band, and a terracotta outer band.
Five storage pieces sit on the lower panel. A terracotta pocket and a green pocket hold your phone and glasses. Below them are a cream cup pocket with a small terracotta button, a narrow terracotta charger pocket, and a green strap with a wooden button that holds a coiled cable. Firm single crochet gives every piece a dense, knit-like texture that holds its shape.
The pattern uses US crochet terms. The finished organizer measures 11 in wide x 18 in tall (27.9 cm x 45.7 cm), not counting the hanging cord.
You’ll crochet a rectangular panel, a half-circle rainbow arch, four pockets, a strap, a button, and a cord. You then sew the arch to the panel, add a two-round border, and sew the pockets in place.
Finished Size and Construction
- Finished size: 11 in x 18 in (27.9 cm x 45.7 cm)
- Skill level: Easy-intermediate
- Terminology: US
- Yarn weight: Worsted (#4) cotton or cotton blend
- Hook: 4.5 mm (US 7)
- Number of pieces: 9 (panel, arch, 2 large pockets, 2 small pockets, strap, button, cord)
- Layout: Arch on top of the panel; 2 large pockets in the upper row; cup pocket, charger pocket, and strap in the lower row
- Panel size: 10 in x 12 in (25.4 cm x 30.5 cm); arch 10 in x 5 in (25.4 cm x 12.7 cm)
- Size before border: 10 in x 17 in (25.4 cm x 43.2 cm)
- Border depth: about 0.5 in (1.3 cm) on each edge
Materials
Pick a smooth, firm worsted cotton or cotton blend at about 190 m per 100 g. Cotton keeps its shape when the pockets are loaded, and acrylic tends to sag.
- Cream: 150 g (285 m): panel, arch band, cup pocket, border, and cord
- Terracotta: 60 g (114 m): arch outer band, large pocket, charger pocket, and button
- Sage green: 50 g (95 m): arch center, large pocket, and strap
These quantities include a margin of about 25 percent.
Tools:
– 4.5 mm (US 7) hook
– Tapestry needle
– Locking stitch markers
– 1 wooden button, 3/4 in (1.9 cm)
– Sewing pins, a ruler, and a blocking mat
– Small wooden peg or hook for hanging
Abbreviations (US Terms)
- ch: chain
- sc: single crochet
- sl st: slip stitch
- st(s): stitch(es)
- BLO: back loop only
- inc: 2 sc in the same st
- MR: magic ring
Special stitch: sc BLO. Insert the hook under only the back loop of the stitch and complete a regular sc. Working into the back loop on turned rows leaves raised ridges, which give the arch its banded look and fold the pocket walls forward.
Gauge and Checkpoints
Gauge: 16 sc and 18 rows = 4 in (10.2 cm) in sc worked in rows. That works out to 4 sts and 4.5 rows per inch.
Crochet the cup pocket front first (12 sts x 20 rows) as your gauge test. It should measure 3 in x 4.4 in (7.6 cm x 11.2 cm). If it’s right, keep it as the finished pocket.
Checkpoints:
– Panel after row 54: 10 in x 12 in (25.4 cm x 30.5 cm)
– Arch after row 22: 9.8 in wide x 4.9 in tall (24.9 cm x 12.4 cm), which blocks to 10 in x 5 in (25.4 cm x 12.7 cm)
– Large pocket front: 3.5 in x 5.3 in (8.9 cm x 13.5 cm)
– Bordered organizer: 11 in x 18 in (27.9 cm x 45.7 cm)
If your piece is too big, go down 0.5 mm in hook size. If it’s too small, go up 0.5 mm. Don’t change any stitch counts, because the border and the pocket layout depend on them.
Back Panel (Cream)
Ch 41.
Row 1: Sc in the 2nd ch from the hook and in each ch across. (40 sts)
Rows 2–54: Ch 1, turn, and sc in each st across. (40 sts)
Fasten off. The panel should measure 10 in x 12 in (25.4 cm x 30.5 cm). Row 54 is the top edge.
Rainbow Arch
The arch is a flat half-circle worked in turned rows from a magic ring. Every row adds 3 stitches, so the count for row n is 3 x n.
Green:
Row 1: MR, ch 1, and 3 sc in the ring. Pull the ring closed. (3 sts)
Row 2: Ch 1, turn, and inc in each st. (6 sts)
Row 3: Ch 1, turn, and sc 1, inc 3 times. (9 sts)
Rows 4–11: Ch 1, turn, and sc in the next (row number minus 2) sts, inc 3 times. For example, row 4 is sc 2, inc 3 times. Counts: 12, 15, 18, 21, 24, 27, 30, 33 sts. Row 11 ends with 33 sts.
Cream: Change to cream in the last st of row 11. Work rows 12–16 in sc BLO, following the same increase formula. Counts: 36, 39, 42, 45, 48 sts.
Terracotta: Change to terracotta. Work rows 17–22 in sc BLO, following the same formula. Counts: 51, 54, 57, 60, 63, 66 sts.
Fasten off. Row 22 has 66 sts, and this is the curved outer edge.
The straight edge is made of 22 row ends on each side plus the closed ring.
Pockets
Every pocket is made the same way:
1. Crochet a flat front.
2. Work an edging row down one side, across the bottom, and up the other side.
3. Work two wall rows. The first is in BLO, which folds the edge forward into a shallow 0.5 in (1.3 cm) side wall.
For each pocket, the edging count is (2 x side count) + width + 4. The extra 4 come from working 3 sc into each of the two bottom corner chains.
Large Pockets (make 1 terracotta, 1 green)
Ch 15.
Row 1: Sc in the 2nd ch from the hook and in each ch across. (14 sts)
Rows 2–24: Ch 1, turn, and sc across. (14 sts)
Don’t fasten off. The front measures 3.5 in x 5.3 in (8.9 cm x 13.5 cm).
Edging row: Ch 1 and rotate the piece.
1. Work 21 sc down the side row ends, skipping the 8th, 16th, and 24th row ends.
2. Working into the free loops of the foundation chain, work 3 sc in the first ch, 1 sc in each of the next 12 ch, and 3 sc in the last ch.
3. Work 21 sc up the other side, skipping the same row ends.
(21 + 3 + 12 + 3 + 21 = 60 sts)
Wall row 1: Ch 1, turn, and sc BLO in each st. (60 sts)
Wall row 2: Ch 1, turn, and sc in each st. (60 sts)
Fasten off, leaving a 24 in (61.0 cm) tail. The pocket covers an area of about 4 in x 5.6 in (10.2 cm x 14.2 cm) on the panel.
Cup Pocket (cream)
Ch 13. Work 20 rows of 12 sc. Don’t fasten off.
Edging row:
1. Work 18 sc down the side, skipping the 10th and 20th row ends.
2. Work 3 sc in the first ch, 10 sc, and 3 sc in the last ch.
3. Work 18 sc up the other side.
(52 sts)
Wall rows 1–2: Work as for the large pockets. (52 sts)
Fasten off and leave a long tail. The front measures 3 in x 4.4 in (7.6 cm x 11.2 cm), and the pocket covers about 3.5 in (8.9 cm) of panel width.
Charger Pocket (terracotta)
Ch 11. Work 20 rows of 10 sc.
Edging row:
1. Work 18 sc down the side, skipping the 10th and 20th row ends.
2. Work 3 sc in the first ch, 8 sc, and 3 sc in the last ch.
3. Work 18 sc up the other side.
(50 sts)
Wall rows 1–2: 50 sts each.
Fasten off. The front measures 2.5 in x 4.4 in (6.4 cm x 11.2 cm), and the pocket covers about 3 in (7.6 cm) of panel width.
Cable Strap (green)
Ch 19.
Row 1: Sc in the 2nd ch from the hook and in each ch across. (18 sts)
Rows 2–5: Ch 1, turn, and sc across. (18 sts)
Fasten off. The strap measures 4.5 in x 1.1 in (11.4 cm x 2.8 cm).
Button (terracotta)
Rnd 1: MR and 6 sc. (6 sts)
Rnd 2: Inc in each st. (12 sts)
Sl st to join and fasten off. The button is about 1 in (2.5 cm) across. Use cream yarn to stitch two short bars in the center so it looks like a two-hole button.
Hanging Cord (cream)
Ch 73, then sl st in the back bump of the 2nd ch from the hook and of each ch across. (72 sl sts)
The cord should be about 18 in (45.7 cm) long. Add or remove chains if your slip stitches run loose or tight.
Make All Pieces
- Cream: 1 panel, 1 cup pocket, 1 cord, plus the arch band and the border
- Terracotta: 1 large pocket, 1 charger pocket, 1 button, plus the outer arch band
- Green: 1 large pocket, 1 strap, plus the arch center
Layout grid (measured on the 10 in x 12 in / 25.4 cm x 30.5 cm panel, with 0 at the top left):
             [  Rainbow arch: green / cream / terracotta  ]
y 0.5–6.1:   | Terracotta large  0.5–4.5 | Green large  5.5–9.5 |
y 6.6–11.3:  | Cream cup 0.5–4.0 | Terracotta 4.5–7.5 | Strap 8.2–9.3 |
All values are in inches. To convert: 0.5 in = 1.3 cm, 4.5 in = 11.4 cm, 5.5 in = 14.0 cm, 6.1 in = 15.5 cm, 6.6 in = 16.8 cm, 7.5 in = 19.1 cm, 8.2 in = 20.8 cm, 9.3 in = 23.6 cm, 9.5 in = 24.1 cm, and 11.3 in = 28.7 cm.
Joining
Arch to panel: Put the arch’s straight edge on top of the panel’s row 54, right sides up. Whipstitch with cream.
– Start at the center by joining the closed magic ring to stitches 20–21.
– Spread the 22 row ends on each side across the 20 panel stitches on that side, sewing 2 row ends into 1 stitch twice on each side.
The arch’s row 22 should end exactly at the panel’s top corners.
Pockets: Pin each pocket inside its area on the layout grid. Whipstitch through the outer loops of wall row 2 and the panel, one stitch for every panel stitch or row. Leave the top of each pocket open.
Stitch tension should match your crochet tension. Snug is right, and puckering is too tight. Use a matching color for each pocket.
Strap: Sew only the short ends, 0.4 in (1.0 cm) deep. Leave the middle free so a coiled cable can slide behind it. Sew the wooden button over the top attachment.
Button: Sew it to the center of the cup pocket, 1.25 in (3.2 cm) above the bottom edge.
Size checkpoint: The panel should still lie flat at 10 in (25.4 cm) wide. If it measures less, the seams are pulling. Loosen them before you add the border.
Border
The border uses cream and the same 4 sts per inch gauge. On the rectangle sides, 54 rows = 12 in, which needs 48 sc. That’s 8 sc for every 9 row ends.
Round 1: Join at the bottom-right corner.
– Bottom: 3 sc in the first st, 38 sc, 3 sc in the last st. (44 sts)
– Left side: 8 sc in every 9 row ends. (48 sts)
– Arch: 1 sc in each row 22 st. (66 sts)
– Right side: 48 sts, worked as for the left side.
Sl st to join. (44 + 48 + 66 + 48 = 206 sts)
Round 2: Ch 1, then work around:
– Bottom: Sc in each st, working 3 sc in the center st of each corner group. (48 sts)
– Sides: Sc in each st. (48 sts each)
– Arch: Sc 21, inc 3 times. (69 sts)
Sl st to join. (48 + 48 + 69 + 48 = 213 sts)
Fasten off.
Why the math works: The 40 bottom stitches gain 2 per corner in each round, which keeps the corners flat. The 48 side stitches match 12 in at 4 sts per inch.
The arch’s outer edge in round 1 sits at a radius of about 5.25 in (13.3 cm). Its arc length is 3.14 x 5.25 = 16.5 in (41.9 cm), and 16.5 x 4 = 66 sts. Round 2 sits at about 5.5 in (14.0 cm), so its arc needs about 69 sts. That’s why it gets 3 increases.
Final Blocking
- Wet the organizer and press out the water in a towel. Don’t wring it.
- Pin it face up to 11 in x 18 in (27.9 cm x 45.7 cm).
- Pin the arch into a smooth curve so that it measures 5 in (12.7 cm) from the seam to the bottom of the border.
- Put rolled washcloths inside the pockets so they dry with an open shape.
- Let it dry flat completely, which takes 24–48 hours.
- Sew the ends of the cord to the back of the arch at the 10 o’clock and 2 o’clock positions, 1 in (2.5 cm) in from the edge.
Final Quality-Control Checklist
- Panel is 10 in x 12 in (25.4 cm x 30.5 cm) before the border
- Arch rows end at 33, 48, and 66 sts, and the color bands are even
- Large pocket edgings have 60 sts, cup pocket 52, and charger pocket 50
- Border round 1 has 206 sts and round 2 has 213
- Finished size is 11 in x 18 in (27.9 cm x 45.7 cm)
- Pocket tops are open and the strap’s middle is free
- The organizer hangs straight with no pull toward one side
Troubleshooting
- Arch ruffles: Your tension is loose. Go down a hook size, or move the increases to alternating positions.
- Arch cups: Your stitches are too tight. Loosen up or go up 0.5 mm.
- Points form along the arch: The increases are stacking. Shift each increase by 1 st on alternate rows.
- Pockets gape: Sew through both the wall and the panel at every stitch.
- Panel puckers around the pockets: The seams are too tight. Unpick and re-sew more loosely.
- Border waves: Re-count the side stitches. There should be 48, not one per row end.
- Organizer tilts: Re-sew the cord ends so they sit at matching heights.
Care
Hand wash in cool water and dry flat, reshaping the pockets while it’s damp. Take everything out of the pockets before you wash it.
Final Notes
Each measurement builds on the one before. Gauge of 16 sc x 18 rows = 4 in (10.2 cm) gives a 10 in x 12 in (25.4 cm x 30.5 cm) panel. Add the 10 in x 5 in (25.4 cm x 12.7 cm) arch for 10 in x 17 in (25.4 cm x 43.2 cm). The 0.5 in (1.3 cm) border brings it to 11 in x 18 in (27.9 cm x 45.7 cm). Check your measurements at each stage, and your pockets will land where the layout grid puts them.
Happy crocheting!