

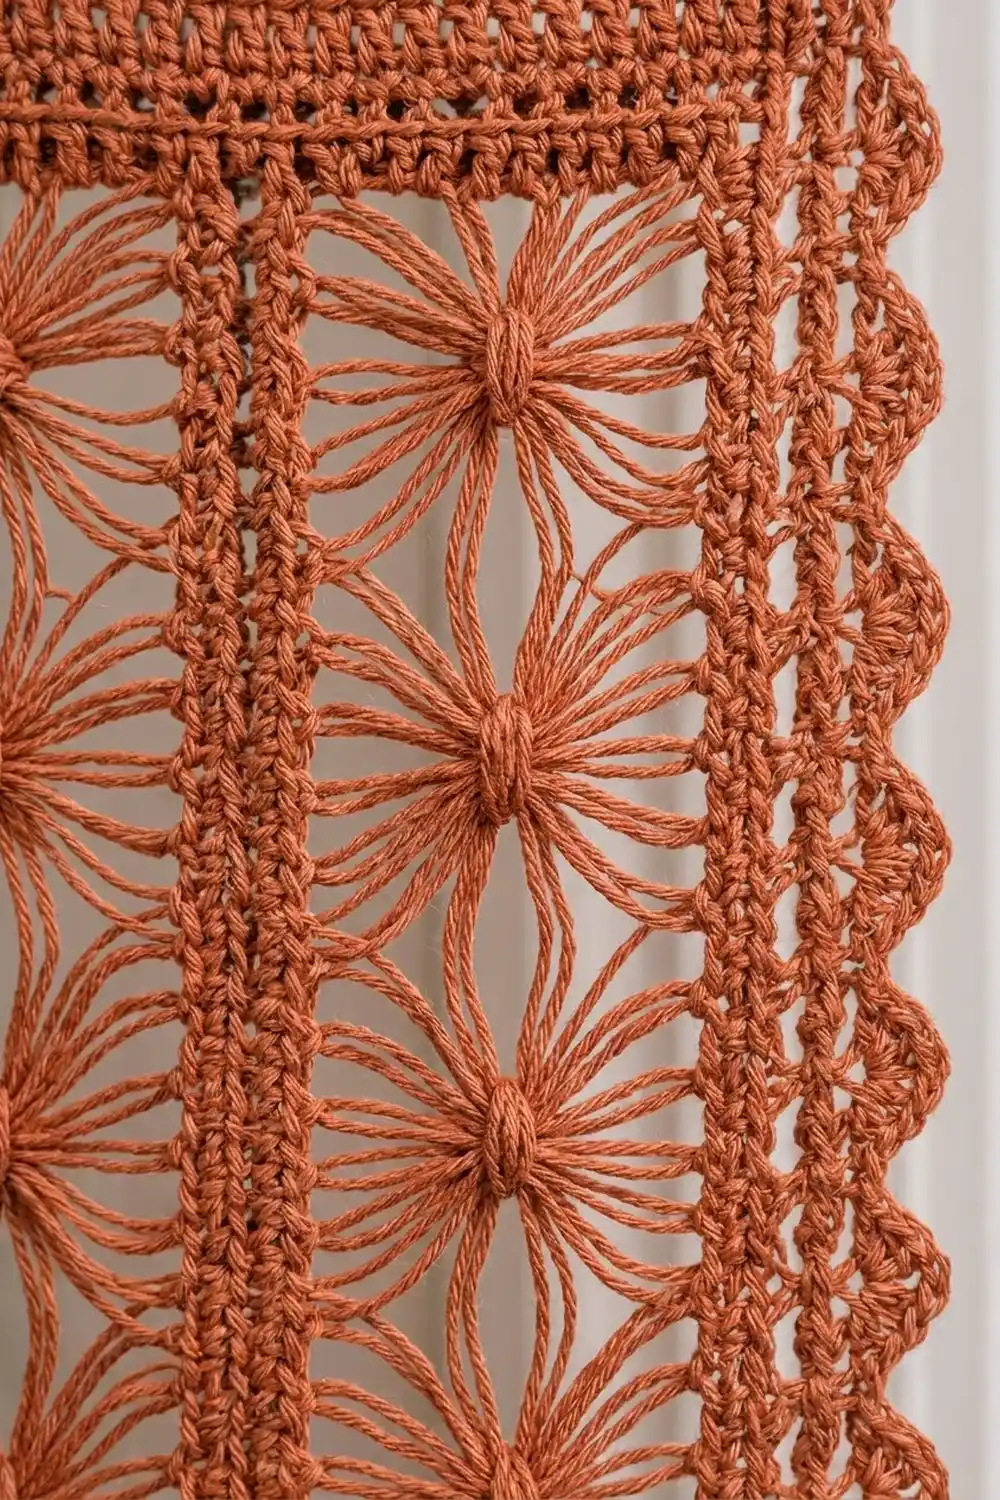
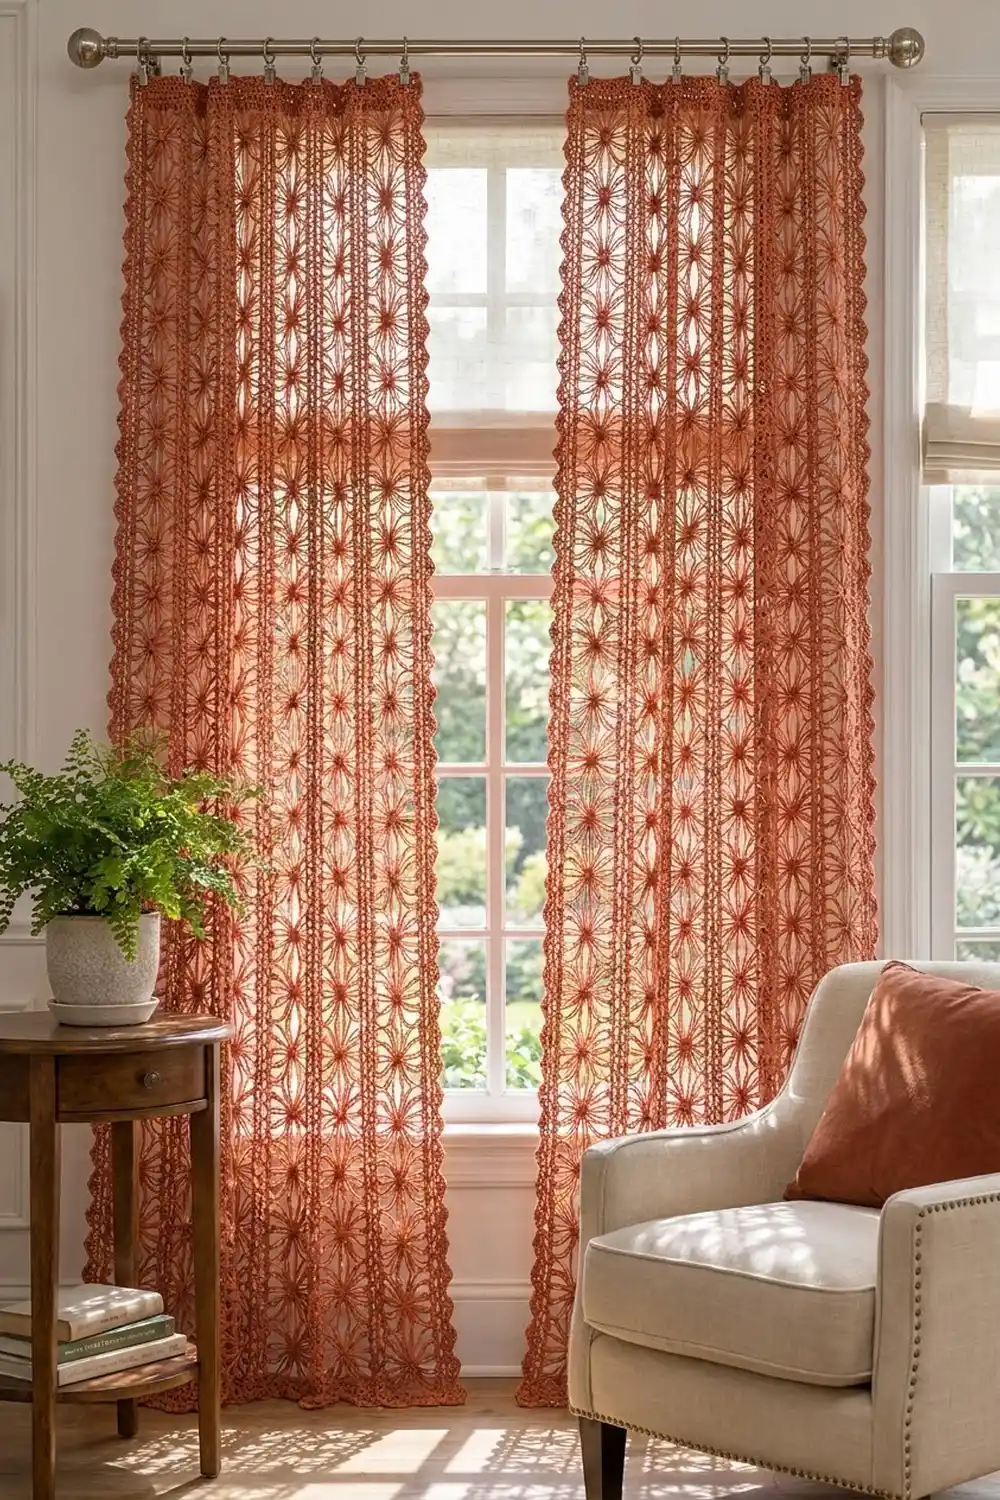
This curtain panel is built from long hairpin lace strips. Each strip has a slim crocheted spine, and the loops on either side are gathered into soft bunches. Where the bunches meet across the spine they form a column of open starbursts, and light shows clearly through every one.
The sample is worked in a single warm terracotta cotton. One color keeps the focus on texture: open loops, solid joining columns, a firm header band and a small scalloped edge. The style is relaxed and boho, and the edges are tidy enough for a formal room. All terms are US crochet terms.
The finished panel measures 38 in (96.5 cm) wide and 84 in (213.4 cm) long after blocking. Make two identical panels if you want a pair like the one shown.
Construction overview: you make 9 hairpin lace strips and edge each one so the loops are gathered into groups of 8. Then you join the strips side by side with a slip-stitch ridge. Last, you work one round of single crochet around the panel, a scallop edging down the sides and along the bottom, and a solid header across the top.
Finished Size and Construction
- Finished size: 38 in x 84 in (96.5 cm x 213.4 cm)
- Skill level: Intermediate (hairpin lace experience helps)
- Terminology: US crochet terms
- Yarn weight: DK (#3) cotton
- Hook: 4.5 mm (US 7)
- Number of pieces: 9 hairpin lace strips
- Layout: 9 strips side by side, all running vertically (1 row x 9 strips)
- Piece size (edged strip): 4 in x 80 in (10.2 cm x 203.2 cm)
- Size before border: 36 in x 80 in (91.4 cm x 203.2 cm)
- Border depth: 1 in (2.5 cm) at the sides and bottom; 3 in (7.6 cm) at the top, including the header
Materials
Yarn: Use a smooth DK cotton or cotton blend at about 120 m (131 yd) per 50 g. Cotton holds the loop shape and hangs straight. Avoid fuzzy yarn, because it hides the starbursts and makes loops hard to count.
- Terracotta: 550 g (1,320 m / 1,444 yd), which is 11 balls of 50 g
The panel uses about 1,040 m (1,137 yd): roughly 100 m (109 yd) per edged strip and about 140 m (153 yd) for joining and borders. The quantity above includes a margin of about 25% for gauge differences and swatching. Buy everything from a single dye lot.
Tools:
- 4.5 mm (US 7) crochet hook
- Adjustable hairpin lace loom set to 3 in (7.6 cm)
- Locking stitch markers (at least 20)
- Scrap yarn in a contrast color for counting loops
- Tapestry needle and scissors
- Tape measure
- Blocking mats and rust-proof pins
- 12 curtain clip rings for hanging
Abbreviations (US Terms)
- ch: chain
- sc: single crochet
- dc: double crochet
- sl st: slip stitch
- sk: skip
- st(s): stitch(es)
- sp: space
- BLO: back loop only
- RS / WS: right side / wrong side
Special stitches:
- Hairpin loop: With the loom tines 3 in (7.6 cm) apart, wrap the yarn around the tines and work 1 sc into the front strand of the left loop at the center of the loom. This makes the spine. Pass the hook to the back, turn the loom a half turn so a new wrap forms, and repeat. Each half turn adds 1 loop to one side, so the two sides grow evenly.
- G8sc (gather-8 single crochet): Insert the hook through the next 8 loops together, picked up in order and without twisting. Yarn over and pull up a loop, then yarn over and pull through both loops on the hook.
Gauge and Checkpoints
Gauge: 16 sc and 16 rows = 4 in (10.2 cm) in sc. Also 4 dc = 1 in (2.5 cm) and 2 dc rows = 1 in (2.5 cm).
Hairpin gauge: 8 loops on one side = 2 in (5.1 cm) of spine, measured gently stretched.
Test one piece first. Make a short test strip with 32 loops on each side, then edge it as shown below using 4 groups instead of 40. Edging Row 2 should have exactly 32 sc and measure 8 in (20.3 cm). The edged strip should be 4 in (10.2 cm) wide.
Checkpoints:
- Test strip, edged: 8 in x 4 in (20.3 cm x 10.2 cm), 32 sc per long edge.
- One full edged strip: 80 in x 4 in (203.2 cm x 10.2 cm), 320 sc per long edge, 16 sts per short end.
- Three strips joined: 12 in (30.5 cm) wide.
- All 9 strips joined: 36 in x 80 in (91.4 cm x 203.2 cm).
- After Border Round 1: 36.5 in x 80.5 in (92.7 cm x 204.5 cm).
- Finished and blocked: 38 in x 84 in (96.5 cm x 213.4 cm).
If the test strip is too long: The edging controls the length. Go down to a 4 mm (US 6) hook for the edging rows only. If it is too short: go up to a 5 mm (US 8) hook for the edging. If the strip is too wide or narrow: set the loom 1/4 in (0.6 cm) narrower or wider. Don’t change the stitch counts, because the joining and border math depends on them.
Hairpin Lace Strips (Make 9)
As you go, mark each side’s loops in bundles of 40 with scrap yarn. When the loom fills, remove the bottom bar, slide the loops off, and put the last few loops of each side back on the tines before you continue.
Strip: Work hairpin loops until there are 320 loops on each side (640 loops in total). Fasten off. The strip should be about 80 in (203.2 cm) long when gently stretched.
Count before edging. You should have 40 groups of 8 loops on each side. Each group on the left must sit directly across from a group on the right. That alignment is what creates the starburst shape.
Side Edging (work on both long sides of each strip)
Row 1 (gathering row): With RS facing, join yarn with a sl st at the spine end. Ch 3. G8sc over the first 8 loops. (Ch 7, G8sc over the next 8 loops), repeat from * to * 38 more times, for 39 repeats in all. Ch 4 and sl st to the opposite spine end.
Count: 40 G8sc + 3 ch + (39 x 7 = 273) ch + 4 ch = 320 sts. The sl sts at the ends are not counted.
Row 2: Ch 1 and turn. Sc in each ch and each G8sc across.
Count: 320 sc (320 sts x 1 sc each + 0 extra). Fasten off.
Repeat Rows 1 and 2 on the other long side, gathering the matching loop groups. Each long edge now has 320 sc, which is 80 in (203.2 cm) at 4 sc per inch.
End Rows (work on both short ends)
With RS facing, work across the short end: sc in the row-end of Row 2, sc in the row-end of Row 1, ch 5, 2 sc in the spine end, ch 5, sc in the row-end of Row 1 on the other side, and sc in the row-end of Row 2.
Count: 1 + 1 + 5 + 2 + 5 + 1 + 1 = 16 sts, or 4 in (10.2 cm). Fasten off and weave in the ends.
Make All Pieces
- Terracotta: 9 strips, each with 320 loops per side, both long sides edged and both ends finished.
Layout grid (all strips vertical, with the top end of every strip facing up):
| S1 | S2 | S3 | S4 | S5 | S6 | S7 | S8 | S9 |
Before joining, mark the 20th group on each strip to confirm that the starbursts line up across the panel.
Joining
Method: Slip-stitch join through the back loops, worked with the WS of the strips together so that a neat raised ridge forms on the RS. These ridges become the solid columns between the starbursts.
Stitch-to-stitch logic: Hold S1 and S2 with WS together and the Row 2 edges aligned. Begin at the top end. Join yarn and sl st through the BLO of the first sc on both strips. Continue with 1 sl st through each matched pair of sc for the full length.
Count: 320 sl st per seam, matching sc 1 to sc 1 and sc 320 to sc 320. No stitches are added or skipped. Fasten off.
Join S3 to S2 the same way and continue across to S9, for 8 seams in total.
Tension: Keep the sl sts as loose as the sc they go into. Tight joins pucker the long seams and pull the panel shorter than 80 in (203.2 cm). If the seam ripples, go up one hook size for joining.
Size checkpoint: The joined panel measures 36 in x 80 in (91.4 cm x 203.2 cm). The top edge has 9 x 16 = 144 sts. Each outer long edge has 320 sc, from S1 and S9.
Border
Border gauge: 4 sc = 1 in (2.5 cm) and 4 dc = 1 in (2.5 cm). Each scallop takes up 4 sts, or 1 in (2.5 cm).
Round 1 (sc frame): With RS facing, join at the top right corner. Work 1 sc in each of the 144 top sts and ch 2 at the corner. Work 1 sc in each of the 320 sc down the side and ch 2 at the corner. Work 1 sc in each of the 144 bottom sts and ch 2 at the corner. Work 1 sc in each of the 320 sc up the side, ch 2, and sl st to the first sc.
Count: Top 144, side 320, bottom 144, side 320 = 928 sc, plus 4 ch-2 corner sps. The corner sps are not stitches. Each side count is 1 sc per existing st + 0 extra. Fasten off.
Round 2 (scallop edging, sides and bottom only): Join with sc in the top right corner ch-2 sp.
– Right side: (sk 1, 5 dc in next st, sk 1, sc in next st), repeat 80 times. The last sc lands in st 320.
– Bottom right corner sp: (5 dc, sc).
– Bottom: repeat the scallop 36 times. The last sc lands in st 144.
– Bottom left corner sp: (5 dc, sc).
– Left side: repeat the scallop 80 times, then sc in the top left corner ch-2 sp. Fasten off.
Count: 80 + 36 + 80 + 2 corner shells = 198 shells, and 200 sc.
Header (top edge only), worked in rows:
Row 1: With RS facing, join in the top right corner ch-2 sp. Ch 3 (counts as dc), dc in each of the 144 top sts, dc in the top left corner sp.
Count: 144 + 2 = 146 dc.
Rows 2–5: Ch 3 (counts as dc) and turn. Dc in each st across = 146 dc.
Row 6: Ch 1 and turn. Sc in each st across = 146 sc. Fasten off.
Why the math works:
– Scallops: Each side has 320 sts, and 320 ÷ 4 = 80 scallops. The bottom has 144 sts, and 144 ÷ 4 = 36 scallops. Every scallop closes with an sc in the last st before a corner.
– Header width: 146 sts = 36.5 in (92.7 cm), which matches the width after Round 1.
– Header height: Round 1 (1/4 in, 0.6 cm) + 5 dc rows (2.5 in, 6.4 cm) + 1 sc row (1/4 in, 0.6 cm) = 3 in (7.6 cm).
– Width: 36 in + 2 x 1/4 in (0.6 cm) + 2 x 3/4 in (1.9 cm) = 38 in (96.5 cm).
– Length: 3 in + 80 in + 1 in = 84 in (213.4 cm).
Final Blocking
- Weave in all ends along the spines and seam ridges, never through the open loops.
- Soak the panel in cool water with a little wool wash for 15 minutes.
- Press out the water without wringing, then roll the panel in towels.
- Lay it flat on mats or a clean sheet over carpet.
- Pin the header straight first, at 36.5 in (92.7 cm).
- Pin both long sides at 84 in (213.4 cm), keeping every seam ridge straight and parallel.
- Ease each starburst open, centering the loops evenly on both sides of the spine.
- Pin every scallop point so the outer width is 38 in (96.5 cm).
- Let it dry completely before unpinning.
Final Quality-Control Checklist
- All 9 strips have 40 loop groups per side, and the groups line up across each spine.
- Every long edge has 320 sc, and every short end has 16 sts.
- All 8 seams have 320 sl sts, and the ridges sit on the RS.
- Starbursts sit at matching heights across the panel.
- Round 1 has 928 sc plus 4 corner sps.
- Sides have 80 scallops each, the bottom has 36, and there are 2 corner shells.
- The header has 146 sts in every row.
- The blocked size is 38 in x 84 in (96.5 cm x 213.4 cm).
Troubleshooting
- Loops twisted in a group: Undo the G8sc and pick up the loops again in order, keeping each one flat.
- Starbursts don’t line up across the spine: One side probably has an extra loop. Recount and correct it at the strip’s end before you edge.
- A strip is shorter than its neighbors: Check that Row 2 has 320 sc. Missing chains in Row 1 are the usual cause.
- Seam puckers: Remove the seam and rework it with a larger hook.
- Scallops flare: Go down a hook size for Round 2 only.
- The panel stretches when hung: Cotton relaxes. Re-block it and space the clips evenly.
Care
Hand wash cool and dry flat, reshaping to 38 in x 84 in (96.5 cm x 213.4 cm). Never hang it wet, because the weight of the water stretches the loops.
Final Notes
The measurement chain is simple:
– 8 loops make 2 in (5.1 cm).
– 40 groups make an 80 in (203.2 cm) strip with 320 sc per edge.
– 9 strips at 4 in (10.2 cm) each make 36 in (91.4 cm).
– Round 1 brings that to 36.5 in (92.7 cm), and the scallops finish the width at 38 in (96.5 cm).
– The header and bottom border bring the length to 84 in (213.4 cm).
If your test strip matches its checkpoint, the rest of the panel will match too. Clip 12 rings evenly across the header and let the light show off the starbursts.
Happy crocheting!