

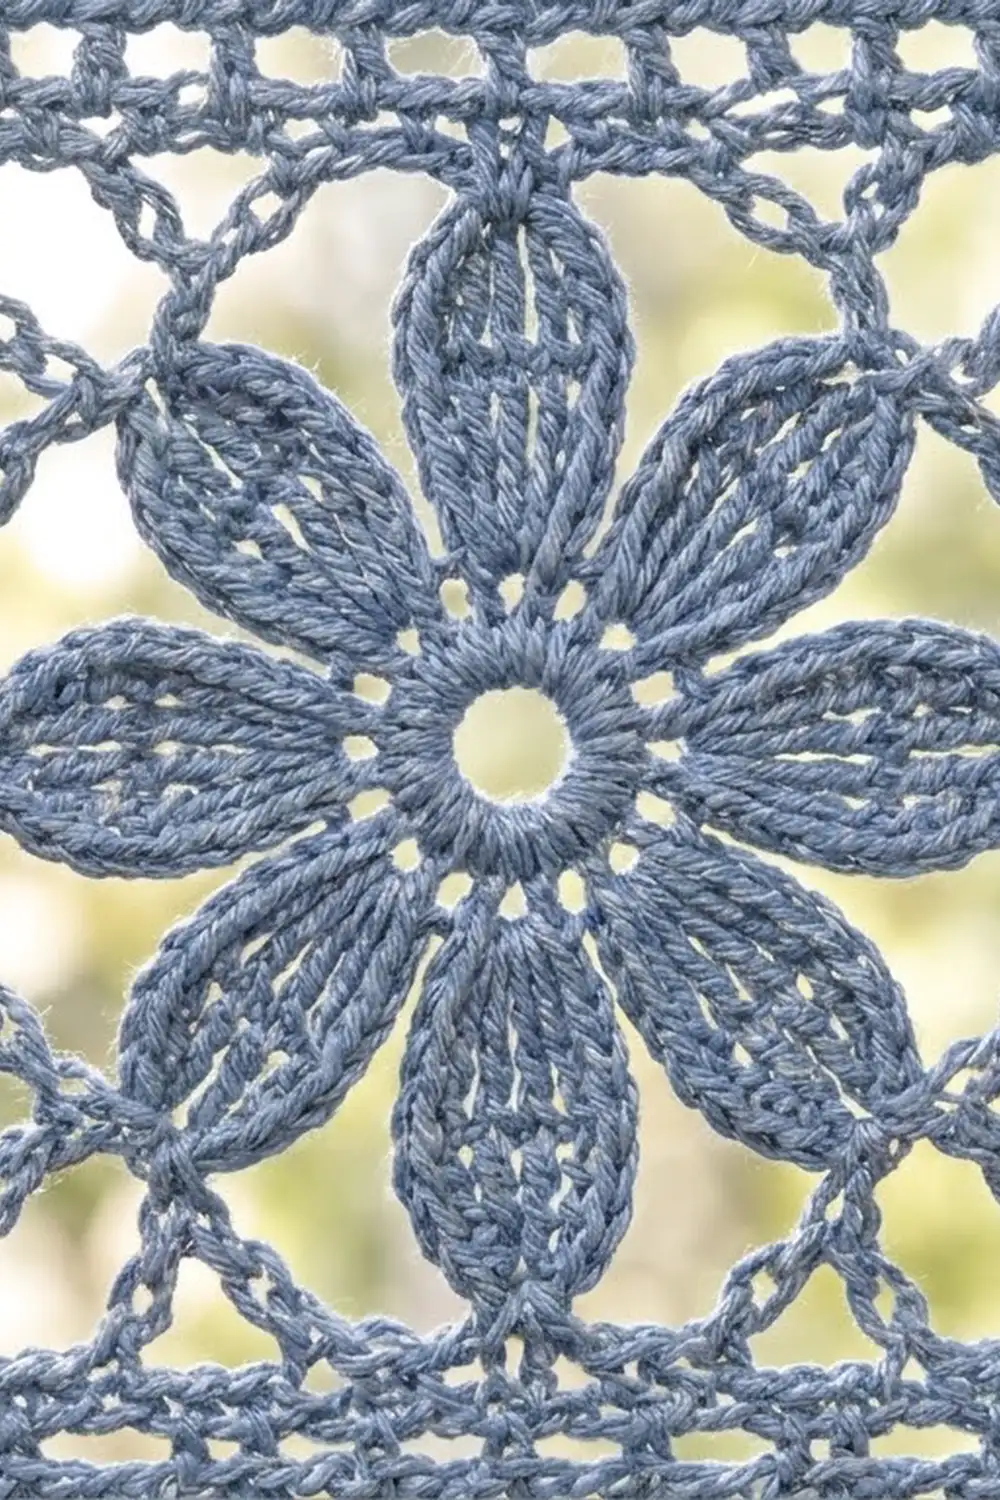
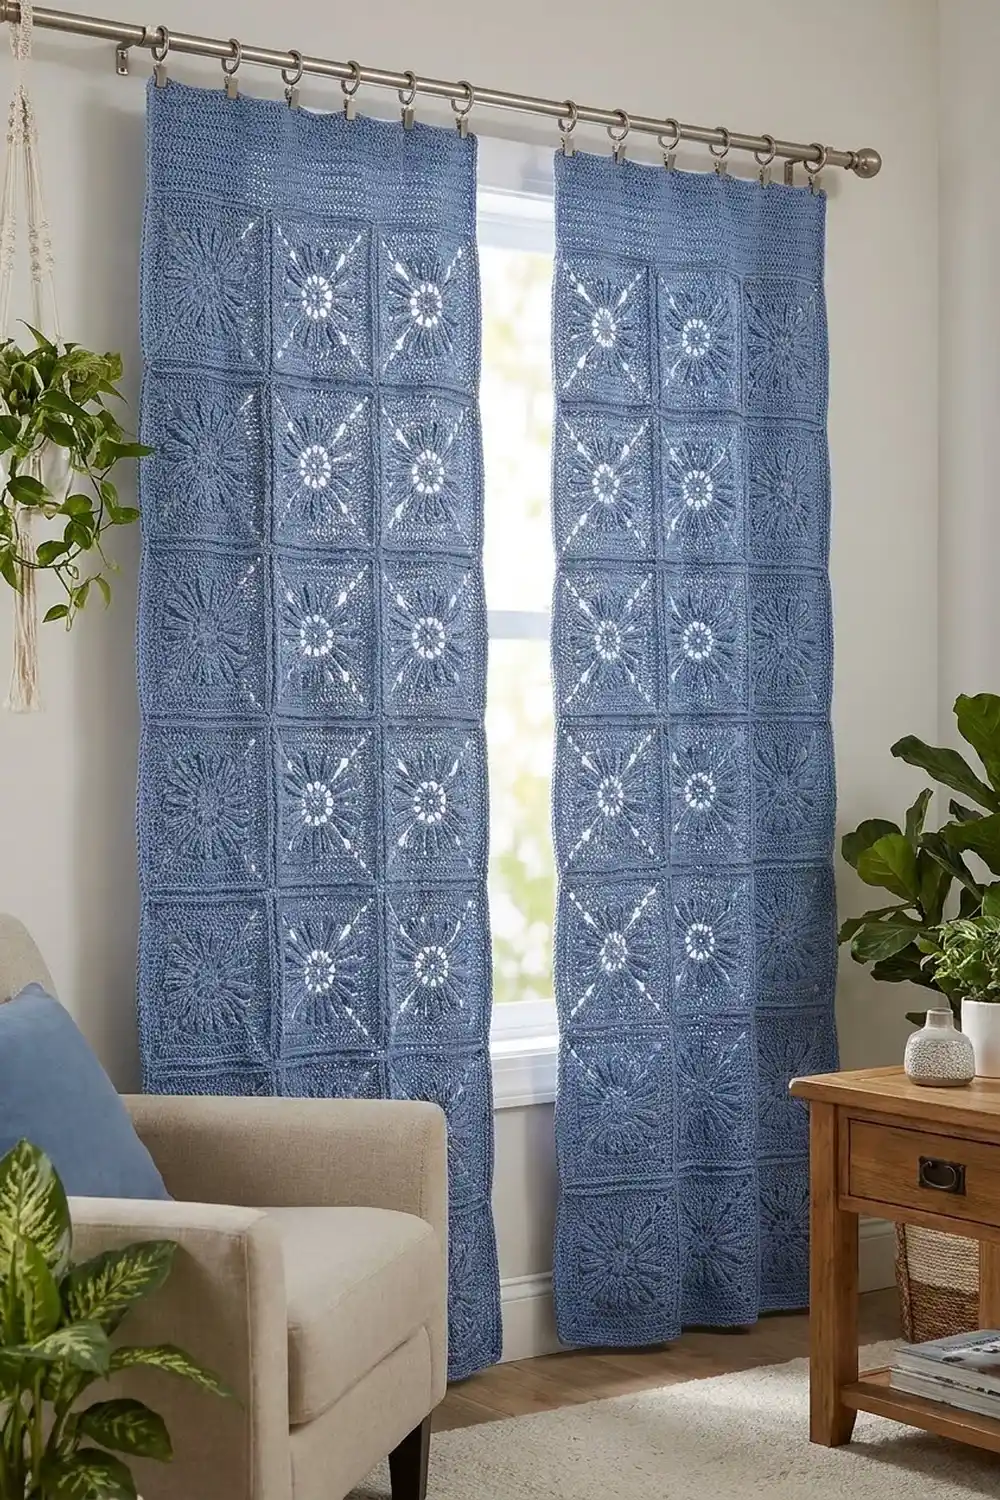
These lace curtain panels are made from eight-petal flower squares joined into a neat lattice. Each square has an open ring at the center, eight pointed petals, and a light chain-and-double-crochet frame. A firm single crochet edge on every square forms the raised grid lines between the flowers.
The whole set is worked in one color, a soft dusty cornflower blue. Light comes through the mesh easily, so the panels look airy against a window but still give some privacy. A solid half double crochet header band across the top gives you a sturdy place to clip curtain rings.
This pattern uses US crochet terms. Each finished panel measures 25 x 63.25 in (63.5 x 160.7 cm), and the pattern makes two matching panels.
Construction is simple. You crochet 80 identical flower squares, join 40 of them into each panel (4 squares wide by 10 squares tall) with single crochet seams, then work a two-round edging around each panel and a header band across the top.
Finished Size and Construction
- Finished panel size: 25 x 63.25 in (63.5 x 160.7 cm), two panels
- Skill level: Intermediate
- Terminology: US crochet terms
- Yarn weight: DK / light worsted (#3), cotton or cotton blend
- Hook: 3.5 mm (E-4)
- Number of pieces: 80 squares (40 per panel)
- Layout per panel: 4 squares wide x 10 squares tall
- Square size: 6 x 6 in (15.2 x 15.2 cm), blocked
- Panel size before border: 24 x 60 in (61.0 x 152.4 cm)
- Border depth: 0.5 in (1.3 cm) on the sides and bottom; 2.75 in (7.0 cm) at the top, including the header band
Materials
Pick a smooth DK cotton or cotton blend with good stitch definition. Mercerized cotton shows the petals and lattice lines most clearly, and it hangs without much stretch. Avoid fuzzy yarns, which fill in the open mesh.
Yarn (one color):
– Dusty Cornflower Blue: 1,000 g, about 2,250 m (10 balls of 100 g / 225 m each)
Estimated use per panel is about 400 g for the squares, 13 g for the joining, and 17 g for the border and header. That comes to about 860 g for both panels. The quantity listed includes a margin of about 15% for gauge differences and a test square.
Tools:
– 3.5 mm (E-4) crochet hook, plus 3.25 mm and 3.75 mm hooks for gauge changes
– Tapestry needle
– Scissors
– Stitch markers (at least 4)
– Measuring tape
– Blocking mats, rustproof pins, and a spray bottle
– 16 curtain ring clips (8 per panel)
Abbreviations (US Terms)
- ch – chain
- sl st – slip stitch
- sc – single crochet
- hdc – half double crochet
- dc – double crochet
- tr – treble crochet
- sp(s) – space(s)
- st(s) – stitch(es)
- RS / WS – right side / wrong side
Special stitch – Petal: In the stated sp, work (sc, hdc, dc, 2 tr, ch 3, 2 tr, dc, hdc, sc). Each petal has 10 sts and a ch-3 tip.
Gauge and Checkpoints
Make one complete square first and block it before starting the rest. The key gauge is the Rnd 6 edge: 29 sc = 6 in (15.2 cm) along one side, corner to corner.
Measure at these checkpoints:
- After Rnd 1: 1.25 in (3.2 cm) across
- After Rnd 2: 1.75 in (4.4 cm) across
- After Rnd 3: 4 in (10.2 cm) from petal tip to opposite petal tip
- After Rnd 4: about 5 in (12.7 cm) square
- After Rnd 5: 5.5 in (14.0 cm) square
- After Rnd 6: 6 in (15.2 cm) square after blocking
Your blocked square should land between 5 7/8 and 6 1/8 in (14.9 and 15.6 cm). If it is bigger, change to a 3.25 mm hook. If it is smaller, change to a 3.75 mm hook. Make a new test square after each hook change, because a small difference in each square adds up to a big difference over 10 squares.
Flower Square (Make 80)
Ch 6, sl st in first ch to form a ring.
Rnd 1: Ch 3 (counts as dc), 15 dc in ring; sl st in top of beg ch-3. (16 dc)
This leaves an open ring at the center.
Rnd 2: Ch 1, sc in same st, ch 4, skip next dc, sc in next dc, ch 4, skip next dc; repeat from * 6 more times; sl st in first sc. (8 sc, 8 ch-4 sps)*
Rnd 3: Sl st in next ch-4 sp, work a Petal in same sp, Petal in next ch-4 sp; repeat from * 6 more times; sl st in first sc. (8 petals: 80 sts and 8 ch-3 tips)*
Petals sit side by side. Each one tapers to a pointed ch-3 tip, with the trebles giving it a long, ribbed look.
Rnd 4: Sl st in next 4 sts (hdc, dc, tr, tr), sl st in ch-3 tip. Ch 1, sc in same tip, ch 6, (2 tr, ch 3, 2 tr) in next tip (corner), ch 6, sc in next tip; repeat from * 3 more times, leaving out the final sc; sl st in first sc. (4 sc, 16 tr, 8 ch-6 sps, 4 corner ch-3 sps)*
The petals now point alternately to the middle of a side and to a corner, which squares off the motif.
Rnd 5: Ch 5 (counts as dc and ch 2), (dc, ch 2, dc) in next ch-6 sp, ch 2, dc in next 2 tr, (2 dc, ch 3, 2 dc) in corner sp, dc in next 2 tr, ch 2, (dc, ch 2, dc) in next ch-6 sp, ch 2, dc in next sc, ch 2; repeat from * 3 more times, ending last repeat at ; sl st in 3rd ch of beg ch-5. (52 dc, 24 ch-2 sps, 4 corner ch-3 sps)*
Each side now has 13 dc and 6 ch-2 sps between the corner ch-3 sps.
Rnd 6: Ch 1, sc in each dc, 2 sc in each ch-2 sp, and 3 sc in each corner ch-3 sp; sl st in first sc. Fasten off, leaving a 6 in (15.2 cm) tail. (112 sc)
Counting each side: Rnd 6 has 13 sc from the dc plus 12 sc from the ch-2 sps, which makes 25 sts between corner groups. Each corner group has 3 sc, and the middle one is the corner st. One side therefore has 1 + 1 + 25 + 1 + 1 = 29 sts, including both corner sts. Check: 4 x 29 − 4 shared corners = 112.
Put a marker in each corner st. Weave in the starting tail and leave the ending tail for now.
Make All Pieces
You need 80 squares in Dusty Cornflower Blue, 40 for each panel. Block all squares to 6 in (15.2 cm) before joining (see Final Blocking). Matching sizes make the seams lie straight.
Layout per panel (A = flower square), 4 wide x 10 tall:
A A A A
A A A A
A A A A
A A A A
A A A A
A A A A
A A A A
A A A A
A A A A
A A A A
Joining
Join with sc through both layers, holding the squares WS together so the seam ridge sits on the RS. The ridges form the raised grid lines between the flowers.
Horizontal seams first: Place two rows of 4 squares WS together. Join at the right corner st of the first pair. Work sc through both loops of both layers in each matching pair of sts, 29 sc per pair of squares, from corner st to corner st. Go straight on to the next pair of squares without adding chains, so the corner st of one pair is followed by the corner st of the next. Each horizontal seam has 4 x 29 = 116 sc. Each panel has 9 horizontal seams.
Vertical seams next: Join each column edge the same way, 10 x 29 = 290 sc per seam, 3 seams per panel. Where a vertical seam meets a horizontal ridge, step over the ridge and keep working from corner st to corner st, without adding a stitch.
Stitch-to-stitch logic: Every square has 29 sts per side, so the stitches always match 1-to-1. No stitches are skipped or added.
Tension: Keep the seams as loose as your square edges. If a seam puckers, work it with a hook one size larger.
Size checkpoint: Each joined panel should measure 24 x 60 in (61.0 x 152.4 cm).
Border
Border gauge: The border matches the square edge gauge, 29 sc = 6 in (15.2 cm), and each sc round adds about 0.25 in (0.6 cm) of depth. Before the border, each panel has:
- Top and bottom: 4 squares x 29 sts = 116 sts each
- Sides: 10 squares x 29 sts = 290 sts each
Each of these counts includes the two panel corner sts at the ends of that edge.
Border Rnd 1 (RS): Join yarn in any st along a side. Sc in each st around, working 3 sc in each of the 4 panel corner sts; sl st in first sc. Count each side from corner-center st to corner-center st:
– Top and bottom: 114 + 4 = 118 sts each
– Sides: 288 + 4 = 292 sts each
– Total: 2 x 118 + 2 x 292 − 4 = 816 sts
Border Rnd 2: Ch 1, sc in each st, working 3 sc in each corner-center st; sl st in first sc. Fasten off.
– Top and bottom: 120 sts each
– Sides: 294 sts each
– Total: 2 x 120 + 2 x 294 − 4 = 824 sts
The sides and bottom are now 0.5 in (1.3 cm) deep.
Header Band: Work back and forth across the top edge only, in rows.
Row 1 (RS): Join yarn in the top right corner-center st. Ch 2 (does not count as a st), hdc in each st across to the top left corner-center st. Turn. (120 hdc)
Rows 2–8: Ch 2, hdc in each st across. Turn. (120 hdc)
Fasten off. The header adds 2.25 in (5.7 cm), so the top edge is 2.75 in (7.0 cm) deep in total.
Why the math works: Each round works 1 sc into each existing stitch at the same gauge as the square edges, so the border sits flat with no ruffling or pulling. The 3 sc at each corner give the 2 extra stitches each round needs to turn the corner, which is why every side grows by exactly 2 per round. The header uses the same 120 sts, so it stays as wide as the panel: 24 in (61.0 cm) plus 0.5 in (1.3 cm) of border on each side makes 25 in (63.5 cm).
Repeat the joining and border for the second panel.
Final Blocking
- Weave in all remaining ends along the seam ridges, where they will not show through the mesh.
- Soak each panel in cool water for 15 minutes, then gently squeeze out the water. Do not wring.
- Roll the panel in towels and press to remove extra water.
- Lay it flat on blocking mats, or across a clean bed or floor covered with towels.
- Pin the outer edges to 25 x 63.25 in (63.5 x 160.7 cm), with a pin about every 3 in (7.6 cm).
- Line up the seam ridges with a straight edge, so the grid runs square.
- Open each petal tip and ch-3 corner with your fingers so the flowers lie flat.
- Let the panel dry completely before you unpin it.
Final Quality-Control Checklist
- Every square has 29 sts per side and measures 6 in (15.2 cm).
- All 8 petals on each flower are the same length and have a visible pointed tip.
- The center rings are open and round.
- Seam ridges are on the RS and run straight across and down the panel.
- No gaps or bunching where seams cross.
- Border Rnd 2 counts: 120 sts top and bottom, 294 sts on each side.
- Header band is 8 rows, 120 hdc wide, with straight edges.
- Both panels measure 25 x 63.25 in (63.5 x 160.7 cm).
- All ends are woven in securely.
Troubleshooting
Petals curl or cup: The ch-4 sps in Rnd 2 are too tight. Work those chains looser, or use ch 5.
Square has a wavy edge: Rnd 5 chains are too loose. Make the ch-2 sps snugger, or go down one hook size for Rnd 5 only.
Corners pull in: Make sure each corner gets 3 sc in Rnd 6 and (2 dc, ch 3, 2 dc) in Rnd 5.
Seams pucker: Work the joining with a larger hook and keep your tension even.
Header flares: Count again and make sure you have exactly 120 hdc. Do not work into the turning ch-2.
Panel too long after hanging: Cotton stretches a little. Block it again flat and let it dry before you rehang it.
Care
Hand wash in cool water with mild detergent, then lay the panels flat to dry. Do not tumble dry, because the heat can distort the squares.
Final Notes
Everything comes back to the measurement chain. Each square has 29 sts per side and measures 6 in (15.2 cm). Four squares across give 116 sts and 24 in (61.0 cm), and ten squares down give 290 sts and 60 in (152.4 cm). Two sc rounds bring the border to 120 x 294 sts and add 0.5 in (1.3 cm) on every side. The 8-row header adds 2.25 in (5.7 cm). That gives each panel a finished size of 25 x 63.25 in (63.5 x 160.7 cm). Hang each panel with 8 ring clips spaced about 3.5 in (8.9 cm) apart along the header.
Check your first square carefully, count your stitches at each checkpoint, and the panels will come out the right size.
Happy crocheting!