

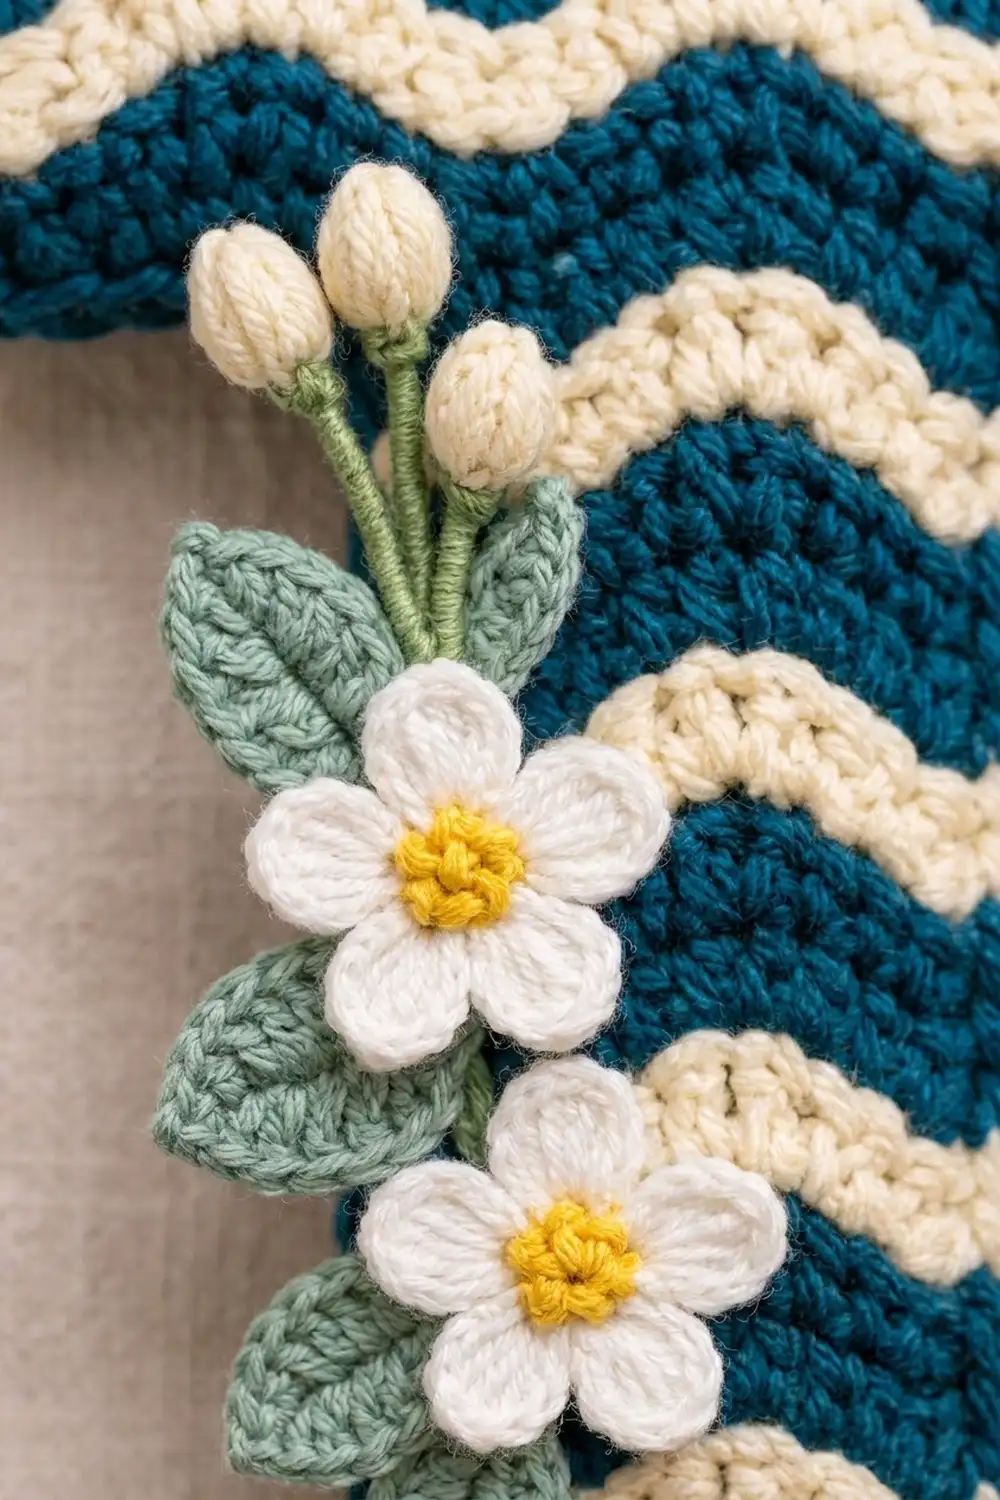
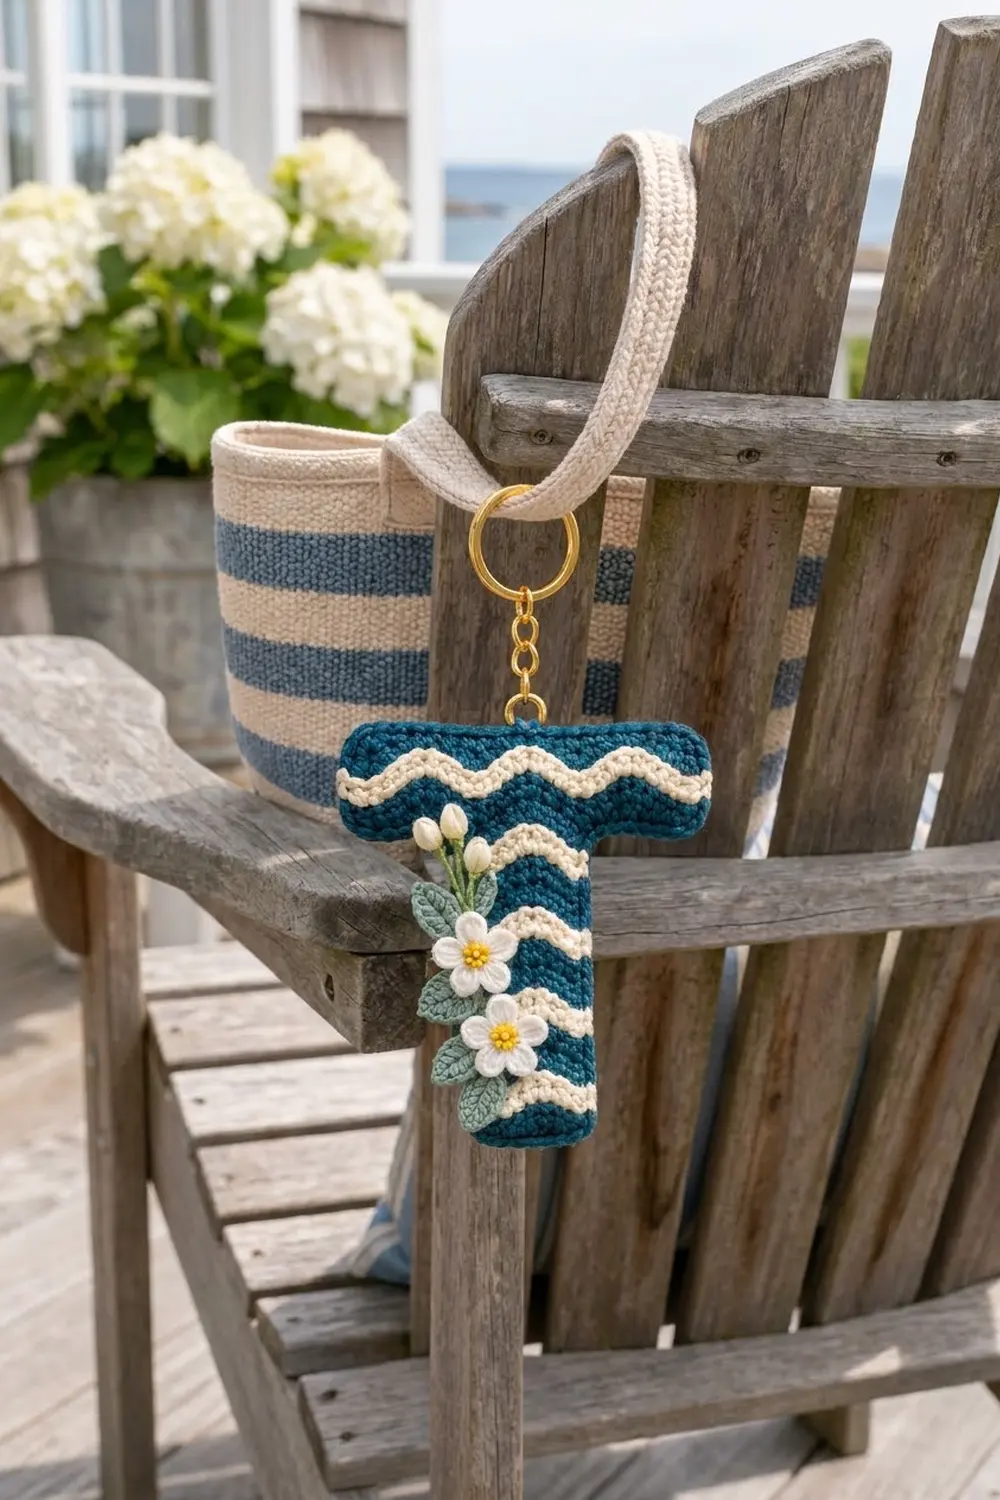
This letter T keychain is a padded initial charm in deep teal with soft cream wave stripes. A small spray of appliqué flowers sits on the lower left of the stem: two white five-petal blossoms with yellow centers, sage green leaves, and three cream buds on green stems. A gold split ring hangs from a short chain at the top center.
The look is coastal and fresh, like a striped beach tote. Deep teal and cream do most of the work, and white, yellow and sage add a small floral accent. The finished charm measures about 4.25 in (10.8 cm) wide and 4.5 in (11.4 cm) tall. It is about 3/8 in (1.0 cm) thick once lightly stuffed.
This pattern uses US crochet terms throughout.
You crochet two identical flat T panels from the bottom of the stem up, adding stitches for the crossbar near the top. The waves come from changing stitch heights, not from increases, so the side edges stay straight. You sew the appliqués to the front panel. Then one round of single crochet joins the two panels, with a little stuffing added before you close the edge.
Finished Size and Construction
- Finished size: 4.25 in (10.8 cm) wide x 4.5 in (11.4 cm) tall, not counting the hardware
- Skill level: Easy-Intermediate
- Terminology: US crochet terms
- Yarn weight: Sport (#2), cotton or cotton blend
- Hook: 2.75 mm (C-2)
- Number of pieces: One keychain charm, made from 2 identical T panels joined by the border, plus small appliqués
- Layout: A single letter T, with the front and back panels placed wrong sides together
- Panel size: 4 in (10.2 cm) wide x 4.25 in (10.8 cm) tall; the stem is 2 in (5.1 cm) wide
- Size before border: 4 in x 4.25 in (10.2 cm x 10.8 cm)
- Border depth: about 1/8 in (0.3 cm) on every edge
Materials
Choose a smooth, mercerized cotton or cotton blend in sport weight. Clear stitch definition makes the waves easy to see, and cotton holds the T shape well. Avoid fuzzy yarns, because they blur the stripe lines.
- Color A, Deep Teal: 12 g, about 34 m
- Color B, Cream: 6 g, about 17 m
- Color C, White: 2 g, about 6 m
- Color D, Yellow: 1 g, about 3 m
- Color E, Sage Green: 2 g, about 6 m
These amounts include about 20 percent extra for swatching and tails.
Tools:
- 2.75 mm (C-2) crochet hook
- Tapestry needle
- A small amount of polyester fiberfill
- Gold split key ring, 1 in (2.5 cm), with a short chain and a jump ring
- Stitch markers
- Blocking mat and rustproof pins
- Scissors
Abbreviations (US Terms)
- ch – chain
- sl st – slip stitch
- sc – single crochet
- hdc – half double crochet
- dc – double crochet
- fsc – foundation single crochet
- st(s) – stitch(es)
- RS / WS – right side / wrong side
Foundation single crochet (fsc): Insert your hook in the base chain of the previous sc. Yarn over and pull up a loop. Yarn over and pull through 1 loop; this is the new base chain. Yarn over and pull through both loops. Each fsc adds one new stitch to the end of the row.
Puff stitch (puff): (Yarn over, insert hook in the indicated st, yarn over and pull up a loop) 3 times. Then yarn over and pull through all 7 loops on the hook.
Gauge and Checkpoints
Gauge: 6 sc and 8 sc rows = 1 in (2.5 cm). One dc row is about as tall as 3 sc rows. That makes one 4-row wave repeat (Rows 3–6) 3/4 in (1.9 cm) tall.
Make one panel first and treat it as your gauge swatch. Check it before you start the second panel.
Checkpoints for one panel:
- After Row 2: 2 in (5.1 cm) wide and 1/4 in (0.6 cm) tall
- After Row 6: 1 in (2.5 cm) tall
- After Row 10: 1.75 in (4.4 cm) tall
- After Row 18, the full stem: 3.25 in (8.3 cm) tall
- After Row 20: 4 in (10.2 cm) wide across the crossbar and 3.5 in (8.9 cm) tall
- After Row 24: 4.25 in (10.8 cm) tall
If your panel is too big, switch to a 2.5 mm hook. If it is too small, switch to a 3.0 mm hook. If the width is right but the waves look flat, your dc stitches are too short. Pull up the first loop of each dc a little taller.
Panel (Make 2)
The stem is worked in rows of 12 sts, which is 2 wave repeats of 6 sts each. The ch 1 at the start of sc rows and wave rows does not count as a stitch. The ch 2 at the start of fill rows does not count either. Turn at the end of every row.
To change color, use the new color for the last yarn over of the final stitch. Carry the unused color up the side edge, where the border will cover it.
Stem
With Color A, ch 13.
Row 1 (A): Sc in 2nd ch from hook and in each ch across. Turn. (12 sts)
Row 2 (A): Ch 1, sc in each st across. Change to B. Turn. (12 sts)
Row 3 (B, wave row): Ch 1, *sc in next st, hdc in next st, dc in each of next 2 sts, hdc in next st, sc in next st; repeat from * once more. Turn. (12 sts: 4 sc, 4 hdc, 4 dc)
This row rises to a peak in the middle of each 6-st repeat and dips at the sc stitches. That makes the wave.
Row 4 (B): Ch 1, sc in each st across. Change to A. Turn. (12 sts)
This sc row follows the wave shape and makes the cream stripe two rows deep.
Row 5 (A, fill row): Ch 2, *dc in next st, hdc in next st, sc in each of next 2 sts, hdc in next st, dc in next st; repeat from * once more. Turn. (12 sts: 4 dc, 4 hdc, 4 sc)
This row puts tall stitches above the dips and short stitches above the peaks. In every column, Rows 3 and 5 together add up to one sc plus one dc, so the top edge is level again.
Row 6 (A): Ch 1, sc in each st across. Change to B. Turn. (12 sts)
Rows 7–18: Repeat Rows 3–6 three more times. (12 sts in every row)
The stem now has 4 cream wave stripes. Don’t fasten off. Check that the stem measures 2 in x 3.25 in (5.1 cm x 8.3 cm).
Crossbar
Row 19 (A): Ch 7. Sc in 2nd ch from hook and in each of the next 5 ch (6 sts). Sc in each of the 12 stem sts (18 sts). Then work 6 fsc off the last sc. Turn. (24 sts: 6 + 12 + 6)
Row 20 (A): Ch 1, sc in each st across. Change to B. Turn. (24 sts)
Row 21 (B, wave row): Work as for Row 3, working the repeat from * 4 times in total. (24 sts)
Row 22 (B): Ch 1, sc in each st across. Change to A. Turn. (24 sts)
Row 23 (A, fill row): Work as for Row 5, working the repeat from * 4 times in total. (24 sts)
Row 24 (A): Ch 1, sc in each st across. (24 sts)
Fasten off and weave in the B ends. The crossbar wave lines up with the stem waves because both use the same 6-st repeat, and the crossbar adds exactly one repeat on each side of the stem.
Panel checkpoint: 4 in (10.2 cm) wide x 4.25 in (10.8 cm) tall. The crossbar is 1 in (2.5 cm) tall.
Appliqués
Flowers (Make 2)
With Color D, make a magic ring.
Rnd 1 (D): Ch 1, 5 sc in ring, sl st to first sc. Pull the ring closed and fasten off. (5 sts)
Rnd 2 (C): Join C in any st. *(Ch 2, 2 dc, ch 2, sl st) all in the same st, then sl st in the next st; repeat from * 4 more times. Work the last sl st into the st where you joined. (5 petals)
Fasten off, leaving a 6 in (15.2 cm) tail for sewing. Each flower is about 1 in (2.5 cm) across.
Leaves (Make 4)
With Color E, ch 6.
Sc in 2nd ch from hook, hdc in next ch, dc in next ch, hdc in next ch, then 3 sc in the last ch to round the tip. Working along the other side of the chain: hdc in next ch, dc in next ch, hdc in next ch, sc in last ch. Sl st to first sc. (11 sts)
Fasten off, leaving a tail. Each leaf is about 7/8 in (2.2 cm) long.
Buds (Make 3)
With Color B, ch 3, work a puff in the 3rd ch from the hook, then ch 1 to close the puff. Change to E and ch 6 for the stem. Fasten off, leaving a tail.
Each bud is about 3/8 in (1.0 cm) tall, on a stem about 1 in (2.5 cm) long.
Placing the Appliqués
Choose one panel as the front. Arrange the spray along the lower left of the stem so it slightly overlaps the left edge.
- Place the buds first, fanning upward, with the tips reaching the second wave stripe from the top of the stem.
- Place one flower just below the bud stems. Place the second flower about 1 in (2.5 cm) lower.
- Tuck 2 leaves behind each flower, one angled out to the left and one angled down.
Sew through the front panel only. Use small stitches under the petals and along the center of each leaf. Knot all ends on the WS, where the back panel will cover them.
Border
Border gauge: Along the top and bottom edges, work 1 sc in each stitch. Along the side edges, where you are working into the ends of rows, work 1 sc in the end of each sc row and wave row. Work 2 sc in the end of each fill row, since those rows end in a dc.
The side counts below do not include the corner stitches. The corner groups are listed separately.
Hold the two panels WS together with the front facing you and all edges matched. Work every stitch through both layers.
Round 1 (A, joining round): Join A in the first foundation st at the bottom right of the stem.
- Stem bottom: 3 sc in the first st (corner), sc in the next 10 sts, 3 sc in the last st (corner). (10 sts + 2 corners of 3 sts = 16)
- Left stem side: 2 sc for Rows 1–2, then 5 sc for each of the 4 wave repeats. (22 sts)
- Left crossbar underside: Sc in the first 5 base sts, then 3 sc in the 6th base st (corner). (5 sts + 1 corner of 3 sts = 8)
- Left crossbar end: 1 sc each for Rows 19, 20, 21 and 22, 2 sc for Row 23, and 1 sc for Row 24. (7 sts)
- Crossbar top: 3 sc in the first st (corner), sc in the next 22 sts, 3 sc in the last st (corner). (22 sts + 2 corners of 3 sts = 28)
- Right crossbar end: Work as for the left end. (7 sts)
- Right crossbar underside: 3 sc in the first base st (corner), then sc in the remaining 5 base sts. (5 sts + 1 corner of 3 sts = 8)
- Right stem side: Work as for the left side. (22 sts)
Before you work the last 10 sts of the right stem side, stuff the charm lightly through the gap. Push small tufts into the ends of the crossbar first. Then finish the side and sl st to the first sc. Fasten off and hide the tail inside. (118 sts)
Why the math works: The top and bottom edges have 12 + 6 + 24 + 6 = 48 stitches to work into. The side edges give 22 + 7 + 7 + 22 = 58 sts. Each of the 6 outer corners turns 1 stitch into 3, adding 2 sts per corner, for 12 extra sts. 48 + 58 + 12 = 118. The 2 inner corners, where the stem meets the crossbar, have no increase, so they stay crisp.
Each 3/4 in (1.9 cm) wave repeat gets 5 border sts. That is slightly denser than the 6 sts per inch along the top. The small extra length allows for the curve of the stuffed edge, so the sides don’t pull flat.
Border checkpoint: 4.25 in (10.8 cm) wide x 4.5 in (11.4 cm) tall.
Hardware: Open the jump ring and pass it through the top of the border between the 14th and 15th sts of the 28-st crossbar top. This is the exact center. Attach the chain and split ring, then close the jump ring firmly.
Final Blocking
- Lightly mist the charm with water. Don’t soak it, because wet stuffing dries slowly.
- Lay the charm face up on a blocking mat.
- Pin the 6 outer corners and the 2 inner corners to these measurements: 4.25 in (10.8 cm) across the crossbar, 4.5 in (11.4 cm) tall overall, and 2.25 in (5.7 cm) across the stem.
- Gently straighten the side edges so they are parallel.
- Don’t flatten the appliqués. Lift the petals slightly with a fingertip.
- Let the charm dry completely, then remove the pins.
Final Quality-Control Checklist
- Both panels match in size to within 1/8 in (0.3 cm)
- There are 4 cream waves on the stem and 1 on the crossbar, on both sides
- The wave peaks line up between the stem and the crossbar
- The border round has 118 sts, with no gaps at the corners
- The inner corners are sharp, not puckered
- The stuffing is even, and the charm is about 3/8 in (1.0 cm) thick
- All appliqué knots are hidden inside
- The jump ring is at the exact top center and is fully closed
Troubleshooting
The waves look flat: Your dc stitches are too short. Pull the loops up taller, and check that Row 3 really alternates sc and dc as written.
The edge is not level after a fill row: Check that each fill row starts with a dc above the sc of the wave row, not with an sc.
The crossbar is lopsided: Count the sts on each side of the stem in Row 19; there should be 6 on each side. One fsc too many is the usual cause.
The border ruffles along the sides: If your dc rows are short, work 1 sc in each fill-row end instead of 2.
The border pulls in: Make sure each fill-row end got 2 sc.
Stuffing shows through: Use less stuffing, or use fiberfill in a color close to the yarn.
The panels don’t match: Block both panels flat to 4 in x 4.25 in (10.2 cm x 10.8 cm) before you join them.
Care
Spot clean with mild soap and cool water. Press out the water in a towel and let the charm dry flat. Don’t machine wash it, because the stuffing and the metal ring won’t hold up.
Final Notes
Here is the measurement chain. The gauge is 6 sc and 8 rows per 1 in (2.5 cm), and each wave repeat is 3/4 in (1.9 cm) tall. The stem is 2 in x 3.25 in (5.1 cm x 8.3 cm), and the crossbar brings each panel to 4 in x 4.25 in (10.2 cm x 10.8 cm). The 118-st joining round adds 1/8 in (0.3 cm) on every edge, so the finished charm is 4.25 in x 4.5 in (10.8 cm x 11.4 cm). If each checkpoint matches, the finished charm will match too.
Happy crocheting!