

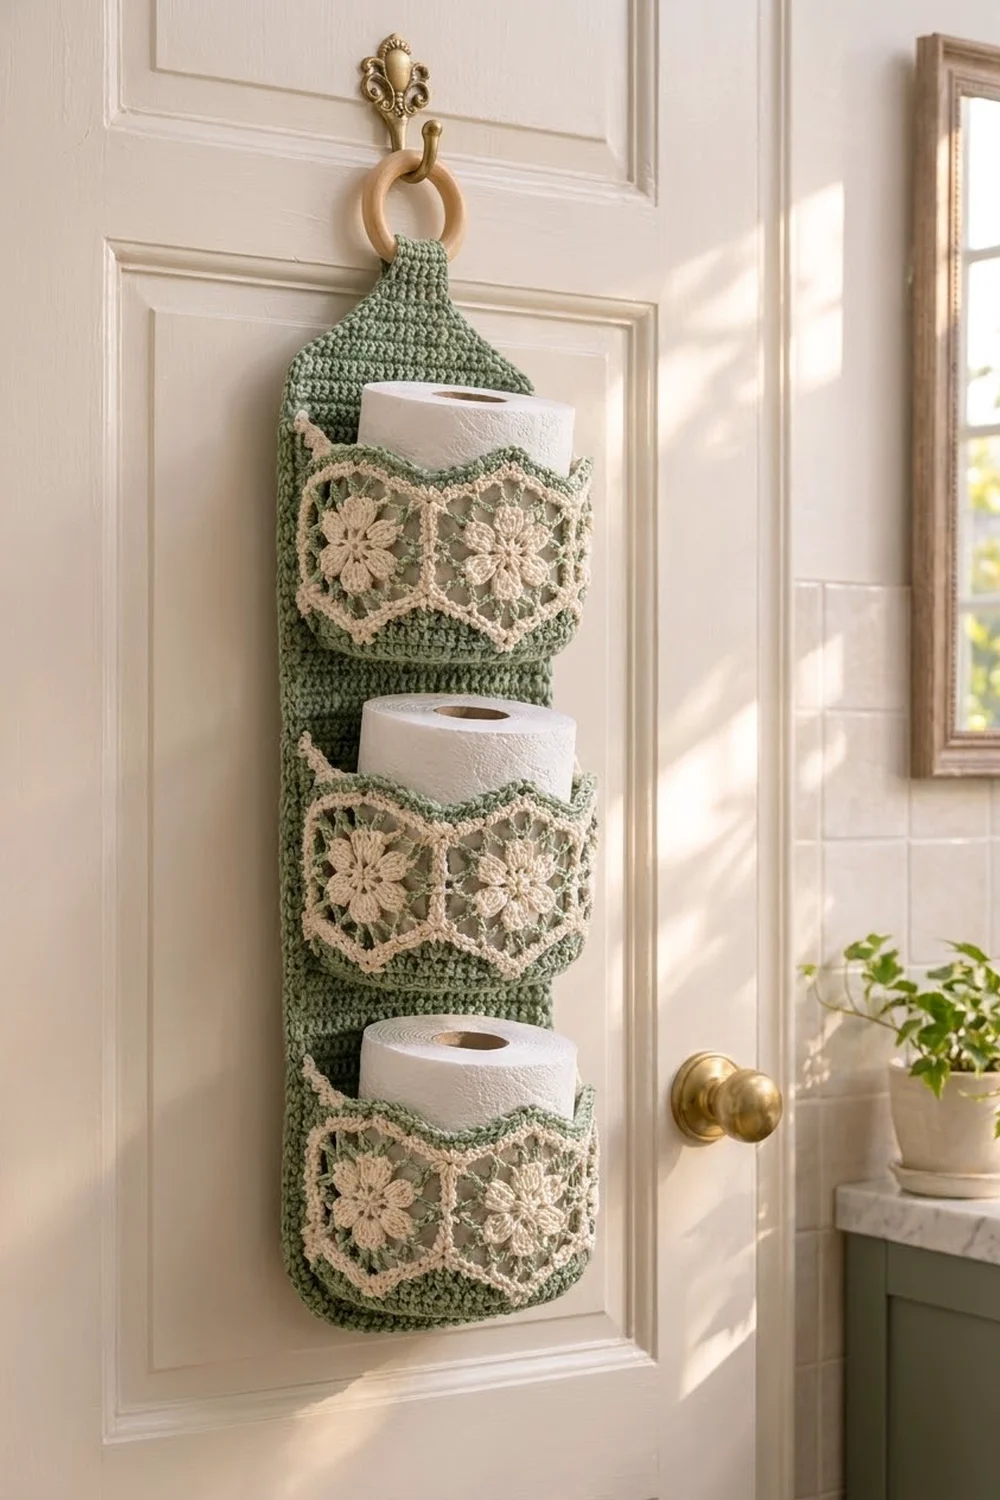
The Sage Bloom holder is a hanging organizer for three rolls that goes on the back of a bathroom door. A long sage-green panel carries three round pockets, and a band of lacy hexagon flowers wraps each pocket. The pointed tops of the hexagons form a zigzag rim, and each roll peeks out above it.
The palette has two colors. Sage green is used for the panel, mesh, outlines and pocket bases. Cream is used for the flowers, the hexagon frames and the small picots. The style is fresh cottage décor, and cotton yarn keeps it firm and washable.
This pattern uses US crochet terms. The finished panel is about 6.3 in (16.0 cm) wide and 26.8 in (68.1 cm) tall from the bottom edge to the top of the folded tab, plus a 2.5 in (6.4 cm) wooden ring. Each pocket is about 5.6 in (14.2 cm) across and 5 in (12.7 cm) deep.
The holder is built in parts. First you crochet one back panel in rows. Then you make three pockets. Each pocket is five hexagons joined into a ring, plus a green leveling band worked down from the ring and a flat round base. Last, you sew the pockets to the panel and wrap the tab around the ring.
Finished Size and Construction
- Finished size: 6.3 in (16.0 cm) x 26.8 in (68.1 cm) hanging, plus ring
- Skill level: Intermediate
- Terminology: US
- Yarn weight: DK (3) cotton
- Hook: 3.5 mm (E-4)
- Number of pieces: 19 (1 panel, 15 hexagons, 3 bases)
- Layout: 3 pockets stacked on 1 panel; 5 hexagons per pocket ring
- Hexagon size: 2 in (5.1 cm) per side, 4 in (10.2 cm) point to point, about 3.5 in (8.9 cm) flat to flat
- Panel size before border: 6 in (15.2 cm) x 28 in (71.1 cm), including the tab
- Border depth: 0.15 in (0.4 cm), one round of sc
Materials
Use a smooth cotton in DK weight. Cotton holds its shape and does not leave lint on the rolls. These amounts assume about 115 m per 50 g ball.
- Sage green: 300 g, about 690 m
- Cream: 100 g, about 230 m
These amounts include about 20 percent extra to allow for gauge differences and swatching.
Tools:
- 3.5 mm (E-4) crochet hook
- One wooden ring, 2.5 in (6.4 cm) outside diameter
- Tapestry needle and scissors
- Stitch markers (at least 6)
- Pins and a blocking mat
- Measuring tape
Abbreviations (US Terms)
- ch – chain
- sl st – slip stitch
- sc – single crochet
- hdc – half double crochet
- dc – double crochet
- tr – treble crochet
- sc2tog / dc2tog / dc3tog – work 2 or 3 stitches together
- sp – space
- st(s) – stitch(es)
- RS / WS – right side / wrong side
Special stitches:
- Cluster (cl): [yo, insert hook in st, pull up a loop, yo, draw through 2 loops] 3 times, yo, draw through all 4 loops.
- Beginning cluster (beg cl): Ch 2, then work the cluster with only 2 repeats (yo, draw through all 3 loops).
- tr2tog over notch: [yo twice, insert hook in ch-2 sp, pull up a loop, (yo, draw through 2) twice] in the first notch sp. Repeat in the second notch sp, then yo and draw through all 3 loops.
- Picot: Ch 3 between two sc in the same sp.
Gauge and Checkpoints
Gauge: 26 sc and 28 rows = 4 in (10.2 cm); 26 dc and 12 rows = 4 in (10.2 cm). Crochet firmly, because a holder needs dense fabric.
Make one hexagon before anything else. This one small piece tests your round gauge, color changes and corners.
Hexagon checkpoints:
- After Rnd 2: the flower is about 1.75 in (4.4 cm) across
- After Rnd 4: about 3.2 in (8.1 cm) flat to flat
- After Rnd 5: 2 in (5.1 cm) per side, 4 in (10.2 cm) point to point
If too big: go down to a 3.25 mm (D-3) hook. If too small: go up to a 3.75 mm (F-5) hook. Change the hook, not the stitch counts. Every later count depends on 13 sts per hexagon side.
Back Panel
Work the panel from bottom to top in green. The ch 3 at the start of each row counts as a dc throughout.
Row 1: Ch 41, dc in 4th ch from hook and in each ch across, turn. (39 dc)
Rows 2–63: Ch 3, dc in each st across, turn. (39 dc)
Checkpoint: 6 in (15.2 cm) wide and 21 in (53.3 cm) long.
Shoulders. Work the decreases at both ends of each row. On a dc3tog row, start with ch 2 and dc2tog, and end with dc3tog.
- Row 64: Dc3tog at each end, dc across. (35)
- Row 65: Same as Row 64. (31)
- Rows 66–74: Dc2tog at each end, dc across. (29, 27, 25, 23, 21, 19, 17, 15, 13)
- Row 75: Ch 3, dc in each st across. (13)
Checkpoint: Rows 64–75 add 4 in (10.2 cm).
Tab, Rows 76–84: Ch 3, dc in each st across, turn. (13 dc) Fasten off.
Checkpoint: the tab is 2 in (5.1 cm) wide and 3 in (7.6 cm) long. The full panel is 28 in (71.1 cm) long.
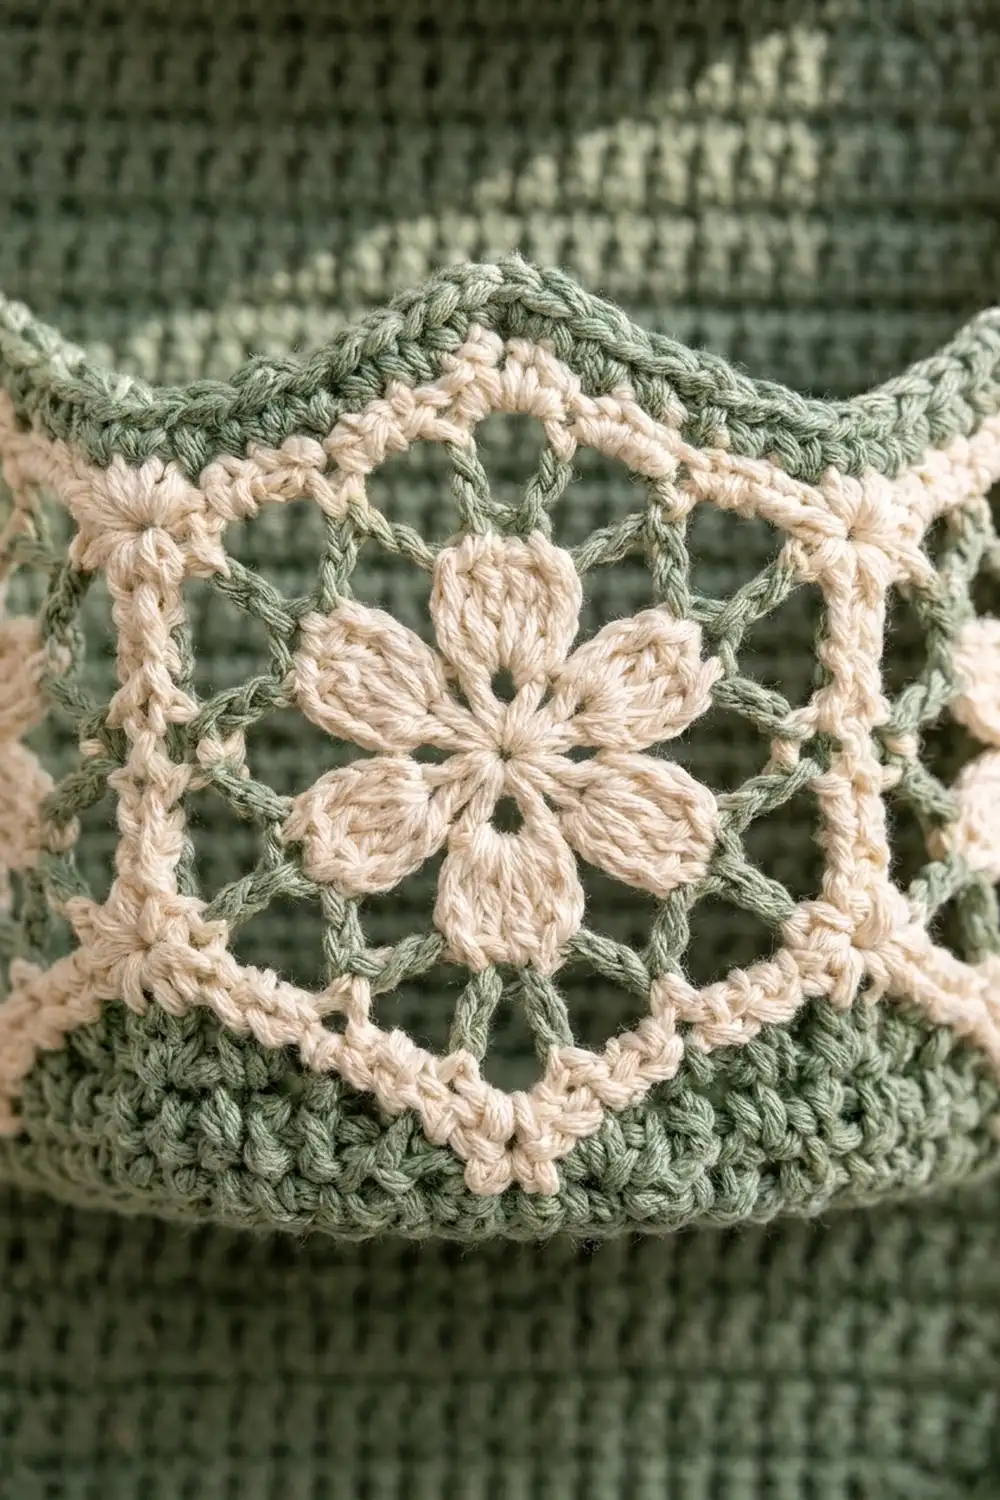
Hexagon Motif (make 15)
Rnd 1 (cream): Magic ring, ch 1, 12 sc in ring, join with sl st to first sc. (12 sc)
Rnd 2 (cream): Beg cl in same st, ch 3, skip next st, [cl in next st, ch 3, skip next st] 5 times, join to top of beg cl. Fasten off. (6 cl, 6 ch-3 sps)
Rnd 3 (green): Join in any ch-3 sp, ch 1, [sc in ch-3 sp, ch 5, sc in top of next cl, ch 5] 6 times, join to first sc. Fasten off. (12 sc, 12 ch-5 loops)
Rnd 4 (cream): Join in a ch-5 loop that comes right after a cluster-top sc. Ch 3, 3 dc in same loop, dc in next sc, 4 dc in next loop, (dc, ch 2, dc) in next cluster-top sc. *4 dc in next loop, dc in next sc, 4 dc in next loop, (dc, ch 2, dc) in next sc; repeat from * 4 more times, join to top of ch 3. Fasten off. (66 dc, 6 ch-2 corners, 11 dc per side)
Rnd 5 (green): Join in any ch-2 corner, ch 1. *(sc, ch 2, sc) in corner sp, sc in each of next 11 dc; repeat from * 5 more times, join. Fasten off. (78 sc, 6 ch-2 corners)
Each side now has 13 sc from one corner sp to the next: 1 corner sc + 11 + 1 corner sc. This number 13 drives the joining and both pocket edges.
Make All Pieces
- Hexagons: 15 (5 per pocket). Use cream for Rnds 1, 2 and 4, and green for Rnds 3 and 5.
- Bases: 3, green.
- Panel: 1, green.
Front layout (panel rows counted from the bottom):
          [ ring ]
          [ tab  ]      Rows 76–84
         /        \     Rows 64–75 shoulders
        | POCKET 3 |    base on top of Row 45
        | POCKET 2 |    base on top of Row 24
        | POCKET 1 |    base on top of Row 3
        |__________|    Row 1
Pocket ring (seen from above, front at bottom):
        [H3]~~[H4]      back, against panel
      [H2]        [H5]
            [H1]        front center
Joining
Hexagon ring. Hold each hexagon with one point straight up, so its left and right sides are vertical. Place two hexagons WS together. With green, whipstitch through the back loops only, from one corner ch-2 sp to the next, catching all 13 sc on each side. Join H1 to H2, H2 to H3, H3 to H4 and H4 to H5. Then join H5 to H1 to close the ring.
Match the stitches one to one: 13 sts on one hexagon meet 13 sts on the other, with none skipped. Pull the yarn about as firmly as you crochet so the seams don’t pucker.
Checkpoint: the ring is 4 in (10.2 cm) tall at the points and about 17.5 in (44.5 cm) around.
Leveling band. Turn the ring upside down so the bottom points face up. Each hexagon has two free bottom sides of 13 sts each and a bottom point ch-2 sp. Each bottom notch (the V between two hexagons) has two joined corner ch-2 sps.
Fill Rnd 1 (green, conversion round): Join in any bottom notch, ch 4 (counts as tr2tog). *First side: skip 1 st, tr in next 3, dc in next 3, skip 1, hdc in next 2, sc in next 3. Sc in bottom point ch-2 sp. Second side: sc in next 3, hdc in next 2, skip 1, dc in next 3, tr in next 3, skip 1. Tr2tog over the notch sps. Repeat from * around, leaving out the last tr2tog, and join to the top of ch 4.
Count: 5 x 22 graded sts worked over 26 existing sts (4 skipped per hexagon) + 5 point sc + 5 notch tr2tog = 120 sts. The tall stitches fill the notches, so the edge comes out level.
Fill Rnd 2: Ch 1, [sc in next 18, sc2tog] 6 times, join. (114 sc)
Fill Rnds 3–5: Ch 1, sc in each st, join. (114 sc) Do not fasten off.
Base (make 3): With green, 6 sc in magic ring. (6)
- Rnd 2: 2 sc in each st. (12)
- Rnd 3: [sc in next st, 2 sc in next] 6 times. (18)
- Rnds 4–19: On each round, [sc in next n−2, 2 sc in next] 6 times, where n is the round number. Each round has 6 x n sts, so Rnd 10 = 60 sts and Rnd 19 = 114 sts.
Checkpoint: Rnd 10 is about 2.9 in (7.4 cm) across, and Rnd 19 is about 5.5 in (14.0 cm). Fasten off.
Join base: Hold the base against Fill Rnd 5, WS together. With the live loop, sc through both pieces in each st around, one to one. (114 sc) Fasten off. Checkpoint: the pocket is 5 in (12.7 cm) deep at the points.
Attach pockets. On the base join round, mark the seam between H3 and H4. Count 19 sts to each side of it and mark again. These 38 sts are the back third of the pocket, about 5.8 in (14.7 cm) wide. Pin that edge straight across the panel on top of Row 3, with the end markers at the panel edges. Whipstitch it down. Then whipstitch up the pocket wall along each panel edge to the top notch. Attach the other pockets the same way on top of Rows 24 and 45.
Checkpoint: 2 in (5.1 cm) of panel shows between pockets.
Border
The border uses the main gauge: 26 sc = 4 in (10.2 cm).
Panel edging (green, 1 round): With RS facing, join at the bottom right corner. Work 3 sc in each of the 4 corner stitches.
- Bottom edge: 37 sc + two 3-sc corner groups = 43 sc
- Each long side: 2 sc per row end over 84 rows = 168 sc (126 along the body, 42 along the shoulders and tab)
- Tab top: 11 sc + two 3-sc corner groups = 17 sc
Total: 43 + 168 + 17 + 168 = 396 sc. Join and fasten off.
Why the math works: Each dc row is 0.33 in (0.8 cm) tall. Two sc per row end gives 6 sc per inch, a little under gauge, so the long edges don’t ripple. Each corner group is counted only once, in the bottom or tab-top edge it belongs to.
Pocket top edging (cream, 1 round per pocket): Join at any top notch.
- For each hexagon: sc in each of 13 sts, (sc, picot, sc) in top point sp, sc in each of 13 sts, then sc2tog over the 2 notch sps.
- Count: 5 x 26 sts worked one to one = 130, + 5 x 2 point sc = 10, + 5 notch sc2tog = 5. Total: 145 sc and 5 picots.
Why the math works: The 26 comes from 2 sides x 13 sts on each hexagon, with nothing added at the seams. Only the points gain stitches, which keeps them sharp, and the notch decreases keep the Vs crisp.
Finish tab: Fold the top 1.5 in (3.8 cm) of the tab to the WS through the ring. Whipstitch the last row in place. The hanging length is now 26.8 in (68.1 cm) plus the ring.
Final Blocking
- Weave in all ends along stitches of the same color.
- Soak the holder in cool water for 10 minutes, then roll it in a towel to press out the water. Do not wring.
- Lay the panel flat and pin it to 6.3 in (16.0 cm) wide, keeping the long edges straight.
- Put a dry roll in a plastic bag inside each pocket so the pockets dry round.
- Pin each hexagon point upward and open each picot.
- Let it dry completely, about 24 hours.
Final Quality-Control Checklist
- Each hexagon has 13 sts per side and 6 sharp corners.
- Each pocket ring has 5 hexagons, points up, with H1 at center front.
- Fill Rnd 1 has 120 sts; Fill Rnds 2–5 and the base have 114 each.
- Each pocket bottom is level all the way around.
- Each pocket edging has 145 sc and 5 picots.
- The panel edging has 396 sc and lies flat.
- Pockets are evenly spaced, with 2 in (5.1 cm) gaps.
- The tab is sewn securely around the ring.
Troubleshooting
Hexagon cups: The Rnd 3 chains are too tight. Work each ch 5 loosely.
Hexagon ruffles: Rnd 4 is too loose. Go down one hook size for that round only.
Bottom band waves: The stitches at the notches are too tall. Replace the first tr of each group with a dc.
Bottom puckers: You skipped too many stitches. Recount Fill Rnd 1 to 120.
Base doesn’t match the wall: Recount both to 114. Fix the base, not the wall.
Panel edges ripple: Work exactly 2 sc per row end, never 3.
Pocket sags forward: At each panel edge, add a few tacking stitches 1 in (2.5 cm) above the base seam.
Care
Hand wash in cool water with mild soap. Dry flat with rolls in the pockets to hold their shape, and avoid the dryer.
Final Notes
The whole design rests on one chain of measurements. A hexagon with 13 sts per side has 2 in (5.1 cm) sides and stands 4 in (10.2 cm) from point to point. Five hexagons make a ring about 17.5 in (44.5 cm) around. The 120-stitch leveling round decreases to 114 to match the 114-stitch base. The 38-stitch back third lies flat across the 6 in (15.2 cm) panel. One 396-stitch round edges the panel to 6.3 in (16.0 cm). Check each link as you go, and the holder will hang straight and hold three rolls neatly.
Happy crocheting!