

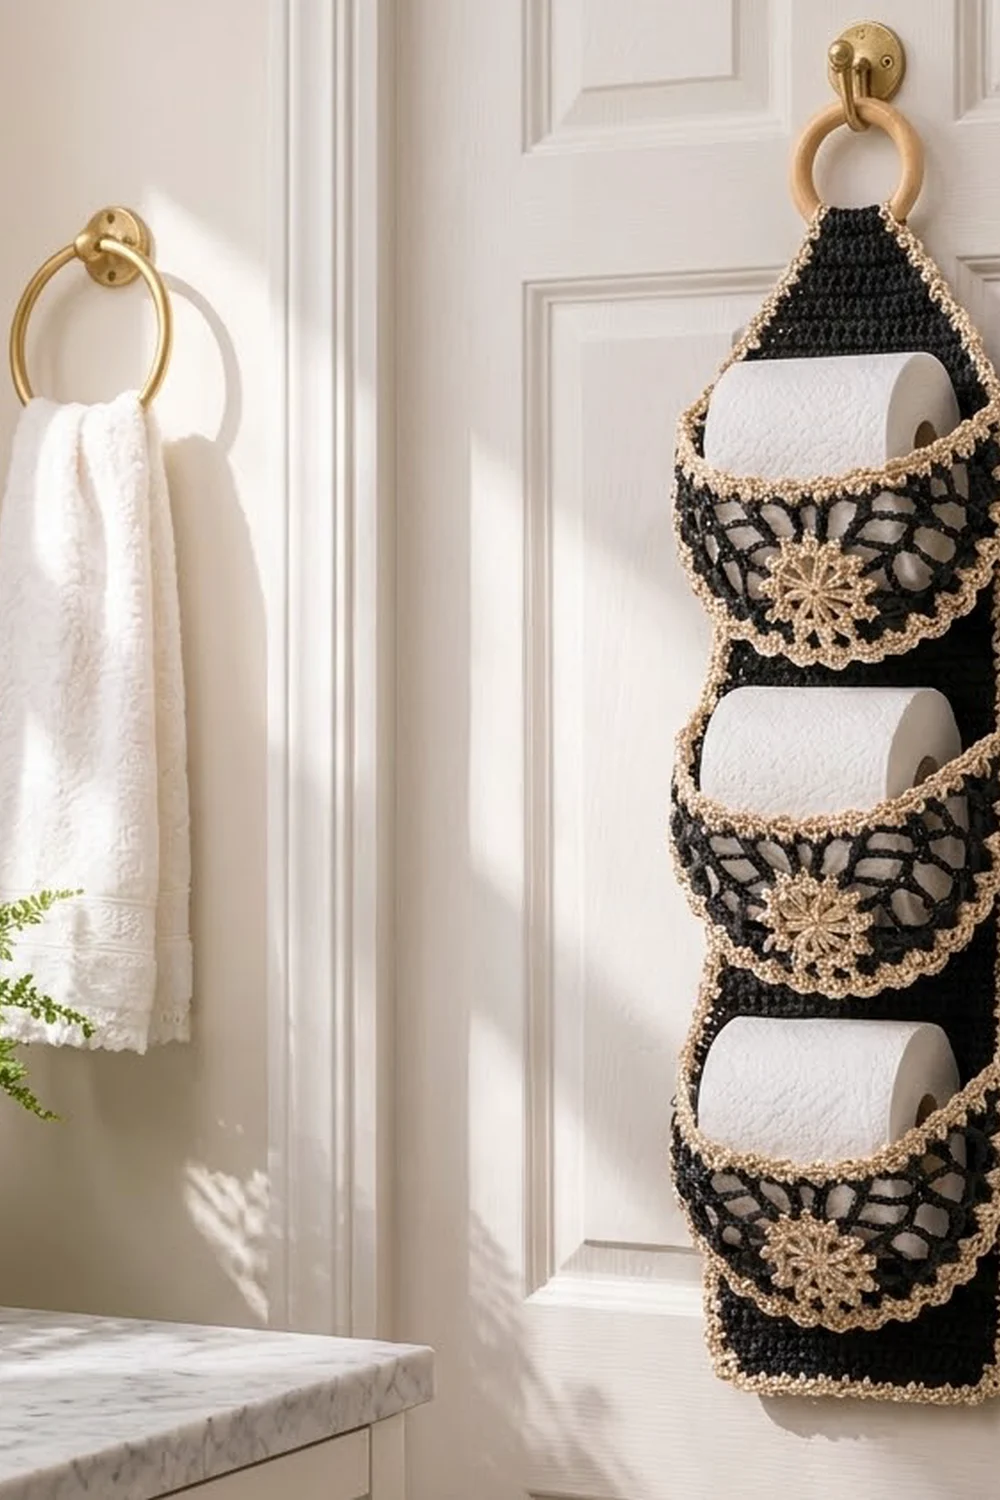
This hanging holder stores three spare rolls on the back of a door or a narrow stretch of wall. A solid black panel hangs from a wooden ring, and three lacy half-circle pockets hold one roll each.
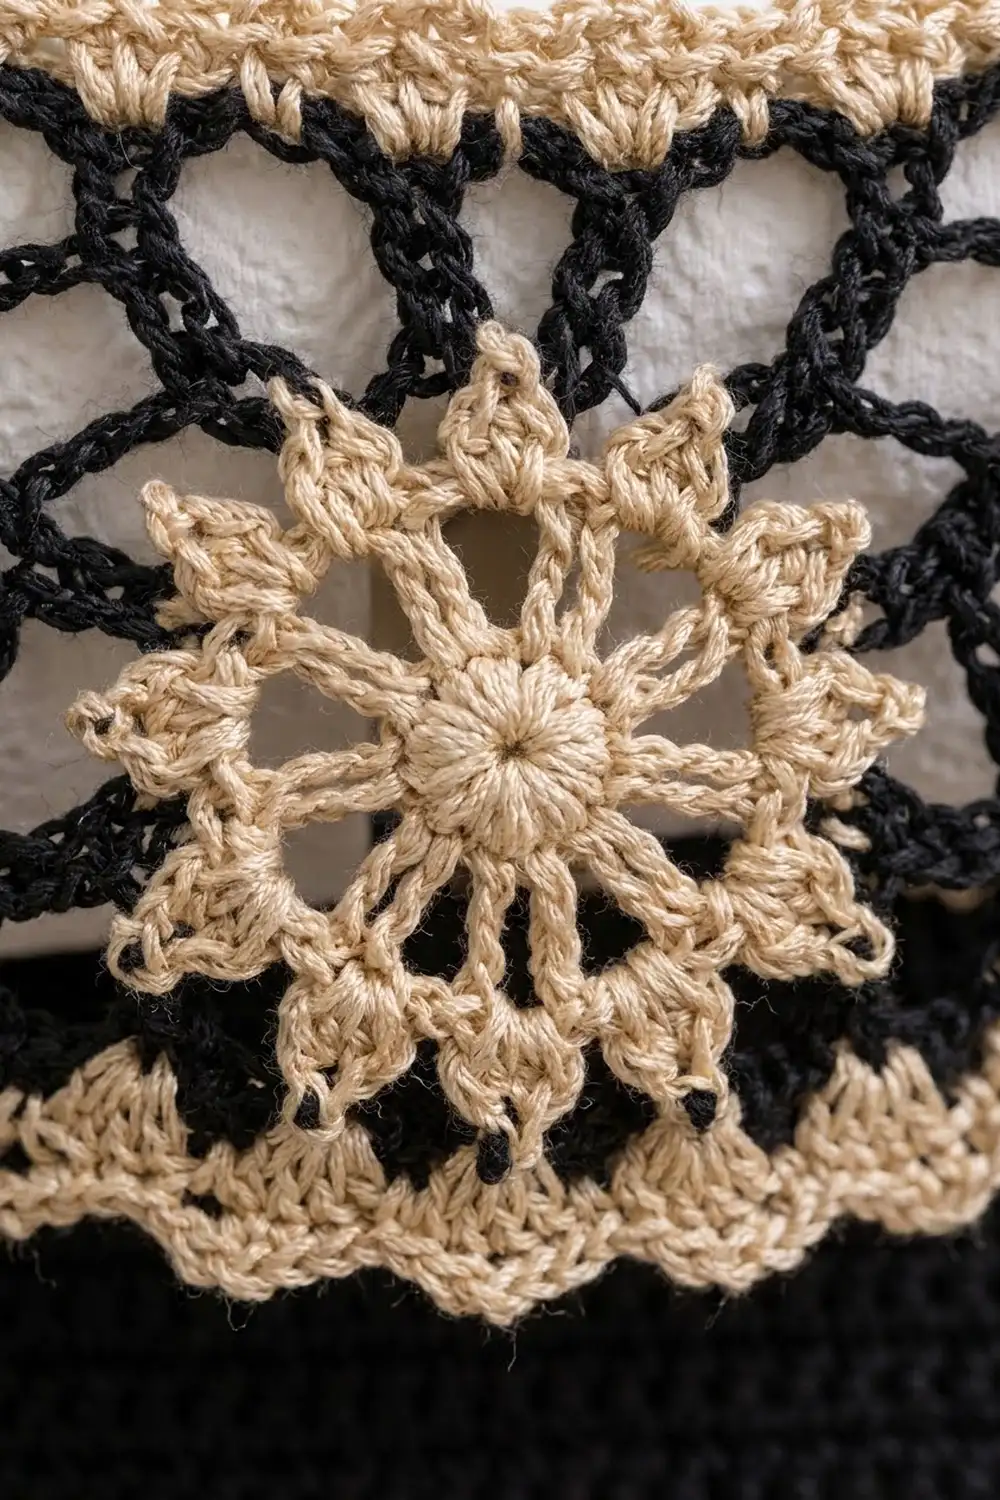
The palette is black and cream. The pockets use open black chain-loop mesh with a cream flower motif on the front, a cream picot scallop along the curved edge, and a cream crab-stitch rim at the opening. The panel has the same crab-stitch edge, so all the pieces look like one design.
The pattern uses US crochet terms. The finished holder hangs 26.4 in (67.1 cm) from the bottom edge to the top of the strap fold, not counting the ring. It is 6.8 in (17.3 cm) wide across the bordered panel. Each pocket is 9 in (22.9 cm) across its opening before it is sewn on.
You will crochet the panel in rows, taper it, and add the border. Next you work three half-circle pockets from the center outward, followed by three small motifs. Finally you sew the motifs to the pockets, sew the pockets to the panel, and fold the strap around the ring.
Finished Size and Construction
- Finished size: 6.8 in x 26.4 in (17.3 cm x 67.1 cm), plus a 3 in (7.6 cm) ring
- Skill level: Intermediate
- Terminology: US
- Yarn weight: Worsted (#4) cotton
- Hook: 5.0 mm (H-8)
- Number of pieces: 7 (1 back panel, 3 pockets, 3 motifs)
- Layout: Three pockets stacked vertically on one panel
- Panel size before border: 6 in x 28 in (15.2 cm x 71.1 cm), strap included
- Border depth: 0.4 in (1.0 cm), 2 rounds
- Pocket size: 9 in (22.9 cm) wide x 4.5 in (11.4 cm) radius, edging included
- Motif size: 2.75 in (7.0 cm) across
Materials
Use a smooth, mercerized or matte worsted-weight cotton. Cotton keeps its shape when it holds weight and doesn’t fuzz in a humid bathroom. Acrylic will work, but the lace pockets will sag more.
- Black: 120 g, about 186 m (panel and pocket mesh)
- Cream/light beige: 70 g, about 109 m (border, pocket edging, motifs)
These quantities include a margin of roughly 15% for gauge swatching and joining.
Tools:
– 5.0 mm (H-8) crochet hook
– One 3 in (7.6 cm) unfinished wooden ring
– Tapestry needle
– Locking stitch markers or safety pins (at least 12)
– Scissors
– Tape measure
– Blocking mat and rust-proof pins
Abbreviations (US Terms)
- ch – chain
- sl st – slip stitch
- sc – single crochet
- hdc – half double crochet
- dc – double crochet
- tr – treble crochet
- dc2tog – double crochet 2 together
- rev sc – reverse single crochet (crab stitch)
- sp(s) – space(s)
- MR – magic ring
- RS / WS – right side / wrong side
Picot: ch 3, sl st in 3rd ch from hook.
Reverse sc: Work from left to right (right-handed). Insert the hook into the next stitch to the right, yarn over, pull up a loop, yarn over, and pull through both loops.
Gauge and Checkpoints
Panel gauge: 14 dc x 8 rows = 4 in (10.2 cm).
Border gauge: 16 sc = 4 in (10.2 cm), which is 4 sc per inch.
Make one pocket before you start the panel. It uses both colors and only about 15 g of yarn, so it is the quickest gauge test. When finished, it should measure 9 in (22.9 cm) across the straight edge.
Checkpoints:
– Panel after Row 10: 6 in (15.2 cm) wide x 5 in (12.7 cm) tall
– Panel after Row 40: 20 in (50.8 cm) tall
– Pocket after Row 3: straight edge 4.5 in (11.4 cm)
– Pocket after Row 6: straight edge 8.5 in (21.6 cm)
– Motif after Round 3: 2.75 in (7.0 cm)
Too big? Go down to a 4.5 mm hook. Too small? Go up to a 5.5 mm hook. Make the pocket mesh loose and even, because tight chain loops won’t stretch around a roll.
Back Panel
Use black. The turning ch-3 counts as a dc throughout.
Foundation: Ch 23.
Row 1 (RS): Dc in 4th ch from hook (skipped chains count as first dc), dc in each ch across; turn. (21 dc)
Rows 2–40: Ch 3, dc in each st across, working the last dc in the top of the turning ch; turn. (21 dc)
Checkpoint: 6 in x 20 in (15.2 cm x 50.8 cm).
Taper
On these rows the ch 2 does not count as a stitch.
Row 41: Ch 2, dc2tog, dc in each st to the last 2 sts, dc2tog; turn. (19 sts)
Row 42: Repeat Row 41. (17 sts)
Row 43: Repeat Row 41. (15 sts)
Row 44: Repeat Row 41. (13 sts)
Row 45: Repeat Row 41. (11 sts)
Row 46: Repeat Row 41. (9 sts)
Row 47: Repeat Row 41. (7 sts)
Row 48: Repeat Row 41. (5 sts)
The taper is 4 in (10.2 cm) tall.
Strap
Rows 49–56: Ch 3, dc in each st across; turn. (5 dc)
The strap is 1.4 in (3.6 cm) wide and 4 in (10.2 cm) long. Fasten off. The panel now measures 28 in (71.1 cm) tall.
Pocket (Make 3)
You work each pocket in rows as a half circle, starting at the center of the straight edge. The straight edge becomes the opening.
With black:
Row 1: MR, ch 4 (counts as dc + ch 1), (dc, ch 1) 5 times in ring, dc in ring; turn. (7 dc, 6 ch-1 sps)
Row 2: Ch 5 (counts as dc + ch 2), dc in first st, *ch 2, (dc, ch 2, dc) in next dc; repeat from * across, working the last group in the 3rd ch of the turning ch; turn. (14 dc, 13 ch-2 sps)
Row 3: Ch 6 (counts as dc + ch 3), *dc in next dc, ch 3; repeat from * to the last st, dc in 3rd ch of turning ch; turn. (14 dc, 13 ch-3 sps)
Checkpoint: straight edge 4.5 in (11.4 cm).
Row 4: Ch 1, sc in first dc, *ch 5, sc in next dc; repeat from * across, working the last sc in the 3rd ch of turning ch; turn. (14 sc, 13 ch-5 loops)
Row 5: Ch 8 (counts as tr + ch 4), *sc in next ch-5 loop, ch 4, tr in next sc, ch 4; repeat from * across, ending with tr in last sc and omitting the final ch 4; turn. (14 tr, 13 sc, 26 ch-4 sps)
Row 6: Ch 1, sc in first tr, *ch 6, skip (ch-4 sp, sc, ch-4 sp), sc in next tr; repeat from * across, working the last sc in the 4th ch of turning ch; turn. (14 sc, 13 ch-6 loops)
These long loops make the open spiderweb mesh. Checkpoint: straight edge 8.5 in (21.6 cm). Fasten off black.
Row 7 (scallop edging, cream): Join cream in the first sc. Ch 1, sc in same st, *(2 sc, hdc, picot, hdc, 2 sc) in next ch-6 loop, sc in next sc; repeat from * across. Fasten off.
(14 sc between scallops + 13 scallops x 6 sts = 92 sts, plus 13 picots)
Opening Band (cream)
With RS facing, join cream at the right-hand corner of the straight edge.
Band Row 1: Ch 1. Along the first half, work 1 sc in the end of Row 7, then 3 sc in the end of each of Rows 6 through 1 (19 sc). Work 1 sc into the center of the magic ring. Along the second half, work 3 sc in the end of each of Rows 1 through 6, then 1 sc in the end of Row 7 (19 sc). Do not turn. (39 sc)
Band Row 2: Ch 1, rev sc in each st across. (39 rev sc) Fasten off.
The band works 19 sc along each 4.5 in (11.4 cm) half, which is about 4.2 sc per inch. That is close to the border gauge, so the opening stays flat without flaring.
Flower Motif (Make 3)
Use cream. Join each round with a sl st to the first st.
Round 1: MR, ch 3 (counts as dc), 11 dc in ring; join. (12 dc)
Round 2: Ch 1, sc in same st, ch 3, *sc in next dc, ch 3; repeat from * around; join. (12 sc, 12 ch-3 sps)
Round 3: Sl st into first ch-3 sp, ch 1, (sc, hdc, dc, hdc, sc) in each ch-3 sp around; join. (60 sts, 12 petals)
Checkpoint: 2.75 in (7.0 cm). Fasten off and leave a 12 in (30.5 cm) tail for sewing.
Make All Pieces
- Back panel: 1 (black body, cream border)
- Pockets: 3 (black Rows 1–6, cream Row 7 and band)
- Motifs: 3 (cream)
Layout, top to bottom:
        [ ring ]
         /strap\
        / taper \
| Pocket 1 (top at Row 40) |
| Pocket 2 (top at Row 27) |
| Pocket 3 (top at Row 14) |
|      bottom edge         |
Border
Add the border to the back panel before you join anything. The pockets have their own finished edges, so the border count depends only on the panel’s row ends and stitches. No seam stitches are added.
Border gauge: 4 sc per inch (2.54 cm). A dc row is 0.5 in (1.3 cm) tall, so 2 sc per straight row end matches the gauge exactly.
Round 1 (cream): With RS facing, join at the bottom right corner (first foundation ch).
– Bottom corner: 3 sc in first foundation ch
– Bottom edge: 1 sc in each of next 19 ch, then 3 sc in last ch (19 sc between corners)
– Left side, body: 2 sc in end of each of Rows 1–40 (80 sc)
– Left side, taper: 5 sc for every 2 rows across Rows 41–48 (20 sc)
– Left side, strap: 2 sc in end of each of Rows 49–56 (16 sc)
– Strap top: 3 sc in first st, sc in next 3 sts, 3 sc in last st (3 sc between corners)
– Right side: strap 16, taper 20, body 80 (116 sc)
– Join to first sc.
Each long side has 80 + 20 + 16 = 116 sc. The total is 4 corners x 3 + 19 + 3 + 116 + 116 = 266 sc.
The taper edge is slanted, so each row end measures about 0.58 in (1.5 cm) instead of 0.5 in (1.3 cm). That’s why the taper gets 5 sc per 2 rows instead of 4.
Round 2: Ch 1, rev sc in each st around; join. (266 rev sc) Fasten off.
The panel now measures 6.8 in (17.3 cm) wide. The width is 6 in (15.2 cm) of panel plus 0.4 in (1.0 cm) of border on each side.
Joining
Sew everything with a cream tail and a tapestry needle. Use a whipstitch through the back loops of the edge stitches.
1. Motifs to pockets. Center one motif on the RS of each pocket, with its lowest petal 1 in (2.5 cm) above the scallop tips. Whipstitch through the sc of Round 3 between petals, catching the mesh behind it. Keep the stitches small so the petals stay free.
2. Placing the pockets. Pocket 1’s top corners go on the panel border at the end of Row 40. Pocket 2 goes at Row 27, and Pocket 3 at Row 14. That spaces them 13 rows, or 6.5 in (16.5 cm), apart.
3. Sewing the curve. Sew only through the base sc of Row 7. Leave every picot and scallop free. Divide the 13 scallops as follows:
– Scallops 1–3: down the left border, 2 in (5.1 cm), which is 4 rows
– Scallops 4–10: straight across the panel face along the row 4 rows below the pocket top
– Scallops 11–13: up the right border, 2 in (5.1 cm)
The curved edge is about 14.1 in (35.8 cm) long. The sewing path is 2 + 6.8 + 2 = 10.8 in (27.4 cm), so about 3.3 in (8.4 cm) of extra length is eased in. This extra length makes the pocket bow forward to hold a roll.
Tension: Pull each stitch snug enough to close the gap, but not so tight that it dimples the panel. Pin every 3 scallops before you sew.
4. Ring. Fold Rows 53–56 of the strap over the wooden ring to the WS and whipstitch them to Rows 49–52.
Size checkpoint: The holder hangs 26.4 in (67.1 cm) from the bottom edge to the top of the fold. This is 20 in body + 4 in taper + 2 in strap + 0.4 in bottom border (50.8 + 10.2 + 5.1 + 1.0 cm).
Final Blocking
- Weave in all ends before blocking. Weave black ends into black stitches and cream ends into cream stitches.
- Mist the whole holder with water until it is damp, not soaked.
- Lay the panel flat and pin it to 6.8 in x 26.4 in (17.3 cm x 67.1 cm).
- Fill each pocket with a roll wrapped in a plastic bag so the mesh dries in a rounded shape.
- Pin out each picot along the scallop edge.
- Let it dry completely, about 24 hours, then remove the rolls and pins.
Final Quality-Control Checklist
- Panel width is 6.8 in (17.3 cm) along its whole length
- Taper edges are straight, with no wavy border
- Each pocket opening has 39 rev sc and lies flat
- All 13 picots on every pocket are free and pointed
- Each motif is centered 1 in (2.5 cm) above the scallop tips
- Pocket tops are level and 6.5 in (16.5 cm) apart
- The strap fold is secure and the ring turns freely
- No ends are visible on the RS
Troubleshooting
Panel border ruffles: Too many sc in the row ends. Work 2 sc per row on the body and check against 4 sc per inch.
Taper border pulls in: Use 5 sc per 2 taper rows, not 4.
Pocket cups instead of lying flat: Your chain loops are too tight. Go up a hook size for Rows 4–6 only.
Pocket too shallow for a roll: Ease more of the curve onto the side borders, or move the bottom sewing line 1 row higher.
Opening band flares: Work 2 sc instead of 3 in the ends of Rows 1–3 on each half (33 sc total).
Panel sags from the ring: Sew the strap fold through both layers along all 5 sts and both sides.
Care
Hand wash in cool water with mild soap, roll it in a towel, and dry it flat with the pockets shaped. Do not tumble dry, because the lace pockets will stretch.
Final Notes
All the measurements build on each other:
– The 14-dc gauge gives a 6 in (15.2 cm) panel.
– The 2-round border brings it to 6.8 in (17.3 cm).
– The 4 sc per inch border rate makes 116 sc per long side and 266 sc in total.
– Each pocket grows to 9 in (22.9 cm) across.
– The extra 3.3 in (8.4 cm) of curve, eased onto the panel, gives each pocket room for a roll.
If your checkpoints match, the finished holder hangs at 26.4 in (67.1 cm) and holds three rolls neatly.
Happy crocheting!