

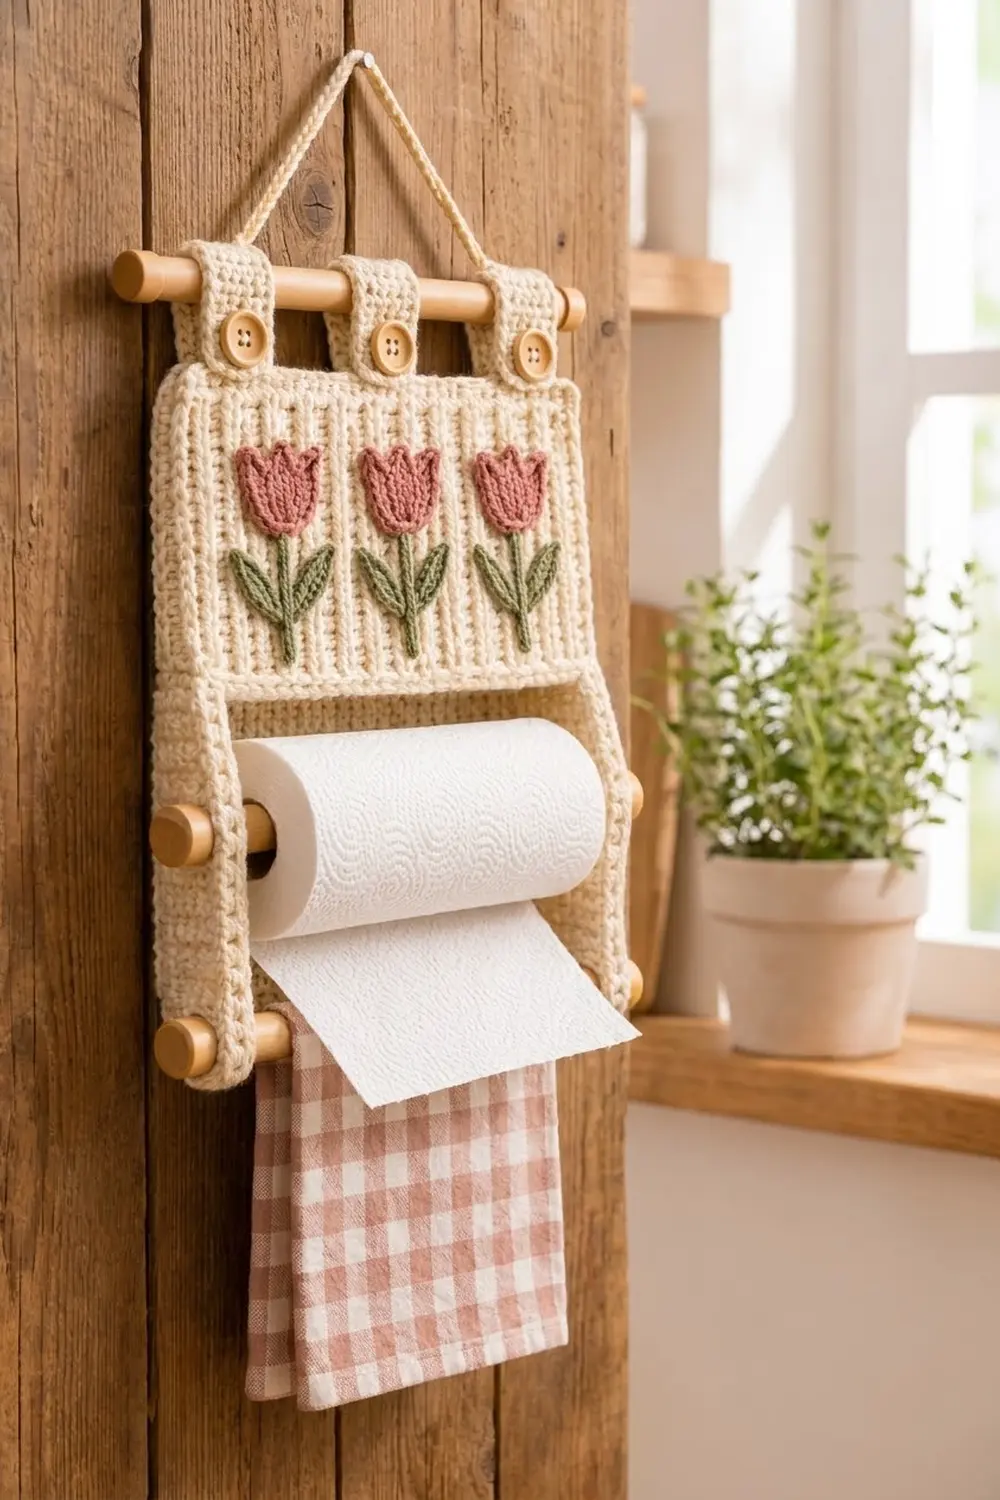
This hanging paper towel holder puts a little spring garden in your kitchen. A cream panel with vertical ribs carries three dusty-rose tulips on sage-green stems. Two ribbed side arms hold wooden dowels for a paper towel roll and a dish towel.
The cream, rose, and green colors and the natural wooden buttons and dowels give it a calm farmhouse look.
The pattern uses US crochet terms. The finished holder measures 16 in (40.6 cm) wide and 19 in (48.3 cm) tall, not counting the tabs and hanging cord.
You’ll work the back panel sideways in single crochet through the back loop only, so the ribs run vertically when the holder hangs. A two-round border firms up the edges. Then you’ll make two side arms with built-in dowel eyelets, three button tabs, and three tulip appliqués, and sew everything together.
Finished Size and Construction
- Finished size: 16 in x 19 in (40.6 cm x 48.3 cm)
- Skill level: Easy to Intermediate
- Terminology: US
- Yarn weight: Worsted (#4) cotton
- Hooks: 5.0 mm for the body, 4.0 mm for the appliqués
- Number of pieces: 19 crocheted pieces (1 panel, 2 arms, 3 tabs, 3 tulip heads, 3 stems, 6 leaves, 1 cord)
- Layout: one panel with an arm on each side and three tulips in a row
- Panel size before border: 15 in x 7 in (38.1 cm x 17.8 cm)
- Border depth: 0.5 in (1.3 cm) on each side
- Panel size after border: 16 in x 8 in (40.6 cm x 20.3 cm)
- Arm size: 13 in x 1.8 in (33.0 cm x 4.6 cm)
Materials
Use a smooth, worsted-weight cotton or cotton blend. Cotton keeps its shape in a kitchen and washes well. The quantities below assume about 153 m per 100 g.
- Cream (main color): 150 g / 230 m
- Dusty rose: 15 g / 23 m
- Sage green: 15 g / 23 m
These quantities include a margin for your gauge swatch and small differences in tension.
Tools and notions:
- 5.0 mm (H-8) crochet hook
- 4.0 mm (G-6) crochet hook
- 3 wooden dowels, each 18 in (45.7 cm) long and 5/8 in (1.6 cm) across
- 3 wooden buttons, 5/8 in (1.6 cm)
- Tapestry needle, stitch markers, and rust-proof pins
- Scissors and a tape measure
Abbreviations (US Terms)
- ch – chain
- sl st – slip stitch
- sc – single crochet
- hdc – half double crochet
- dc – double crochet
- BLO – back loop only
- sk – skip
- sp – space
- st(s) – stitch(es)
- rev sc – reverse single crochet (crab stitch): working from left to right, insert the hook into the next stitch to the right, yarn over, pull up a loop, yarn over, and pull through both loops.
Special stitch: tulip point (tp). Work (dc, ch 2, sl st in 2nd ch from hook, dc) all in the same stitch.
Gauge and Checkpoints
Gauge: 16 sts and 20 rows of sc BLO = 4 in (10.2 cm) with the 5.0 mm hook.
Make a swatch first: ch 17 and work 20 rows of sc BLO, with 16 sts in each row. Block it and measure.
Then make one tab before you start the panel. It should measure 1.75 in x 4 in (4.4 cm x 10.2 cm), which confirms your gauge on a real piece.
Checkpoints:
- Panel Row 1: 28 sts = 7 in (17.8 cm)
- Panel Row 25: 5 in (12.7 cm) wide
- Panel Row 50: 10 in (25.4 cm) wide
- Panel Row 75: 15 in (38.1 cm) wide
- After the border: 16 in x 8 in (40.6 cm x 20.3 cm)
If your piece is too big, go down a hook size. If it’s too small, go up one. Keep the stitch counts the same, because the eyelet positions and dowel spacing depend on them.
Back Panel
Use cream yarn and the 5.0 mm hook. The foundation chain becomes the left edge of the panel, so the chain sets the panel’s height.
Row 1: Ch 29. Sc in 2nd ch from hook and in each ch across. Turn. (28 sts)
Rows 2–75: Ch 1, sc BLO in each st across. Turn. (28 sts)
Every 2 rows form one raised rib. The panel should now measure 15 in x 7 in (38.1 cm x 17.8 cm). Don’t fasten off.
Panel Border
Border gauge: 4 sc per inch along every edge, which matches the body. Each border round adds about 0.25 in (0.6 cm).
Turn the panel so a row-end edge faces up. That edge is the top.
Round 1: Ch 1.
- Top: Work 60 sc across the 75 row ends. To space them evenly, sc in each of the next 4 row ends, sk 1 row end; repeat from * 15 times. Ch 1 at the corner.
- First side: Work 1 sc in each of the 28 sts. Ch 1 at the corner.
- Bottom: Work 60 sc across the 75 row ends, spaced the same way as the top. Ch 1 at the corner.
- Second side: Work 28 sc in the free loops of the foundation chain. Ch 1 and join with a sl st to the first sc.
Count: 60 + 28 + 60 + 28 = 176 sc, plus 4 corner ch-1 sps. The side counts don’t include the corner chains.
Round 2: Ch 1. Work 1 rev sc in each sc and 1 rev sc in each corner ch-1 sp. Join and fasten off.
Count: 176 (one in each existing sc) + 4 (one in each corner) = 180 rev sc.
Why the math works: At 4 sts per inch, 60 sc measure 15 in, which matches the width of 75 rows at 5 rows per inch. 28 sc measure 7 in, the panel’s height. Two rounds add 0.5 in (1.3 cm) on each side, so the panel finishes at 16 in x 8 in (40.6 cm x 20.3 cm).
Side Arms (Make 2)
Use cream yarn and the 5.0 mm hook. Each arm is worked lengthwise, so its ribs also run vertically.
Row 1: Ch 53. Sc in 2nd ch from hook and in each ch across. Turn. (52 sts)
Rows 2–4: Ch 1, sc BLO in each st across. Turn. (52 sts)
Row 5 (eyelet row): Ch 1, sc BLO in first 5 sts, ch 5, sk 5, sc BLO in next 19 sts, ch 5, sk 5, sc BLO in last 18 sts. Turn.
Count: 42 sc + 2 ch-5 sps (5 + 5 + 19 + 5 + 18 = 52 positions).
Row 6: Ch 1, sc BLO in each sc, and sc in each ch of both ch-5 sps. Turn. (52 sts)
Rows 7–9: Ch 1, sc BLO in each st across. Turn. (52 sts)
Fasten off. Each arm measures 13 in x 1.8 in (33.0 cm x 4.6 cm).
The end with the 18-st section is the top of the arm. The upper eyelet holds the paper towel dowel and the lower eyelet holds the dish towel dowel. Their centers are 24 sts, or 6 in (15.2 cm), apart.
Each eyelet is a 1.25 in (3.2 cm) slit, so its opening measures about 2.5 in (6.4 cm) around. A 5/8 in (1.6 cm) dowel measures about 2 in (5.1 cm) around, so it fits snugly.
Button Tabs (Make 3)
Use cream yarn and the 5.0 mm hook.
Row 1: Ch 8. Sc in 2nd ch from hook and in each ch across. Turn. (7 sts)
Rows 2–17: Ch 1, sc BLO in each st across. Turn. (7 sts)
Row 18 (buttonhole): Ch 1, sc BLO in next 2 sts, ch 3, sk 3, sc BLO in last 2 sts. Turn. (4 sc + 1 ch-3 sp)
Row 19: Ch 1, sc BLO in next 2 sts, 3 sc in ch-3 sp, sc BLO in last 2 sts. Turn. (7 sts)
Row 20: Ch 1, sc BLO in each st across. (7 sts)
Fasten off and leave a 10 in (25.4 cm) tail. Each tab measures 1.75 in x 4 in (4.4 cm x 10.2 cm).
Tulip Appliqués
Use the 4.0 mm hook for all appliqué pieces. At about 18 sts per 4 in (10.2 cm), they’ll be firm and crisp.
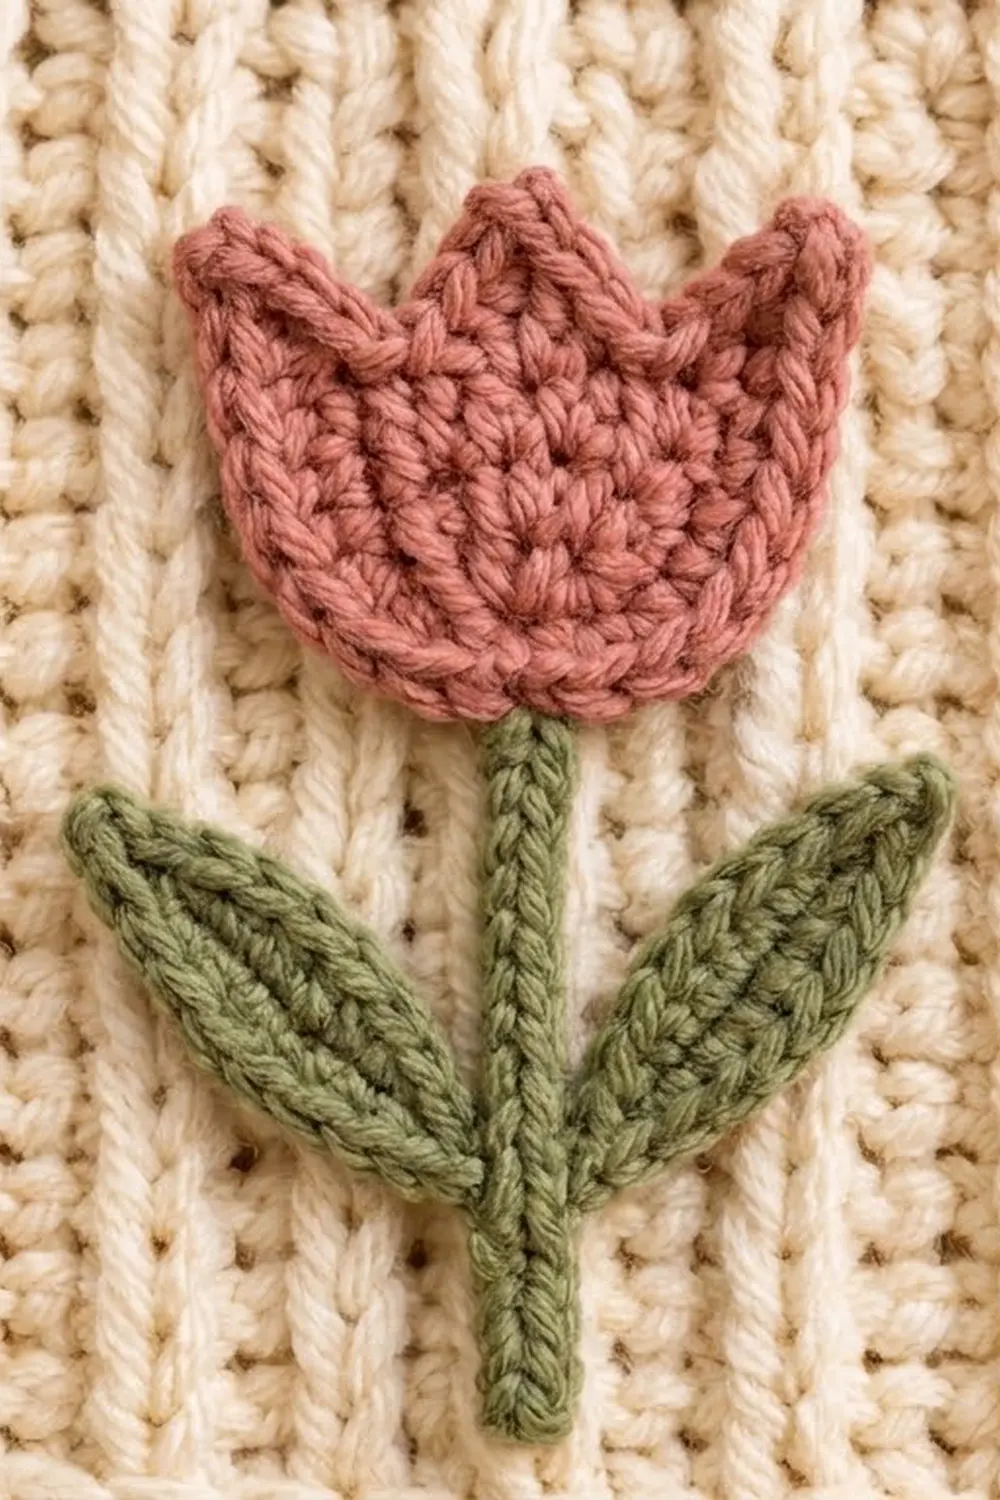
Tulip Head (Make 3, dusty rose)
Work each head from the bottom up, starting with the rounded base and finishing with the three points.
Row 1: Ch 2, 3 sc in 2nd ch from hook. Turn. (3 sts)
Row 2: Ch 1, 2 sc in first st, sc in next, 2 sc in last. Turn. (5 sts)
Row 3: Ch 1, 2 sc in first st, sc in next 3, 2 sc in last. Turn. (7 sts)
Row 4: Ch 1, 2 sc in first st, sc in next 5, 2 sc in last. Turn. (9 sts)
Row 5: Ch 1, sc in each st across. Turn. (9 sts)
Row 6: Ch 1, 2 sc in first st, sc in next 7, 2 sc in last. Turn. (11 sts)
Row 7 (points): Ch 1, hdc in first st, tp in next, hdc in next, sc in next, hdc in next, tp in next, hdc in next, sc in next, hdc in next, tp in next, hdc in last st.
Count: 11 sts (6 hdc, 3 tp, 2 sc). The points sit on sts 2, 6, and 10, so the middle point is centered.
Fasten off and leave a 12 in (30.5 cm) tail. Each head measures about 2.5 in (6.4 cm) wide and 2 in (5.1 cm) tall.
Stem (Make 3, sage green)
Row 1: Ch 19. Sc in 2nd ch from hook and in each ch across. Turn. (18 sts)
Row 2: Ch 1, sc BLO in each st across. (18 sts)
Fasten off and leave a tail. Each stem measures 4 in (10.2 cm) long.
Leaf (Make 6, sage green)
First side: Ch 9. Sl st in 2nd ch from hook; this ch becomes the leaf tip. Then work sc in next ch, hdc in next, dc in each of next 2, hdc in next, sc in next, and (sc, ch 1, sc) in last ch.
Second side: Working in the free loops on the other side of the chain, sc in next ch, hdc in next, dc in each of next 2, hdc in next, sc in next, and sl st in the tip ch. To sharpen the tip, ch 2, sl st in 2nd ch from hook, then sl st in the first sl st.
Count: 16 sts + 1 ch-1 at the base. Fasten off and leave a tail. Each leaf measures about 1.75 in (4.4 cm) long and 0.75 in (1.9 cm) wide.
Make All Pieces
Before you start assembling, check that you have every piece:
- Cream: 1 bordered panel, 2 arms, 3 tabs, and 1 cord. To make the cord, ch 101, then sl st in the back bump of the 2nd ch from hook and of each ch across (100 sl sts). It measures about 24 in (61.0 cm).
- Dusty rose: 3 tulip heads
- Sage green: 3 stems and 6 leaves
Layout (front view):
   [tab]         [tab]         [tab]
 ==O=============O=============O==   top dowel
 | tulip         tulip         tulip |
 | at 3 in       at 8 in       at 13 in
 +--------------- panel -------------+
 [arm]                           [arm]
 ==O===== paper towel dowel =====O==
 [arm]                           [arm]
 ==O====== dish towel dowel =====O==
Joining and Assembly
Tulips. Measure across the panel from the left edge and mark the tulip centers at 3 in (7.6 cm), 8 in (20.3 cm), and 13 in (33.0 cm).
Pin each stem upright with its bottom end 0.75 in (1.9 cm) above the bottom border. Pin a head over the top 0.5 in (1.3 cm) of the stem, so its points sit 0.75 in (1.9 cm) below the top border. Pin two leaves to form a V, angled at 45 degrees, with their bases touching the stem 1.5 in (3.8 cm) above its lower end.
Whipstitch around each piece with its own tail, catching only the front loops of the panel. Keep the stitches snug, but don’t pull them tight or the panel will pucker.
Arms. Lay the panel face down. Place one arm face down along each side edge, with its outer long edge lined up with the outer edge of the border. The top 8 sts, or 2 in (5.1 cm), of each arm overlap the panel.
Whipstitch around the overlap through both layers, working stitch to stitch. Make 1 whipstitch in each of the 9 row ends across the arm’s top and 1 in each of the 8 sts down each long side.
Tabs. Sew the starting end of each tab to the back of the panel’s top edge, centered above a tulip, with a 1 in (2.5 cm) overlap. Sew a button to the front border directly below each tab.
Dowels. Slide one dowel through the three tab loops and button the tabs. Push the other two dowels through the eyelets. Tie the cord ends around the top dowel, just outside the outer tabs.
Size checkpoint: The holder should measure 16 in (40.6 cm) wide and 19 in (48.3 cm) tall: 8 in (20.3 cm) of panel plus 11 in (27.9 cm) of arm below it. The gap between the arms is 12.4 in (31.5 cm), which fits a standard 11 in (27.9 cm) roll.
Final Blocking
- Take out the dowels and mist the holder until it’s damp but not soaked.
- Lay it face up on a blocking mat.
- Pin the panel to 16 in x 8 in (40.6 cm x 20.3 cm), with square corners.
- Pin each arm straight at 1.8 in (4.6 cm) wide.
- Shape the tulip points and leaf tips with your fingers.
- Let it dry completely, then put the dowels back in.
Final Quality-Control Checklist
- The panel measures 16 in x 8 in (40.6 cm x 20.3 cm), and the ribs run vertically.
- The border has 180 rev sc and lies flat at all four corners.
- Both arms measure 13 in (33.0 cm), and their eyelets line up.
- The dowels sit level.
- The tulips are evenly spaced, with three clear points on each head.
- All the yarn ends are woven in.
Troubleshooting
- The border ripples: You have too many stitches. Keep to 60 sc across the 75 row ends.
- The border pulls in: Loosen your tension, or work Round 1 with a hook one size larger.
- A dowel is too tight in its eyelet: Twist the dowel gently as you push it through, or switch to a 1/2 in (1.3 cm) dowel.
- The holder hangs crooked: Retie the cord so both sides are the same length.
- A tulip head curls: Steam it lightly and flatten it before you sew it on.
Care
Take out the dowels, hand wash the holder in cool water, and lay it flat to dry. While it’s still damp, reshape it to 16 in x 19 in (40.6 cm x 48.3 cm).
Final Notes
Here’s how the measurements build. At 4 in (10.2 cm) gauge, the panel works up to 15 in x 7 in (38.1 cm x 17.8 cm). The border brings it to 16 in x 8 in (40.6 cm x 20.3 cm). Two 13 in (33.0 cm) arms overlap the panel by 2 in (5.1 cm), which makes the holder 19 in (48.3 cm) tall.
Check your measurements at each step and everything will line up.
Happy crocheting!